• Please visit and share your knowledge at our sister communities:
  • If you have not, please join our official Homebrewing Facebook Group!

    Homebrewing Facebook Group

Sparge arm

Homebrew Talk

Help Support Homebrew Talk:

This site may earn a commission from merchant affiliate links, including eBay, Amazon, and others.

wegz15

Well-Known Member
Joined
Oct 1, 2009
Messages
599
Reaction score
15
Location
Northbrook
So after about a year of brewing I am tired of standing over my MLT with a slotted spoon during the sparge. Does anyone know of any good tutorials for a diy sparge arm?
 
I was in your shoes last fall. I know exactly where you're coming from.

I bought a new HLT, and converted my old homemade false bottom manifold into a sparging manifold.

The old false bottom was a square pattern of copper piping with holes punched on one side. I turned it upside down, moved some pieces around, and soldered some to others so it wouldn't come apart. I replaced the four elbows with tees and extended the sides a bit to rest on top of my MLT also.

Now I just hook up my HLT via 3/8 hosing to the new sparging manifold, controlling the flow with the ball valve, and I couldn't be happier! Once I find the equilibrium (HLT flow out = MLT flow out) I can "set and forget." I don't have pictures yet, but I plan on taking some soon. If you're lost, let me know and that might persuade me to take them sooner.

Cheers,
TB
 
Not gonna lie... I've read it a couple of times and I'm lost. You're losing me with the HLT and the MLT flowing from one to the other... I use a cooler to mash and lauter.
 
Yep I'm an idiot... got it... one is filled with sparge water... sorry been working since yesterday morning... I'm ready to go home.
 
I don't use a sparge arm, just a piece of foil with a bunch of holes in it set on the grain bed. I let my hose from the HLT set on top and sparge slowly. Works like a charm, but still it would be cool to show off a fancy sparge arm.:ban:
 
So after about a year of brewing I am tired of standing over my MLT with a slotted spoon during the sparge. Does anyone know of any good tutorials for a diy sparge arm?

Ha,Ha.

This imply s you know the setup.

Yep I'm an idiot... got it... one is filled with sparge water... sorry been working since yesterday morning... I'm ready to go home.

This following your first post says, you are not fit to drive a vehicle. At all.

You be safe brother.


Now, on topic.
I have found my favorite sparge device I ever built is a spray nozzle. The kind used for washing off things like potatoes on conveyors. It gives a fan type pattern like a spoon under running water.
 
I don't use a sparge arm, just a piece of foil with a bunch of holes in it set on the grain bed. I let my hose from the HLT set on top and sparge slowly. Works like a charm, but still it would be cool to show off a fancy sparge arm.:ban:

I agree...I actually use the top from a sour cream container...works perfectly:mug:
 
I had some spare 3/8" copper tubing lying around. I used tube bending springs to fit the tubing around the cooler top of my MLT. I thin drilled a series of 1/8" holes at varying angles around the tubing. Once I got the tubing level I got a nice gentle shower effect and have been hitting my gravity numbers without any problems.
 
Hasn't it been proven that if you maintain an inch or two above the surface of the grain bed that just having a hose float on the top is sufficient (blichmann autosparge) and that sprinklers/drippers etc lose a lot of temp?
I primarily Batch sparge but I read too much.
 
wegz
i use (well used to use) a round 10 igloo cooler. i made a sparge system out of 1/2" pvc with holes in the bottom. i have it secured to the top of the coolers lid. all i do is turn on the valve from the HLT and let the shower begin. i tried a lot of different things and this seems to work the best. plus you get to make. if i know how to post pics i would post a few to explain what i mean... good luck.
 
I built a CPVC one for my Blue Igloo, I like it beacuse I can sparge with the lid close.

DSCF0422.jpg
[/IMG]
 
that is the same concept i used. my inlet for the sparge arm comes out of the top of my cooler. you are right it is great to sparge with the lid on....
 
Hasn't it been proven that if you maintain an inch or two above the surface of the grain bed that just having a hose float on the top is sufficient (blichmann autosparge) and that sprinklers/drippers etc lose a lot of temp?
I primarily Batch sparge but I read too much.

+1 If you fly sparge those gadgets are a disadvantage. A piece of silicone tube will float on top of 2 inches of sparge water above the grain bed. If you buy a Brew Magic system this is exactly they do it also along with the Blichmann Autosparge.
 
+2 on that method. I was heavily into trying to reinvent the wheel when it came to my sparge arm. I made two as a matter of fact. Once I started reading and listening to the guys on this board that have done it forever, I switched my process.

Instead of silicone hose I use 1/2" Loc-Line that I purchased from McMaster Carr.
 
I have a phil's sparge arm I got in the 90s when i thought I was going to go all grain. Never used it till recently. It works well though after some modification.

http://www.listermann.com/Store/Details.asp?ID=17

I expanded the holes a little with a sharp file point to increase the flow. To install I drilled a small hole in the top of my cooler and forced the copper tube through it. It keeps it tight enough so I can push the sparge arm up or down to keep it near the level of my mash.

I am finding a bit of heat loss though probably from fine drops of water coming off the rotating arm getting aerated. Sawdustguys probably right on the need only to have a hose into a surface water, however I have already drilled a hole and adapted the system. I may try increasing my strike water temp to compensate for heat loss.

My most recent project was to add another line into the MLT from the HLT so I can cycle hot water through the system faster to bring it up to temp.
 
Hehehe, I didnt read enough and built m sparge manifold with the holes facing up, guess i have to fire up the old torch and spin that baby over! Doht!
 
Hehehe, I didnt read enough and built m sparge manifold with the holes facing up, guess i have to fire up the old torch and spin that baby over! Doht!


Unless I am mistaken, B3 has their holes facing up. Support it just above the surface of the grain bed.
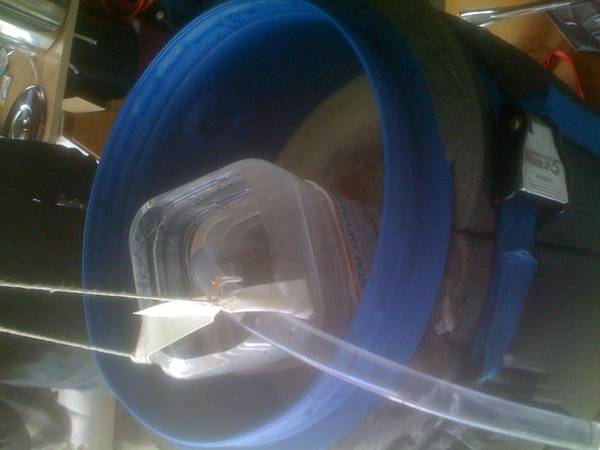
 
Hmm... might just go the cheap route and have the hose float. Thanks for all the replies.
 
I've seen some other good suggestions here other than what I said. I'd like to add, though, that using a sparging nozzle, arm, or manifold of any kind does not necessarily have the disadvantages that some mentioned.

Yes, I do maintain about 1-2" of water on top of the grain bed, but I still keep the light sprinkle going from my sparging manifold. I might lose 2-3 deg from the manifold to the grain bed tops, but I put my sparge water in the HLT about 2-3 hotter than I want for sparging. Besides, I've brewed on large scale professional systems, and guess what -they use their sparging system constantly just like I do at home. Don't worry about what Blichmann or its customers tell you, do what works for you and your budget. You're here to make good beer, and if you're getting that, then you've got nothing to fret about.

Cheers,
TB
 
Behold,

the Sparge-o-Matic!

One gallon water jug with the top cut away, holes drilled in the bottom. and suspended from above.

One of the benefits of this system is that runnings from the vorlauf are poured into the jug, not directly on the grain bed. This shot shows the sparge water being pumped in. Before I got the pump I would just pour the sparge water into the jug. Sparge rate is determined by the number and size of the holes in the jug.

sparge-o-matica.jpg


Total cost $ 0.00

Hey, whatever works! Way to be resourceful!
 
The only thing I can say....if SABCO only uses a hose for recirculation....why wouldn't you consider that instead of spending countless hours fabricating or 30-50 bucks trying to find the perfect sparge arm?

Since I started using the hose (in my case loc-line) I have better results and no clogged pinholes etc etc.


Because its all about the gadgets. Don't you know??

Mine doesn't clog. Its small. Its easily cleaned. It pops in in just seconds. I wish it was a little more sleek.
P1010142-4.jpg

P1010143-4.jpg


Edit: Ha,Ha. Maybe I should call it a sparge finger.
 

Latest posts

Back
Top