So, I’m taking my Mr. Beer training wheels off and just left my LHBS with a equipment kit for doing 1 gallon partial mash brews. One thing I didn’t get was a brew kettle. For the Mr. Beer batches I just used a large stock pot we had around the house. I want to get a dedicated brew pot to use with the new set up. Any of the 1 gallon brewers have specific suggestions?
You are using an out of date browser. It may not display this or other websites correctly.
You should upgrade or use an alternative browser.
You should upgrade or use an alternative browser.
Small batch brew kettles
- Thread starter Jhedrick83
- Start date

Help Support Homebrew Talk:
This site may earn a commission from merchant affiliate
links, including eBay, Amazon, and others.
McKnuckle
Well-Known Member
I had been using a 2.8 or something gallon stainless pot for my smallest batches. But I recently bought the small SS Brewtech 5.5 gallon kettle to replace it. It’s much nicer to have a proper ball valve and pickup tube, and it works for 1-3 gallon batches easily.
It’s a good choice if you’re just getting into all grain, and want at least the option of increasing your batch size. I also picked up a custom-made brew bag for it, so it can be used for single vessel brewing as well.
It’s a good choice if you’re just getting into all grain, and want at least the option of increasing your batch size. I also picked up a custom-made brew bag for it, so it can be used for single vessel brewing as well.
BrewnWKopperKat
(Ο_Ο)
+1 for sizing the equipment to cover 2.5-ish gal batch sizes.and it works for 1-3 gallon batches easily.
OP
OP
McKnuckle, thanks. I was not sure if a 5+ gallon brew kettle would be too big or cause complications for 1 gallon brews.
McKnuckle
Well-Known Member
I like the SS Brewtech in particular because it's relatively narrow, with a 10 7/8" diameter. Therefore the 1 gallon batch size, which occupies at least 1.5 gallons in the boil and more in the mash, fits nicely. It also boils off a reasonable amount. Diameter matters, so watch that dimension for sure.
I do 1-3 gallon biab batches and use an anvil 5.5 gallon kettle. I really like it and it works well across the range of batch size that I brew with it. For one gallon recipes the temp probe won’t be immersed but it will for larger brews. I ended up removing mine anyways as I found I’d rather use an instant read occasionally and not worry about the probe catching and tearing my grain bag again.McKnuckle, thanks. I was not sure if a 5+ gallon brew kettle would be too big or cause complications for 1 gallon brews.
OP
OP
I do 1-3 gallon biab batches and use an anvil 5.5 gallon kettle. I really like it and it works well across the range of batch size that I brew with it. For one gallon recipes the temp probe won’t be immersed but it will for larger brews. I ended up removing mine anyways as I found I’d rather use an instant read occasionally and not worry about the probe catching and tearing my grain bag again.
when you say instant read, are you essentially using a thermometer like we are all using now thanks to COVID or is it a specific tool?
Thermopen style instant waterproof instant read read probe thermometer. It’s actually one I won in a draw from inkbird on the sponsors forum here!when you say instant read, are you essentially using a thermometer like we are all using now thanks to COVID or is it a specific tool?
McKnuckle
Well-Known Member
Instant read thermometers such as the Thermapen are arguably the best available for our purposes.
Here's a search on Amazon for a wide variety of these products.
And here's the real thing, at a premium price, but very well-regarded. They have some cheaper models as well.
Here's a search on Amazon for a wide variety of these products.
And here's the real thing, at a premium price, but very well-regarded. They have some cheaper models as well.
OP
OP
Thanks guys!
Like Elric, I have the Anvil 5.5 gallon pot. It’s rugged, heavy duty, nice ball valve with a little clamp you have to move so it doesn’t open accidently.
The only thing I didn’t like about it was that it comes standard with a thermometer and the thermometer has a long probe that I found interfered with my immersion wort chiller. Just not enough room in a pot that size. I don’t really do brew in a bag but I imagine it would also interfere with your bag.
I removed the thermometer and filled the hole with a plug that blichmann makes and I’m much happier with it now.
McKnuckle
Well-Known Member
The SS kettle also has a thermometer port, and it’s also marginally too high to be useful, but it comes plugged by default.
it’s too bad these thermo ports are always placed assuming that the kettle will be over a flame. They should offer a lower installation option for electric brewers as well.
it’s too bad these thermo ports are always placed assuming that the kettle will be over a flame. They should offer a lower installation option for electric brewers as well.
OP
OP
I think I’ll be ordering that 5.5 Brewtech pot today. Thanks for all the advice guys.
OP
OP
The 5.5 brewtech kettle came today. A solid piece of gear for sure. Getting some TSP in the morning to clean it out with and then to condition it before a hopeful brew day Sunday. Thanks again for the advice
Stormcrow
Well-Known Member
- Joined
- Apr 14, 2020
- Messages
- 591
- Reaction score
- 661
Winning the Inkbird giveaway is my white whale. Someday... SomedayThermopen style instant waterproof instant read read probe thermometer. It’s actually one I won in a draw from inkbird on the sponsors forum here!
Stormcrow
Well-Known Member
- Joined
- Apr 14, 2020
- Messages
- 591
- Reaction score
- 661
That's exciting. Hope you like it.The 5.5 brewtech kettle came today. A solid piece of gear for sure. Getting some TSP in the morning to clean it out with and then to condition it before a hopeful brew day Sunday. Thanks again for the advice
OP
OP
This may be a function of me just being new. That kettle has a nice Trub dam but the ball valve is set high enough that if I’m doing 1 gallon boils in that kettle, the final volume of the wort will mostly be below the ball valve itself. Which makes it nearly useless for transferring into the primary fermenter. Or any I missing something? So, when I’m done chilling it post boil, should I just skip trying to use the ball valve to drain? Just whirlpool it and slowly pour it into the primary fermenter? I do have a funnel with a filter to help with that if I need.
Stormcrow
Well-Known Member
- Joined
- Apr 14, 2020
- Messages
- 591
- Reaction score
- 661
If you don't use the bazooka screen, you can thread in a stainless street L facing down to act as a dip tube.This may be a function of me just being new. That kettle has a nice Trub dam but the ball valve is set high enough that if I’m doing 1 gallon boils in that kettle, the final volume of the wort will mostly be below the ball valve itself. Which makes it nearly useless for transferring into the primary fermenter. Or any I missing something? So, when I’m done chilling it post boil, should I just skip trying to use the ball valve to drain? Just whirlpool it and slowly pour it into the primary fermenter? I do have a funnel with a filter to help with that if I need.
OP
OP
If you don't use the bazooka screen, you can thread in a stainless street L facing down to act as a dip tube.
This is what the set up is like with the Trub Dam. So, there is a somewhat of a dip tube:
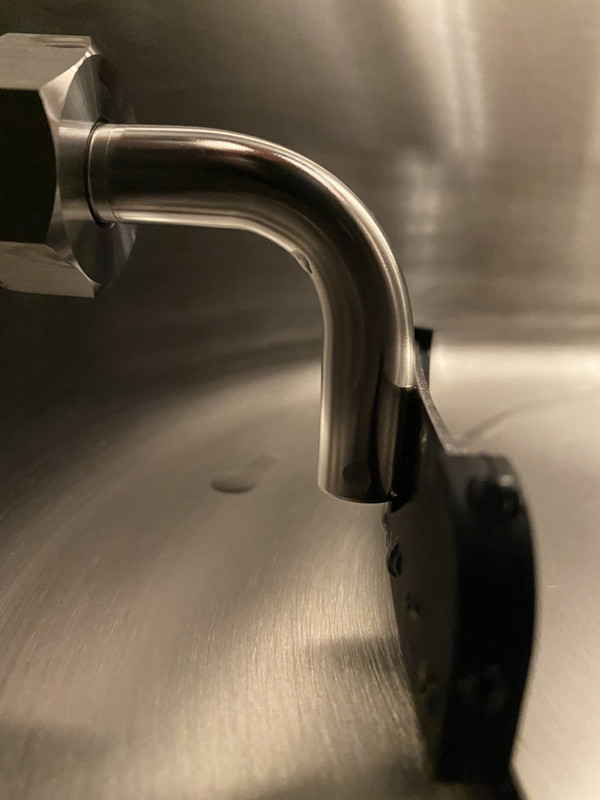
The issue I noticed when I was going through the passivization step was that with 3/4th (or so) of a gallon left, it just stopped draining as the water level was below the bottom of the ball valve itself. Maybe I am missing something. Like I said, I’m net and the kettle just came with a QR code to scan for cleaning and care instructions.
McKnuckle
Well-Known Member
I agree that the dip tube is positioned too high. Why do manufacturers do these things?
First, make sure you use pipe thread tape and tighten everything well on the inside, so the dip tube is sealed inside the port. That will prevent air ingress, which is one reason the siphon can be interrupted.
Second, when you run off into the fermenter, use a tube on the outside that dangles well below the kettle; don't just use the spigot by itself. Otherwise flow will stop at the height of the spigot.
Finally, insert a short bit of silicone tubing (the kind used for floating dip tubes) into the stainless opening, and squish it up there until the other end just barely clears the kettle bottom. You'll get more wort that way.
I'd take a photo if I could, but hope that's self-explanatory.
OP
OP
I agree that the dip tube is positioned too high. Why do manufacturers do these things?
First, make sure you use pipe thread tape and tighten everything well on the inside, so the dip tube is sealed inside the port. That will prevent air ingress, which is one reason the siphon can be interrupted.
Second, when you run off into the fermenter, use a tube on the outside that dangles well below the kettle; don't just use the spigot by itself. Otherwise flow will stop at the height of the spigot.
Finally, insert a short bit of silicone tubing (the kind used for floating dip tubes) into the stainless opening, and squish it up there until the other end just barely clears the kettle bottom. You'll get more wort that way.
I'd take a photo if I could, but hope that's self-explanatory.
I'll tape it up when I get home. I'll have to check my LHBS for a good outside fitting and tube for the run off. Since I would be just pouring the wort into the primary using said tube, should I try to aerate prior? I could heavily wisk (to aerate) it once the heat is off, whirlpool it, chill it, then transfer it. Would the be fine?
The last thing makes perfect sense.
McKnuckle
Well-Known Member
Aerate only once chilled, and immediately before pitching yeast. Never do it warm, and don’t do it when you are not yet at pitching temp.
Yeast will use the O2 right away. But any lag allows some oxidation, which, in contrast to aeration which is temporary, is permanent molecular bonding that will facilitate earlier staling.
Yeast will use the O2 right away. But any lag allows some oxidation, which, in contrast to aeration which is temporary, is permanent molecular bonding that will facilitate earlier staling.
OP
OP
Aerate only once chilled, and immediately before pitching yeast. Never do it warm, and don’t do it when you are not yet at pitching temp.
Yeast will use the O2 right away. But any lag allows some oxidation, which, in contrast to aeration which is temporary, is permanent molecular bonding that will facilitate earlier staling.
Thanks for all your help.
OP
OP
Not sure if my LHBS has elbow barbs that would fit but I know I can find them at Lowes or Home Depot but they would be Brass rather than Stainless Steel. Think that would cause an issue if I used it or am I better off ordering a SS one and just pouring batches by hand until it arrives?
McKnuckle
Well-Known Member
Brass is okay for a fitting as long as you use thread tape to join the different metals. Or why not grab something from Amazon? See the search below:
https://www.amazon.com/s?k=stainless+male+npt+1/2+barb&ref=nb_sb_noss_2
https://www.amazon.com/s?k=stainless+male+npt+1/2+barb&ref=nb_sb_noss_2
I have a 5 gal brew kettle for small batches that has no fixtures on it. I just use a sanitized 1 liter plastic measuring cup to carefully ladle out the cooled wort and find that I get very little trub this way. Since I bottle directly out of a 3 gal primary with spigot, I 3D printed a stand/prop that allows me to tilt the bucket at about 20 degrees hands free and I find I can get most of the beer off of the yeast cake. This might work for your kettle as well. I have stopped using my auto-siphon all together since I find it aerates too much and kind of stresses me out when I use it.
OP
OP
I soaked some PBW in the kettle when I was done and scrubbed it with a towel but it almost seems like I have a band of some sort of something at the level where kettle frothed (but didn’t boil over) when I added the DME. When I clean post boil, should I scrub it with something more abrasive than a towel. Say something like a nylon brush or scotch brite type pad?
McKnuckle
Well-Known Member
I use a standard two-sided sponge on my kettles, the kind with a sponge on one side and a mildly abrasive blue or green side. No need to go nuts scrubbing the kettle removing every blotch and stain. It's kind of inevitable for those to develop. Just ensure there's no solid material anywhere of course. Others may differ and insist on keeping things showroom shiny.
Usually I am able to get everything out to my satisfaction using just hot water. I save my chilling waste water, and pour in a gallon at a time, scrub, then drain. Pour, scrub, drain. After three times max it's good to go. I have PBW if I need it, but this is a small kettle, so it's easy to clean by hand rather than relying on soaking.
Remember to run rinsing water through the bulkhead and ball valve. And make sure to rinse PBW if you use it. It's a soap - it should not be allowed to just dry in there.
OP
OP
Thanks. When I cleaned up I rinsed out all the loose matter first. Then a 10 min PBW soak, a scrub with a towel, let it drain through the ball valve (while saving a gallon or so of the draining water), take the ball valve and thermometer plug out and disassembled them into the retained PBW to soak, scrub the cut outs for the ball valve and thermometer with the rag and retained PBW, rinse out the kettle, scrub the valve and plug and associated washers/nuts, then rinse them thoroughly.
A sponge would make it all easier for sure.
A sponge would make it all easier for sure.
Similar threads
- Replies
- 4
- Views
- 750
