• Please visit and share your knowledge at our sister communities:
  • If you have not, please join our official Homebrewing Facebook Group!

    Homebrewing Facebook Group

Side-by-Side to Fermentation Chamber Build

Homebrew Talk

Help Support Homebrew Talk:

This site may earn a commission from merchant affiliate links, including eBay, Amazon, and others.
Very creative. What are the charcoal briquettes for?

Probably condensation control.


Very, Very nice setup!!! I recently lost my old deep freezer's compressor and had to buy a new one that was smaller. I really miss the storage area of the larger one. My only concern about buying a used one is how long the cooling unit will last. Seeing as you are pretty handy with the inner workings of one, are they inexpensive to replace after going through all of this effort? I bet so, and I wish I had seen this thread a long time ago!!

Prost!:mug:
 
I have a side by side sitting in the back yard of a rental house under a cover the last 3 years thinking it was too much trouble to chop and convert vs a single space frige. I was going to call the recyclers as a new frig is in the house. Now you have me thinking about saving it. My fear was the temperature between the cooled and freezer section causing a problem even with the divider cut out. This is a false fear of mine. This is a free extra fridge that can hold two 24 gallon extra tall keggle fermenters with ease. Now ya got me thinking as the little 1947 Philco is in the patio at home and will remain original, a piece of my grandparents house I must keep original and use with fond memories. Time to rehang the doors, the hinges are in place with no parts missing. The reason I replaced it was the renters were smokers and the frige was sticky brown from their smoking. Time for the SawZall and cut out the divider then relocate it at another house that is empty and my brewing location. I was thinking about that stuff called AirBall a sealer used on decks of boats for sealing the cut open foam sections. Thick brush on item after adding a couple of coats. Thanks I may have saved this frige, hell starting off free just the controller cost is needed plus some butcher work. Wiring it is free in my stock pile. Thanks you may of saved a frige from early RIP.
 
Is this something you can do over the phone? I mean, I don't have any of the stuff I need yet, but I plan to start looking for it. If I can find a fridge with the wiring diagram, I can scan it and post it for you. This would be an amazing addition to my setup. I just don't want to electrocute myself.

Sure I can help you over the phone on in chat. You really don't need to worry about electrocuting yourself, you will do all the wiring witht he fridge unplugged ;)

PM me if you get the stuff together.

Probably condensation control.


Very, Very nice setup!!! I recently lost my old deep freezer's compressor and had to buy a new one that was smaller. I really miss the storage area of the larger one. My only concern about buying a used one is how long the cooling unit will last. Seeing as you are pretty handy with the inner workings of one, are they inexpensive to replace after going through all of this effort? I bet so, and I wish I had seen this thread a long time ago!!

Prost!:mug:

The Charcoal is for the moisture and to take up some of the odor from the paint. I know have Damp rid in there and the charcoal is cleaned up and gone.

The fridge was free from CL. If it kicks the can, I will just get a new one, again for free. This project would really only take a day now that I know what I am doing.

I am glad you guys all find this useful. It is a good way to get some use out of an otherwise useless extra fridge. Plus it is a huge space and very convenient for accessing fermenters.
 
Awesome job, I don't know how I missed this. I was planning on waiting for a vertical freezer to do this same thing, but now I may just try to find a side by side :)
 
Awesome build! Lots of room to ferment in.I have been looking at side by sides, too. I am sure I will come back here for wiring help as well.

As I live in Texas, I need something where I can ferment in more controlled temps. Now that it is getting warm, my primary fluctuates between 72 and 78 on a daily basis. ( I have the bucket in a tub now with a wet T-shirt, so that helps a bit) And I am sure that I'll want to move on to Lagers at some point.

Here is my question: Can I use one side to ferment and set up the other side for cornies with draft tabs? Both would not have to be at freezing, the fermenter side would probably not even have to be chilled, just well insulated.

Has anyone build such a set up? Are the temp controllers suitable for that application?

Any feedback would be great.
 
I have had a couple people ask me about this...

I think it could be done, but will be fairly complicated and would involve moving air with controlled fans. The challenge arises because side-by-side fridges (at least these kind, not Sub Zero or other top end brands) have only one compressor. All the cooling is done in the freezer and then the air is just allowed to flow into the fridge part through vents to keep it cool.

For your needs, I think the best solution would be the fermento-lager-taporator that I designed. I have a link in my sig. I have not built one yet but I think the idea is sound.
 
The challenge arises because side-by-side fridges (at least these kind, not Sub Zero or other top end brands) have only one compressor. All the cooling is done in the freezer and then the air is just allowed to flow into the fridge part through vents to keep it cool.

I've been thinking about this... using two Love controllers, a heater like you've got, and a 120mm fan. In my case, I'd want to lager in the freezer side and ferment ales in the fridge side. Do you see any glaring issues with this:

1 - Install single stage Love controller hooked up to compressor with probe in freezer side, will always be set to lager temps.

2 - Add insulation to fridge side (pink sheets often used for ferm chambers), seal up any vents that I find.

3 - Cut 120mm hole between the two sides, install 120mm fan with pressure-opening baffle of some sort. Add vent hole with same baffle.

4 - Install dual-stage Love with probe in fridge side. Cold trigger will turn on 120mm fan, hot trigger will turn on heater just like yours. Will always be set to ale temps.

Thoughts?
 
I have thought about that idea a lot because many people want to try it. Here is what I have come up with:

Side-by-side_dual_zone.bmp


It is the exact same idea you had, except I would route a tube fromt he bottom of the freezer side to the top of the fridge side. This way, the colder air will not want to "spill" into the fridge side.

If you do it please make a build thread with lots of pics. Many people want to use your idea!
 
I like the tube idea, as that would get ride of the need for the baffles. Two tubes could be used, one with the fan and one without so there would be a vent, too. If both went from the bottom of the freezer area to the top of the fridge side, the temperature gradient should keep any air from moving until the fan kicks on.

I do plan to try this, but admittedly I am not too sure when. If everything works out, maybe by the end of the summer. I'll start checking CL for cheap/free side by sides, I guess.
 
Purchased a new kitchen fridge and today the old KA side by side is mine for dissection in the garage. It's a 1997 model with plastic walls and not metal as the OP's design. My ultimate goal would be to fit my 15 gallon inductor tank and stand inside which requires removal of the entire dividing wall including the front piece that contacts the door seals. I need to somehow keep that piece and make it movable and replaceable after wheeling the tank inside. Any thoughts on how to do that?
 
I thought about removing the center post as well. I think if you want to dot hat,t he best way to keep the seal in tact would be to put a stop plate on one of the doors. In other words, one of the doors would have a plate attached that allowed the second dorr to seal to it, the first door would be closed first, and the secnd door closed second to engage the sealing plate.

Does that make sense to you?

Yes it does - some of the newer french door refrigerators have a spring loaded plate that pops out of the way when you pull the doors open. You can open either side first. Hopefully my DIY skills or lack of them will let me get this done.
 
Using the wiring at the beginning of the thread, could I just use twist caps for the splices instead of the terminal block?

<------ knows nothing about wiring
 
This is beautiful BK!

I have been trying to convince the SWMBO that we need a new fridge so I can do exactly this with the old one. It isn't a side-by-side but I still want to open it up by removing the shelf between the fridge and freezer sections so it becomes a single space.

If I can build a chamber like yours I can start brewing Lagers!!

-Tripod
 
Using the wiring at the beginning of the thread, could I just use twist caps for the splices instead of the terminal block?

<------ knows nothing about wiring

I used push on connecters from Home Depot, different sizes in a package for $1.58. The wires pushed into them perfectly.
 
Has anyone done this with a "top-freezer" model refrigerator? I have a decent-sized old one I could use (maybe 22 cu. ft.?), but I have no idea what is in the panel that separates the fridge from the freezer compartments. If it's just insulation (as in BK's side-by-side fridge) I would think cutting it out would work fine in a top freezer model as well. I'd just rather not destroy the fridge if it definitely won't work for some reason...

Thanks to BK for an inspiring thread!
 
I'm sick of fluctuating fermentation temps, so I just bought a LOVE TSS2-2100, with the intent to build a ferm chamber like this one. Thanks, Boerderij.
 
I am thinking of doing a conversion similar to the one you diagramed for cold on one side and warmer on the other (without cutting out the divider). My intent would be to use the cold side for pre-cooling/pre-carbonating cornies and/or lagering and to use the warm side to control ale fermentation in the summertime.

Can this be accomplished with one love controler that is set to come on to cool down the cold side (compresser) and set to come on to run a fan to cool the warmer side with a 120mm fan blown through the tube?

Any help would be appreciated on this. If I do this, I will certainly post a build thread.
 
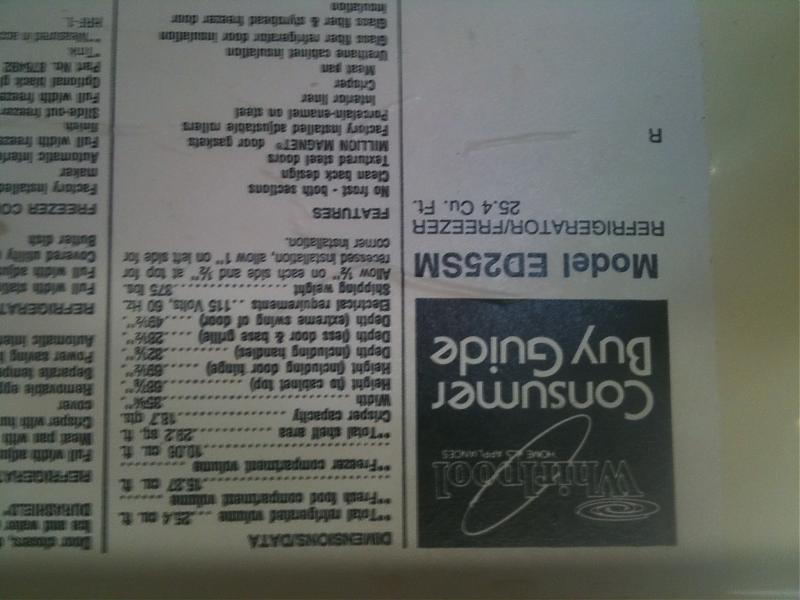
Today I just scored a free side by side from Craigslist. I got the Love controller for a Christmas present. Unfortunately there is no circuit diagram and while I was able to find the owners manual online it didn't have a wiring diagram either. The Model # is a Whirlpool ed25sm

I have attached a picture of the model sticker. Any help with finding the diagram would be greatly appreciated. I would like to plan this project out a little more before I jump into wiring it up.

Sorry the image is up side down. It's after midnight now and I'll just have to go with it.

IMG_0333.jpg
 
I am thinking of doing a conversion similar to the one you diagramed for cold on one side and warmer on the other (without cutting out the divider). My intent would be to use the cold side for pre-cooling/pre-carbonating cornies and/or lagering and to use the warm side to control ale fermentation in the summertime.

Can this be accomplished with one love controler that is set to come on to cool down the cold side (compresser) and set to come on to run a fan to cool the warmer side with a 120mm fan blown through the tube?

Any help would be appreciated on this. If I do this, I will certainly post a build thread.
I just saw your post. I really like that idea. Any luck with getting more info on how to make it happen?
 
I wish I had more info about the side by side dual zone idea. But I haven't made one. I really think it will be as simple as the above diagram. If I were building it, I would use two single stage LOVE controllers just so I could always see the temps in both sides of the unit.

Good luck finding the wiring diagram, you may have to contact a service dealer or something.
 
I'm working on the unit now. Got some help from an electrician at work and think I can do it with just one dual stage controler by bypassing the thermostats. No fan needed. I should be done by next weekend, this weekend if I am lucky. Will post when I see how it goes. Gettign a little frustrated now as I'm not an electrical guy.
 
Have you measured ambient air temperature in there when it's in heating mode and you have your thermo measuring ferm (liquid) temp?

I tried using a small space heater as well, and when I had the thermo measuring liquid temp, ambient air temps would reach 120+ before liquid temp would reach cutoff (64F with a 2F differential). I felt that was too hot so I switched to air temp for the thermo and though the space heater cycles a lot more and I had to set the cutoff a few degrees higher than ferm temp to get the proper liquid temp, it worked well.

I'm thinking of trying a reptile heater and see if I get better results when the thermo is measuring liquid temp.
 
I am thinking about doing something like this, except, being greedy, I want 3 compartments at different temps (ale ferm compart, lager ferm compart, and corny cold storage compart) . I have little electical wiring knowlege and do not want to mess with it. So, what I was thinking about is marrying together BK's side by side fridge fermentor trick-out with a few ideas from his really cool keezer/glass cabinet plans to create something like this:

(1) get a cheap/free large CraigList side by side fridge.

(2) Instead of completely ripping out the center wall, only rip half out from the ground up to a height that will fit corny kegs and a middle shelf.

(3) create a shelf across the middle on a wooden bracket that sits flush with the center wall. Now you have 3 compartments (1 large compartment on the bottom where the cold air comes in for storing lagering cornys and 2 side by side compartments on top).

(4) insulate the bottom of the middle shelf and rip out the door moldings and replace with something flush/smooth that will rest against a gasket on the side edge of the middle floor to create an air-tight barrier between the lower compartment and 2 upper compartments when the fridge doors are closed.

(5) in each of the 2 upper compartments on opposite sides drill 2 holes to insert 2 large tubes with 120mm computer fans glued on top of each tube. attach the so that in each compartment 1 tube goes to near the bottom of the lower cold compatment and blows air into the floor of the compartment above. the other tube goes from the middle floor to near the top of each compartment to blow warm air down to the lower compartment. As others who originally thought up of this type of system have noted, the idea is to blow cold air in near the bottom of each upper compartment and recirculate warmer rising air back into the lower compartment, with the fans controlled by thermostats.

(6) get 2 cheap house A/C-heater battery run digital thermostats. Wire the fans to the thermostats fan control connectors (power source for fans are spliced wall warts from cell phones, etc). I seen from someone else using this method that you can easily solder out the on-board thermisters on these cheap house thermistats, solder on long wires to the board in their place and then re-solder the thermisters onto the wire to allow you to attach the thermister to your fermentation vessel. Set temp on upper left chamber (which is above the cooling unit on what was the freezer side and will be colder) to your desired lager ferm temp; set the temp on the upper right chamber to your warmer ale ferm temp.

(7) plug the fridge into one of those temp controllers that in turns plugs into an electrical socket. place the temp probe in the lower compartment and set for someting like 29-30 degrees to lager your cornys and provide to cold air source for upper compartments on demand. This controls the cold compartment with no electrical wiring needed.

I am thinking that at this point it would be finished with very minimal DIY skills and little electrical wiring skills. If the frige is large enough, you could ferment up to 4 beers at a time ( 2 in each compartment) and store a a bunch of cornys. Has anybody thought about or tried doing it this way? Any logic/design flaws here that come to mind before I try something lilke this?
 
Back
Top