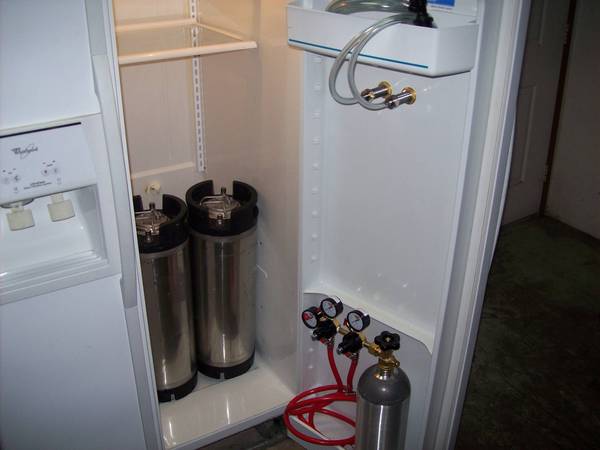
Quick question for those with CO2 tanks on the outside. Did you just stick the gas line through a hole in the collar, or is there a piece of hardware to keep everything sealed up? I want to avoid open gaps as much as possible to keep the heat out/cold in :rockin:
You are using an out of date browser. It may not display this or other websites correctly.
You should upgrade or use an alternative browser.
You should upgrade or use an alternative browser.
Show us your Kegerator
- Thread starter Flyin' Lion
- Start date

Help Support Homebrew Talk:
This site may earn a commission from merchant affiliate
links, including eBay, Amazon, and others.
bendavanza
Well-Known Member
You can shove tubing through a tight fitting hole, or make a bulkhead, but running it though the hole should not be much concern for loss of temps.
ajwillys
Well-Known Member
Quick question for those with CO2 tanks on the outside. Did you just stick the gas line through a hole in the collar, or is there a piece of hardware to keep everything sealed up? I want to avoid open gaps as much as possible to keep the heat out/cold in :rockin:
I made a bulkhead through the collar. Also, its nice to have an on/off valve at this connection so you can disconnect the co2 without depressurizing the whole system.
Quick question for those with CO2 tanks on the outside. Did you just stick the gas line through a hole in the collar, or is there a piece of hardware to keep everything sealed up? I want to avoid open gaps as much as possible to keep the heat out/cold in :rockin:
I put a brass pipe through a fairly tight hole in the collar. I'm planning on putting a little caulk around the hole next time I have the caulk out. A shutoff valve on the regulator prevents the system from venting out pressure when I need to refill the bottle.
HOOTER
Well-Known Member

$33.99 ($17.00 / Count)
$41.99 ($21.00 / Count)
2 Pack 1 Gallon Large Fermentation Jars with 3 Airlocks and 2 SCREW Lids(100% Airtight Heavy Duty Lid w Silicone) - Wide Mouth Glass Jars w Scale Mark - Pickle Jars for Sauerkraut, Sourdough Starter
Qianfenie Direct


$28.98
Five Star - 6022b_ - Star San - 32 Ounce - High Foaming Sanitizer
Great Fermentations of Indiana


$479.00
$559.00
EdgeStar KC1000SS Craft Brew Kegerator for 1/6 Barrel and Cornelius Kegs
Amazon.com


$7.79 ($7.79 / Count)
Craft A Brew - LalBrew Voss™ - Kveik Ale Yeast - For Craft Lagers - Ingredients for Home Brewing - Beer Making Supplies - (1 Pack)
Craft a Brew


$22.00 ($623.23 / Ounce)
AMZLMPKNTW Ball Lock Sample Faucet 30cm Reinforced Silicone Hose Secondary Fermentation Homebrew Kegging joyful
无为中南商贸有限公司


$10.99 ($31.16 / Ounce)
Hornindal Kveik Yeast for Homebrewing - Mead, Cider, Wine, Beer - 10g Packet - Saccharomyces Cerevisiae - Sold by Shadowhive.com
Shadowhive
![Craft A Brew - Safale BE-256 Yeast - Fermentis - Belgian Ale Dry Yeast - For Belgian & Strong Ales - Ingredients for Home Brewing - Beer Making Supplies - [3 Pack]](https://m.media-amazon.com/images/I/51bcKEwQmWL._SL500_.jpg)


$159.99 ($26.66 / Count)
3M High Flow Series System BREW120-MS, 5616001, For Brewed Coffee and Hot Tea, Valve-in-Head Design
SpaceCityProviders

$44.99
$49.95
Craft A Brew - Mead Making Kit – Reusable Make Your Own Mead Kit – Yields 1 Gallon of Mead
Craft a Brew


$176.97
1pc Commercial Keg Manifold 2" Tri Clamp,Ball Lock Tapping Head,Pressure Gauge/Adjustable PRV for Kegging,Fermentation Control
hanhanbaihuoxiaoshoudian

$58.16
HUIZHUGS Brewing Equipment Keg Ball Lock Faucet 30cm Reinforced Silicone Hose Secondary Fermentation Homebrew Kegging Brewing Equipment
xiangshuizhenzhanglingfengshop


$719.00
$799.00
EdgeStar KC2000TWIN Full Size Dual Tap Kegerator & Draft Beer Dispenser - Black
Amazon.com


$53.24
1pc Hose Barb/MFL 1.5" Tri Clamp to Ball Lock Post Liquid Gas Homebrew Kegging Fermentation Parts Brewer Hardware SUS304(Gas MFL)
Guangshui Weilu You Trading Co., Ltd


$53.24
1pc Hose Barb/MFL 1.5" Tri Clamp to Ball Lock Post Liquid Gas Homebrew Kegging Fermentation Parts Brewer Hardware SUS304(Liquid Hose Barb)
yunchengshiyanhuqucuichendianzishangwuyouxiangongsi


$76.92 ($2,179.04 / Ounce)
Brewing accessories 1.5" Tri Clamp to Ball Lock Post Liquid Gas Homebrew Kegging Fermentation Parts Brewer Hardware SUS304 Brewing accessories(Gas Hose Barb)
chuhanhandianzishangwu


$20.94
$29.99
The Brew Your Own Big Book of Clone Recipes: Featuring 300 Homebrew Recipes from Your Favorite Breweries
Amazon.com


Nitrousbob
Active Member
1234567890-
Taps installed. Picking up my nitrogen/co2 mix tank Monday. I am moving everything over and the tanks will be between the fridge and the wall. I still need to do something to make it look better, either graphics and/or a chalkboard on the freezer door.

JakeTheHopDog
Well-Known Member
Sorry, posted to the wrong thread.
And these last few posts answer his original question how, exactly?
Who is HE? This is the "show us your kegerator" thread, the last few posts seem appropriate to me.
fineexampl
Well-Known Member
That's not ghetto, it's "simplistic and functional".Kind of ghetto, but that's what happens when you're on a college budget.

nebben
Well-Known Member


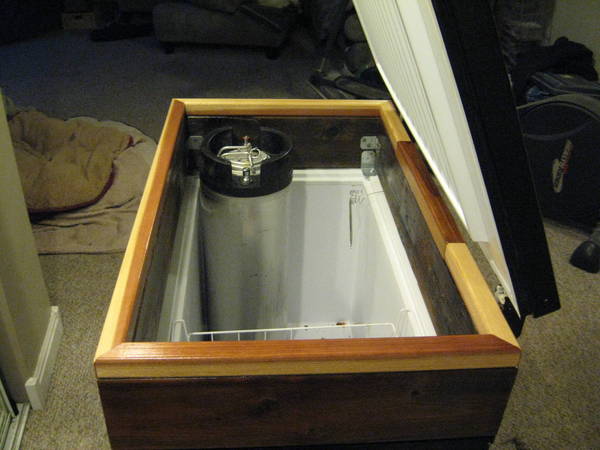
I have a pile of old lumber from a disassembled play-set that we found in our backyard when we moved in four years ago. At the time of disassembly, it wasn't clear what kind of wood it was since it was already grey and weathered somewhat. I am red-green colorblind, and had no idea what it was (I assumed it was pine). SWMBO recognized a strong red color in the mitered cuts...Redwood! YAHOO! I sanded it and got some color to come out. Good enough for me. I like the slightly beat-up look for it since the fridge is also slightly beat up. I also got a new 2x2 of redwood that is much lighter to glue on top of the 2x6 collar. Together, they raise the height enough that I can fit 2 more kegs on the compressor hump. I screwed the corners together and fixed them onto the freezer with angle brackets on top of a strip of dense foam weatherstripping. I also painted the freezer with black enamel paint- such an awesome result after only $8.00 !!!

I got a mechanical thermostat from chicompany.net for $36 . Such a great deal here- It adjusts from ~30F to 110F. The probe hangs freely inside the freezer and the control hides nicely next to the compressor underneath.

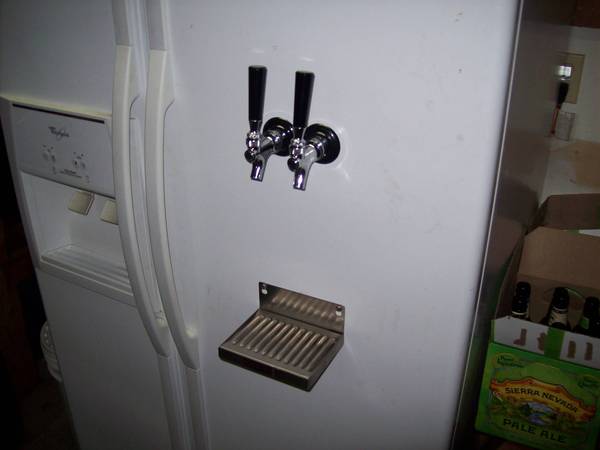
I only have 2 faucets at the moment , but will eventually expand to 4 when budget and the brew-backlog allows. The tap handles have original "Miller Lite" labels, as a decoy strategy that should help keep snobbery drinkers from wanting to pour a glass :cross:
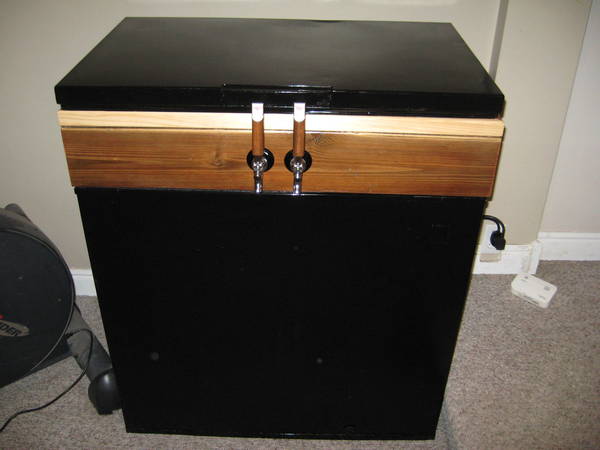
I'm quite pleased with the result.
Jaysus
Well-Known Member
looks pretty!
Kind of ghetto, but that's what happens when you're on a college budget.
That's not ghetto - THIS was ghetto!!

It worked, though, and kept me going til I could build the Keezer

Gfei
Well-Known Member
^^ That's awsome... Here's mine:
Tripod
Well-Known Member
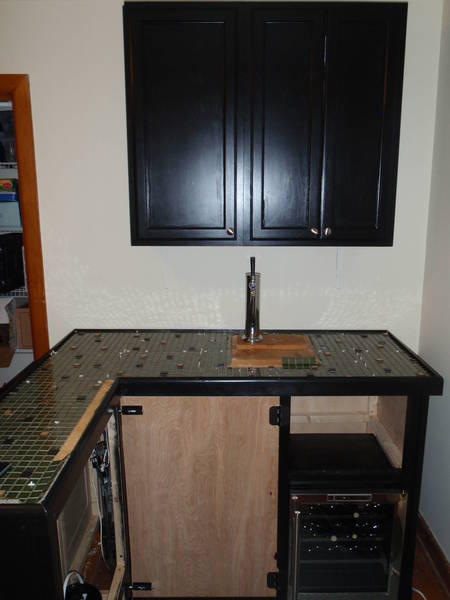
^^^ Gfei, I really like your bar top...
Gfei
Well-Known Member
Thanks, it's been sitting unfinished like that for a couple weeks now. Haven't gotten around to actually setting the tile... sucks not having my own tools, slows me way down.
- Joined
- Nov 6, 2007
- Messages
- 62,016
- Reaction score
- 6,923
I've been curious about your bar top. Are those random tiles raised higher than the rest? Won't that be a pain trying t set glasses down? Or am I not seeing it right?
Gfei
Well-Known Member
They're higher because we just set them out on top of the base tile to get a feel for how it will look. I went back and cut out the tiles underneath to drop them in place sometime after the picture was taken.
chainsawbrewing
Well-Known Member
i like the random raised tile look. if it were me, i'd keep it that way, and then epoxy over them all, including up over the raised ones. it would add a nice depth to the top, and yet still be a smooth top.
Gfei
Well-Known Member
I could do that, but then the gallon of epoxy i bought wouldn't be nearly enough to cover. That stuff is expensive.
chainsawbrewing
Well-Known Member
I could do that, but then the gallon of epoxy i bought wouldn't be nearly enough to cover. That stuff is expensive.
yeah, lol, don't have to tell me! it took me around 5 gallons for my bartop.
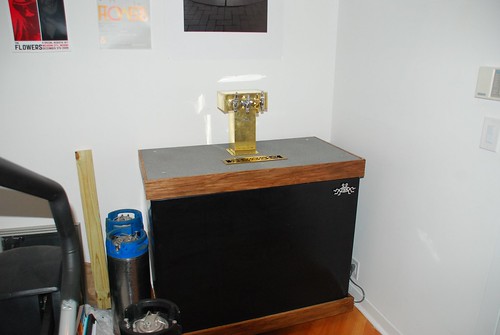
Fridge was a freebee thanks to Craigslist
Little shelf in the bottom allows 4 cornys plus 10 # CO2
Chalk board is krylon Chalk board spray paint
Keging equipment is all from Keg Connection. (shameless plug). He's right down the road in San Marcos and his prices plus customer help was right on.


Little shelf in the bottom allows 4 cornys plus 10 # CO2
Chalk board is krylon Chalk board spray paint
Keging equipment is all from Keg Connection. (shameless plug). He's right down the road in San Marcos and his prices plus customer help was right on.
Any ideas on how to rotate that pic? Every thing I open it including Preview, adobe etc has it right side up?
Gfei
Well-Known Member
i think you can rotate it from within your forum gallery if that's where it is...
Inspired by Guntr's keezer with a tap tower...
build blog:
http://ovalbrewing.com/2010/02/22/keezer-build/
http://ovalbrewing.com/2010/03/02/keezer-build-part-2/
http://ovalbrewing.com/2010/03/03/keezer-build-part-3-all-done/
build blog:
http://ovalbrewing.com/2010/02/22/keezer-build/
http://ovalbrewing.com/2010/03/02/keezer-build-part-2/
http://ovalbrewing.com/2010/03/03/keezer-build-part-3-all-done/
plinytheporter
Active Member
I added two taps last night, I will add two more in the future. Probably put a stout tap in the middle. I also moved the Co2 tank to the outside.

I can fit six corny's in this bad boy. I still need a secondary regulator and a gas manifold. Will be purchased in the very near future.
I can fit six corny's in this bad boy. I still need a secondary regulator and a gas manifold. Will be purchased in the very near future.
BlackHillsBrewing
Active Member
Ok, I just finished mine and it turned out great. I have about $$375 bucks invested.
Holds 4 kegs
Medium sized frig. (Used) $ 25.00
All tubes, Taps etc. $340.00
Kegs Free (Used)
Co2 Tank Free!

Holds 4 kegs
Medium sized frig. (Used) $ 25.00
All tubes, Taps etc. $340.00
Kegs Free (Used)
Co2 Tank Free!
Similar threads
- Replies
- 23
- Views
- 1K
- Replies
- 25
- Views
- 1K
- Replies
- 2
- Views
- 280
