• Please visit and share your knowledge at our sister communities:
  • If you have not, please join our official Homebrewing Facebook Group!

    Homebrewing Facebook Group

Show us your element housings/pots. How did you do it?

Homebrew Talk

Help Support Homebrew Talk:

This site may earn a commission from merchant affiliate links, including eBay, Amazon, and others.
What do you guys think of this design? I was thinking about something like this for my setup which I am currently building.(https://www.homebrewtalk.com/f170/just-another-electric-brewery-build-thread-317746/#post3951391)

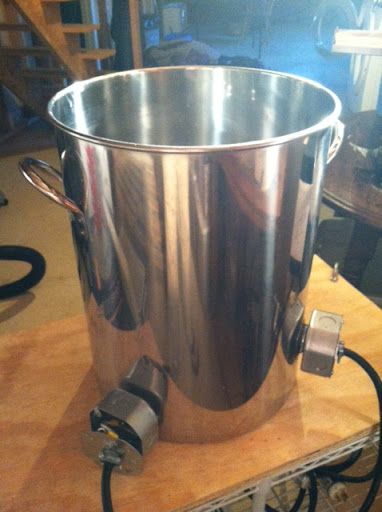
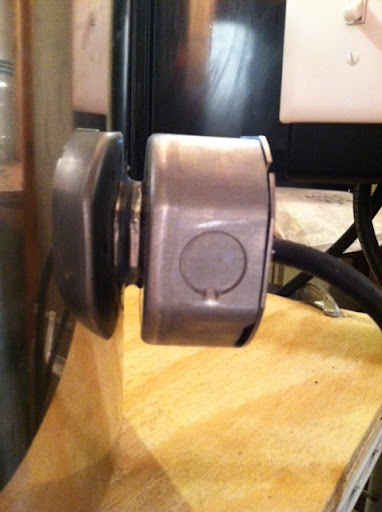
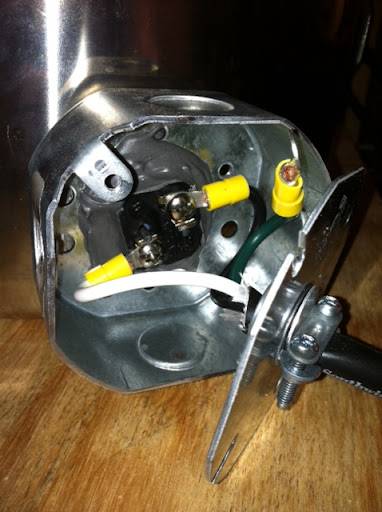
This setup would use 2 high temp silicon O-Rings and a Nut inside the kettle. The electrical box would have a 1.25" hold punched and be on the THREADED side of the element using the 2nd o-ring to make a seal. This design should be water tight from the inside and outside of the kettle.

O-RINGS: http://www.highgravitybrew.com/Prod...ating-Element-Replacement-O-ring-157p3505.htm
INSIDE NUT: http://www.highgravitybrew.com/ProductCart/pc/Weldless-Heating-Element-Kit-157p2652.htm

RED: O-RINGS
BLACK: Electrical Box
GREEN: Inside Nut
BLUE: Kettle Wall

EDIT: As an alternative the 2nd O-RING could be moved down 1 layer so it is inside the electric box.

 
Not good. There is nothing preventing the wort from traveling along the threads from inside the kettle to inside your electrical box.
 
Here's my latest installation, it uses Kal's o-ring inside washer method (blichmann) as he described in this thread. The element is 2000w 120v, and I've added a toggle switch. The box is an extension ring, not an actual box. This is thinner.
No silicone, nothing but the oring and metal-to-metal seating. I was able to tighten it down all the way, flattening the kettle wall.
The bolts run through the box extension holding the two covers and gaskets together on either side.
7326-kettle-stir-plate.jpg

7325-inside-kettle.jpg
 
I run a slow recirculation with the mash tun, and the stirring helps me keep the temps straight in the BK, which is acting as a rims heater. Bit more details here
 
TC15F10NPSCOV-400-2.jpg

As much as I love DIY, I couldn't pass up on these tri-clover adapters from Brewers Hardware. I don't have the tools or skills to do all the machining like they did. Can't wait to get them wired up.
 
TC15F10NPSCOV-400-2.jpg

As much as I love DIY, I couldn't pass up on these tri-clover adapters from Brewers Hardware. I don't have the tools or skills to do all the machining like they did. Can't wait to get them wired up.

Are you just going to weld them in? whats your plan?
 
sasky7777 said:
As much as I love DIY, I couldn't pass up on these tri-clover adapters from Brewers Hardware. I don't have the tools or skills to do all the machining like they did. Can't wait to get them wired up.

I saw these a couple weeks ago and thought they looked perfect. What has your experience been?
 
TC15F10NPSCOV-400-2.jpg

As much as I love DIY, I couldn't pass up on these tri-clover adapters from Brewers Hardware. I don't have the tools or skills to do all the machining like they did. Can't wait to get them wired up.

Are you welding in half or full ferrules? This smaller one? http://www.brewershardware.com/1.5-Tri-Clover-Ferrule-Short.html

Or is this one better to weld in? http://www.brewershardware.com/1.5-Tri-Clover-Ferrule-Long.html

Or the larger one? I am going to copy you but would like to know which ferrule most people use(short or long?)
 
If you haven't welded a ferrule yet you need to consider the type of element so it doesn't touch the ferrule on the kettle which can be common with the 1-1/2" ferrule and fold back elements. You need at least 1/2" projection from the kettle with the ferrule in order to get a clamp on it. The short ferrules are usually used to weld on to a tube but can be used on the side of a kettle. They are easier to silver solder on than weld because of how short they are.
 
If you haven't welded a ferrule yet you need to consider the type of element so it doesn't touch the ferrule on the kettle which can be common with the 1-1/2" ferrule and fold back elements. You need at least 1/2" projection from the kettle with the ferrule in order to get a clamp on it. The short ferrules are usually used to weld on to a tube but can be used on the side of a kettle. They are easier to silver solder on than weld because of how short they are.

I ordered the long type ferrule from brewers hardware this morning and it sounds like the right decision(although its hard to tell from your response you make it sound like no fold back elements will fit a 1.5" ferrule).

I figured the fold back elements would fit fine since it fits in the 1.5" RIMS tube from brewers hardware.

However I have no real world experience are you saying the 1.5" long ferrule won't work with standard fold back elements? I realize the ripple elements won't work. Will the long 1.5" ferrule welded in the side of a brew kettle work with fold back elements? If not someone please let me know asap so i can try to adjust my order.
 
You'll be fine with the longer ferrule and a straight element. No worries.

Yeah the ripples are a pain with 1-1/2" TC that's why I went with 2" TC on my boil kettle.
 
You'll be fine with the longer ferrule and a straight element. No worries.

Yeah the ripples are a pain with 1-1/2" TC that's why I went with 2" TC on my boil kettle.

Thanks man! I feel better now. Can't wait. Love this design. Now i just need to find a welder locally!

Anyone know if this element is shorter than it actually says? I'd like to buy this for the BK and HLT but for some reason amazon lists it as 17". kind of hard to believe and I haven't found another site that really lists the length properly. I have a 10 gallon blichmann boilermaker that is only 14" in diameter.

This is the only 4500w ULWD element i could find in a fold back design but I am concerned about the length and cannot find more details anywhere.


http://www.amazon.com/dp/B0002YUDSI/?tag=skimlinks_replacement-20
 
Last edited by a moderator:
This is the same one (50w per sq. inch = ULWD) and fits a 14" tank so it is less then 14". When I get home I can get you the exact installed length if the helps. It’s less expensive too.

http://www.ronshomeandhardware.com/2923-4500W-240V-FLD-Elemen-p/565426.htm

Thanks man! I feel better now. Can't wait. Love this design. Now i just need to find a welder locally!

Anyone know if this element is shorter than it actually says? I'd like to buy this for the BK and HLT but for some reason amazon lists it as 17". kind of hard to believe and I haven't found another site that really lists the length properly. I have a 10 gallon blichmann boilermaker that is only 14" in diameter.

This is the only 4500w ULWD element i could find in a fold back design but I am concerned about the length and cannot find more details anywhere.


http://www.amazon.com/dp/B0002YUDSI/?tag=skimlinks_replacement-20
 
Last edited by a moderator:
Thanks! you just confirmed this element is fine! i dont know why amazon says it is 17". Thanks for the cheaper source! I pulled the trigger. now I have to find a welder :)
 
Wait...wuh? Can you tell me about what's going on here? If I am correct, is that a control knob for an old heater?

Naah. It's something called a Chill Chaser. A hand held immersion heater with a temperature control knob from a company that's no longer in business. Bought it cheap on eBay. It's now mounted in the side of my MLT. Took the cord off and put in a plug with J-B Weld. Easier to clean and store with out a cord dragging.

Chill_Chaser.jpg

29201d1309945012-gfci-problem-chill-chaser-emlt-chill-chaser.jpg
 
I'm also using the Brewer's Hardware housings with full ferrules. I want them welded as close as possible and will remove any excess from the inside of the keg. Even if there isn't any sticking through, it will be fine. Just need to weld them above the line where the false bottom sits to prevent creating a route for stuff to bypass it.

I had to use straight elements as the curvy ones wouldn't pass through the housing.

image-3284872287.jpg
 
I'm also using the Brewer's Hardware housings with full ferrules. I want them welded as close as possible and will remove any excess from the inside of the keg. Even if there isn't any sticking through, it will be fine. Just need to weld them above the line where the false bottom sits to prevent creating a route for stuff to bypass it.

I had to use straight elements as the curvy ones wouldn't pass through the housing.

Sweet! When are you getting that welded in?
 
I gotta figure out getting the 1.5" hole in the side of the kegs for the two ferrules.

I have the perfect hole/punch saw for this if you want it. It is a 1 3/8" carbide tipped hole cutter. It is perfect for the ferrules. Just pay $15 which should cover shipping.
PM me.
 
Here is my kettle, two 1500W 120V elements fed from separate breakers in my panel. My ground wire is fastened to the screw for the electrical box, I did a continuity check to ensure I have a good ground.

Later down the road I believe I am going to tear it apart and weld the stainless locknut to the kettle. I also need to make a quick disconnect at the element's electrical boxes since I don't use a pump and typically batch sparge makes it hard to lift kettle to pour. The cords get hung up on things.

element3.JPG


element4.JPG


element2.JPG


Element1.JPG
 
Sparky said:
Here's mine:

How'd you get the curved elements to fit? The 5500W 240V elements I had from Ron's Home and Hardware didn't fit through. I'm wondering if I tried with the ferrule clamped on and didn't take it off...oh well.

Sparky said:
I have the perfect hole/punch saw for this if you want it. It is a 1 3/8" carbide tipped hole cutter. It is perfect for the ferrules. Just pay $15 which should cover shipping.
PM me.

1 3/8 hole cutter makes a hole big enough for a 1.5" ferrule? I put a caliper on the ferrule and it's definitely bigger than 1.375".
 
Just finished my element covers/boxes. 2" TC X 1" NPS element plate from Hillbilly Stills soldered through 14ga stainless plate which in turn is bolted to water-tight box. Provides grounding point and covers element wiring inside the box. Cable strain relief on the side for my 10/3 cords and that's it.

Have to say, even it's going slow, the build is really fun.

Thanks to many from the forum for continuing inspiration.

Where did you find the box & strain relief? I have the same adapter from Hillbilly Stills.

Thanks,
Chris
 
I found the boxes on eBay but he has sold them all now. Usually a little searching with different keywords will result in finding something. There are alot of 4x4 junction boxes that will work too.
 
How'd you get the curved elements to fit? The 5500W 240V elements I had from Ron's Home and Hardware didn't fit through. I'm wondering if I tried with the ferrule clamped on and didn't take it off...oh well.


1 3/8 hole cutter makes a hole big enough for a 1.5" ferrule? I put a caliper on the ferrule and it's definitely bigger than 1.375".

I had to bend (straighten out) the curved element. If you take your time, it will bend any shape you want. However, I think it is best to go with a straight one if you have the option.

The 1 3/8" hole cutter is perfect for the 1.5" ferrule. Since it cuts less, it lets the 1.5" ferrule site on the kettle, not inside it. It is flush with the kettle. Measure the inside diameter of the ferrule and it should show that the 1 3/8" cutter works best.
 
Back
Top