• Please visit and share your knowledge at our sister communities:
  • If you have not, please join our official Homebrewing Facebook Group!

    Homebrewing Facebook Group

Show us your element housings/pots. How did you do it?

Homebrew Talk

Help Support Homebrew Talk:

This site may earn a commission from merchant affiliate links, including eBay, Amazon, and others.

Boerderij_Kabouter

Well-Known Member
Joined
Dec 21, 2007
Messages
7,763
Reaction score
180
Location
Oconomowoc, Wisconsin
I can't believe this thread doesn't exist. Let's put together a resource for people to see how they want to protect themselves for electrocution!

I'll go first...

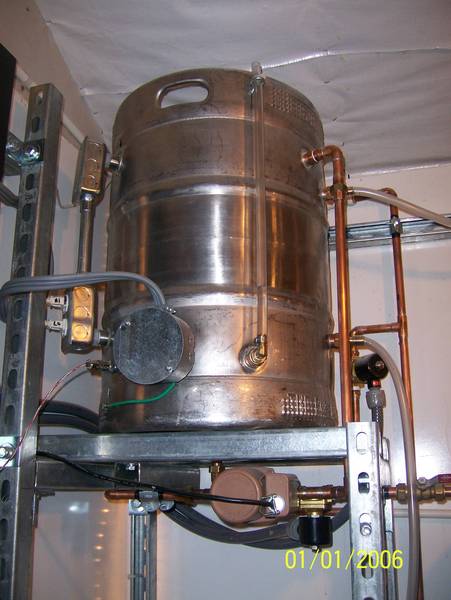
My BK uses a rubber coated keg, so my situation may be a bit different.

CIMG5144.JPG


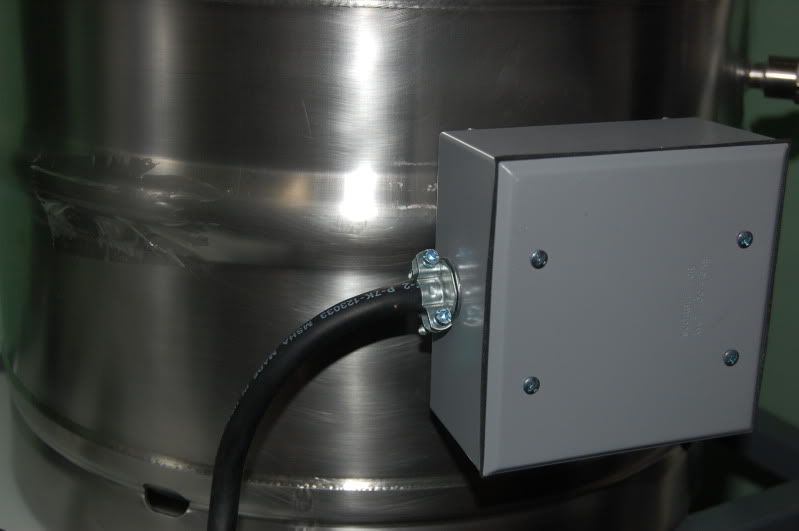
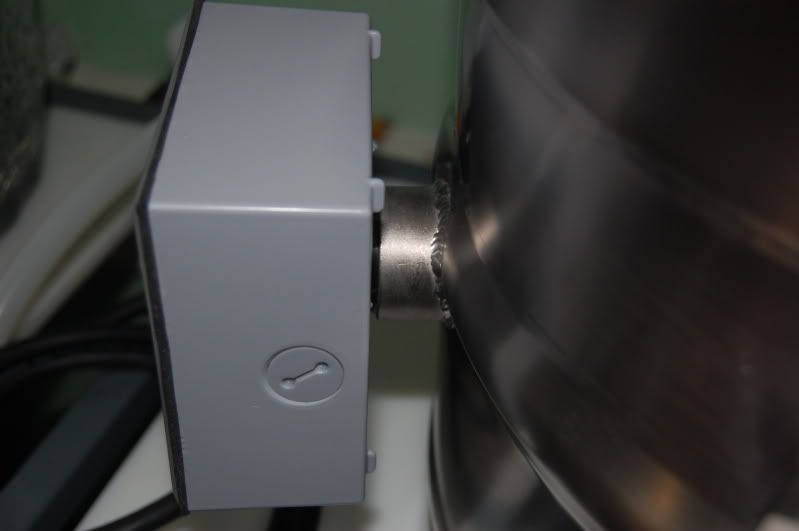
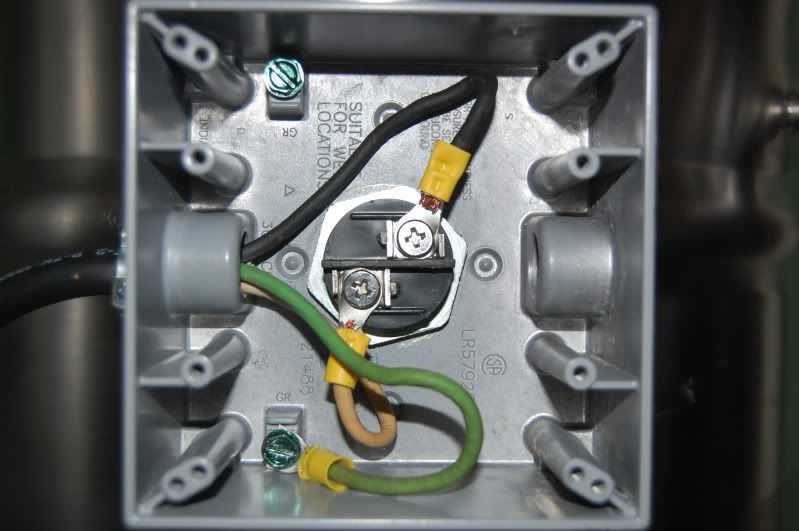
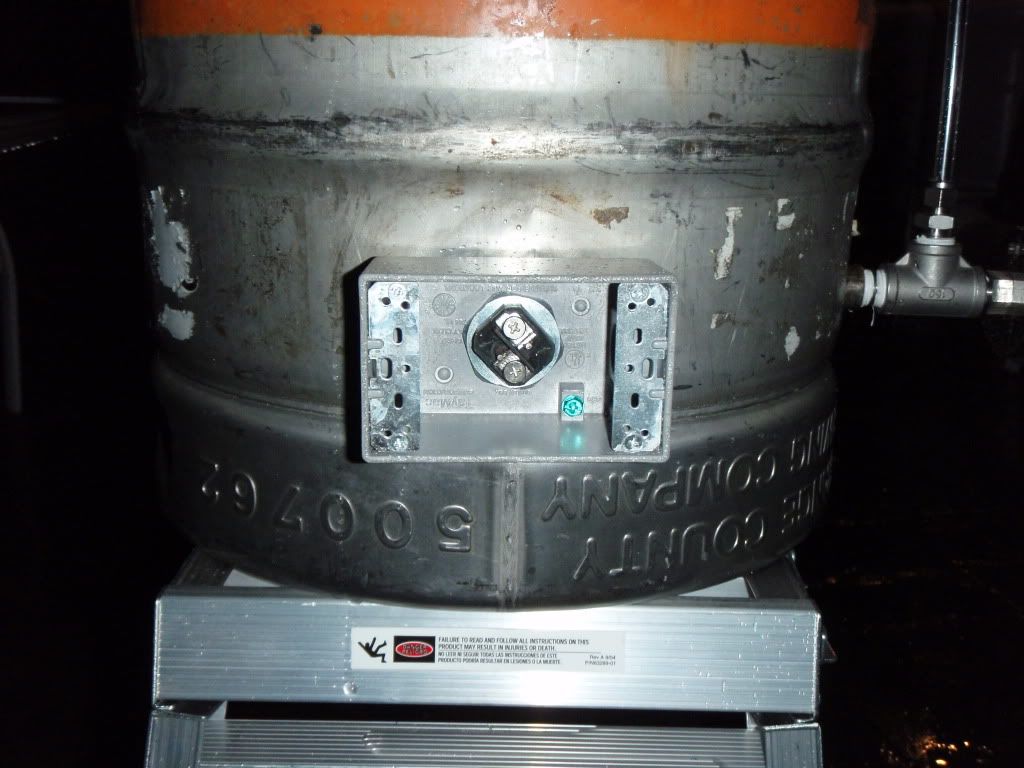
It is a cannibalized plastic box with an all weather face plate. The recessed outlet is sealed up with silicone and the box is fully plastic welded (plastic specific epoxy) to the keg exterior.

I used a profile guage to steal the profile of the keg:

CIMG5146.JPG


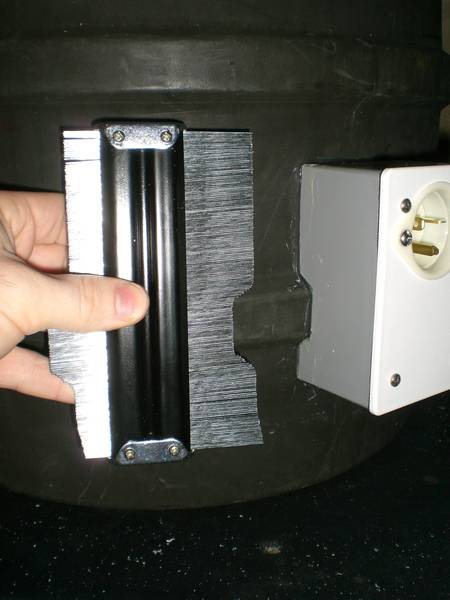
Then, I traced that profile onto the box, and cut it out with my mini band saw.

Then I clamped the box in place with a bungie cord, and epoxied the crap out of it. Wiped smooth with a squeegee and bob's yer uncle.

CIMG5145.JPG


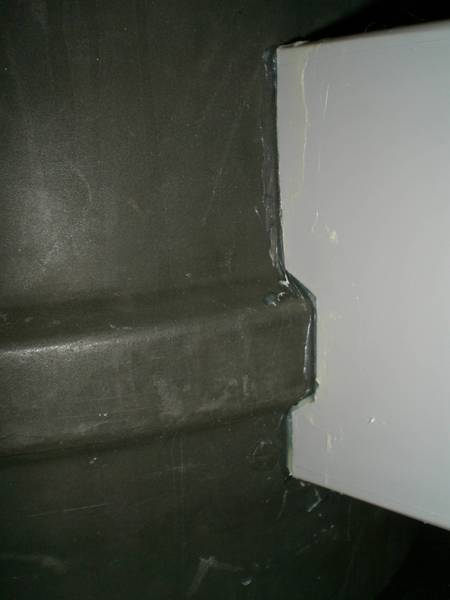
The flash picks up some extra epoxy, but it looks perfect with the naked eye.
 
You KNOW I'm ready to do mine, so I'll be watching this thread with interest.
 
For my elements, I used 1" SLB conduit elbows, boring the hole a little larger with a step bit. Then I inserted the element, wired it up to include a strain relief at the bottom, and filled it with JB Weld. I let the epoxy cure overnight, not moving it until it hardened right where I wanted it. Then I screwed on the backplate and attached the ground wire to a lug I soldered on the kettle.

Just hope I don't burn out an element....it's more work than I'd want to do every few brews, but it's rock solid and as safe as I could make it.

P1040074.jpg


P1040087.jpg


P1040138.jpg
 
Sorry for the link but I have never figured out how to post pics here.
http://picasaweb.google.com/sehaun3333/ElectricalBox#
Too make a long story short, I had 1/4" ss bolts welded to my kettles and then bolted on a waterproof outlet box. I drilled a hole in the back big enough to go over the electric element coupling and then used silicone caulking to seal up.
 
Here's mine. Its a custom Sabco HLT for my HERMS set up. They welded a half coupler for me for the heating element. I was able to simply drill a hole in the electrical box, insert the heating element, add the gasket it came with, and screw it into the half coupler. It made for a water tight seal without even using teflon. I will probably add high temp silicone in the box as well just to be safe.
DSC_0719-2.jpg

DSC_0720-2.jpg

DSC_0725-1.jpg

DSC_0724-2.jpg
 
I did exactly what hatfieldenator did, but used a single gang box and soldered a 1" NPS locknut to the keg.

PC090167.jpg
 
With the exception of the OP, how do you clean your kettles with those wires permanently affixed?

I am getting ready to convert my system to electric, but want to be able to remove the wire from the pot for cleaning.
 
I plan on CIP, but my element screws right out and my ground wire can be removed from the lug.
 
My kettle and MT/LT are inverted sanke kegs with the spear/valves removed. I attach the drains with 2" tri-clovers. For cleanup I scoop out as much of the grains/hops as I can, then I pull the false bottoms and remove the tri-clovers. The rest of the grain and hops gets hosed out onto the patio then swept up later. As far as washing I run hot oxyclean through the entire system for about 20 mins (with the drains re-installed) followed by water. Using this system I don't have to worry about the wires.
 
For my HLT I don't really need to clean it out since all that touches it is hot water. However, I plan on also building an electric boil kettle that will need cleaned out. For that I suppose I'll just unplug the heating element and clean it over the sink being careful not to soak the electrical box, although it is in a weather tight box...
 
How to attach the elements to our Blichmann kettles in a safe and secure manner took some thinking. I spent many months on this. We wanted the entire kettle to be electrically grounded for safety reasons the same way any power tool or appliance chassis is grounded.

Grounding means that the entire metal chassis (in this case the entire kettle) is connected to your house's electrical system ground plane. This ensure that any stray current can find its way to ground instead of through something else (such as the brewer!) in the off chance that something goes wrong and one of the 'hot' wires becomes disconnected and touches the kettle. Without proper grounding the kettle would instead simply become energized and pose a great danger to the brewer. A proper electric brewing setup should always have everything properly grounded!

I also don't want any wires exposed as they could be easily damaged. Kettles are heavy and moving them around while you clean them means the brewer will inadvertently bump parts sticking out against other things. No matter how careful you are, it will happen. I wanted the wires to be protected as much as possible and completely covered up.

So I stole ideas from how Blichmann does weldless fittings and came up with this:

IMG_1553.jpg


IMG_3580.jpg


element_box_cutaway.jpg


Complete instructions with parts list is here: http://www.theelectricbrewery.com/heating-elements

Kal
 
Kal,

I understand. I too have 3 Blichmann's (10 gallon) and I am gearing up to do all electric. As you know I have already copied you chiller to the exact specifications from your site (and donated ;) ) and study the rest of your build, and others, on a daily basis until I my brain hurts (which doesn't take much :p ).

The reason I ask is that I want to be able to do the same as the OP and be able to disconnect my cord at both ends. By doing so on a Blichmann, is it not possible to do it correctly?
 
I knocked out the back of a deep octagon box to 1". I inserted the element as below and welded (just two tacks) the element nut to the box. With the rubber washer all it takes is hand tightening and you can get a pretty good grip on the box. I have a 1" stainless half coupling soldered to the keg. Just took a few minutes with the right tools.

0107101508a.jpg


Here it is installed in my HLT.

20100515_13.JPG
 
Lots of different ways to do this....for those that are watching, I'd shy away from putting your box on the "thread side" of the element...(see the above pic by Ischiavo, his box is on the BACK of the element, away from the threads).....there's the potential for water to leak past the o-ring, through the threads, and potentially into your box. If you're dead set on doing it this way, you need to COMPLETELY cover (pot) the element connections with epoxy....so that if moisture is in the box, there is very little chance you can have a short.
 
If you're dead set on doing it this way, you need to COMPLETELY cover (pot) the element connections with epoxy....so that if moisture is in the box, there is very little chance you can have a short.

I thought about this, but I prefer to keep the element replaceable so I can change it out at a moment's notice. I was very careful in the construction, and took no shortcuts with Kal's method; it's rock solid. No leaks, ever. For an added layer of protection, I applied a generous amount of silicone around the element inside the box, just as Kal did. I'm confident that it won't leak.

In the unlikely event that it does, it will short and trip the gfci or breaker. And I never touch my system while it's "hot." For me, epoxy just isn't the answer; and even epoxy isn't fail-safe.
 
Am I the only one using teflon around my element threads, screwing it into the couple and calling that water tight? I then plan on some heat shrink around the terminal section with either and o-ring or silicone bead under the heat shrink on either side.
 
Am I the only one using teflon around my element threads, screwing it into the couple and calling that water tight? I then plan on some heat shrink around the terminal section with either and o-ring or silicone bead under the heat shrink on either side.

I may have used some teflon tape when I installed my element. I can't recall. The rubber ring that comes with the element should be sufficient though if installed with the seal against the coupling and not the electrical box.

We are not talking about a pressurized vessel after all and that is how they are meant to be installed in a water heater (which is pressurized). I don't think the use of any additional sealant is necessary and would only seem to make replacement more difficult.
 
I mean I just used it instead of the seal. The 1" coupler I bought from bargain fittings isn't straight threaded. it's tapered so the element only screws in so far. but the teflon secures it fine by itself, just like every other fitting on my keggle. I have welded fittings btw.
 
I mean I just used it instead of the seal. The 1" coupler I bought from bargain fittings isn't straight threaded. it's tapered so the element only screws in so far. but the teflon secures it fine by itself, just like every other fitting on my keggle. I have welded fittings btw.

Ok. I understand. I did not have a problem threading my element in far enough to seal with the supplied gasket. My coupling must not be tapered.

I am a big fan of teflon tape myself and also used it on every threaded fitting in my brewery. I recently gathered up all my plumbing supplies into a big toolbox and found I had about 10 rolls:rockin:
I guess I didn't really try with the gasket, just figured it easier to use tape. Teflon is one of those things, every time you're in the plumbing isle, you might as well grab a roll or 2 :D
 
Teflon will work, but recently I've gotten into using silicone adhesive sealant. Just put a fair amount on your threads, screw it in, wipe away the excess, and let it set. I think it's a bit more reliable than teflon tape (IME) and can be used for lots of other stuff.....
 
Teflon tape is not meant to be a sealant. It's purpose is to lubricate the threads so that the thread form will seat well enough to make the proper seal. If you want a sealant, use silicone adhesive as ScubaSteve suggested or use pipe dope.
 
Kal,

I understand. I too have 3 Blichmann's (10 gallon) and I am gearing up to do all electric. As you know I have already copied you chiller to the exact specifications from your site (and donated ;) ) and study the rest of your build, and others, on a daily basis until I my brain hurts (which doesn't take much :p ).

The reason I ask is that I want to be able to do the same as the OP and be able to disconnect my cord at both ends. By doing so on a Blichmann, is it not possible to do it correctly?

No reason why you couldn't add a cord disconnect on the kettle end as well. The major issue I see is size. You most certainly could not use a NEMA L14-30P receptacle like this in the 2-gang box at the kettle end as it's way too big:

30 Amp, 125/250 Volt, NEMA L14-30P, 3P, 4W, Flanged Inlet Locking Receptacle,Industrial Grade


You'd have to use something small if you want to use the same 2-gang box box I use.

Then there's cost too as you'd need an extra receptacle and connector per cable (assuming 2 kettles with elements this is about $50 x 4).

One recommendation: If you do add a disconnect at the kettle for safety reasons make absolutely sure that the kettle side is a MALE connector (like the picture above) and the cable is FEMALE (like this one). This ensures that if for any reason you disconnect the two while power is on, you don't have live power on the cable that someone can touch. Just like the standard power 120V power outlets in your house.

Kal
 
Kal.

Is that what the OP used in the very first picture? If so, you say it is too big?

Also, 10-4 on the male on the kettle as pictured and female on the cord end. :mug:
 
I don't know what the OP used. Definitely not locking nor the picture I posted however.

The MALE connector the OP shows in his first post is not locking (that much is sure)and looks like a 15-20A socket to me (not 30A). Hard to tell. The OP also really knows his stuff so I'm sure he'll post here. ;)

Kal
 
I thought about this, but I prefer to keep the element replaceable so I can change it out at a moment's notice. I was very careful in the construction, and took no shortcuts with Kal's method; it's rock solid. No leaks, ever. For an added layer of protection, I applied a generous amount of silicone around the element inside the box, just as Kal did. I'm confident that it won't leak.

In the unlikely event that it does, it will short and trip the gfci or breaker. And I never touch my system while it's "hot." For me, epoxy just isn't the answer; and even epoxy isn't fail-safe.

I potted my heat sticks solidly with epoxy, but I don't want to pot my RIMS TUBE connections with epoxy. I grounded the tube and covered the connections with liquid electrical tape as a precaution.
 
The OP is a 15-20A receptacle for 120VAC. It is for the Simple Brewery. I am glad people are posting their ideas here; this should become a very good resource for builders.
 
Back
Top