• Please visit and share your knowledge at our sister communities:
  • If you have not, please join our official Homebrewing Facebook Group!

    Homebrewing Facebook Group

Show us your DIY wort chillers

Homebrew Talk

Help Support Homebrew Talk:

This site may earn a commission from merchant affiliate links, including eBay, Amazon, and others.
That run seems really short, what length of copper did you use? Less surface area will just mean more time to chill, not a big deal but faster is better.
 
Only 20ft of 3/8. I was on a budget. Guess I'll find out next weekend how it works. Worse case I'll use it for a pre chill coil down the road.
 
thats 5' shorter than what i use, you'll be fine :) i wouldn't worry about it too much at all, just save up for another 20' coil sometime later and run them parallel
 
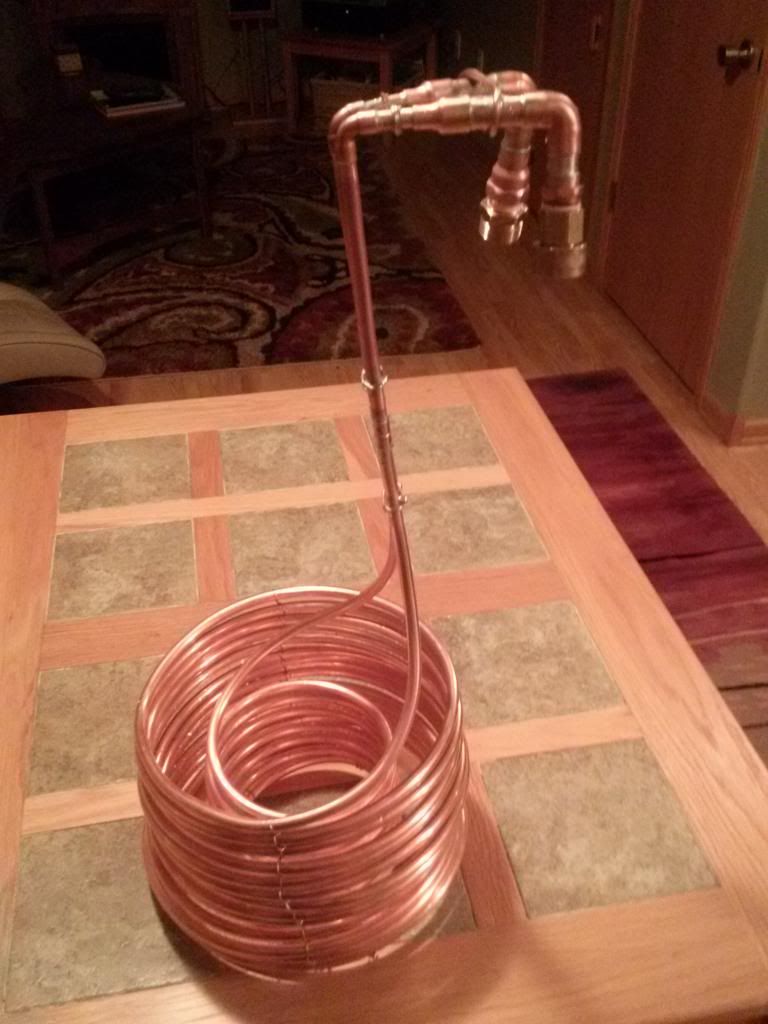
I just got into the home brewing recently... but im nuts about trying to improve the process...

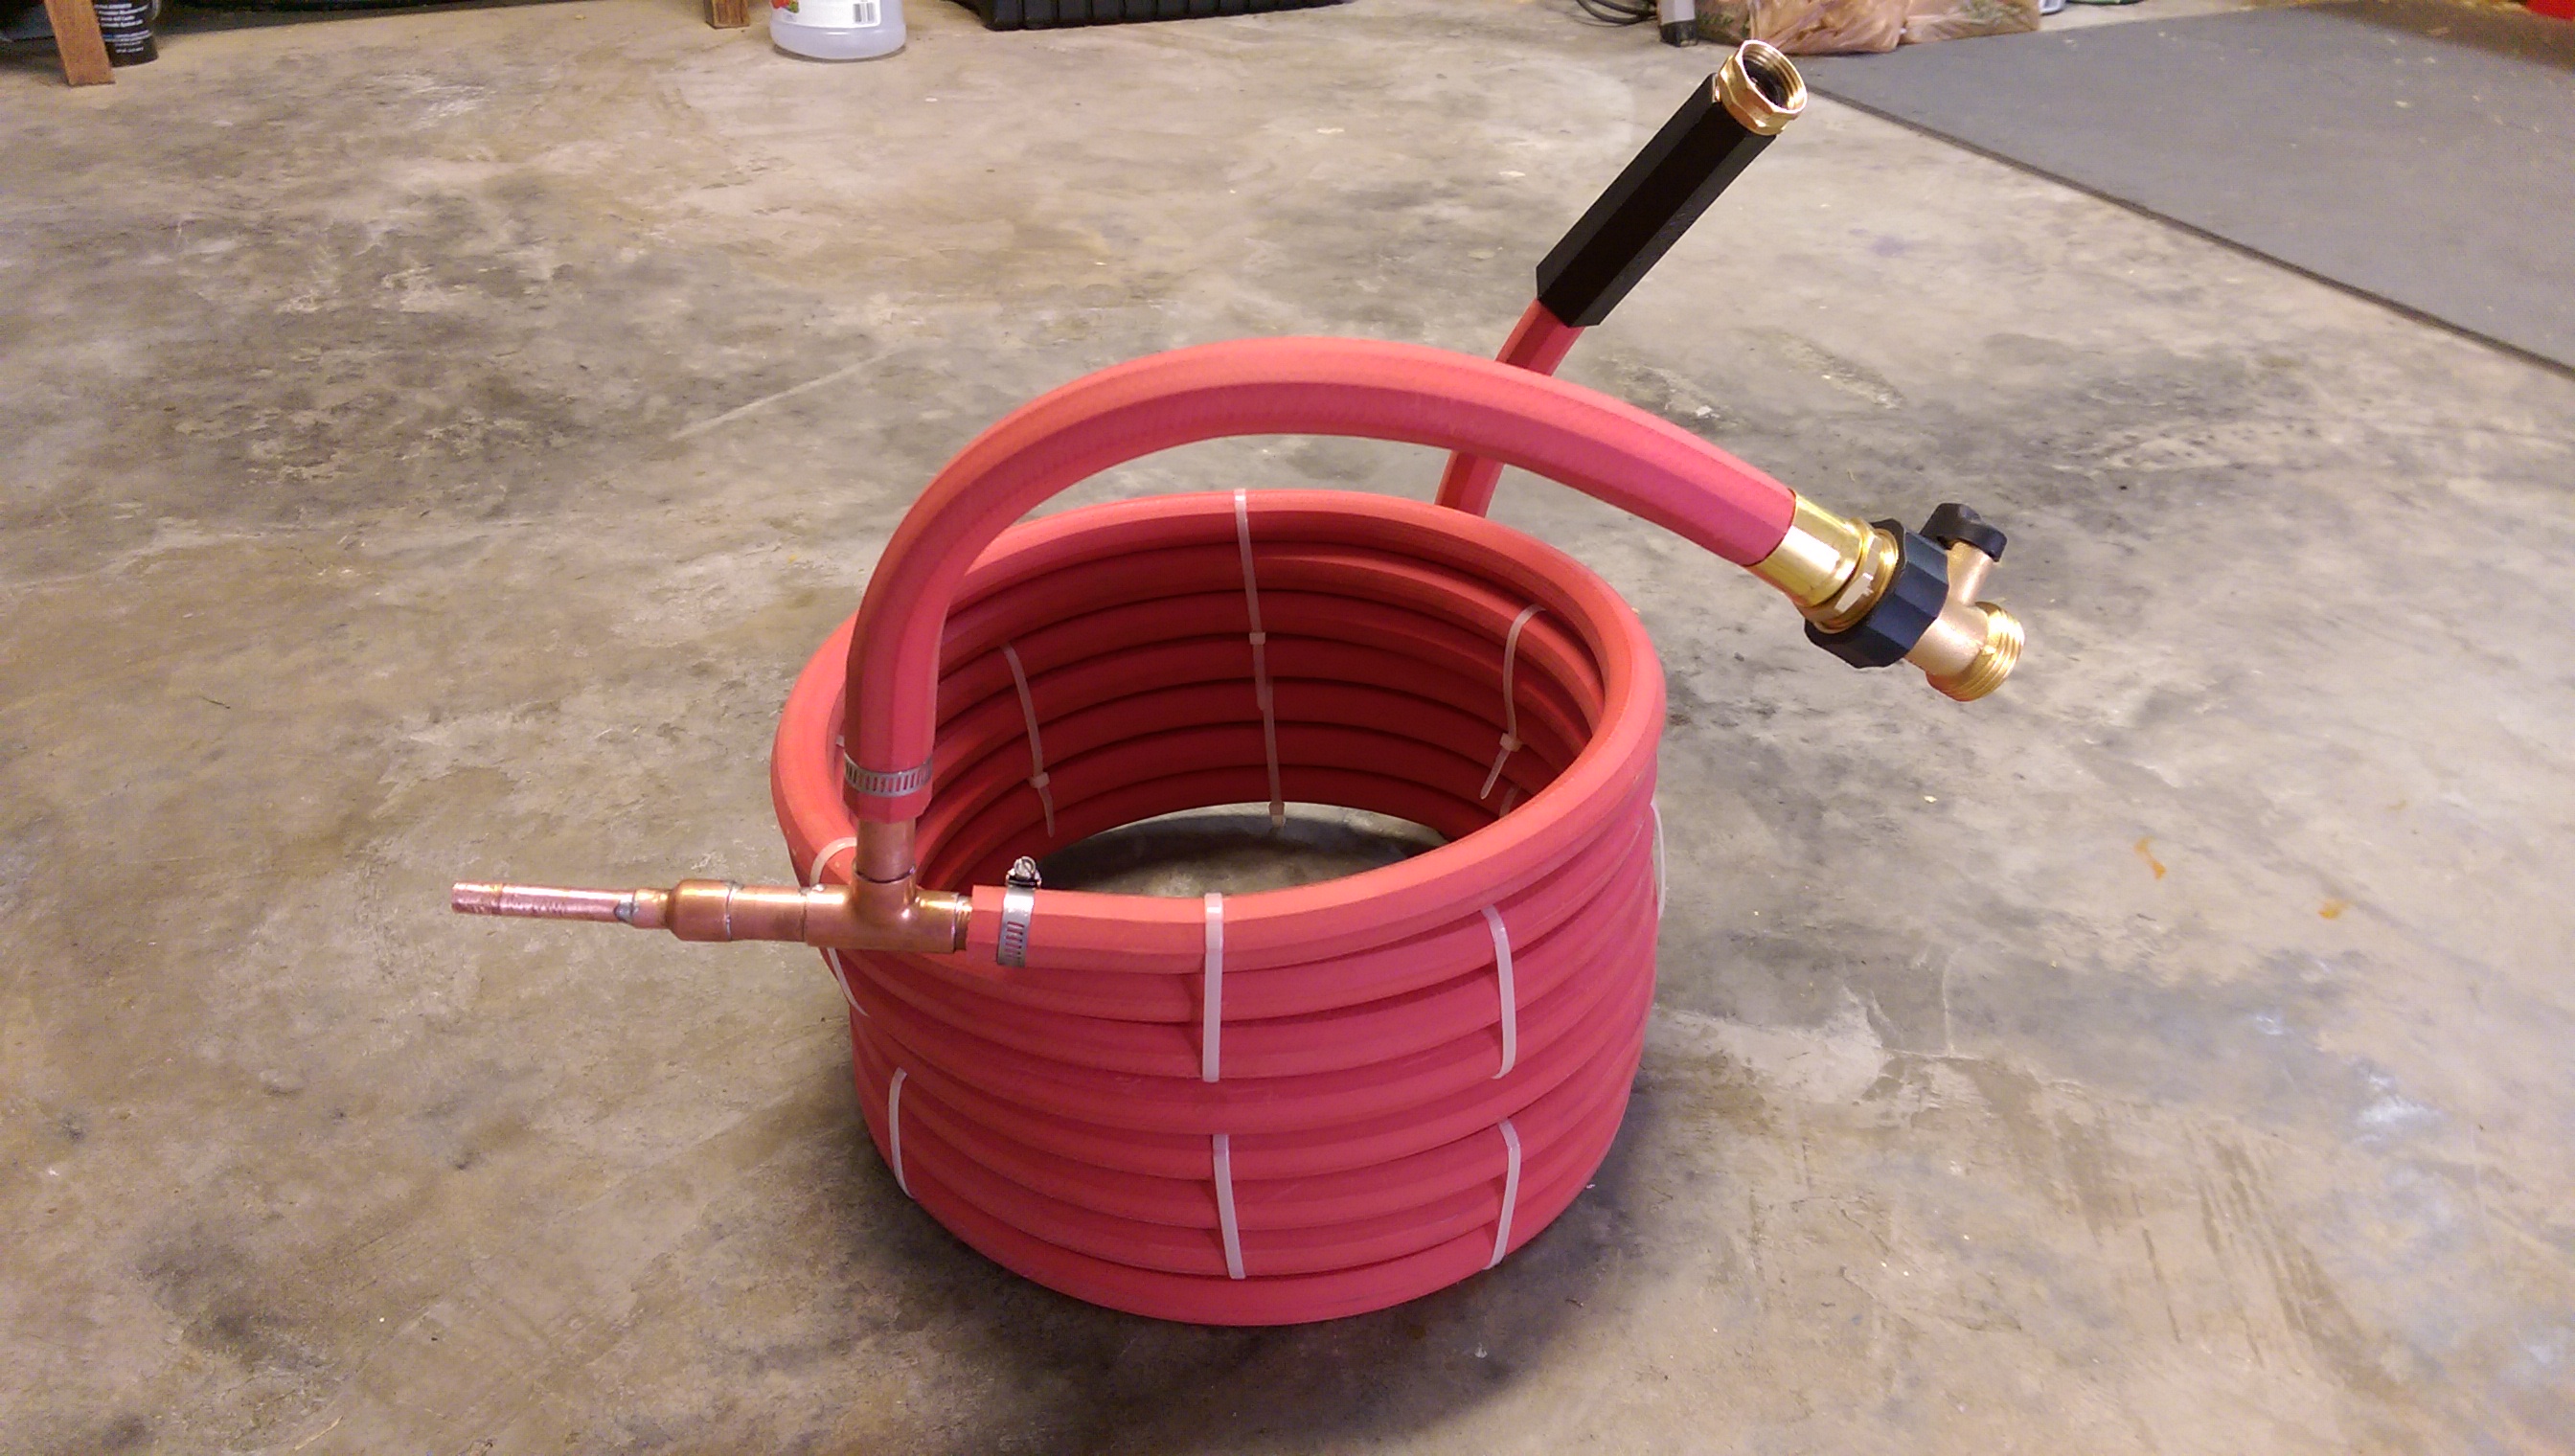
Here is the wort chiller i just built, as you can tell im neither a plumber or an engineer...

img_20140820_172108-63668.jpg


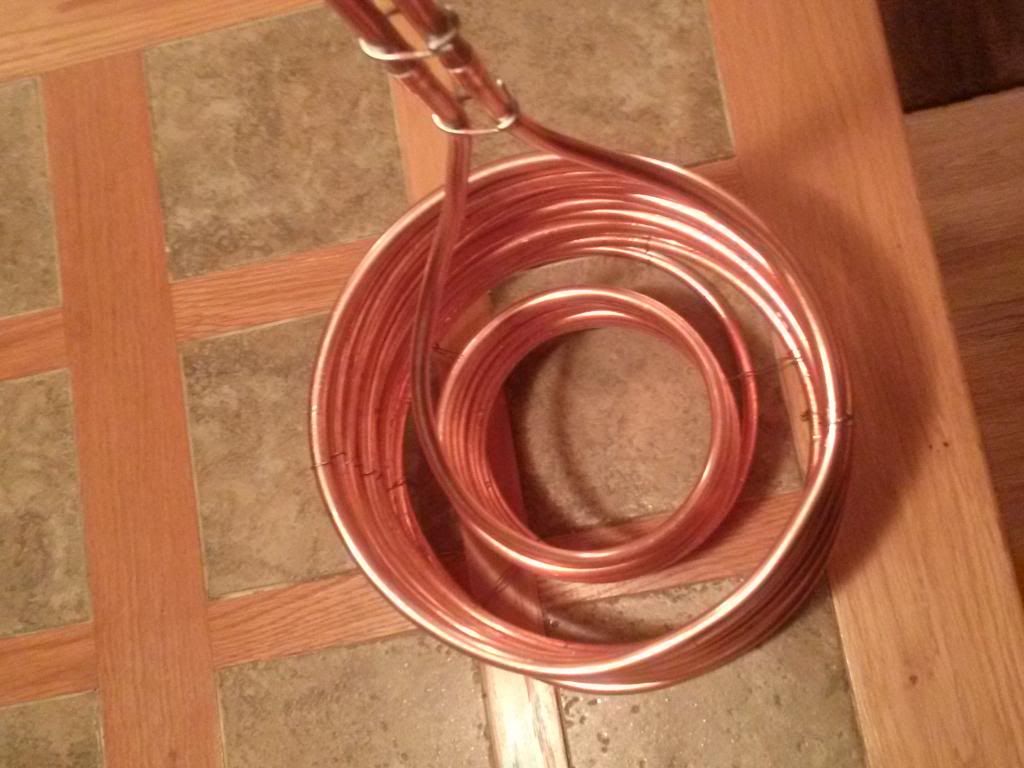
its 5 x 10ft of 1/4" copper tubing connecting to 3/8" pipe as feed and collector...

with tap water at about 68F it took about 7 minutes to hit 77F with a half batch boil.

next batch i did with it was the next size pot i was able to get my hands on without spending money... which turned out to be a 60 quart pot... so i did a double batch boil. chiller still did a fantastic job... cooled the wort in about 15 minutes with a lot of stirring and an awkward fit on a much larger pot.

i left some space on top of the 3/8" pipes and im thinking of adding another coild or two of 1/4" to allow for more surface area and water flow.

actually planning on doing a kind of step by step with all the ideas and mistakes as a guide or inspiration source for someone who can do it better... or even possibly to save someone the trouble and just do a single coil.

the output hose might be restricting flow, i'd take it off and use a normal hose and see if it cuts down times at all.
 
50', 1/4" ID, not pictured are brass compression fittings, 90° turns, garden hose in and hose barb out.

Went with a kind of hybrid ribcage design – I liked how the ribcage keeps the coils from touching each other and thus "wasting" surface area, but wanted to preserve the crude counterflow feature (coolest water against coolest wort at the bottom of the chiller/kettle) of a single coil. Might be overthinking it a bit, but I get down to 75° in fifteen minutes without a pre-chiller, so, I'll take it!

wort chiller.jpg
 
the output hose might be restricting flow, i'd take it off and use a normal hose and see if it cuts down times at all.

actually... the output is all 3/4" including the hose....
its the input that is 1/2" washing machine hose.... but thats what the plumbing in the garage is so a bigger input pipe was not going to improve much.
 
50', 1/4" ID, not pictured are brass compression fittings, 90° turns, garden hose in and hose barb out.

Went with a kind of hybrid ribcage design – I liked how the ribcage keeps the coils from touching each other and thus "wasting" surface area, but wanted to preserve the crude counterflow feature (coolest water against coolest wort at the bottom of the chiller/kettle) of a single coil. Might be overthinking it a bit, but I get down to 75° in fifteen minutes without a pre-chiller, so, I'll take it!
If this was a cake id eat it...sweetness .well done.
 
Just finished up my 20' counterflow chiller using the standard design found multiple places on the forum. I did, however, make a slight alteration to eliminate any possible contamination issues at the wort output. I actually built the whole thing and then remade the T fittings because I don't trust my sweating abilities! I used the 1/2"-->1/4" reducer and brought my inner copper tubing out an extra couple inches. I then sweated barbs onto the ends of the 3/8" copper tubing so that the wort entrance and exits are nowhere near any un-sanitized tap water.

20150314_094246.jpg

20150314_094254.jpg
 
Figure for my first try it came out pretty decent. 50+ feet of 1/2" L soft copper with a few rigid pieces on the end to give it stability. Wrapped with copper wire to keep it together.
Coils are 15 inches high, the top of the copper goes up to 23 inches and its 12 inches in diameter, so I think it'll work well with my 10 gallon pot.

11051163_808801682526054_1628027234_n.jpg


11072465_808801685859387_1862783668_n.jpg


11056906_808801692526053_1313283274_n.jpg
 
My Cleanable counter flow chiller. The ends of the 1/2" copper get connected with 12" pieces of 1/2" silicone tubing. Pop the tubes off and you can see and clean the tubes. I just built it and haven't used it to brew yet but I just tested it with 12 gallons of boiling water. I recirculated it back into the boil kettle through a whirlpool arm to cool the full 12 gallons and it chilled from boiling to 140 in 4 minutes and chilled the complete 12 gallons in the kettle to 65 degrees in 14 minutes. This means the hot and cold break will be skittle in the middle of the kettle and not in my carboys.
View attachment ImageUploadedByHome Brew1426557417.387690.jpgView attachment ImageUploadedByHome Brew1426557436.254543.jpgView attachment ImageUploadedByHome Brew1426557467.921986.jpgView attachment ImageUploadedByHome Brew1426557489.223378.jpg
 
WOW! There are some amazing immersion chiller builds out there!

I just made a simple one, for a simple mind!

I had an extra bilge pump from my boat, 12 VDC, found a AC adapter on sale to run it from the house outlet, and plumbed it in to my immersion cooler. The cooler is 25' ofd 3/8 copper. I can hook a garden hose up or hook the pump up. I use a rubbermade tote full of ice water to get the wort down to 70 real fast.

Wort_cooler.jpg
 
Here is a few pictures of how I made my chiller. It was really easy :)
It's only 5 meter (16 feet) 12mm, but I don't need more than that.
It chills 15 liters from boil to 18 celsius in under 10 min.

DSC_0136.jpg


DSC_0137.jpg


DSC_0138.jpg


DSC_0140.jpg


DSC_0141.jpg


DSC_0180.jpg
 
Here is mine. Taking my time with it. It is a tube/shell style heat exchanger made from 304 stainless. The wort will flow through the tubes and the chilling water will flow through the shell. The shell is not installed in photos below, and I still have a few tubes to install.

Original design was 57x12" long tubes of 3/16" OD in a 3" shell. The tubes are 11.875. I have 7 baffles to cause turbulence. On each end there will be a sanitary fitting and cap (with wort passage) fit with gasket and triclamp so I can remove the core for cleaning.

The design was simulated to cool 212F wort to 92 with 45F water (from my prechiller) first pass, and since I recirculate through the brew kettle to whirlpool, I should be able to get the wort down fast with this device.. <crosses fingers>

halfcomplete.jpg


almost_complete.jpg

Impressive! What's your plan for the plenum for the wort? And sealing the tube etc.
 
So I am in the Army and I was cleaning out a old connex or storage and found this R2D2 looking cooling bot that was on top of a 10 gal water igloo. So of course I took the igloo and took apart the Top piece and found this! all copper with some aluminum fins! So my plan is to run the hot wert into one side and out the other to the fermenter, all while in a ice chest. Any thoughts? I did a test hit about a week ago with 150 degree hot water and it went from 150 to 80-84 at the end. If any one is using something like this please share. thoughts?

IMG_3140.jpg


IMG_3139.jpg
 
So I am in the Army and I was cleaning out a old connex or storage and found this R2D2 looking cooling bot that was on top of a 10 gal water igloo. So of course I took the igloo and took apart the Top piece and found this! all copper with some aluminum fins! So my plan is to run the hot wert into one side and out the other to the fermenter, all while in a ice chest. Any thoughts? I did a test hit about a week ago with 150 degree hot water and it went from 150 to 80-84 at the end. If any one is using something like this please share. thoughts?

Looks like it has great potential, I don't see why it wouldn't work well. My main concern is what type of potentially hazardous chemical was that used for originally? You don't really have a good way to know if there are any deposits or sediments from whatever use to be in there, and you probably don't want them touching your beer. Unless of course you can disassemble everything and mechanically clean every bit of tubing.
 
This is mine:
attachment.php


That being said, I'm installing a ZChiller counterflow chiller in my BIAB stand to minimize equipment/plumbing changes.
 

Latest posts

Back
Top