You are using an out of date browser. It may not display this or other websites correctly.
You should upgrade or use an alternative browser.
You should upgrade or use an alternative browser.
Show Me Your Wood Brew Sculpture/Rig
- Thread starter twst1up
- Start date

Help Support Homebrew Talk:
This site may earn a commission from merchant affiliate
links, including eBay, Amazon, and others.
Sorry about the "little upgrade" comment. I didn't mean to say this was a little upgrade, what I meant was that all I wanted was a little upgrade but after looking at many different builds I ended up going overboard and building this. The HLT and BK are gas and the MLT is rims. I tried to keep everything very neat and contained inside the cabinet. The connectors on the side are to the CFC which is mounted underneath as you can see in one of the pictures. I used garden hose quick connects from lowes. One port is water in, one is water out and the third is the cooled wort.
Shutupjojo, Hood looks very nice. What type of lighting are you using inside the hood and how are they holding up to the moisture? Happy New Year, Castermmt

Rcole
Well-Known Member
bd2xu said:Brew day two on my first all grain system. Northern brewers Irish red ale.
Your setup looks good.


$33.99 ($17.00 / Count)
$41.99 ($21.00 / Count)
2 Pack 1 Gallon Large Fermentation Jars with 3 Airlocks and 2 SCREW Lids(100% Airtight Heavy Duty Lid w Silicone) - Wide Mouth Glass Jars w Scale Mark - Pickle Jars for Sauerkraut, Sourdough Starter
Qianfenie Direct


$58.16
HUIZHUGS Brewing Equipment Keg Ball Lock Faucet 30cm Reinforced Silicone Hose Secondary Fermentation Homebrew Kegging Brewing Equipment
xiangshuizhenzhanglingfengshop


$20.94
$29.99
The Brew Your Own Big Book of Clone Recipes: Featuring 300 Homebrew Recipes from Your Favorite Breweries
Amazon.com
![Craft A Brew - Safale S-04 Dry Yeast - Fermentis - English Ale Dry Yeast - For English and American Ales and Hard Apple Ciders - Ingredients for Home Brewing - Beer Making Supplies - [1 Pack]](https://m.media-amazon.com/images/I/41fVGNh6JfL._SL500_.jpg)
$6.95 ($17.38 / Ounce)
$7.47 ($18.68 / Ounce)
Craft A Brew - Safale S-04 Dry Yeast - Fermentis - English Ale Dry Yeast - For English and American Ales and Hard Apple Ciders - Ingredients for Home Brewing - Beer Making Supplies - [1 Pack]
Hobby Homebrew


$22.00 ($623.23 / Ounce)
AMZLMPKNTW Ball Lock Sample Faucet 30cm Reinforced Silicone Hose Secondary Fermentation Homebrew Kegging joyful
无为中南商贸有限公司


$176.97
1pc Commercial Keg Manifold 2" Tri Clamp,Ball Lock Tapping Head,Pressure Gauge/Adjustable PRV for Kegging,Fermentation Control
hanhanbaihuoxiaoshoudian


$53.24
1pc Hose Barb/MFL 1.5" Tri Clamp to Ball Lock Post Liquid Gas Homebrew Kegging Fermentation Parts Brewer Hardware SUS304(Gas MFL)
Guangshui Weilu You Trading Co., Ltd


$53.24
1pc Hose Barb/MFL 1.5" Tri Clamp to Ball Lock Post Liquid Gas Homebrew Kegging Fermentation Parts Brewer Hardware SUS304(Liquid Hose Barb)
yunchengshiyanhuqucuichendianzishangwuyouxiangongsi

$39.22 ($39.22 / Count)
Brewer's Best Home Brew Beer Ingredient Kit - 5 Gallon (Mexican Cerveza)
Amazon.com


$10.99 ($31.16 / Ounce)
Hornindal Kveik Yeast for Homebrewing - Mead, Cider, Wine, Beer - 10g Packet - Saccharomyces Cerevisiae - Sold by Shadowhive.com
Shadowhive


$7.79 ($7.79 / Count)
Craft A Brew - LalBrew Voss™ - Kveik Ale Yeast - For Craft Lagers - Ingredients for Home Brewing - Beer Making Supplies - (1 Pack)
Craft a Brew

$479.00
$559.00
EdgeStar KC1000SS Craft Brew Kegerator for 1/6 Barrel and Cornelius Kegs
Amazon.com


Rcole said:Your setup looks good.
Btw for anyone using a Bayou Classic banjo (I have the KAB4) as is (vs just the burner mounted to a frame) With a Keggle, I HIGHLY recommend doing this mod: https://www.homebrewtalk.com/f51/modding-kab4-6-a-259864/. I did mine before this session and WOW. I barely cranked up the burner otherwise the flames were creeping out past the sides. Did not do a measurement on efficiency difference but I bet I used half the usual propane. And my sight glass did not boil like it has in the past. Definitely a worthwhile mod for anyone using this burner in floor standing mode, with a keggle.
Oldskooler
Supporting member
Wow, really nice rig. Home Run first at bat!
itzkramer said:My BIAB rig.
Hand crank.
2x2 tube steel with wood shelves.
Monster chiller. Did you make it or buy it? My 25' is not cutting it with a 10 gallon batch in the keggle.
I made it. Home depot only sells 50' or 60'. The 50' is $50.00. The 60' is $100.00!
I wanted at least 60' so I bought 2 50's and spliced them together with a compression fitting to make a 75'.
I used the leftovers to make a whirlpool section and 3 vertical supports tied on with copper wire.
If I did it again I would have soldered the tubing splice.
I wanted at least 60' so I bought 2 50's and spliced them together with a compression fitting to make a 75'.
I used the leftovers to make a whirlpool section and 3 vertical supports tied on with copper wire.
If I did it again I would have soldered the tubing splice.
Mischief_Brewing
Well-Known Member
After a few years working with the scrap wood tiered system, I finally was gifted some gift certificates for my local HB shop. I decided to pick up a pump and it was all downhill from there.
Now being the cheap b*sturd that I am, I decided to use the extra/scrap wood I had sitting around the garage. 2 days worth of work and below is my new single-tier system:
The heat shields are built out of old metal shelves that were in the attic when I bought the house. I did have to spend $2 on some L brackets to make sure the shelves stay upright, but the rest cost me nothing (other than the pump). I brewed a batch of Irish red 2 weeks ago and it performed flawlessly. I just have to coat it with some paint (for looks only) and figure where I want to secure the surge protector that serves as my pump switch.
rwagner23
Well-Known Member
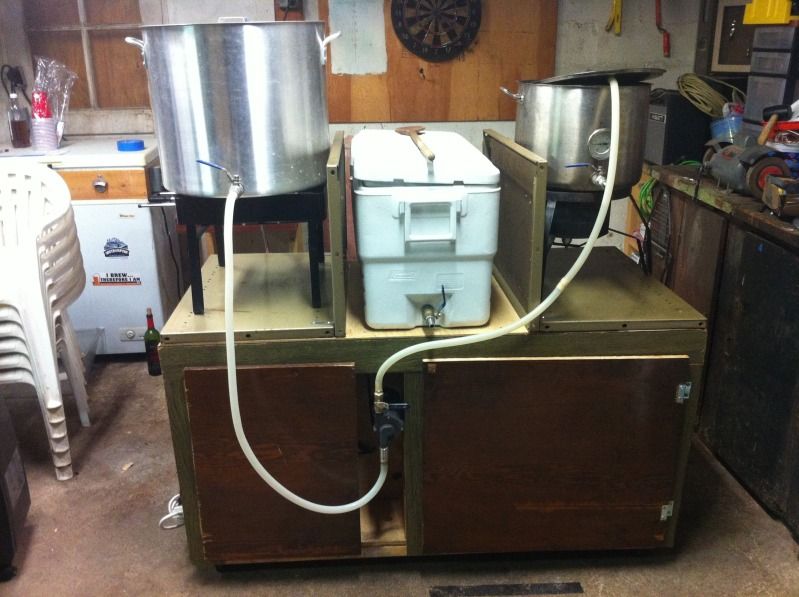
I built a modular system. For easy storage as well as being able to wheel the boil kettle over to my outlet so that I can drain beer from the garage to the basement.
All set up:
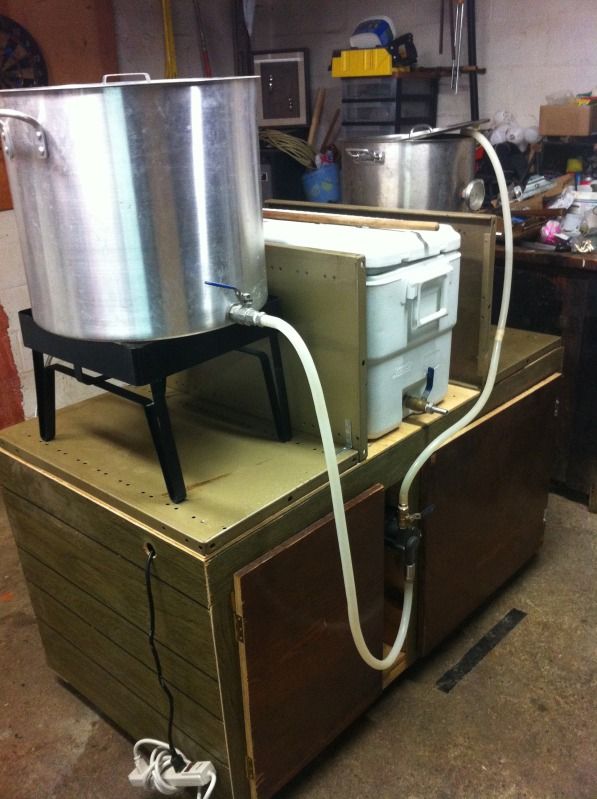
Nicely stored away:
All set up:
Nicely stored away:
rwagner23 said:I built a modular system. For easy storage as well as being able to wheel the boil kettle over to my outlet so that I can drain beer from the garage to the basement.
All set up:
Nicely stored away:
This looks a lot like my setup but is modular.
Drain the boil kettle from the garage to basement?! Brilliant! You have to post a pic of that! You should put an aerator inline so while the wort flows to the basement it is aerated on the way.
rwagner23
Well-Known Member
You should put an aerator inline so while the wort flows to the basement it is aerated on the way.
Challenge accepted!
Here is a potential setup for a poor man's electric build:

Step one: cut pallet in half
Step two: put kegs on pallet
Simple as that and I haven't seen this done. It seems like it would be a tight squeeze but nothing beats free
Step one: cut pallet in half
Step two: put kegs on pallet
Simple as that and I haven't seen this done. It seems like it would be a tight squeeze but nothing beats free
After a few years working with the scrap wood tiered system, I finally was gifted some gift certificates for my local HB shop. I decided to pick up a pump and it was all downhill from there.
Now being the cheap b*sturd that I am, I decided to use the extra/scrap wood I had sitting around the garage. 2 days worth of work and below is my new single-tier system:
Just out of curiosity, why do you have your pump running from the lauter tun to the boil kettle? I'm bored at work and for some odd reason, it's bugging me! I've gotta know!

jww9618
Well-Known Member
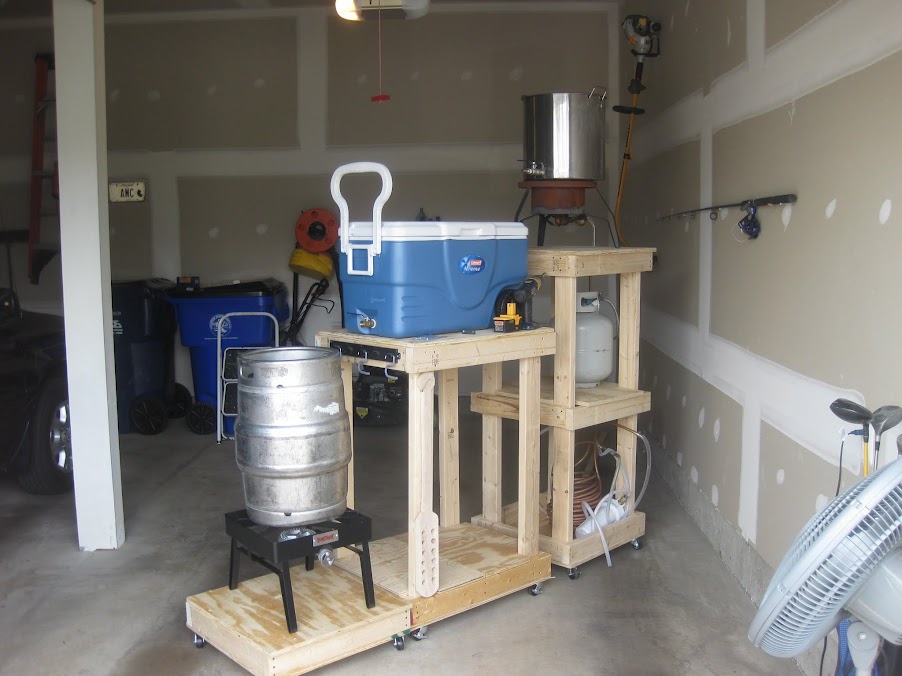
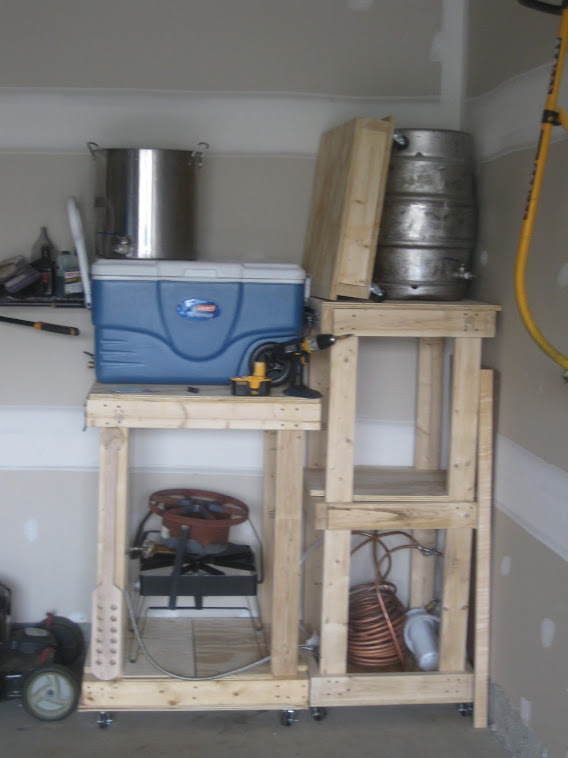
Here's mine.

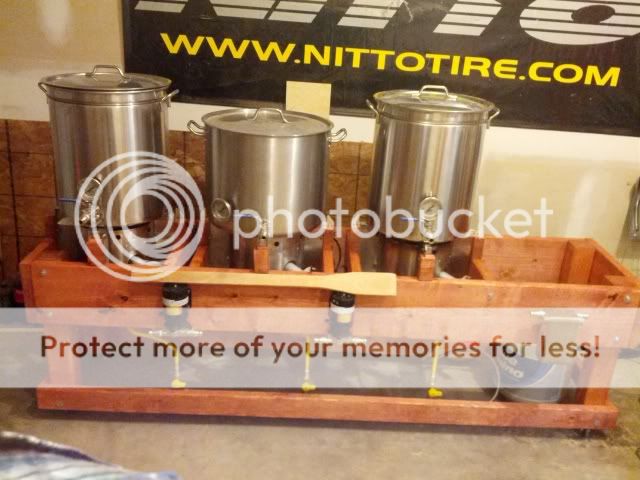
Well here's my first post to the forum. I've been brewing mead and beer kits for a few years and finally took the plunge to go all grain. My brothers and I built this and I did the measurements specific to my equipment, so the "all gravity" works great. Did my first batch last night and all went well til the water hose froze up during the last 15 min of boil so I had nothing to hook my chiller to. Nothing like hauling a huge pot of boiling hot wort up stairs thru the house!


Hey Jackle...
Dunno where you're at, but if it's cold enough to freeze your water line, just leave the pot out in the coooooold air to chill...snowbank works too! It's what I gotta do in northern Minnesota if I want to do a full boil. Hauling 5 Gals of HOT wort (40#) plus weight of the kettle = disaster waiting to happen!! I did it (hauled wort to kitchen in winter) a couple of times b4 deciding to use Mama Nature to chill in winter. MUCH easier on the back too.
Cheers!!
Well here's my first post to the forum. I've been brewing mead and beer kits for a few years and finally took the plunge to go all grain. My brothers and I built this and I did the measurements specific to my equipment, so the "all gravity" works great. Did my first batch last night and all went well til the water hose froze up during the last 15 min of boil so I had nothing to hook my chiller to. Nothing like hauling a huge pot of boiling hot wort up stairs thru the house!
View attachment 98276
Thanks for the advice and yes, my back is killing me. That was the whole point of the gravity system! I'm installing a faucet off my hot water heater in the garage before my next batch, should make cleanup and everything else easy too.
Gitmoe
Well-Known Member
Here's the wooden single tier I'm building. It's almost done in this pic. Need to finish the work table part on the end and plumb the water and electric still. Just haven't had time to finish...
Gitmoe said:Here's the wooden single tier I'm building. It's almost done in this pic. Need to finish the work table part on the end and plumb the water and electric still. Just haven't had time to finish...
Quick question on plate chillers, I see you have one mounted. Do you pump from boil kettle through the chiller and straight into your fermenter or do you recirculate the wort the through the chiller back into the kettle until the temp drops enough? One pas through the chiller or multiple? Depends on the water temp I guess?
Gitmoe
Well-Known Member
Quick question on plate chillers, I see you have one mounted. Do you pump from boil kettle through the chiller and straight into your fermenter or do you recirculate the wort the through the chiller back into the kettle until the temp drops enough? One pas through the chiller or multiple? Depends on the water temp I guess?
I'm adding a recirculation/whirlpool port on the boil kettle. The wort will be pumped through the chiller and back into the boil kettle until the temperature is dropped far enough. Honestly I haven't used that Therminator yet to pass on first hand experience. I was previously using an immersion chiller in my old setup. I've seen people on youtube pass through the Therminator once and drop the temp to around 60 degrees with cold enough counterflow water. It's a beast of a chiller.
Gitmoe said:I'm adding a recirculation/whirlpool port on the boil kettle. The wort will be pumped through the chiller and back into the boil kettle until the temperature is dropped far enough. Honestly I haven't used that Therminator yet to pass on first hand experience. I was previously using an immersion chiller in my old setup. I've seen people on youtube pass through the Therminator once and drop the temp to around 60 degrees with cold enough counterflow water. It's a beast of a chiller.
Yeah I've heard great things about the Shirron one in particular but they all seem to be a step up from immersion. I am using a keggle right now and trying to decide the best way to whirlpool and transfer. Right now I have a dip tube in the middle that drains it all no problem but all the break and hops go too. I've been moving to secondary after a week... Not to open another topic...
rangrr4834
Active Member

brew2enjoy
Well-Known Member
Very nice! 4x4's and lag bolts? you could park a car on that thing!
Hey, ours are pretty similar! Question, do you have some sort of heat barrier b/t the bottom brew kettle and post for the mash tun? I've only brewed one batch and did my boil on the garage floor b/c I didn't want to torch the front legs. Thinking of getting some stainless steel sheets.
rangrr4834
Active Member
Hey, ours are pretty similar! Question, do you have some sort of heat barrier b/t the bottom brew kettle and post for the mash tun? I've only brewed one batch and did my boil on the garage floor b/c I didn't want to torch the front legs. Thinking of getting some stainless steel sheets.
I did eventually wind up putting a thin layer of cement board (durock) against the lower tier (and also the top tier as a precaution) just as a safeguard to prevent the same issue you are concerned about. However, I will state that my sculpture (as built) did not have any evidence of charring, burns, or anything that would lead me to worry about a fire except the fact that I had a burner lower that wood that was nearby. The durock and screws were fairly cheap so it wasn't a big deal and gave me piece of mind. I have since plumbed the whole sculpture for propane and also filtered water to help with ease when brewing.
Oldskooler
Supporting member
Very nice just what I'm looking for thanks.
Similar threads
- Replies
- 7
- Views
- 2K
- Replies
- 13
- Views
- 4K
