You are using an out of date browser. It may not display this or other websites correctly.
You should upgrade or use an alternative browser.
You should upgrade or use an alternative browser.
Show Me Your Wood Brew Sculpture/Rig
- Thread starter twst1up
- Start date

Help Support Homebrew Talk:
This site may earn a commission from merchant affiliate
links, including eBay, Amazon, and others.

VanHorneDog
Well-Known Member
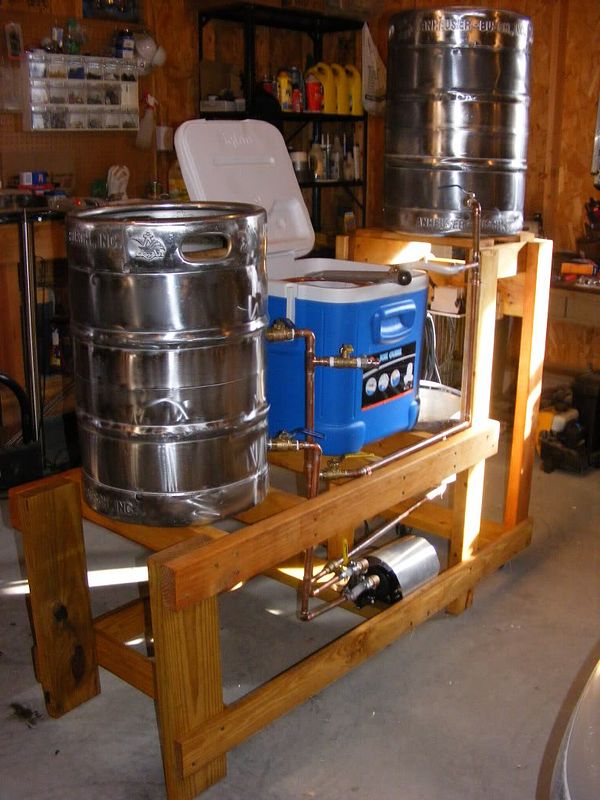
The burner goes right at the end of the rig, turkey fryer. $10 in wood, turned brew day into a much more enjoyable and easier affair.

Lucky_Chicken
Well-Known Member
just got done building mine... water test and brew today/ tomorrow
BrokenDog
Well-Known Member
Following this thread for reference later.
Bubba70
New Member
Wooden Herms


Single Tier HERMS that I finished last summer. Makes life so much easier and after spending that much time/money I make sure it gets plenty of use. There is no way I could have done it without this site.


$176.97
1pc Commercial Keg Manifold 2" Tri Clamp,Ball Lock Tapping Head,Pressure Gauge/Adjustable PRV for Kegging,Fermentation Control
hanhanbaihuoxiaoshoudian


$53.24
1pc Hose Barb/MFL 1.5" Tri Clamp to Ball Lock Post Liquid Gas Homebrew Kegging Fermentation Parts Brewer Hardware SUS304(Liquid Hose Barb)
yunchengshiyanhuqucuichendianzishangwuyouxiangongsi


$22.00 ($623.23 / Ounce)
AMZLMPKNTW Ball Lock Sample Faucet 30cm Reinforced Silicone Hose Secondary Fermentation Homebrew Kegging joyful
无为中南商贸有限公司


$53.24
1pc Hose Barb/MFL 1.5" Tri Clamp to Ball Lock Post Liquid Gas Homebrew Kegging Fermentation Parts Brewer Hardware SUS304(Liquid Hose Barb)
Guangshui Weilu You Trading Co., Ltd


$58.16
HUIZHUGS Brewing Equipment Keg Ball Lock Faucet 30cm Reinforced Silicone Hose Secondary Fermentation Homebrew Kegging Brewing Equipment
xiangshuizhenzhanglingfengshop


$27.29 ($13.64 / Count)
$41.99 ($21.00 / Count)
2 Pack 1 Gallon Large Fermentation Jars with 3 Airlocks and 2 SCREW Lids(100% Airtight Heavy Duty Lid w Silicone) - Wide Mouth Glass Jars w Scale Mark - Pickle Jars for Sauerkraut, Sourdough Starter
Qianfenie Direct


$39.22 ($39.22 / Count)
Brewer's Best Home Brew Beer Ingredient Kit - 5 Gallon (Mexican Cerveza)
Amazon.com

$33.95
Five Star - 6022b_ - Star San - 32 Ounce - High Foaming Sanitizer
Bridgeview Beer and Wine Supply


![Craft A Brew - Safale S-04 Dry Yeast - Fermentis - English Ale Dry Yeast - For English and American Ales and Hard Apple Ciders - Ingredients for Home Brewing - Beer Making Supplies - [1 Pack]](https://m.media-amazon.com/images/I/41fVGNh6JfL._SL500_.jpg)
$6.95 ($17.38 / Ounce)
$7.47 ($18.68 / Ounce)
Craft A Brew - Safale S-04 Dry Yeast - Fermentis - English Ale Dry Yeast - For English and American Ales and Hard Apple Ciders - Ingredients for Home Brewing - Beer Making Supplies - [1 Pack]
Hobby Homebrew


$7.79 ($7.79 / Count)
Craft A Brew - LalBrew Voss™ - Kveik Ale Yeast - For Craft Lagers - Ingredients for Home Brewing - Beer Making Supplies - (1 Pack)
Craft a Brew


$20.94
$29.99
The Brew Your Own Big Book of Clone Recipes: Featuring 300 Homebrew Recipes from Your Favorite Breweries
Amazon.com

$10.99 ($31.16 / Ounce)
Hornindal Kveik Yeast for Homebrewing - Mead, Cider, Wine, Beer - 10g Packet - Saccharomyces Cerevisiae - Sold by Shadowhive.com
Shadowhive


CourtHouseBrewing
Well-Known Member
Wooden Herms
Hey Bubba70;
I like this a lot. The tile top is what I've been thinking about using for clean ability and heat shielding. It also makes it look nice for not a lot of money. I also think its great the way the kegs store in the shaped racks below. I would think the lose hoses and bobbles and bits would store in the kegs. I would think a plastic cover over the whole rig would keep the dust and dirt out till brew day.
:rockin:
I think that I've gone through this entire thread about 4 times now. Mine seems totally lame! The joy of mine is how easy it collapses and how simple it is. Where mine falls short is how simple it is. The plastic horses were cheap and have 2x4 slots, which I used to create a the table top for. All of the wood was extra. This is a very beginner setup which I plan to replace in a few years ... I like what I see here!

Just used my new woody for the first time yesterday, its not quite done as I'm waiting to add the blichmann tower of power to automate the mash temp if it ever gets done. And have to wire the pumps to a more permanent solution as well.

uncle_jimbo
Active Member
Got a ton of ideas from this thread and finished mine a couple months ago.
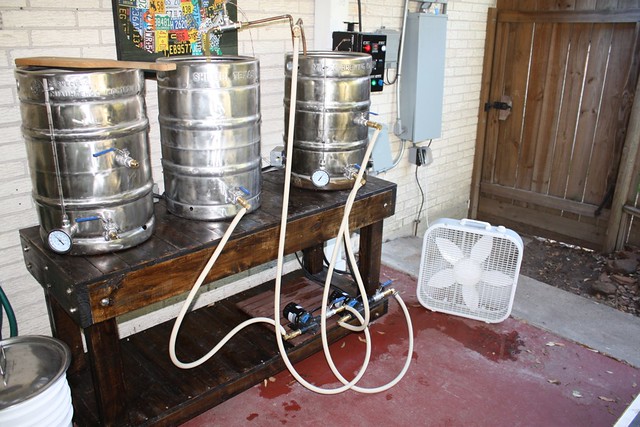
I'm only doing 5 gallon batches now and I'm batch sparging, but I left room in my build to add a 2nd burner on the top left above the mash tun and enough space to fit a full keg or a much larger brew kettle on top of the right side burner.
My landlord had a few extra ceramic kitchen tiles in the garage that fit perfectly in the spots below my burner and between the burner and the vertical posts. I don't know if they are helping with heat or not, but I figure it didn't hurt. I was actually somewhat worried about the glass sliding door right behind the burner, but I don't know anything about heat conduction. I've brewed 2 batches and it hasn't seemed to be putting off that much heat.
Rcole
Well-Known Member
uncle_jimbo said:Got a ton of ideas from this thread and finished mine a couple months ago.
Looks like a great setup.


Rcole
Well-Known Member
Wood rules!!!

It ain't much, but I finally built myself a brew cart. It is "upholstered" with a fire resistant tarp that I had stuffed in the shed. I have a few things left to do, but it came together just like I wanted it to.
soundsign
New Member
Here's mine. Still need to add a pump, but it works great.

BigJim_inFLA
Well-Known Member
Just finished building this. It will hold a 3 vessel electric HERMs setup shortly.

harten74 said:Thanks gents. I used Google Sketch Up to design it and I'd be happy to share those plans with anyone that is interested.
http://dl.dropbox.com/u/7265982/Restoration%20Brewing/Plans/BrewRig.skp
Updated link on 05/10/12
Hmmm...This link doesn't seem to go anywhere. Looks like it was updated recently though...Any assistance? I love the design and am looking forward to building something similar if not the same. Thats right I wanna bite it! =)
OneHoppyGuy
Well-Known Member
It's a Google Sketch Up file. You have to download it and Google Sketch Up to view it.
OneHoppyGuy said:It's a Google Sketch Up file. You have to download it and Google Sketch Up to view it.
Wow...How did I not pick up on that? Thanks. I'll have to download it and check it out.
OneHoppyGuy
Well-Known Member
Wow...How did I not pick up on that? Thanks. I'll have to download it and check it out.
the file extension: '.skp'
benbradford
Well-Known Member
Here is mine... Gotta add a control panel at some point, but it is pretty much finished ")

wilserbrewer
BIAB Expert Tailor
Sweet work benbradford! That middle thermo looks a tad small
benbradford
Well-Known Member
Ya, I got it for $2 and even debated about putting it on... I had a 3 inch dial thermo on it originally, and only a 4" probe, and it never even kept a close temp for mashing. This is closer to a 6" probe and in the middle of the tank, so I hope it is more accurate Going digital soon anyway i guess, but I like the way they look
Going digital soon anyway i guess, but I like the way they look Indytruks138
Well-Known Member
Here is mine... Gotta add a control panel at some point, but it is pretty much finished
This is one sexy beast of a brew stand. Cheers brother.
OneHoppyGuy
Well-Known Member
I usually don't care for wood brew systems but this is one very nice looking unit. Almost a piece of furniture. Well Done!
blaster_54738
Well-Known Member
My rig I just finished. About $40 in lumber and hardware. The support arms come off and the tiers fold down, then the bottom comes off for easy storage.
blaster_54738 said:My rig I just finished. About $40 in lumber and hardware. The support arms come off and the tiers fold down, then the bottom comes off for easy storage.
Nice setup...do you have plans or materials list? I like the idea of folding it up to store when not using it. Space is at a premium in the garage!

Similar threads
- Replies
- 7
- Views
- 2K
- Replies
- 13
- Views
- 4K

Latest posts
-
-
 Factors affecting Water Chemistry Calculations (Oh no, not again!)
- Latest: BrewnWKopperKat
-

-

-
-
-