• Please visit and share your knowledge at our sister communities:
  • If you have not, please join our official Homebrewing Facebook Group!

    Homebrewing Facebook Group

Show Me Your Wood Brew Sculpture/Rig

Homebrew Talk

Help Support Homebrew Talk:

This site may earn a commission from merchant affiliate links, including eBay, Amazon, and others.
This is a great setup. Is that a room in your house or a basement or something? Looks like a converted wine cellar. Very cool!
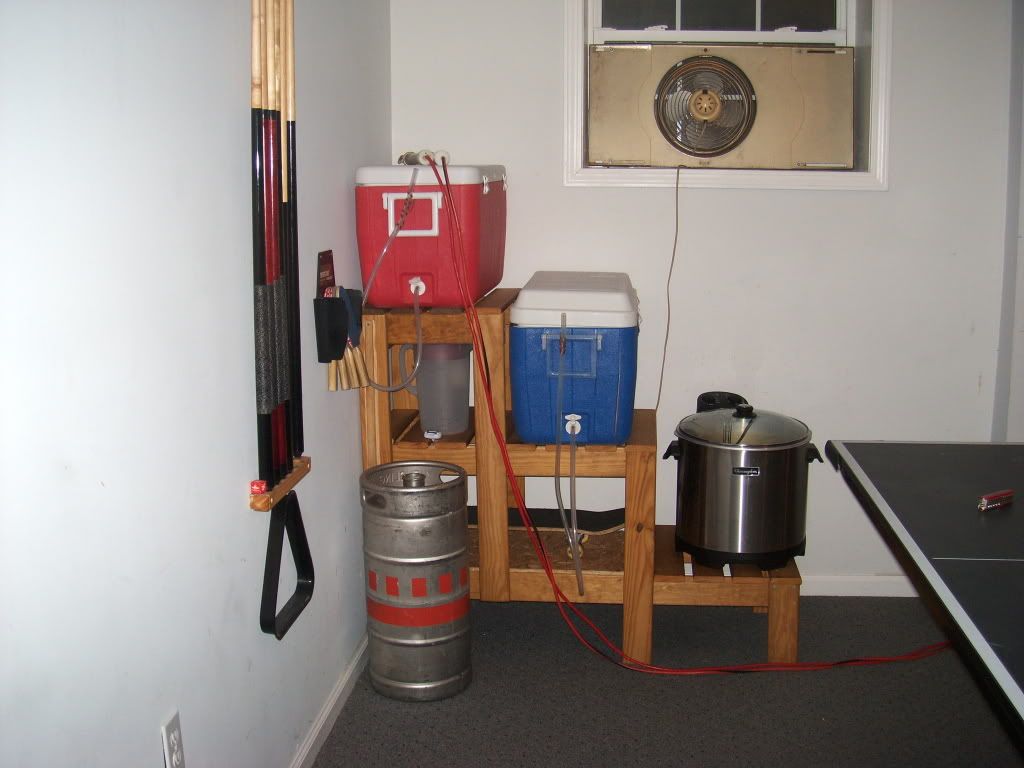
Yup! In the basement. It's a cold room that located under the front steps of the house. Separate and insulated.

I built a wine rack in half of it, the other half is the brewery. It's a bit tight but brewering is only done about once a month or so.

Kal
 
i plan on building a simple gravity rig for batch sparging. as of now i have to sit my cooler, hlt etc. on whatever in the garage, thought it would be nice to have a decated rig for it. Has anyone built one like this?

http://hbd.org/discus/messages/366/33903.html

its the pic that says my old brewery at the top. all the ones i saw on this post were different and long. this will save me space my only concern is the heat off the burner for the boil pot.
 
my only concern is the heat off the burner for the boil pot.

use some flashing or concrete board to make yourself some heat shields.

As soon as it starts to warm up I'll be able to get back to my garage and get mine together
 
If you insist I suppose I will toot my own horn a bit...

Mash tun:
IMG_0973.jpg

IMG_0972.jpg


Water filtration and distribution:
IMG_0963.jpg


HLT temp controller:
IMG_0950.jpg

What are the details with that temp controller? Is it hard to dial in and maintain a temp?
 
I am bribing SWMBO to let me store it indoors, which was my plan all along. Sort of a conversation piece, when it isnt pumping out IPAs and Lagers.

FWIW, I now just leave my ghetto rig out in the open in my pool/game room (finished basement). It has a real post-modern white-trash engineered feel to it ;)
 
FWIW, I now just leave my ghetto rig out in the open in my pool/game room (finished basement). It has a real post-modern white-trash engineered feel to it ;)

Yah, my wife wouldnt let me play with her fake ****ies (when she gets them finally!) if I did that bro.
 
Here's the one I threw together this weekend for $50. Burners are screwed to wood, should be getting another bayou burner to replace the old turkey burner soon.

Brewed our first Creme ale in it last night.

Brew session went very smooth!!

2brew-med.jpg
 
Built this yesterday. Fits perfectly and I can still fit two cars in the garage:
IMG_03342.JPG


Not sure if I'll need any shielding to prevent the cooler from melting. I was thinking about picking up some cement backer board if the cooler gets too hot.
 
Nice job! I was thinking about building one just like this, with a couple tweaks. I'd definitely recommend some cement board and/or metal flashing just in case. Better to be safe than burn your brew rig to ashes.
 
Nice job! I was thinking about building one just like this, with a couple tweaks. I'd definitely recommend some cement board and/or metal flashing just in case. Better to be safe than burn your brew rig to ashes.

Thanks. Still have need to put together my "control panel" (you can see the home depot bag with parts). It will basically be a junction box with two plugs and two switches so I don't have to pull the plug on my pump and heat stick to turn them off. Not sure where I'm going to mount it though.
 
I have been thinking of spraying mine with black grill spray paint. Says it is good for 2000 degrees, I would think it would have to offer some fire retardant value to it.

During the first 5 hour brew session, the wood hardly warmed up.
 
Built this yesterday. Fits perfectly and I can still fit two cars in the garage:
IMG_03342.JPG


Not sure if I'll need any shielding to prevent the cooler from melting. I was thinking about picking up some cement backer board if the cooler gets too hot.

do you have a pumping system? if not, you will need to elevate the units.
 
That'd be what the pump is there in front with the inlet and outlet pointing up and down :p

oh, it isn't that clear in the picture. is it really worth it to have a pump instead of gravity for a system that small? seems like maintenance, cleaning and worrying about more places for bacteria to hide in would be issues.
 
oh, it isn't that clear in the picture. is it really worth it to have a pump instead of gravity for a system that small? seems like maintenance, cleaning and worrying about more places for bacteria to hide in would be issues.

Usually with a pump, you'll recirculate your boil through the Counter Flow Chiller for the last 15 minutes or so of the boil. This will sanitize both the pump and the chiller before you start chilling. A pump is worth it if you have thw ~$150 to blow and you ever sit on the couch with a sore back after brew day.
 
Usually with a pump, you'll recirculate your boil through the Counter Flow Chiller for the last 15 minutes or so of the boil. This will sanitize both the pump and the chiller before you start chilling. A pump is worth it if you have thw ~$150 to blow and you ever sit on the couch with a sore back after brew day.

My parents were nice enough to give me the pump for my birthday a few years back. It's definitely a back saver. Besides, who wants to lift a keggle with 5gal of water to batch sparge? I know I could have built a three tier sculpture, but it's nice to be able to see inside the HLT without getting on a ladder. And the wort chills much faster pumping through a CFC than it does if I gravity feed. And vorlaufing is so much easier when you can just recirculate for the last 5 min of the mash.

Overall, I'd say the pump is probably my best investment in my brewing equipment (granted, it didn't cost me anything, but I would have bought one myself if I didn't receive one as a gift).

Hadn't thought of recirculating the mash. I'm worried about pulling suction with the pump on a mash. Any issues getting a stuck sparge because of it?
 
Hadn't thought of recirculating the mash. I'm worried about pulling suction with the pump on a mash. Any issues getting a stuck sparge because of it?

I've had no issues, but I only open the valve on the pump output about half way when I recirculate so I don't disturb the grain bed too much. I'm also using a copper manifold instead of a SS braid in my MLT which improved the flow a lot over the SS braid I started with.
 
Hadn't thought of recirculating the mash. I'm worried about pulling suction with the pump on a mash. Any issues getting a stuck sparge because of it?

I've never had a stuck mash, but a REALLY slow sparge after recirculating at 100% open on the march pump valve. I try to keep it under 50% open on the recirculation, which will set the grain bed and start the filtering process but not compact the grain bed into a barley brick.
 
wilserbrewer, your build played a role in my development! when my buddy and i were building it today, i said "this actually DOES look like a bunk bed"
 
Almost done with mine.

Just need to silver solder a ground point on the kettle.
Run hose for return on the kettle and mash tun.

Should get some calibration in this week and first brew on it next weekend!!!

imag0234.jpg
 
Back
Top