Setup revision critique

Homebrew Talk - Beer, Wine, Mead, & Cider Brewing Discussion Forum

Help Support Homebrew Talk - Beer, Wine, Mead, & Cider Brewing Discussion Forum:

This site may earn a commission from merchant affiliate links, including eBay, Amazon, and others.
Joined
Jul 12, 2009
Messages
458
Reaction score
13
Location
Denver
G'day all, been screwing around with gravity feed for a while while i try to get all the equipment etc. together to build a one tier system. What do you think about this proposed set-up? I will be replacing the 2nd burner so it is not resting on wood, and will be replacing/getting all silicone hosing at the right lengths.
I have a stainless steel bazooka type screen (not braid) in mash tun, and in kettle, and keep the tun (cooler) on separate stand to keep away from the banjo heat.
Wort chiller will be put on last as to not melt the clips and hose.

From left to right: 10 gal mash tun, 15.5 gal sanke HLT, 15.5 gal brew kettle.

Also thinking of adding a portable induction cooktop for decoctions.

Thoughts? Much appreciated!

d1e5e0d0.jpg

9adcb147.jpg

9adcb147.jpg
 
The stand is not a typical setup but what do you not like about it? What went wrong?
 
Well, few things:
1. Lots of hose changing, was a PITA while sparging, then switching the hoses around to pump mash to the brew kettle. Made a bit of a mess too. Think I either need another march pump or somehow try to configure it at least so it uses same hoses for sparge to mash tun and mash tun to kettle.
2. I had the HLT on the right, rather than in the middle not sure if that would have worked better.
3. I had a carboy that was taller than the one in the pic, and the height wasn't quite right for the gravity feed from the brew kettle. But don't want to put the kettles much higher or i'll need a step stool. I also replaced that burner with one of the same banjo's like the middle which i guess is a little shorter.
4. I need to get a dip tube in the HLT so I don't waste a gallon and a half of water.
5. Brew kettle has a kettle valve, and I used a hop spider/blocker that I made, and the bag got caught on it.
6. Would have liked to get more wort out of the kettle, thinking about a dip tube in that too, but not sure if that will get blocked or not.
7. Garden hose fitting to plate chiller still leaks. I originally had quick disconnects which leaked a lot worse. Feel like there is a better solution out there somewhere.

Thinking of trying to get it all on the ground and using pump for brew kettle to fermenter.
 
Ok a few suggestions:

1st: Buy a good hose. Its worth the non leaking investment and if you go to target or walmart they are on sale for around 10$. Also you should be using a good bit of pluming tape if you arent already. Lastly simplicity is key with house fittings! you look like you have a monster on the water out, just buy a fitting at lowes that will screw into the water out portion that has the largest opening possible. Attach 4 foot of hose and call it good.

2nd- I would get quick connects on the pump and valves. Then In your boil kettle figure out a way to keep trub from exiting the Boil kettle. This way you can gravity feed the wort from the boil kettle to your pump and to the top of the Chiller. This way no matter how low the chiller is you will always have pressure forcing the wort through the chiller and into the carb. (you dont have to wait for gravity) Make your pump work for you! You dont need two pumps you just need to use the one you have for all facets of your brewing. This will also get rid of the many hose changing your doing throughout the brewing day.

3rd- Get a dip tube. LOL

4th- Lastly, and Im not trying to be rude, but dont re-invent the wheel on your first go. Check out what other brew stands (both professional and DIY) look like and model yours after them. Then after you have done a few batches on the layout you can tweek the system to your liking.

I hope this helps! Dont give up the reward is in the beer!
 
By the way do you live in BroomField? And if so do you work for Level (3)?
 
Thanks bmunos, I appreciate your feedback and taking the time to respond.

On the chiller, I have two good RV hoses. My leak problem comes from the water in. Do you think it could be because my water out is too restricted? I don't have any leaking coming from the water out. When i put the chiller together, i was told to put a way to control the outflow (hence red tap nozzle) to control the wort out temp by adjusting how much cold water is going through, perhaps I should put a bigger ball valve on that water out and use larger tubing and see if that helps.

Agree with all your other points and will give them a shot.

Not in Broomfield but that is where our homebrew club is based out of. Dont' work for level 3. Why do you ask?

Thanks again!
 
Im not sure why you would want to control the amount of water out? But that may be an issue above my head haha. Is the leak coming from inbetween the hose mount? I know as soon as I opened up the water out my leak went away. And I work for level(3) in tulsa but we are based in broomfield
 
bmunos said:
Im not sure why you would want to control the amount of water out? But that may be an issue above my head haha. Is the leak coming from inbetween the hose mount? I know as soon as I opened up the water out my leak went away. And I work for level(3) in tulsa but we are based in broomfield

Ahh. It allows me to control the amount of cold water going through the chiller, so If I turn it down, I have less cold water and more hot wort going through hence raising the temp of output to the fermenter. Don't want to chill it too much.
Yeah the leak comes from hose to coupler to water in on plate chiller. It's not horribly bad but feel there should be a better way.
 
Quick Disconnects are the best way to go, IMHO.

Makes life a lot easier. You might want to consider restricting the water inlet rather than the outlet. The water pressure may be a bit high coming out of the chiller.

I would also suggest a pump from the kettle to the heat exchanger. It will speed things up quite a bit.

You are welcome to come down to Littleton anytime if you want to look over my rig. You can see what I have done on the links in my sig.
 
Thanks Wayne as always for your advice. Your system rocks from the post. I do need to get out to Littleton sometime to brew with you. I've heard good and bad things about QD, one guy who now brews professionally took all his plastic ones out and replaced them with hose clamps because they were giving him issues. What kind of QD's do you have?
 
I did a bit of larger scale brewing some years ago. That is why I built my rig with QD.

I use the stainless steel camlocks. BargainFittings.com and Austin Homebrew sell them.

NewToys1.JPG
 
I did a bit of larger scale brewing some years ago. That is why I built my rig with QD.

I use the stainless steel camlocks. BargainFittings.com and Austin Homebrew sell them.

NewToys1.JPG

Thanks, I was reading through your post, and thus far, looks like you have changed it up a bit. I plan to read the rest of it. Quick question on the cam locks, are 1/2 inch truly 1/2 inch on inside diameter? Might be in for some!
 
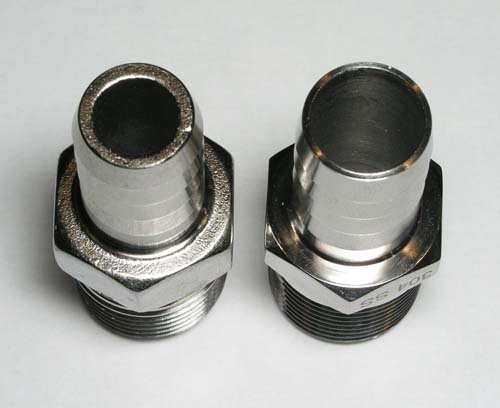
Most any fitting with a hose barb will reduce the diameter.

The most recent change to the system addressed this. I sold off all my female camlock hose barb fittings and replaced them with female camlock male threaded fittings. I then stretched the silicone hose over the threads and held it in place with stainless steel wire.

Another way to do it would be to use the threaded fittings and to also use the full bore hose barbs sold byBrewersHardware

They are more expensive, but they are the only full bore stainless fittings I am aware of. Most of the other fittings will restrict flow.

TFB58_BoreComp.jpg


He also has the same fitting with female threads. I use the full bore fittings on my pump inlets. That really helped a lot with the amount of flow through the pumps.
 
Just to be clear, those are 5/8" hose barbs. They work fine with most 1/2" ID tubing as long as it isn't too rigid. For sure it works with silicone tubing since it's so soft, but most of us have found that it also stretches over 1/2" NPT nipples just fine as well which is even better than the ID of a 5/8" barb for much less money. Those barbs sure are pretty though.
 
Back
Top