• Please visit and share your knowledge at our sister communities:
  • If you have not, please join our official Homebrewing Facebook Group!

    Homebrewing Facebook Group

Scuba's Herms Build!

Homebrew Talk

Help Support Homebrew Talk:

This site may earn a commission from merchant affiliate links, including eBay, Amazon, and others.

ScubaSteve

Well-Known Member
Joined
May 21, 2007
Messages
3,673
Reaction score
91
Allright folks!-

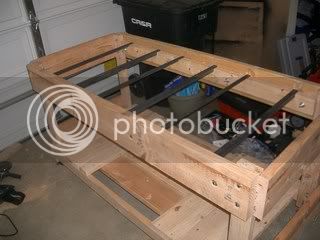
Here's the beginnings of my rig build! Lot's of pics. See my original post for all the goodies I got to build this thing:
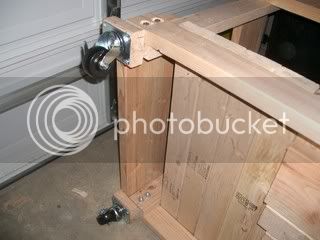
LET'S GET ALL MACGYVER A few words about my design; comments/advice welcome:

1) I wanted to build a HERMS because I liked the idea of keeping the wort away from direct heat if possible. I also had an extra 50' of 1/2" copper....so why not?

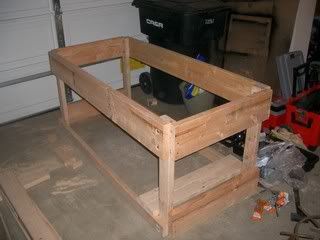
2) I got 2 pumps when I bought all this equipment. I decided on a single-tier because I wanted to avoid a mishap. I am strong enough to lift a full keg, it's just not so safe when on a ladder and after having a six-pack. I also have a little one on the way...so I'm thinking safety from here on out.;)

3) I have my old turkey fryer burner, so I decided to actually make a Hybrid HERMS. I will have the capability for a very controlled low heat direct fire if needed; i.e. in the case of cold weather.

OKAY! PICS!:ban:

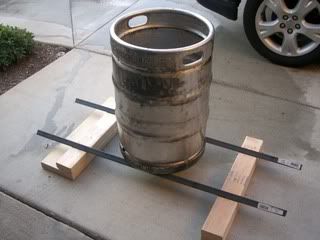
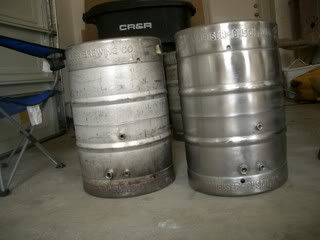
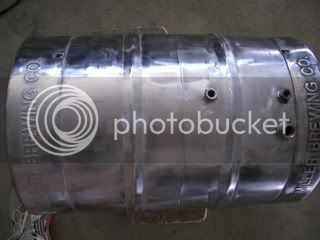
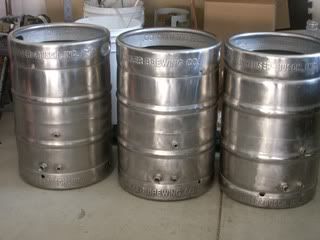
First, I had these dull/dirty kegs...
http://s165.photobucket.com/albums/u76/hawkie333/HOMEBREWING/EBAY%20SCORES%20EQUIPMENT%20ETC/
 
I soaked everything in PBW, then removed all the valves, etc. This is all the junk I ended up with:
IMGP3091.jpg

I'll probably recycle what I can use, like the stainless valves, etc. Then I got some Barkeeper's Friend (WEAR GLOVES!) and scrubbed the hell out of the keg. Then I got a car buffer and poured on Brasso. This is how I got it after about 6 hours of work.
IMGP3114.jpg
 
Then I said screw that, and bought a cheap angle grinder for $30. I buffed it with coarse pads and it looked like this:
IMGP3115.jpg

I didn't really like the swirling effect, but after buffing, etc. you can barely tell. Here's all three together:
IMGP3116.jpg
:rockin:
 
have you got a stand put togethe yet?? I went single tier and will never go back. Gravity is for those without pumps
 
Hold on dude! I'm still postin' pics! I guess the beer is slowing me down :)
 
So, I had been looking real hard at this site: http://just-brew-it.com/ It is probably one of the most innovative single tiers out there, next to Brewtus 10. I really liked this one too: http://www.campbellsmoonshinebrewery.50megs.com/ Bottom line, I decided that I could do this thing with wood, and still make it classy. I wasn't worried about burning the rig up, because I could shield the interior with aluminum flashing. Also, I thought that heat transfer could be a problem with a steel frame...causing me to be branded like a steer. Only drunker. :cross: So here is the rudimentary frame:
IMGP3128.jpg

I used 3/8' hex bolts, 2X4's, and 2X8's. This thing is build like a tank, and light enough for 2 people to carry. I filled in the bottom deck with planks, and had a dropped section in the center for the pumps to get even further away from the overhead burners.
 
If I have to frequently disconnect QD's from the pumps, then I will use this space to put a drip pan right under the pump heads. I gave my plumbing a lot of thought, and am thinking real hard about just using silicone tubing with QD's. There are many reasons for this:

1) Ease of use. I just connect to where I want things to go...no messing with valves.
2) It is not hard plumbed, and so easily replaceable if cleanliness/wear&tear become an issue.
3) It is not hard plumbed, so is much less easily damaged in transit/storage.
4) I can easily visually inspect for gross matter buildup is repeated infections occur.

***PLEASE GIVE OPINIONS ON THIS! I HAVE NOT DONE THE PLUMBING YET!***

Then, I put some 3" 275 lb casters on each corner.
IMGP3131.jpg
 
I am currently getting the gear together to build a HERMS system (I suppoe this stands for heat exchanging recirculating mash system?) In which case I can drop the wor system from above?

I am in two minds about the hard plubing or not. I fundamentlaly think that using silicon hoses is just a cheap dodge, but it would be really easy. I think most commerical breweries clean their set-ups by pumping caustic soda around the place, so I am sure you won't have trouble with build up of crap and infections if you do that. I have also had trouble with leaking hoses that have been clamped with hose clamps, probably just dodgy clamps...but if you hard plumb it and it doesnt leak, it definately won't start leaking if you bump it during a brew.

I vote hard plumbing - Especially seeing as you have 50 feet of pipe!!
 
So then I went to HD and got some 1" angle iron. I wanted a bit bigger, but that was a compromise between strength and price. Damn, that stuff adds up! Just to be sure, I stress tested it with a keg full of water at the same distance between boards that I would use in the rig:
IMGP3132.jpg

I know, I know! Heat is going to weaken the steel! I put my additional bodyweight on the thing and still noticed little sign of bowing/stress. After I was satisfied with the strength of my design, I cut my steel (can you say sparks???) and laid it in the frame on an internal rail:
IMGP3137.jpg

I cut a 1" notch in the rail and fit one side of the angle iron down into it like this:
IMGP3138.jpg
Probably not the BEST way to do it, but it IS strong. I climbed on top of this thing and stood on each set of steel rails with no problem. I weigh 190 lb. I may still drill through the ends of the steel and into the wooden rail...effectively screwing the angle iron to the rail.
 
Here's where I'm at as of now:

IMGP3136.jpg


I still have to plumb the propane lines, burners, and water/drains in, sand/stain, etc. etc.

So please everyone, let me know your thoughts!!!!:mug:
 
nabs478 said:
I am currently getting the gear together to build a HERMS system (I suppoe this stands for heat exchanging recirculating mash system?) In which case I can drop the wor system from above?

I am in two minds about the hard plubing or not. I fundamentlaly think that using silicon hoses is just a cheap dodge, but it would be really easy. I think most commerical breweries clean their set-ups by pumping caustic soda around the place, so I am sure you won't have trouble with build up of crap and infections if you do that. I have also had trouble with leaking hoses that have been clamped with hose clamps, probably just dodgy clamps...but if you hard plumb it and it doesnt leak, it definately won't start leaking if you bump it during a brew.

I vote hard plumbing - Especially seeing as you have 50 feet of pipe!!

I was going to use the copper tubing for the HERMS coil in the HLT. I would definitely have to use stiff copper pipe if going the hard plumbing route. I agree, using hoses is kind of the easy way out....and definitely doesn't look as awesome as polished copper. I'm gonna look at doing the burners/propane piping next, then move to liquids. Will give this some thought.....any other ideas are welcome.
 
GO WITH Q/D's!!!! I have my setup done in hard pipe. 1/2" SS tubing with swagelok fittings and I do love it but if it weren't for good friends and the scrap yard it would have been easily $1000.00 or more. I had it set up similar with Silicone tubing and wasn't happy. I had a fancy manifold with ball valves on the return that I would keep the same(I kinda did after the refit) but If I hadn't been given a 3-way ball valve I would have just gone with Q/D's and silicone tubing for the lines from each vessel to the pump. It's cheap, easy to clean/sanitize(I have to tear my fancy set-up apart to clean it out) and you DO NOT GET AIR BUBBLES IN YOUR PUMP!!!! the big breweries use clover clamps. Those are perfect for running caustic through. They don't trap wort. Threads trap wort. Compression fittings trap wort. Trapping wort leads to bad times. There's good, and bad about hard plumbing. It looks SEXY!!!! but it's a pain to clean. Hope my imput was helpful. Just my 2cp.
 
ScubaSteve said:

Not to be a jerk, but this is probably where it'll fail if it does. You've undermined the inherent strength in angle iron my cutting the angle off. Perhaps you could have notched the wood instead?

It would just be a shame (and dangerous) to lose 10+ gallons or boiling wort.

Also, I'd be curious as to if the heat absorbed by the angle iron carries into the wood and starts to burn it. Like I said, curious, not worried.

Edit: To be part of the solution and not the problem, two ideas;
1) Add another board to the face of the exiting on and notch it or even stagger it down so that the vertical part of the angle is supported.
2) Drill a hole in the end of the angle iron and drive a lag bolt down through it into the wood. This would help it from bending itself upward and having everything falling through the middle.
 
I love a good build thread but I have to agree. You'll have issues with the angle once it gets up to 500+ degrees. Granted, my experience is based on bedframe angle which is really inferior, but I've gotten them to bend after a long boil. I wonder how the wood is going to hold up too, there's a lot of radient heat under a keggle. You'll get some scortching if you don't put some metal flashing on the wood near the burners.
 
Eric_Duel said:
Not to be a jerk, but this is probably where it'll fail if it does. You've undermined the inherent strength in angle iron my cutting the angle off. Perhaps you could have notched the wood instead?
Actually I think he did notch the wood.

ScubaSteve said:
I cut a 1" notch in the rail and fit one side of the angle iron down into it like this:
 
Nwcw2001 said:
Actually I think he did notch the wood.

After a second look, I think you're right. I can't tell from the pic.

If that's the case, I stand completely corrected, and good work!
 
I used flashing as heat shields on the original "Bellybuster" It worked but I would advise giving at least 2" airspace behind it to the wood. Mine was 1" away from the wood and it eventually did start to burn.
I also hard plumbed most of my new system and really like it. I did use union fittings in places so I can dismantle for detailed annual cleaning. However I am really considering going the QD route
 
Yeah, I did notch the wood....definitely didn't want to compromise the structure of the steel. I tried to show that in the pic, but it's hard to see.

I'll keep the flashing in mind....I plan on creating some sort of collar around the burner as a wind/heatshield, and then I'll also use flashing on the upper/inner part of the wood frame. I designed the rig to give me 6" between the keggle wall and the wood in any direction. What if I placed a 6" or 8" strip of reflectix around the inside, then covered with flashing and screwed it down? That would provide a reflective shield, then the reflectix would provide further insulation. I've also seen guys put some of that concrete infused board in there....that's fireproof. How's that sound?
 
Bobby_M said:
I love a good build thread but I have to agree. You'll have issues with the angle once it gets up to 500+ degrees. Granted, my experience is based on bedframe angle which is really inferior, but I've gotten them to bend after a long boil. I wonder how the wood is going to hold up too, there's a lot of radient heat under a keggle. You'll get some scortching if you don't put some metal flashing on the wood near the burners.

I tried to address this issue with my stress testing experiments. Granted, that was with cold steel. Needless to say, when I finally get this thing up and running, I'm gonna take it slow. I tried to space my burners out to allow the flames to come up under the keg and not directly hit the angle iron, while still providing a solid base for weight distrubution.

A few points:

1) I figured my heaviest vessel will be the mash tun when its got grain and all the water in it at the same time. I will use a smaller turkey fryer burner to do occasional low heat direct fires. Heat should be less of an issue here, so I trust the steel to hold.

2) I would like to put a hurricane or banjo burner (anybody got preferences?Bobby- you got anymore of those LP halo burners?) under the HLT and Kettle, so heat is going to a real issue, and I will definitely watch for bending!
 
ScubaSteve said:

In my build I've got my angle iron the other way around. That way the bend in the angle iron cradles the keg and it can't move at all. No accidental bumps or slides when pouring in water/wort. Although now that you've already notched the wood, you may not want to invert the rail now...
 
Craig5_12 said:
In my build I've got my angle iron the other way around. That way the bend in the angle iron cradles the keg and it can't move at all. No accidental bumps or slides when pouring in water/wort. Although now that you've already notched the wood, you may not want to invert the rail now...

The wood can always be replaced if it means I will avoid a catastrophe. I kinda thought the angle iron would be stronger if it were like a chevron "^", with the point on the bottom of the keg....but then there wouldn't be as much surface area to distribute weight. In a "V" config I wonder if the weight wouldn't "pry" open the angle? How long are your bars? Mine are 28" with a 1.5" overlap on each end...I figure that being that short, they should be wicked strong.
 
It turned out that my ring burners were NOT propane versions but actually nat gas. The reason I was confused is that my previous burners, also labelled NG, had much larger orifices than the later versions I came into. These things are monsters and I'd prefer the 10 tip version if they were available.

The bed frame angle that I partially melted and bent was actually in the chevron position. I think the heat and weight open up the "V" to a more obtuse angle and it weakens it big time. You might be fine in the L position.
 
ScubaSteve said:
The wood can always be replaced if it means I will avoid a catastrophe. I kinda thought the angle iron would be stronger if it were like a chevron "^", with the point on the bottom of the keg....but then there wouldn't be as much surface area to distribute weight. In a "V" config I wonder if the weight wouldn't "pry" open the angle? How long are your bars? Mine are 28" with a 1.5" overlap on each end...I figure that being that short, they should be wicked strong.

My bars are pretty short, only about 18 inches with about an inch overlap onto more steel. They're also 3/8 or 1/4" so I don't worry about those suckers bending. A buddy of mine that owns a machine shop actually put together the frame out of the blue for me. Check it out here: www.mybrewery.shutterfly.com

In regards to the V, I don't think i'd go that route. I like having the L shape hold the keg still.

BTW...your build looks great so far!
 
Craig5_12 said:
My bars are pretty short, only about 18 inches with about an inch overlap onto more steel. They're also 3/8 or 1/4" so I don't worry about those suckers bending. A buddy of mine that owns a machine shop actually put together the frame out of the blue for me. Check it out here: www.mybrewery.shutterfly.com

In regards to the V, I don't think i'd go that route. I like having the L shape hold the keg still.

BTW...your build looks great so far!

Mine's kind of an upside down "L". I thought about having the sides come up in an "L" so as to trap the keg in a kind of shelf, but I didn't want the steel that far out to the sides because of weight distribution. I like the "upside down L" because the lower (vertical) portion provides a nice, stiff spine that resists bending. Only time will tell though! Thanks guys! More pics to come! I the meantime, I welcome any input/ideas!
 
Ryanh1801 said:
...WTH is HERMS???

Heat Exchange Recirculating Mash System. (I could be a little off, but I'm pretty sure that's it) It's where you indirectly heat your wort. You put flame to a kettle of water and heat to a certain temp. You don't DIRECTLY heat your mash tun. You recirculate your wort from the mash tun THROUGH the hot water inside a copper coil(or whatever else you can find) and back into your mash tun. Your wort will reach the temp of the other kettle's water. This technique aviods scorching of grains/sugars and dosn't kill any enzymes because the temperature never exceeds the target temp.

ScubaSteve, If you want to increase rigidity you could always run 2 more pieces of angle iron lengthwise the width of your keggles and cradle them so they don't go anywhere. I'm sure it'd be a bit more expensive but just another idea. Not sure if you have thought of it or not yet. I'm sure it'd work great without as well. :D
 
Bellybuster said:
coffee cans
my work is done here

Yeah, I had though about coffee cans....But Bobby makes a good point with rust/paint issues. I was thinking maybe I could use Hi-Temp rustoleum.....but that still may be too hot. I've seem aluminum flashing/round ducting that might work well too.
 
Back
Top