Sanyo SR 4912M kegerator conversion

Homebrew Talk - Beer, Wine, Mead, & Cider Brewing Discussion Forum

Help Support Homebrew Talk - Beer, Wine, Mead, & Cider Brewing Discussion Forum:

This site may earn a commission from merchant affiliate links, including eBay, Amazon, and others.

lightkeeper

Member
Joined
Nov 14, 2007
Messages
5
Reaction score
0
All the "how to" advice I have seen on the internet suggests cutting a 3" hole for the tower dead center in the top. I have seen one posting on NB Forum from Jeff who hit a refrigerant line in the top with one of the tower mounting screws. (Bummer!)

Seems like it would be safer to move the tower off dead center towards the front by about an inch or so to get further away from the refigerant line which crosses the top about 7" from the back side.

Anyone have any opinions or advice on locating the tower hole in the top of the 4912M?

I took temp readings on the top with a handheld laser thermometer - which seem to confrim the location of the refrigerant line in the top as others have suggested - about 7" from the back side. I get a hot spot right in the middle --- less temp towards the sides, more rapid temp drop off towards front or back -- I interpret this as line may be spot welded to top in the middle and then burried in the insulation as it goes to the sides. Does that sound right? Anyone know anything more about where the lines are in the top. Is only the one line - right??
 
Most of the how-to guides I have seen detail the process of finding the exact location of the refrigerant line using something along the lines of smearing the top with a cornstarch/water mixture and letting the fridge run with the door open so the line heats up, causing it to dry the paste faster and thus be easy to spot.
 
Most of the people who have mounted the tower have used a board that fits inside some of the webbing of the plastic removable top. Bolt thru the wood and plastic; when installing into the plastic, use some silicone caulking as a glue to help hold the board into the plastic for extra rigidity. I used stainless screw that only went thru the tower, the plastic and then into the wood and stainless t-nuts. Continuing the screws thru the fridge are not necessary...

I believe I cut out some of the webbing with a razor knife and achieved a board size of about 9", what ever the square size is that you have when you remove some of the ribs....

I used the exact center of the plastic top as a hole location, pilot drilled that center, and then set the plastic into position and pilot drilled thru the fridge-it works.
 
If you drill dead center you should miss the refridgerant line by over an inch. The only times I have heard people hitting the line they were trying to place the tower further back on the fridge.

The main reason for using the center (as noted above) is to be able to insert plywood to act as an anchor.
 
If you are that worried about it, you could always off-center the hole (1" towards the front or whatever) in the center section of plywood that anchors that tower.

The 1 inch "offcentered-ness", shoudn't make the tower that much more unstable...

I plan to follow the buford/Orpheus how-to to a T (conversion day scheduled for next Tuesday) and hopefully it all works out!
 
I'm doing the brother buford conversion. I've removed the shelf from the door, but what im running into now is that I can't seem to find any place to buy a sheet of dry-erase board..at least not for cheap anyway. I've seen some places sell framed dry-erase boards for cheap so I'm thinking that maybe I could buy one of those and just cut the frame out and cut it to fit. My experience has been it's more expensive to get a plain unframed board than to get a finished and framed dry-erase board so I was wondering if anyone had any thoughts on where to go or if there were any good alternatives. I really do like the idea of the dry-erase board for writing notes about the batches and etc.

Also, maybe this is a dumb question, but what is a good suggestion for where to get the bottle the temperature probe is inserted into and how do you seal it up so the ice pack goo doesn't leak out. Ive heard of one person using a liquid yeast bottle, but I don't have one of those. I'm assuming you seal it up with silicone sealant?

For now, I'm not doing a full kegerator conversion, I'm just going to use it for fermenting/lagering for my carboys for now. Then later, as my funds permit, purchase all the rest of the equipment and the kegs and finish the conversion.

Thanks in advance!
 
Do you REALLY need the temp gauge? Or have people had success running the original dial thermostat?
 
VoodooV, I've been pretty much in the same situation as you, I haven't found a good/cheap replacement for the front door moulding. So far I've only been using the fridge to ferment, though, and both my bucket and 6g better bottle fit without doing the door mod (just keep them to the left side of the fridge).

For the temperature probe, I've had good success just taping the probe to the side of the fermenter using painters tape (which is easy to pull on/off). This is arguably superior to putting it in gelpac goo anyway, for a fermenter.
 
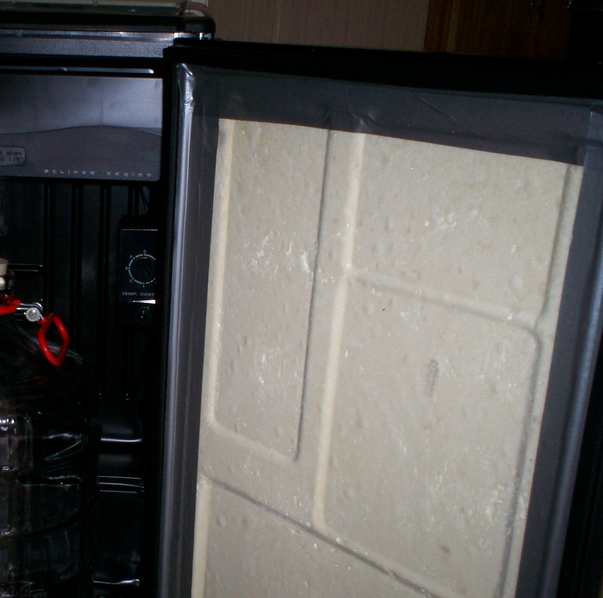
Not a very elegant solution, but on mine, I removed the door panel and re-attached the seal using duct tape directly to the rigid foam on the door. It does hold, does seal, but after reading this will go in search of a whiteboard or maybe a thin rigid foam panel - like used by advertisers and artists - that would use the many tiny screws to secure it and of course be more visually appealing than my method.

fridgedoor.jpg
 
VoodooV, kkngs, all --

If you hit the bathroom section of a Home Depot, they generally have a whiteboard-analog called "Tile Board" (I've actually used it for white boards, and have it on the list for my Sanyo conversion...)

A 4'x8' sheet generally runs about $20.
 
I cut the door panel around the edges to keep the part that holds the gasket onto the door with the screws. Basically I just made a large rectangle out of the door panel then reattached the gasket with that frame. I would take a picture of it, but I'm 700 miles away from home working.
 
+1 for Lowes. I finally found an employee who knew where the white board panels were. They were pretty well hidden amongst some of the other material in the paneling section.

I had a heck of a time getting the gasket properly seated when I put the whiteboard panel on. I was just about to give up and take a dremel to the plastic liner when my wife and I started making progress with it. The key was to get one corner attached, then slowly inch around making sure that each new screw continued to grip the gasket.

It didn't help that when I first drilled out the holes for the screws in the whiteboard panel, I ended up marking the wrong side of the board, so that when I was done, I had the mirror image of the pattern I needed. :drunk:
 
Go to Lowes. In the bathroom section, there is whiteboard. It's not exactly dry erase white board. It is textured. You purchase it by a 4' x 8' piece. I think it's pretty cheap.
 
Looks to me like there should be plenty of room for a dual pressure regulator. Can anyone confirm this for me? Thanks!
 
I finally bought my beer tower so I'm getting closer to finishing this project.

I did eventually find a dry-erase board...bought it at staples and had a coupon so it ended up only being 15 bucks for the board and a friend who had a table saw cut it up for me.

I still need to make that shelf that the CO2 cannister sits on. Does anyone know the measurements for that?

I also still need the drip tray and the blower. I found a website a while back that sold a pre-made blower but I can't find it now.

I have a dual pressure regulator and it should fit nicely in there once I get that shelf made and strap it down with bungee cord
 
Sorry to wake up and old thread, but did it work? Just got a 4431s from a buddy, so trying to figure out how to approach it. Not many threads on it...

If so, how did you go about bending?
 

Latest posts

Back
Top