Does anyone see a problem with just drilling two smaller holes big enough for the just large enough for the liquid lines, instead of the 3" hole? Does the bottom of the tower sit flush with the fridge top or does part of it actually go into the hole? I realize the tower will not be insulated, but I would like, at least for now, to minimize the modifications.
You are using an out of date browser. It may not display this or other websites correctly.
You should upgrade or use an alternative browser.
You should upgrade or use an alternative browser.
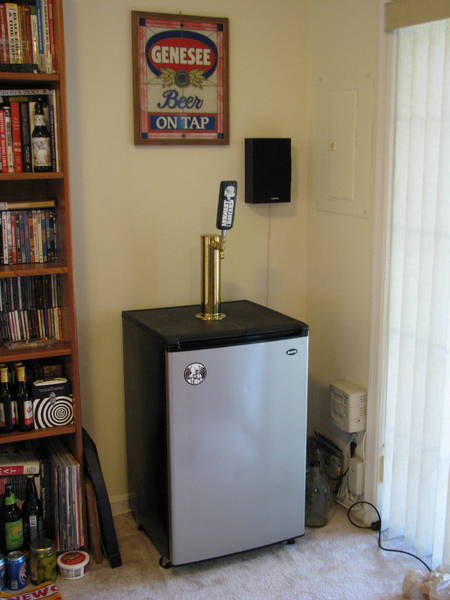
Sanyo 4912 Kegerator Conversion
- Thread starter Orpheus
- Start date

Help Support Homebrew Talk:
This site may earn a commission from merchant affiliate
links, including eBay, Amazon, and others.
doublegun
Well-Known Member
tag for future reference
Impetuous Brewer
Active Member
How much does this conversion cost, all expenses factored in? I'm trying to decide whether or not to buy or build.
Thanks!
Thanks!

I bought a tank and two corny kegs for a great price. I want to do this conversion but I know that the 20lb tank won't fit in the sanyo.
Do you think it is worth it to swap the 20lb tank for a 5 lb tank? Will a 10 lb tank fit in the sanyo with two cornys?
Do you think it is worth it to swap the 20lb tank for a 5 lb tank? Will a 10 lb tank fit in the sanyo with two cornys?
missing link
Well-Known Member
GIusedtoBe said:No, kegs and sys are at the same setting but I do believe I had the beer a bit overcarbed. I turned the regulator down to about 9 PSI and reduced the temp in the fridge and i got a much better, clearer pour.
I do still get a shot of foam to start and then it runs clean. I start it in a plastic cup and then slide my glass in when the foam clears. I usually only lose about a swallow or two.
Any ideas what causes this?
Also, if i were to lengthen my lines, how do you get at the lines and connections in the tower top?
Regards,
Al
The beer in the tower is warm and foams easily, once you get cold beer the foaming stops.
Linc


$10.99 ($31.16 / Ounce)
Hornindal Kveik Yeast for Homebrewing - Mead, Cider, Wine, Beer - 10g Packet - Saccharomyces Cerevisiae - Sold by Shadowhive.com
Shadowhive

![Craft A Brew - Safale BE-256 Yeast - Fermentis - Belgian Ale Dry Yeast - For Belgian & Strong Ales - Ingredients for Home Brewing - Beer Making Supplies - [3 Pack]](https://m.media-amazon.com/images/I/51bcKEwQmWL._SL500_.jpg)

$7.79 ($7.79 / Count)
Craft A Brew - LalBrew Voss™ - Kveik Ale Yeast - For Craft Lagers - Ingredients for Home Brewing - Beer Making Supplies - (1 Pack)
Craft a Brew


$53.24
1pc Hose Barb/MFL 1.5" Tri Clamp to Ball Lock Post Liquid Gas Homebrew Kegging Fermentation Parts Brewer Hardware SUS304(Gas MFL)
Guangshui Weilu You Trading Co., Ltd


$58.16
HUIZHUGS Brewing Equipment Keg Ball Lock Faucet 30cm Reinforced Silicone Hose Secondary Fermentation Homebrew Kegging Brewing Equipment
xiangshuizhenzhanglingfengshop


$479.00
$559.00
EdgeStar KC1000SS Craft Brew Kegerator for 1/6 Barrel and Cornelius Kegs
Amazon.com


$33.99 ($17.00 / Count)
$41.99 ($21.00 / Count)
2 Pack 1 Gallon Large Fermentation Jars with 3 Airlocks and 2 SCREW Lids(100% Airtight Heavy Duty Lid w Silicone) - Wide Mouth Glass Jars w Scale Mark - Pickle Jars for Sauerkraut, Sourdough Starter
Qianfenie Direct


$159.99 ($26.66 / Count)
3M High Flow Series System BREW120-MS, 5616001, For Brewed Coffee and Hot Tea, Valve-in-Head Design
SpaceCityProviders

$28.98
Five Star - 6022b_ - Star San - 32 Ounce - High Foaming Sanitizer
Great Fermentations of Indiana

$44.99
$49.95
Craft A Brew - Mead Making Kit – Reusable Make Your Own Mead Kit – Yields 1 Gallon of Mead
Craft a Brew

$22.00 ($623.23 / Ounce)
AMZLMPKNTW Ball Lock Sample Faucet 30cm Reinforced Silicone Hose Secondary Fermentation Homebrew Kegging joyful
无为中南商贸有限公司


$76.92 ($2,179.04 / Ounce)
Brewing accessories 1.5" Tri Clamp to Ball Lock Post Liquid Gas Homebrew Kegging Fermentation Parts Brewer Hardware SUS304 Brewing accessories(Gas Hose Barb)
chuhanhandianzishangwu

$20.94
$29.99
The Brew Your Own Big Book of Clone Recipes: Featuring 300 Homebrew Recipes from Your Favorite Breweries
Amazon.com

$719.00
$799.00
EdgeStar KC2000TWIN Full Size Dual Tap Kegerator & Draft Beer Dispenser - Black
Amazon.com

$176.97
1pc Commercial Keg Manifold 2" Tri Clamp,Ball Lock Tapping Head,Pressure Gauge/Adjustable PRV for Kegging,Fermentation Control
hanhanbaihuoxiaoshoudian


$53.24
1pc Hose Barb/MFL 1.5" Tri Clamp to Ball Lock Post Liquid Gas Homebrew Kegging Fermentation Parts Brewer Hardware SUS304(Liquid Hose Barb)
yunchengshiyanhuqucuichendianzishangwuyouxiangongsi

Evan!
Well-Known Member
rh348877 said:I bought a tank and two corny kegs for a great price. I want to do this conversion but I know that the 20lb tank won't fit in the sanyo.
Do you think it is worth it to swap the 20lb tank for a 5 lb tank? Will a 10 lb tank fit in the sanyo with two cornys?
I've never tried it, but I hear that a 10lb'er won't fit. It's really tight with the 5lb tank...and while I don't know the exact dims of the 10 lbs cyls, I know they are considerable taller. The way this conversion works, you have to store the tank on the lip in the back, meaning it's already up off the floor of the unit. So even with a 5lb tank and the regulator, it's a mere few inches from the ceiling. My educated guess is no, since the 5 lb is tight as it is.
ohiobrewtus
Well-Known Member
I don't have a 10 lb. tank, but others here have verified that it will not fit.
Soulive
Well-Known Member
I thought someone on here said they had a weird shaped 10lb tank that fits in the Sanyo. I personally can't see anything bigger than 5lb fitting in there. I'm content with the 5lb tank. I don't have to refill for several months and thats infrequent enough for me...
Evan!
Well-Known Member
I don't wanna start a new thread for this question, so I'm gonna go ahead and ask it here:
When I got my new co2 tank filled at the welding supply place on Friday, they gave it back to me with a little blue plastic ring hanging from the neck via a rubber band. It looks like it's the perfect size to sit in between the two fittings when I attach the regulator. Is this something I should be using? I have it attached without it right now, and it's not leaking as far as I can tell.
When I got my new co2 tank filled at the welding supply place on Friday, they gave it back to me with a little blue plastic ring hanging from the neck via a rubber band. It looks like it's the perfect size to sit in between the two fittings when I attach the regulator. Is this something I should be using? I have it attached without it right now, and it's not leaking as far as I can tell.
Soulive
Well-Known Member
Evan! said:I don't wanna start a new thread for this question, so I'm gonna go ahead and ask it here:
When I got my new co2 tank filled at the welding supply place on Friday, they gave it back to me with a little blue plastic ring hanging from the neck via a rubber band. It looks like it's the perfect size to sit in between the two fittings when I attach the regulator. Is this something I should be using? I have it attached without it right now, and it's not leaking as far as I can tell.
I never got one of those, so obviously I'm not using one. Maybe my regulator has one inside already...
Evan!
Well-Known Member
Soulive said:I never got one of those, so obviously I'm not using one. Maybe my regulator has one inside already...
The regulator has a little black o-ring (looks like a ball lock post o-ring to me) built into the face of it---the face that compresses against the tank. But the tank has a circular groove in its face that matches up with the circular raised portion on the plastic piece. I'll take pics later...I'm curious as to what it's for.
adx
Well-Known Member
I have a short 10lb tank that would probably fit. I know it fits height wise. If you built a shelf and removed the door insides it would probably be able to hold it. I'm too lazy to build a shelf for it so I stuck it outside and ran the gas line through the drain hole.
taydawg197
Active Member
- Joined
- Jul 27, 2007
- Messages
- 38
- Reaction score
- 0
How do you guys fit a 1/4 keg in this sanyo? I just measured mine and the depth was like 13 inches. This site:http://www.micromatic.com/beer-questions/sizes-keg-draft-beer-available-aid-11.html it seems it wouldnt be deep enough to fit one...
Thanks!
Thanks!
Another member of the family fresh off the assembly line. :rockin:

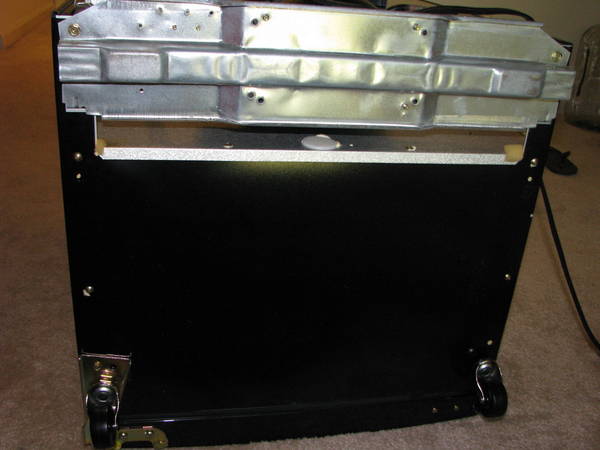
Here you can sort of see where the line is. In fact if you want to do it even cheaper you don't really need the cornstarch test. You can run the back of your hand along the top of the metal and clearly feel the warm spot vs the rest being cool.

Also as a tip to the next people who do the conversion: I used #10-24 x 5/16" T-nuts and #10-24 x 3/4" machine screws and it was a perfect fit. No need to trim the ends off.
Thanks again to all who have posted this info to help the rest of us build this wonderful machine!
Here you can sort of see where the line is. In fact if you want to do it even cheaper you don't really need the cornstarch test. You can run the back of your hand along the top of the metal and clearly feel the warm spot vs the rest being cool.
Also as a tip to the next people who do the conversion: I used #10-24 x 5/16" T-nuts and #10-24 x 3/4" machine screws and it was a perfect fit. No need to trim the ends off.
Thanks again to all who have posted this info to help the rest of us build this wonderful machine!
EricK The Red
Well-Known Member
Evan! said:The regulator has a little black o-ring (looks like a ball lock post o-ring to me) built into the face of it---the face that compresses against the tank. But the tank has a circular groove in its face that matches up with the circular raised portion on the plastic piece. I'll take pics later...I'm curious as to what it's for.
It's a seal and it should be used!
OP
OP
Orpheus
Well-Known Member
Nicely done Paranode!
What's going to be pouring out of those taps first?
What's going to be pouring out of those taps first?
Got an Irish Red coming out of the tap now, and a dunkelweizen still conditioning. Nitrogen regulator, tank, and stout faucet are also on the way for my stout. 
The beer I poured from the tap was the best I've ever tasted. Don't know if it's because I'm getting better or it was just 'cause I thought it was so cool.
The beer I poured from the tap was the best I've ever tasted. Don't know if it's because I'm getting better or it was just 'cause I thought it was so cool.
vinchete
Member
The last post to this thread was a while ago, but I actually just stumbled upon it after doing the same conversion to my Sanyo fridge this weekend. The web site that told me where to drill the Sanyo must have been a web gallery of a member because the pics are similar. This is all good stuff and it's given me a few ideas for how to make my kegerator even better.
One thing I've been struggling with is how to mount wheels to the bottom. Has anyone had any success?
I'm thinking about using the threaded holes that the rubber feet mount with to bolt a piece of plywood underneath the fridge, and mount wheels to the plywood. This gets convoluted because I still have to drill through the metal plate in the back of the fridge and knotch the plywood where the lower hinge protrudes.
I haven't had any luck yet finding wheels that screw directly into the threaded holes that the rubber feet mount to.
Any thoughts?
Laurel
Well-Known Member
I'd consider getting some angle iron and welding it into a 3 sided square. Then just use one "side" of the 4th piece to finish off the square and mount wheels to that. It could be easily removed if you don't like it and seems like it would be more stable/less visible(once painted black) than plywood.
MoRoToRiUm
Well-Known Member
- Joined
- Jun 17, 2008
- Messages
- 1,389
- Reaction score
- 6
I just did a conversion the other weekend (I still get that warm feeling inside when I come home and see it).
I picked up the same type handles at Lowes for about the same price as your link (FYI for anyone else who is anxious to see their visualization come to fruition). Grab a pair of wire cutters, nip the bolts, cardboard hole spacing template and viola!
Kudos to buford, orpheus, and all the others for sharing their conversions; They helped a lot!
vinchete
Member
I'd consider getting some angle iron and welding it into a 3 sided square. Then just use one "side" of the 4th piece to finish off the square and mount wheels to that. It could be easily removed if you don't like it and seems like it would be more stable/less visible(once painted black) than plywood.
I don't think I follow you and unfortunately don't have access to a welder. I was thinking of cutting out a large square in the center of the plywood and spray painting it black when finished. You'd end up with a 4" wide square frame mounted in each of the four corners. The plywood frame would be smaller than the fridge so it wouldn't protrude from the fridge around the edges, and it'd be painted black so it still wouldn't be completely visible (at least in my mind it wouldn't).
I wish I had a welder and could make a metal frame but that's not really an option. I'm not happy with the plywood either though, which is why I posted to this forum. Can't say I saw too many wheels on the bottom of everyone's kegerators...
MoRoToRiUm
Well-Known Member
- Joined
- Jun 17, 2008
- Messages
- 1,389
- Reaction score
- 6
vinchete,
I'm in the same predicament! In another post, some one had suggested using one/multiple dollies, but I'd much rather have them attached. You can fairly easily do the back wheels, but the front pose a challenge.
What I was planning to do, is take the front feet off (I believe there are just bolts there) and get a piece of metal, either bent or use spacers and matching nuts, to secure the metal to the bolts. Drill some holes in the metal slap on some casters...
Hope that gets you thinking, let me know what you come up with!
vinchete
Member
I successfully installed wheels to the bottom of my Sanyo 4912 conversion earlier this morning. I did it with about $15 in parts I purchased at my local Home Depot. It's a lot simpler than I thought and I'm happy with how it turned out.
The front feet underneath the fridge are 5/16"-18 threaded stem feet. So all you need to replace the front feet with caster wheels is a 5/16"-18 threaded stem caster wheel. Home Depot sells a 2" swivel wheel from Shepherd Hardwood Products that I used for this project. The original feet had a 1/2" stud and the Shepherd caster has a 1" stud, but I was pleased to find that the Shepherd caster screwed all the way into the fridge. I'm not sure how much deeper you can go but these Shepherd casters where $3.98 each and worked out perfectly.
The back wheels were a bit tougher because there are no pre-existing inserts to screw into. I picked up another set of 2" straight wheels from Home Depot, also manufactured by Shepherd. After looking at the bottom of the fridge there's a perfect spot on either side for these wheels.
There's barely enough room to bolt the straight wheels in place, so I pushed the wheel all the way up to the edge of the bent metal and marked where I was going to drill. I started with small bits and progressed up to a 1/4" bit. Using 1/4" nuts, bolts, lock washers and washers I was able to mount the straight wheels in the back.
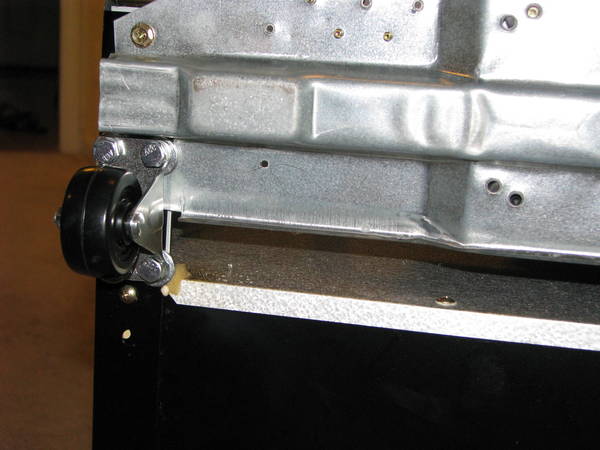
You can see it's a tight fit on the inside so be careful marking and drilling:
I thought I finished, but when I put the fridge upright I noticed it wasn't level. Luckily, I bought extra washers and after removing and reattaching the wheels a few times I got it level.
Here's what I used to level the fridge:
Front swivel wheels - One 5/16" lock washer only
Rear straight wheels - One 1/4" lock washer closest to the bolt head, and either three or four 1/4" washers between the wheel mount and fridge
I used four washers on the rear straight wheels when the wheel mount was pressing up against the black of the fridge, the fourth washer accounting for the thickness of the metal that the other half of the wheel mount was fastened to.
I suppose you could use sheet metal bolts to attach the rear wheels, but I felt nuts and bolts were more secure - though it was tricky getting them attached. Also, the three or four washer spacers isn't the way I'd prefer to level the fridge, but it's not readily visible so I'll be the only one who knows.
It rolls quite nicely on my carpet. I'll keep an eye out for 2" swivel caster wheels with a brake, but for now this'll do. My SS drip tray is in the mail and the bar handles are on back-order until mid-September. Thank to everyone for the info and advice!
Cheers,
V
The front feet underneath the fridge are 5/16"-18 threaded stem feet. So all you need to replace the front feet with caster wheels is a 5/16"-18 threaded stem caster wheel. Home Depot sells a 2" swivel wheel from Shepherd Hardwood Products that I used for this project. The original feet had a 1/2" stud and the Shepherd caster has a 1" stud, but I was pleased to find that the Shepherd caster screwed all the way into the fridge. I'm not sure how much deeper you can go but these Shepherd casters where $3.98 each and worked out perfectly.
The back wheels were a bit tougher because there are no pre-existing inserts to screw into. I picked up another set of 2" straight wheels from Home Depot, also manufactured by Shepherd. After looking at the bottom of the fridge there's a perfect spot on either side for these wheels.
There's barely enough room to bolt the straight wheels in place, so I pushed the wheel all the way up to the edge of the bent metal and marked where I was going to drill. I started with small bits and progressed up to a 1/4" bit. Using 1/4" nuts, bolts, lock washers and washers I was able to mount the straight wheels in the back.
You can see it's a tight fit on the inside so be careful marking and drilling:
I thought I finished, but when I put the fridge upright I noticed it wasn't level. Luckily, I bought extra washers and after removing and reattaching the wheels a few times I got it level.
Here's what I used to level the fridge:
Front swivel wheels - One 5/16" lock washer only
Rear straight wheels - One 1/4" lock washer closest to the bolt head, and either three or four 1/4" washers between the wheel mount and fridge
I used four washers on the rear straight wheels when the wheel mount was pressing up against the black of the fridge, the fourth washer accounting for the thickness of the metal that the other half of the wheel mount was fastened to.
I suppose you could use sheet metal bolts to attach the rear wheels, but I felt nuts and bolts were more secure - though it was tricky getting them attached. Also, the three or four washer spacers isn't the way I'd prefer to level the fridge, but it's not readily visible so I'll be the only one who knows.
It rolls quite nicely on my carpet. I'll keep an eye out for 2" swivel caster wheels with a brake, but for now this'll do. My SS drip tray is in the mail and the bar handles are on back-order until mid-September. Thank to everyone for the info and advice!
Cheers,
V
MoRoToRiUm
Well-Known Member
- Joined
- Jun 17, 2008
- Messages
- 1,389
- Reaction score
- 6
Looks good! You beat me to it- Once I finish off this keg it looks like I will doing some drilling
MoRoToRiUm
Well-Known Member
- Joined
- Jun 17, 2008
- Messages
- 1,389
- Reaction score
- 6
It's been done for awhile, but my Sanyo has wheels! Rather then dealing with all of the bolts with the fixed wheel setup, I went with the same swivel casters for the back that are used on the front. After using bolts, I spent my small fortune on washers. Five washers on the front/back, plus the ease of only drilling one easier accessible hole in the back it seams fairly solid and stable. The only issue is the caster under the bottom mount for the door. There is not much space for a wrench to tighten it in as much as I would like, but am sure I will remedy that some day...
amercuric
Well-Known Member
I have a question on the exact position of the whole. When you say you are drilling 9 1/2 inches from the back is that it middle of the hole of the edge?
These links might yield some more info for you.
https://www.homebrewtalk.com/f35/gearing-sanyo-4912-kegerator-conversion-126460/
Last edited by a moderator:
def plan on doing the vodka trick but just some reasurance before i start drilling away. I have also run into problems with the door as i tried to replace it with dry erase board i found the seal doesnt sit flush on the back like the factory door panel preventing the fridge from making an airtight seal, anyone else get this problem or got a solution
amercuric
Well-Known Member
i tried to replace it with dry erase board... the seal doesnt sit flush ... preventing the fridge from making an airtight seal
How thick is your board? This is what I did:
1. I purchased whiteboard from Home Depot, it was at least 1/8" thick. The panel was something like 8'x4' and I had Home Depot cut it to size.
2. Mark and drill precise screw holes in the whiteboard panel. This part is a PITA and might take a couple tries.
3. The edges of the whiteboard panel should fit in the rubber stripping that you took off the factory panel. Once you have fitted the stripping to the whiteboard, screw the whiteboard panel back onto the refridgerator door.
Similar threads
- Replies
- 0
- Views
- 204
- Replies
- 39
- Views
- 1K
