You are using an out of date browser. It may not display this or other websites correctly.
You should upgrade or use an alternative browser.
You should upgrade or use an alternative browser.
Priming a March with an 'autovent'
- Thread starter Yorg
- Start date

Help Support Homebrew Talk:
This site may earn a commission from merchant affiliate
links, including eBay, Amazon, and others.
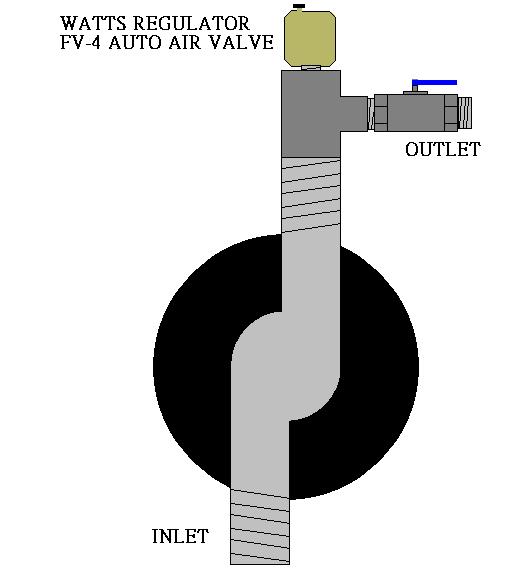
here is a quick down and dirtay MS Paint on how I plan on using my air vent.
Is this going to work for me?
-=Jason=-
I just finished plumbing my rig with the autovent. I put it just off output of the pump. Been testing it for about half an hour. So far it works flawlessly.
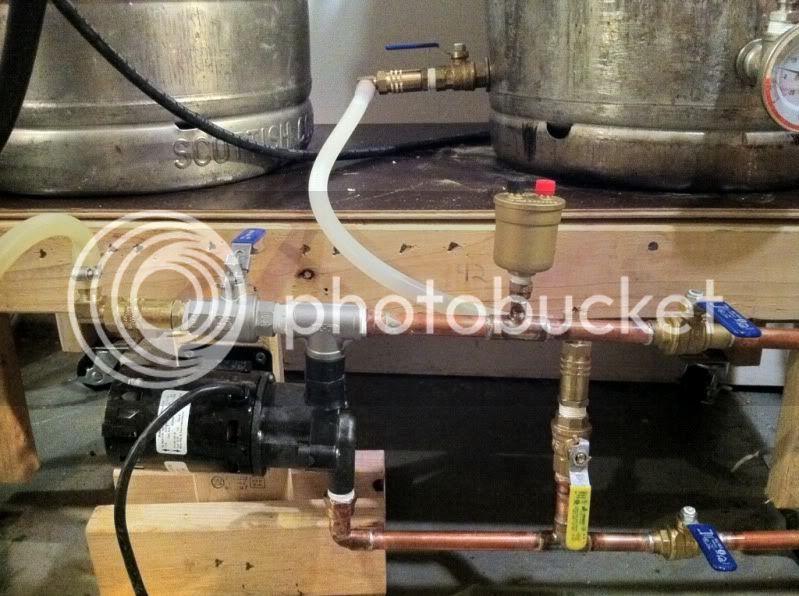
Here's my new hard plumbing. Got tired of the mishaps with quick connects.
I tested my system doing everything I'd do on a brew day. Autovent worked, well, automatically. So you should be good with your design.
Cheers!

iaefebs
Well-Known Member
Comparing this post to the one on the Randall 3.0... Yeah I know it is two different applications... however they are both using Hi-Vents, auto vents, I just replaced my hi-vent in my home heating boiler system. These vents are made by Taco, Maid-O-mist and others check Pex supply for prices also.
They are still available from Grainger. Seriously, for $10 I can't believe more people don't trumpet this solution. I wonder if it's a pain to clean.
Grainger has 'em.
Grainger has 'em.
well like I said I called my Watts rep at work and was told the DuoVent was going to be discontinued. the FV-4 was its equal or will do the same thing.
at work the Plumbers aka HD SUPPLY PLUMBING stocks the FV-4 in 1/8" so I'd use a 1/2x1/8" bushing in my 1/2" tee.
the vent is my cost of $5.61 and the bushing is $.79. so really how can I go wrong for less than 10$. on Grainger I'd have to pay shipping and wait for it to get to me.
I can just walk 20 steps from my desk and pay for the parts from the plumbers and be done with it.
I am buying my FV-4 today and I'll report back on how it works after I get my pump.
-=Jason=-
alowell
Well-Known Member
Has anyone used the autovents in their system and can offer any insight to how dirty they get during process and if they are hard to clean? I recirc PBW through my system and wasn't sure if they would have to be taken out to be cleaned or they would get clean enough in-line with the PBW recirc. Thanks!


$20.94
$29.99
The Brew Your Own Big Book of Clone Recipes: Featuring 300 Homebrew Recipes from Your Favorite Breweries
Amazon.com

$49.95 ($0.08 / Fl Oz)
$52.99 ($0.08 / Fl Oz)
Brewer's Best - 1073 - Home Brew Beer Ingredient Kit (5 gallon), (Blueberry Honey Ale) Golden
Amazon.com

$53.24
1pc Hose Barb/MFL 1.5" Tri Clamp to Ball Lock Post Liquid Gas Homebrew Kegging Fermentation Parts Brewer Hardware SUS304(Liquid Hose Barb)
Guangshui Weilu You Trading Co., Ltd


$53.24
1pc Hose Barb/MFL 1.5" Tri Clamp to Ball Lock Post Liquid Gas Homebrew Kegging Fermentation Parts Brewer Hardware SUS304(Liquid MFL)
yunchengshiyanhuqucuichendianzishangwuyouxiangongsi


![Craft A Brew - Safale S-04 Dry Yeast - Fermentis - English Ale Dry Yeast - For English and American Ales and Hard Apple Ciders - Ingredients for Home Brewing - Beer Making Supplies - [1 Pack]](https://m.media-amazon.com/images/I/41fVGNh6JfL._SL500_.jpg)


$22.00 ($623.23 / Ounce)
AMZLMPKNTW Ball Lock Sample Faucet 30cm Reinforced Silicone Hose Secondary Fermentation Homebrew Kegging joyful
无为中南商贸有限公司


$58.16
HUIZHUGS Brewing Equipment Keg Ball Lock Faucet 30cm Reinforced Silicone Hose Secondary Fermentation Homebrew Kegging Brewing Equipment
xiangshuizhenzhanglingfengshop


$10.99 ($31.16 / Ounce)
Hornindal Kveik Yeast for Homebrewing - Mead, Cider, Wine, Beer - 10g Packet - Saccharomyces Cerevisiae - Sold by Shadowhive.com
Shadowhive


$33.99 ($17.00 / Count)
$41.99 ($21.00 / Count)
2 Pack 1 Gallon Large Fermentation Jars with 3 Airlocks and 2 SCREW Lids(100% Airtight Heavy Duty Lid w Silicone) - Wide Mouth Glass Jars w Scale Mark - Pickle Jars for Sauerkraut, Sourdough Starter
Qianfenie Direct

$176.97
1pc Commercial Keg Manifold 2" Tri Clamp,Ball Lock Tapping Head,Pressure Gauge/Adjustable PRV for Kegging,Fermentation Control
hanhanbaihuoxiaoshoudian

$7.79 ($7.79 / Count)
Craft A Brew - LalBrew Voss™ - Kveik Ale Yeast - For Craft Lagers - Ingredients for Home Brewing - Beer Making Supplies - (1 Pack)
Craft a Brew


the top is just a cap that can be easily removed for cleaning it says so on the WATTS website.
Can be disassembled for inspection and cleaning.
http://www.watts.com/pages/_products_details.asp?pid=664
-=jason=-
Can be disassembled for inspection and cleaning.
http://www.watts.com/pages/_products_details.asp?pid=664
-=jason=-
Okay, the spec sheet for the autovent I used (not the newer replacement) says "not for use in potable systems."
That would seem like a problem, no?
That would seem like a problem, no?
every thing its made from looks legit.
http://media.wattswater.com/ES-DuoVent.pdf
also here is the FV-4 spec sheet
http://media.wattswater.com/ES-FV-4M1.pdf
-=Jason=-
http://media.wattswater.com/ES-DuoVent.pdf
also here is the FV-4 spec sheet
http://media.wattswater.com/ES-FV-4M1.pdf
-=Jason=-
alowell
Well-Known Member
Just ordered two FV-4's 1/2". I have a hard piped system and don't want to fool with bleeder valves! I'll let everyone know what they are like once I get 'em in. Thanks for all the advice HBT
big_al_in_k-zoo
Well-Known Member
Subscribed. Can't wait to see/find out your results Flomaster / Alowell.
This seems to be a no brainer.
This seems to be a no brainer.
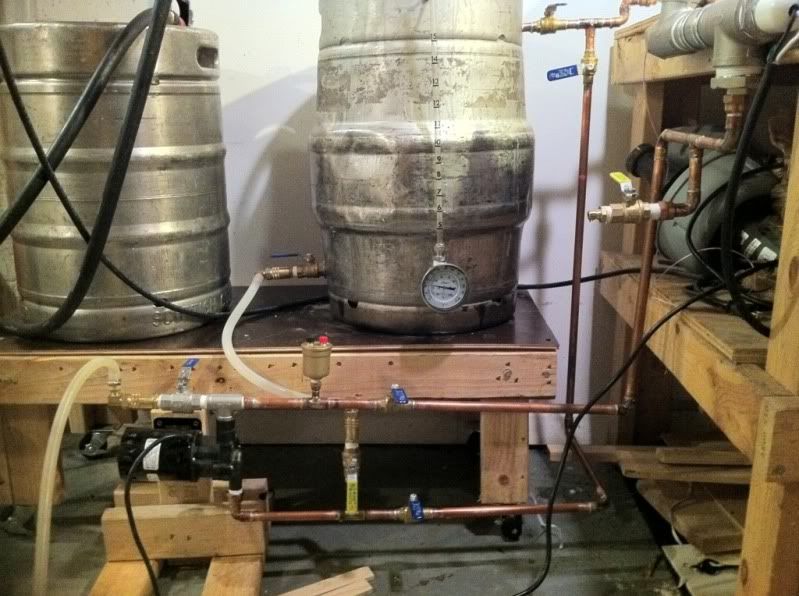
Sorry to kill the party, but now I'm having trouble with my autovent. It's not priming well enough to take strike water all the way to my mash tun. I still have a bleeder valve, but I'm not sure what has happened. All I did was some tests with water. Worked great first few times, now I'm having problems.
Here's my setup in case anyone can see the issue:
I can readily send water out the left hand side of of the outlet. But not to the right. Not sure why. I also don't hear any hissing from my autovent.
Thanks.
Here's my setup in case anyone can see the issue:
I can readily send water out the left hand side of of the outlet. But not to the right. Not sure why. I also don't hear any hissing from my autovent.
Thanks.
perhaps its where your auto valve is located. maybe if you used a cross instead of a tee directly above your outlet it *MIGHT* work better?
Idunno because I don't have my pump or valve yet but seems like a it might work just a tad bit better.
-=jason=-
Idunno because I don't have my pump or valve yet but seems like a it might work just a tad bit better.
-=jason=-
Just a wild guess here - assuming that the kegs are sitting on a level surface, it looks like the horizontal pipe slants down to the right. This would let air accumulate between the closed valve to the left of the pump output and the pump without reaching the vent. It might work better if the path to the vent sloped continuously upward with the vent being the highest point. If that's not it, I don't have any other ideas.
Looking at the Watts spec sheet I see that they advise two things:
1) loosen the black cap two turns for proper venting.
2) Mount the air vent on a pipe size LARGER than the size of your system to get proper separation of air and water.
Gonna try that and report back.
1) loosen the black cap two turns for proper venting.
2) Mount the air vent on a pipe size LARGER than the size of your system to get proper separation of air and water.
Gonna try that and report back.
Well, I have mine working, but it's not 100%. I think I need a better understanding of where to position the vent and what is making my system less than optimal.
I increased the size of the tee housing the autovent. The recommendation was 2.5 times the incoming pipe, but I just went from 1/2" to 3/4" as that's what I had. I also removed the black screw cap.
When I open the valve from my keggle, I hear air hiss out of the autovent, so it is working. But that doesn't mean that my pump is primed. I think it mostly vents when turned off, so sometimes I have to turn the pump on and off a few times, then it's primed.
Not the slam dunk I was hoping for. I'm hoping to learn more about how to setup this autovent.
Report back on your experiences, guys!
IMO, it would work better if you positioned the autovent a little lower. The top of the autovent as shown is only a couple of inches or so below the kettle valve. You could test this hypothesis by raising the kettle on blocks of some kind. I would think raising it 4-6 inches might do it. It would be worth a try at least.
I had some priming problems with a kettle I use to heat water (ball valve on the kettle is connected to the pump input, pump is about a foot lower than the kettle). It worked fine with cold water, but when heating the water, it would frequently lose prime. I suspected the dip tube inside the kettle was the problem, so I removed it, and haven't had any more problems - the dead space created by not having a dip tube isn't really a problem as I only use this kettle for heating water.
Here's a thread with some more detailed information from Beerthirty on his setup.
Seems like he has an autovent on BOTH the input and the output. This seems like a good way to go as I'm still having problems with the air in the diptube preventing fluid from filling the pump head. I ordered a second auto vent for the input line. Makes sense.
I'm wondering why the setup with no autovent on the input side works so well in Yerg's video that started this thread. Since he mentioned draining from this "tun" I'm thinking he does not have a dip tube. So he has no issue with air trapped in the dip tube like I do. Also, I don't have near as much force gravity draining as he does in his setup.
The second autovent on the inlet side should make this thing automatic for me. Wish I didn't have to wait for it as I'm brewing tomorrow! I'll report back when I get the second autovent.
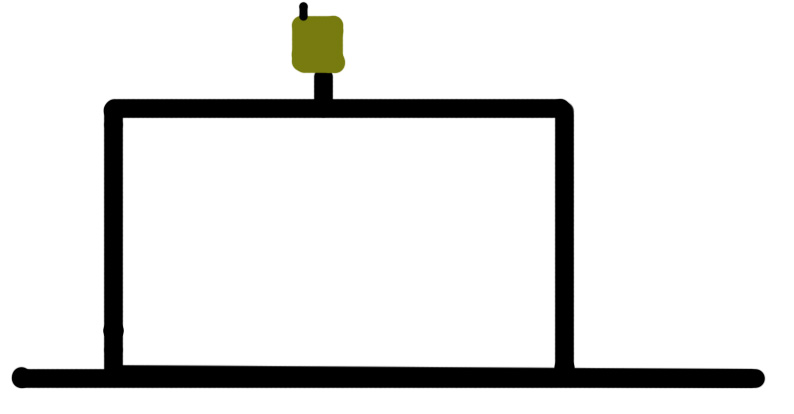
The autovents in BeerThirty's rig were placed above the pumps with enough tubing to catch the air bubble from the keg dip tube. When the pump is started the bubble hits the inlet side first and most will vent if the pump is stopped for about 15 seconds, the remaining air usually will pass on out through the outlet air vent. The plastic tubing connecting them to the pumps is 1/2" PFA that was heated and formed into the bends to keep the stress on the pump connections minimal. if you were to build a "D" loop on its back with the flow along the bottom and the air vent in the top, you might be able to catch the air bubble and vent it.
It would seem to me that once an air bubble makes it past the pump head it would make no difference where it goes. It may exit through the autovent or it may move on to where the tubing terminates. Once the pump head is flooded and no air remains downstream on the suction side of the pump, there should be no further priming problems unless there's an air leak. I would think that the autovent would permit the pump head to be flooded with ease, then you could turn on the pump and push out any air that in front of the pump.
The autovents in BeerThirty's rig were placed above the pumps with enough tubing to catch the air bubble from the keg dip tube. When the pump is started the bubble hits the inlet side first and most will vent if the pump is stopped for about 15 seconds, the remaining air usually will pass on out through the outlet air vent. The plastic tubing connecting them to the pumps is 1/2" PFA that was heated and formed into the bends to keep the stress on the pump connections minimal. if you were to build a "D" loop on its back with the flow along the bottom and the air vent in the top, you might be able to catch the air bubble and vent it.
Unfortunately I don't understand the idea. a quick drawing would greatly help.
Many thanks for your replies.
It would seem to me that once an air bubble makes it past the pump head it would make no difference where it goes. It may exit through the autovent or it may move on to where the tubing terminates. Once the pump head is flooded and no air remains downstream on the suction side of the pump, there should be no further priming problems unless there's an air leak. I would think that the autovent would permit the pump head to be flooded with ease, then you could turn on the pump and push out any air that in front of the pump.
So you're basically saying I should put the air vent on the inlet side of the pump to allow air that blocks the pump head from flooding the release.
My understanding is that this is one issue. The second issue is that when you turn off your pump, air can be pulled back into the pump head, causing it to lock up on you. Hence the need for two autovents.
I'm not sure where the best spot to position the vents are, though. Close to the pump? Near the keggle? Up high? I even thought of having them on a quick connect I could move around.
I'm going to try having a vent on the inlet side as well as the outlet.
Absolutely NO. The vent must be on the output side of the pump.
Here's my take:
1. You can avoid the possibility of pulling air back into the pump head by simply closing the flow control valve on the output side of the pump before turning off the pump.
2. Raise your kettle some or lower the pump. You need a little bit more positive suction head in order to make priming easier. This would very extremely easy to try, so why not do it?
3. You only need a single vent (auto or manual) on the output side of the pump.
Put this kind of loop on the inlet side, right, with the left side heading to the pump and the right side the inlet.
Assuming I have that right I'll give it a shot, though today I'm brewing with the system I've got. A nice porter for the winter.
Assuming I have that right I'll give it a shot, though today I'm brewing with the system I've got. A nice porter for the winter.
Absolutely NO. The vent must be on the output side of the pump.
Here's my take:
1. You can avoid the possibility of pulling air back into the pump head by simply closing the flow control valve on the output side of the pump before turning off the pump.
2. Raise your kettle some or lower the pump. You need a little bit more positive suction head in order to make priming easier. This would very extremely easy to try, so why not do it?
3. You only need a single vent (auto or manual) on the output side of the pump.
I understand what you're saying. #1 makes sense to prevent air being pulled back. However, according to Beerthirty, the vent that was to relieve air pressure pulled back was on the OUTLET side.
I have one on the inlet of each pump to allow priming when the pump cavity is full but the line is empty, and one on the outlet of each pump so when the pump is turned off air that is trapped in the outlet lines or valves cant flow back to the pump and vapor lock the pump.
My problem really does appear to be lack of positive pressure from the keggle. I see the air bubbles get trapped in the tube from keggle to pump. But raising it is an issue due to hard plumbing I have to gravity transfer from my mash tun above it. It's as high as it can go to allow transfer. If I raise it, it'll be above my mash tun plumbing, among other challenges. I might be able to lower the pump a bit, but not much.
If the problem is air stuck in the dip tube, wouldn't a vent on the inlet side solve this problem?
Secondly, If I drilled a small hole or two in the dip tube, would it keep air out of it and still suction fine? I use a hop strainger so hops aren't really an issue.
Thanks again for all the ideas. There do seem to be some conflicting concepts about setup of this thing.
I understand what you're saying. #1 makes sense to prevent air being pulled back. However, according to Beerthirty, the vent that was to relieve air pressure pulled back was on the OUTLET side.
Closing the valve on the ouput side (the flow control valve) would prevent ANY air from being pulled back into the pump head. Close this valve BEFORE turning off the pump.
My problem really does appear to be lack of positive pressure from the keggle. I see the air bubbles get trapped in the tube from keggle to pump. But raising it is an issue due to hard plumbing I have to gravity transfer from my mash tun above it. It's as high as it can go to allow transfer. If I raise it, it'll be above my mash tun plumbing, among other challenges. I might be able to lower the pump a bit, but not much.
It appears from the pics that you have a flexible tubing (not hard piping) from the kettle to the QD which should allow you to raise the kettle very easily.
If the problem is air stuck in the dip tube, wouldn't a vent on the inlet side solve this problem?
IMO, this should not be necessary.
Secondly, If I drilled a small hole or two in the dip tube, would it keep air out of it and still suction fine? I use a hop strainger so hops aren't really an issue.
This would also not be necessary so long as you have enough positive suction head which can be accomplished by raising the kettle some. You could also try removing the dip tube entirely and re-test. IOW, temporarily remove the DIP tube from the equation.
Thanks again for all the ideas. There do seem to be some conflicting concepts about setup of this thing.
...
If I drilled a small hole or two in the dip tube, would it keep air out of it and still suction fine? I use a hop strainger so hops aren't really an issue.
I'm wondering if this would aerate my wort too much.
Similar threads
- Replies
- 1
- Views
- 1K
- Replies
- 4K
- Views
- 440K
- Replies
- 24
- Views
- 4K
- Replies
- 8K
- Views
- 2M
