Prevent oxygen during cold crash

Homebrew Talk - Beer, Wine, Mead, & Cider Brewing Discussion Forum

Help Support Homebrew Talk - Beer, Wine, Mead, & Cider Brewing Discussion Forum:

This site may earn a commission from merchant affiliate links, including eBay, Amazon, and others.
I clean a keg, fill it completely with StarSan, and use bottled CO2 to push out the StarSan -- leaving a CO2 filled keg. I bleed almost all of the pressure off the keg, to the point where I feel one more tug on the pressure relief would fully depressurize it.
View attachment 613607

I like the balloon idea. If you have two kegs or at least a 7 gallon pale you can do this without using your own bottled co2 and just use the fermentation. You can do the same Starsan solution in the keg prior to fermentation. You could then hook the the line coming out of your ferementer to the filled keg’s gas line. Then hook the kegs beer line up to the second kegs gas line or into a 6+ gallon pale. The co2 from your fermentation will push the starsan to the next keg or bucket and completely purge the keg of oxygen. You’ll also still be able to fill your balloon. It’s the Same idea you explained but you’re just utilizing the fermentation and saving money on the co2
 
... hook the the line coming out of your ferementer to the [StarSan] filled keg’s gas line. Then hook the kegs beer line up to the second kegs gas line or into a 6+ gallon pale. The co2 from your fermentation will push the starsan...

I'd be a bit concerned that there would be enough back pressure to loosen the stoppers in the top of my fermenter, in which case the Starsan wouldn't get purged and the CO2 wouldn't get captured.

Your idea seems best used with fermenters that are built for pressurization. I know it's not much pressure, but it doesn't take much to push a stopper out, or force liquid through the little plastic drain valve at the bottom of my fermenter (even when it's closed).
You could try it and see what happens. If it leaks you coud buy some wide silicone washers and put those against both sides in the spout hole, then the o rings. This would increase the surface area and increase it ability to handle psi.

I’m sure there are ways to anchor down the bung. Even getting 1 or 2 stainless steal or galvanized strap clamps with stainless screws and rubber washers or gaskets could work. That would even allow dryhoping under slight pressure.
 
Last edited:
The LODO guys have a video of fermentation pushing out sanitizer and filling a keg with CO2.

Vitality Starter

author S. cerevisiae

All one needs to make a well-shaken starter is a sanitizable vessel that is at least four times the volume of the starter being prepared, a sanitizable screw-on cap for the vessel, and a funnel. I do not know if anything comparable is available in the UK; however, one U.S.-gallon glass jugs (demijohns in UK speak) are plentiful in the United States. Home brew supply stores sell plastic replacement caps for these jugs that can be sanitized (38mm polyseal screw top caps). If one has money to burn, a 5L borosilicate glass media bottle like I currently use is a very nice toy. However, 5L media bottles can cost prohibitive when purchased new. I acquired my current 5L media bottle as unused laboratory surplus, and it was not cheap. I used a 1-gallon glass jug for a very long time before switching over to using a 5L media bottle.

Preparing the starter medium (a.k.a. starter wort)

The starter medium is prepared like one would prepare a starter any other way. A 10% weight/volume solution is made by mixing 100 grams of pale DME into a little more than 1L of water. The goal here is to end up with 1L of media after the solution has been boiled and cooled to room temperature. I boil the solution for 15 minutes in a 3-quart stainless steel sauce pan (A U.S. quart is slightly smaller than a liter). The media is chilled in the sauce pan with the cover affixed using an ice water bath in my kitchen sink.

Sanitizing the starter vessel, screw-on cap, and funnel

The starter vessel, screw-on cap, and funnel should be sanitized while the medium is boiling and chilling. While I use bleach and StarSan, feel free to use your preferred sanitizer. It is critical that the funnel is sanitized as well, and that one does not touch the inside surface of the funnel after it has been sanitized.

Note: One thing that I like to teach home brewers is to get into the habit of wiping the lip over which yeast or nutrient will be poured with an alcohol saturated cotton ball before decanting yeast, medium, or supernatant (supernatant is the clear liquid that lies above the solids in a starter, yeast crop, or a batch of beer). Wild microflora (yeast, mold, and bacteria) rides through the air on house dust. What we want to do is ensure that we do not drag any dust that may have come to rest on the pouring lip of the container that we are decanting into a vessel in which we intend to grow a culture or ferment a batch of beer. This precaution makes sense If one thinks about what a nurse or doctor does before giving one an injection. The reason why a doctor or a nurse cleans an injection site with an alcohol wipe before giving one an injection is to prevent the needle from dragging microflora that is on one’s skin into the injection site.

Pouring the starter medium

After placing the funnel in the starter vessel, one should wipe the pouring lip of the sauce pan in with an alcohol saturated cotton ball before pouring the starter medium into the starter vessel. I use 70% or 90% isopropyl alcohol. I used to use 95% ethanol (a.k.a. grain alcohol). However, my state outlawed its sale due to teenagers and young adults abusing it. Any 140 proof or better clear spirit will work. Please do not use methylated spirits.


Inoculating the starter medium

If using a White Labs vial, wipe the pouring lip of the vial with an alcohol saturated cotton ball before pouring the yeast culture into the starter vessel. If using a Wyeast smack pack, wipe the outside of the smack and the blades of the pair of scissors that one is using to cut a corner off of the smack pack with an alcohol saturated cotton ball before making the cut, and wipe the cut edge of the smack pack with an alcohol saturated cotton ball before pouring the contents of the smack pack into the starter vessel.


Caping and shaking

Here’s where my method differs from the way the average home brewer makes a starter. The reason why a vessel with a screw-on cap is necessary with this method is because one is going to shake the culture very vigorously for about a minute. I usually tell brewers to shake the starter vessel like it owes you money (think mafia enforcer). The goal here is to attempt to turn the media into foam. That's why the vessel has to be at least four times the volume of the starter. One should then allow the starter to sit for around thirty minutes before loosening the cap to allow the foam to drop.

A well-shaken starter in a 5L media bottle

WSY_NO_64_SNS_zps4331525f.jpg
[/URL]


Pitching the starter

Pitching is one area where most home brewers get it completely wrong. A starter is not a small batch of beer. It is a yeast biomass growth medium. The goal here is to grow the culture to maximum cell density and then pitch it. Maximum cell density occurs at high krausen. Beyond that point, all cell reproduction is for replacement only. Yeast taken at high krausen is much healthier than yeast that is taken from a sedimented starter or batch of beer. That’s why traditional breweries crop yeast at high krausen. Allowing a starter to ferment out and settle places the cells in the yeast equivalent of hibernation where they will have to undo survival-related morphological changes that occurred at the end of fermentation as well as completely replenish their ergosterol and unsaturated fatty acid reserves after being pitched.

High krausen should occur within 12 to 18 hours after pitching the starter. The yeast biomass grows exponentially, not linearly. The yeast cell count grows at a rate of 2^n, where the symbol “^” means raised to the power of, and n equals the number of minutes that have elapsed since the end of the lag phase divided by 90; hence, the difference in propagation time between 200B cells and 400B cells can be as little as 90 minutes.
 
Last edited:
This introduction of oxygen through pitching in the whole starter into a fermenter and racking your wort ontop of it or pitching after racking the wort will have no ill effects on your beer, it will only have benefits. The yeast will consume all of this oxygen during fermentation, just as it does oxygen from the stir plate as it will continue multiply. The yeast need some level of oxygen during fermentation.

Freezing liquid yeast is a no go. The yeast will be fully hydrated so when you freeze it you will cause those yeast cells to burst, plummeting the viability of the yeast. You can regrow what is remaining, sure, but since you can not properly calculate the remaining viability, you are most likely terribly underpiching. This causes all sorts of problems such as infections that won’t be out competed, negative byproducts, and low attenuation with the potential for stuck fermentations
You are confusing dissolved oxygen and oxidation. Your starter contains both. The beer will consume all of the dissolved oxygen in the starter. However all of the oxidized malt flavors will carry over to the finished beer.
 
You are confusing dissolved oxygen and oxidation. Your starter contains both. The beer will consume all of the dissolved oxygen in the starter. However all of the oxidized malt flavors will carry over to the finished beer.
Sorry, I’m just having a difficult time following. If the yeast consume all the disolved oxygen and use it as energy and convert it to co2, how could malts flavors oxidized? If that is the case, wouldn’t that mean every beer’s malt profile is oxidize. I’m just struggling to understand this because even strict LODO brewers don’t argue oxygenating for fermentation purposes. If you could explain this in detail it would be helpful.
 
Just as always, his experiments are poorly conducted and flawed.c3l for a smaller beer and is built it outrageously above the threshold that would be consider normal and had it 15% of his volume. Wouldn’t you be able to identify a beer with a 15% difference in ingredients.

His rationale is also flawed. it only stated they identified their was difference. Did not state their were any off flavors or undesirable flavors. So it doesn’t prove anything
 
I like the balloon idea. If you have two kegs or at least a 7 gallon pale you can do this without using your own bottled co2 and just use the fermentation. You can do the same Starsan solution in the keg prior to fermentation. You could then hook the the line coming out of your ferementer to the filled keg’s gas line. Then hook the kegs beer line up to the second kegs gas line or into a 6+ gallon pale. The co2 from your fermentation will push the starsan to the next keg or bucket and completely purge the keg of oxygen. You’ll also still be able to fill your balloon. It’s the Same idea you explained but you’re just utilizing the fermentation and saving money on the co2

I'd be a bit concerned that there would be enough back pressure to loosen the stoppers in the top of my fermenter, in which case the Starsan wouldn't get purged and the CO2 wouldn't get captured.

Your idea seems best used with fermenters that are built for pressurization. I know it's not much pressure, but it doesn't take much to push a stopper out, or force liquid through the little plastic drain valve at the bottom of my fermenter (even when it's closed).

The keg does not need to be filled with StarSan prior to purging it with CO2 from fermentation. Start with a keg full of air, and you can end up with single digit parts per billion O2 content in the keg at the end of fermentation. The complete analysis is here. Having no liquid in the keg will eliminate most of the back pressure on the fermenter.

There is also an analysis of suck back (without a CO2 back fill arrangement) here that covers both the suck back due to the temp drop lowering the pressure, as well as how much suck back could be caused by CO2 reabsorption from the headspace.

Brew on :mug:
 
Just as always, his experiments are poorly conducted and flawed.c3l for a smaller beer and is built it outrageously above the threshold that would be consider normal and had it 15% of his volume. Wouldn’t you be able to identify a beer with a 15% difference in ingredients.

His rationale is also flawed. it only stated they identified their was difference. Did not state their were any off flavors or undesirable flavors. So it doesn’t prove anything

I don't know which experiment you're referring to but in the one linked they were NOT able to identify a difference.
 
I don't know which experiment you're referring to but in the one linked they were NOT able to identify a difference.
Totally miss the total number of participants, for some reason I thought it was 11. The wife and I had our kids Monday moring. Literally running on 8 hours of sleep since Sunday night lol. But that strengthens my argument, thanks lol
 
Last edited:
I guess congratulations are in order then... :ban::bravo:
Unfortunately, it also strengthens the argument that Brulosophy's tasting panels never ever detect any difference no matter what. :rolleyes:
 
I guess congratulations are in order then... :ban::bravo:
Unfortunately, it also strengthens the argument that Brulosophy's tasting panels never ever detect any difference no matter what. :rolleyes:
Thats true but it does put things in perspective...Homebrewers worry about way to much.

Like brewing at 156 or 148...I've never noticed a bit of difference. Its nice that someone puts the effeot in to test theories....which is more than most of use do
 
The keg does not need to be filled with StarSan prior to purging it with CO2 from fermentation... The complete analysis is here. Having no liquid in the keg will eliminate most of the back pressure on the fermenter...

Thanks for the work on that, and for pointing me to it. I had not seen it.

But you've cost me money! I need to buy some more kegs to have around for this.
 
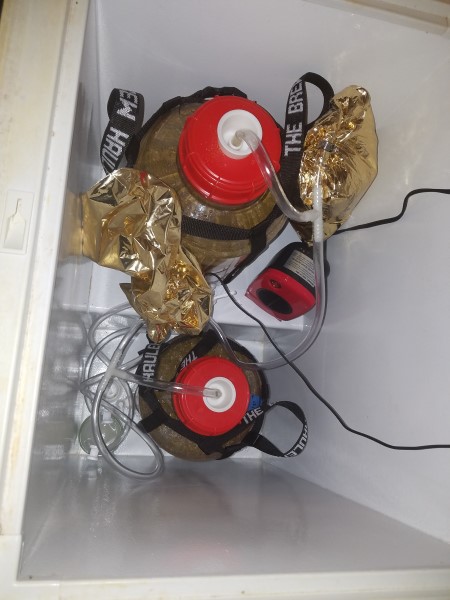
Here's how I do it. I found the little nylon tube fittings at Ace Hardware, and the mylar balloon at Walmart. A nurse friend found the tube clamp for me.

For the first two days of fermentation the tube clamp is closed, so the balloon does not fill with air that is pushed out of the headspace by fermentation.
View attachment 613603

On the third day I open the clamp and Spiderman fills up with C02.
View attachment 613604

This is cold crashed to 38F.
View attachment 613606

I clean a keg, fill it completely with StarSan, and use bottled CO2 to push out the StarSan -- leaving a CO2 filled keg. I bleed almost all of the pressure off the keg, to the point where I feel one more tug on the pressure relief would fully depressurize it.

I connect the keg beer connector to the fermenter drain valve, and connect the keg gas connector to the top of the fermenter. I close the tube clamp to the balloon, because there's no point in letting it fill up again -- I roll it up for storage between brews.
View attachment 613607

Great idea, I am going to have to try this. My Wife bought me a balloon for Valentines day (LOL).

How do you release CO2 pressure from the fermenter after the balloon has filled up?
 
Here's how I do it.

This is the cleanest solution I have seen to this issue! I like how it solves both the suck back from crashing, and the "suck in" that would occur when emptying the fermenter.

I researched the "harvester" type solutions and how I could make my own. The video they put out seems a bit misleading. Discussions on this show people going out and picking up 1 gal jars to support enough suck back volume. I was thinking I could probably chain 3 or 4 of the 42 oz wide mouth plastic bottles I have, but even that is pretty bulky.

The video does also not show filling the first container completely with sanitizer, which is needed to prevent just a mix of air and CO2 in the first container though maybe after a week there would not be much Oxygen left. I have concerns about the amount of pressure needed to push out the solution, but I have not tried it. A "balloon" type solution just seems much more practice and much less bulky...either a homemade solution or a commercial solution.

Has this been included: http://brulosophy.com/2018/05/10/7-methods-for-reducing-cold-side-oxidation-when-brewing-beer/
 
Just as always, his experiments are poorly conducted and flawed.c3l for a smaller beer and is built it outrageously above the threshold that would be consider normal and had it 15% of his volume. Wouldn’t you be able to identify a beer with a 15% difference in ingredients.

His rationale is also flawed. it only stated they identified their was difference. Did not state their were any off flavors or undesirable flavors. So it doesn’t prove anything

Many complain about Brülosophy experiments but no one else is doing them. Don’t like them? Do it yourself and publish the results. Guess what — you’ll be criticized. All the armchair quarterbacks around here know better than the guys on the field. At least he’s out there.
 
Many complain about Brülosophy experiments but no one else is doing them. Don’t like them? Do it yourself and publish the results. Guess what — you’ll be criticized. All the armchair quarterbacks around here know better than the guys on the field. At least he’s out there.
He just doesn’t understand( or chooses not) how to eliminate extraneous variables. He puts in a lot of work no doubt, and I’m not knocking his determination and effort...but effort only gets you so far. I’d rather listen to Janish and others who conduct “true” experiments to provide us with validity. I didn’t use his work as evidence, I just provided a reason for why his experiment was flawed and could provide invalid results due to an extraneous variable.
 
Great idea, I am going to have to try this...

The idea is not mine. What I've done is just a refinement of ideas I got from the good people here on HBT.

How do you release CO2 pressure from the fermenter after the balloon has filled up?

There's no need to do that.

In the first photo of my post above you can see that there is a second hose from the stopper that goes to a traditional blow off tube in a jar of StarSan. Gas is free to flow through either path, it will take the path of least resistance.

During fermentation if the tube clamp to the balloon is open, and the balloon is empty, gas will go to the balloon. It would take a little more force to bubble gas through the StarSan, so it will instead go to the balloon. Once the balloon is filled, gas will start bubbling out through the blowoff tube in the StarSan.

During cold crashing, it would take a little more force to pull gas through the blow off tube in the StarSan, so the gas will instead be pulled from the balloon. As long is there is sufficient volume in the balloon, nothing will get pulled through the blowoff tube in the StarSan.

The only thing you have to remember to do is clamp off the balloon for the first day or two of fermentation. That will give enough time for the air in the fermenter headspace to be purged out through the blowoff tube. After that, release the clamp and everything takes care of itself.

Don't use an elastic balloon or bag, because if you do then the balloon will expel its contents if you need to open the fermenter (for dry hopping, etc.). With a mylar balloon (or similar bag), that doesn't happen.
 
The idea is not mine. What I've done is just a refinement of ideas I got from the good people here on HBT.

Based on your setup I put together one of my own. I used 3/8" tubing and some T-connectors from Home Depot and some balloons from Walmart. This is a split batch of IPA. The batch I brewed on Saturday with WLP001 slurry was fermenting hard all week, and might not have enough left to fill the balloon (I think I got a good seal). The batch I brewed on Sunday with WLP013 inflated the balloon though...so it must still be chugging along.

I picked up the connectors to do a keg transfer as well. I messed up and got 1/4" barbs for the keg connectors, then realized I needed 5/16" to be able to connect to the 3/8" tubing so had to make a second shopping trip. I dry hopped them yesterday and plan to put my newly acquired fermentation chamber to use and cold crash before kegging this weekend if fermentation is done.


20190225_203647.jpg
 
He just doesn’t understand( or chooses not) how to eliminate extraneous variables. He puts in a lot of work no doubt, and I’m not knocking his determination and effort...but effort only gets you so far. I’d rather listen to Janish and others who conduct “true” experiments to provide us with validity. I didn’t use his work as evidence, I just provided a reason for why his experiment was flawed and could provide invalid results due to an extraneous variable.

You seem pretty sure on this. I've looked at what they do and I think they do a nice job of controlling extraneous variables. But, I don't know everything, so if you could point out the places where, experimentally, they're falling short, perhaps I might learn something.
 
Many complain about Brülosophy experiments but no one else is doing them. Don’t like them? Do it yourself and publish the results. Guess what — you’ll be criticized. All the armchair quarterbacks around here know better than the guys on the field. At least he’s out there.

I've always given them credit for A) doing something, and B) what I see as pretty decent experimental control.

Where I've long had issues is in the testing. It's not good, and given that nobody knows what panelists are drinking prior to testing, "no difference" results might mean little more than people just burned out their tastebuds on a triple IPA that left them incapable of discerning differences.
 
You seem pretty sure on this. I've looked at what they do and I think they do a nice job of controlling extraneous variables. But, I don't know everything, so if you could point out the places where, experimentally, they're falling short, perhaps I might learn something.
http://brulosophy.com/2016/10/10/decanted-vs-full-yeast-starter-exbeeriment-results/
This experiment was is one I can use as an example. He was testing the flavor impact (aka difference) between pithing full volume active starter over pitching a decanted starter. To start this experiment is technically flawed from the beginning due to no true control group since they aren’t both going to have truly the same yeast cell count. One pack verse the other may have had an increased viability, so the decanted or the non decanted starter could have had a significantly larger cell count than the other. Any difference in the final beer could be linked to this unforeseen variable.

With that being said, we can considering the control group the beer that was decanted and the experimental group the nondecanted beer. For the experimental group He made a 3.1 liter starter, which is 3 times larger than the standard 1L starter used for a krausening (an active, full volume starter) pitch which is typically 5% of total volume of the wort. The 3L starter would make It 15% of total volume. By doing this, he has already invalidated the outcome because any perceived difference could be linked to increased dilution of the wort by pure volume alone.

In addition to volume alone, the non decanted beer would actually have a higher abv at the end, since he is pitching a starter that would have 3x’s the alcohol present than the typical full 1L starter pitch, which could cause an elevated impact on the flavor.

Even with this flaws, significance was not found. However, if it were found, these flaws could be seen as the extraneous variables that actually caused the flavor difference and not the process of pitching an active starter

I agree with you--at least to some extent. I would agree that--perhaps, but only perhaps--the two yeast packs differed in terms of vitality, but if they were the same lot, and presumably--presumably--treated the same way, it's quite unlikely they'd differ signficantly. Maybe they aren't the same, but without having read the specfics, I'd bet they tried to control for that, too--same lot, same treatment, etc.

There are also other limitations to these experiments. They're limited to a particular yeast strain. Would it work the same way with others? How about the recipe? The decisions on mash temp, strike water, etc?

Hard to get around all that, but it is what it is.

********

As to variables such as ABV, dilution and so on, we are going to have to disagree. They are part of the experimental conditions! How do you evaluate such differences when you want to eliminate the differences? Of COURSE there will be differences in ABV, dilution, and so on. That's what's being tested--whether doing it one way produces a discernable difference as opposed to the other way. It's a test of process.

********

Even so, the "non-significant" result is not a reasonable conclusion. I say that not because they haven't eliminated all the extraneous variables which, if relevant, would be a possible reason for the result (and we don't agree on whether that's true, but set that aside).

Rather, the way they're testing the results is very flawed. They don't do the triangle test correctly. There's no indication as to what people have been eating or drinking prior to the test--if they're drinking, say, a double IPA before the test, are they still able to perceive differences after having their taste buds slammed by a bitter IPA?

This always bums me out. I think that, generally, they do a pretty decent job of experimental control. I don't see a lot of places where they could improve things.

But then they spoil what is a nice experimental design with a poor testing procedure. I wish they didn't do that. They're doing all this work to create a control and an experimental batch, only to do a flawed testing procedure. Disappointing.
 
... I put together one of my own. I used 3/8" tubing and some T-connectors from Home Depot and some balloons from Walmart...

Your balloons don't have Spiderman on them. Your beer will be normal, not super beer.

Seriously now, it looks good. You will need some type of clamp or valve between the balloon and the T, unless you plan to use a regular airlock or blow-off tube until fermentation has purged the headspace.

I used latex tubing from Ace Hardware. It is very flexible, so a little tubing clamp is all it takes to fully close it. I didn't have luck using that type of clamp on vinyl tubing, it was too stiff and didn't close off completely.
 
I agree with you--at least to some extent. I would agree that--perhaps, but only perhaps--the two yeast packs differed in terms of vitality, but if they were the same lot, and presumably--presumably--treated the same way, it's quite unlikely they'd differ signficantly. Maybe they aren't the same, but without having read the specfics, I'd bet they tried to control for that, too--same lot, same treatment, etc.

There are also other limitations to these experiments. They're limited to a particular yeast strain. Would it work the same way with others? How about the recipe? The decisions on mash temp, strike water, etc?

Hard to get around all that, but it is what it is.

********

As to variables such as ABV, dilution and so on, we are going to have to disagree. They are part of the experimental conditions! How do you evaluate such differences when you want to eliminate the differences? Of COURSE there will be differences in ABV, dilution, and so on. That's what's being tested--whether doing it one way produces a discernable difference as opposed to the other way. It's a test of process.

********

Even so, the "non-significant" result is not a reasonable conclusion. I say that not because they haven't eliminated all the extraneous variables which, if relevant, would be a possible reason for the result (and we don't agree on whether that's true, but set that aside).

Rather, the way they're testing the results is very flawed. They don't do the triangle test correctly. There's no indication as to what people have been eating or drinking prior to the test--if they're drinking, say, a double IPA before the test, are they still able to perceive differences after having their taste buds slammed by a bitter IPA?

This always bums me out. I think that, generally, they do a pretty decent job of experimental control. I don't see a lot of places where they could improve things.

But then they spoil what is a nice experimental design with a poor testing procedure. I wish they didn't do that. They're doing all this work to create a control and an experimental batch, only to do a flawed testing procedure. Disappointing.
Agreed about testing. Maybe I’m interpreting the specific study wrong, however I’m under the impression that he is testing the difference mainly due pitching the “fermenting” starter as in the by products produce. This is why I would then consider the sure size of the starter that he built causing the extraneous variables I mentioned. I think of it like this, if you were testing the effects of adding lactose to a finished beer, you wouldn’t then add it with 3 times the typical amount of water, because that alone could cause an unexpected outcome. Just not the way I’d do it. Anywho, I’ve hijacked this thread enough. My bad OP
 
Your balloons don't have Spiderman on them. Your beer will be normal, not super beer.

I know...I could not even find a Dora the Explorer balloon...just the section with these plain ole 1, 2, 3...the "1" balloon looked like it has the most volume and would stay out of the way more than the "8" balloon.

Seriously now, it looks good. You will need some type of clamp or valve between the balloon and the T, unless you plan to use a regular airlock or blow-off tube until fermentation has purged the headspace.

I think I can clamp the balloon off with a twist tie during the first few days to ensure I am getting CO2 in the balloon. I could put a hose clamp on there as well. Today I did a quick swap of the hoses to get the batch that is still fermenting to fill up the other balloon.
 
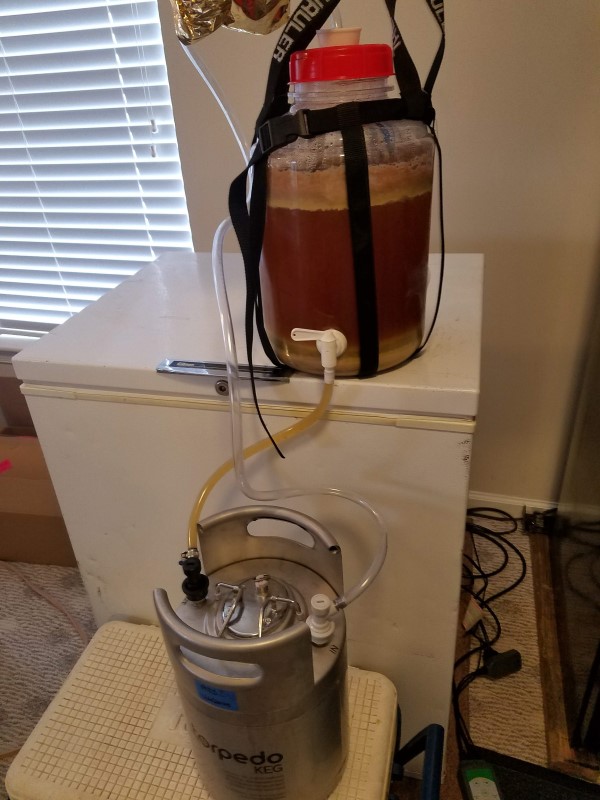
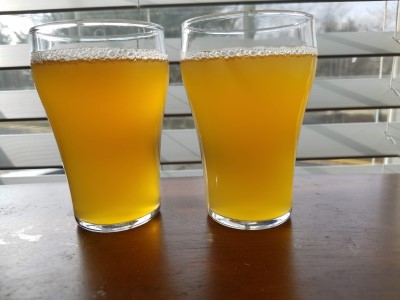
I kegged my two batches of NEIPA today and checked "closed keg transfer" off my list of process improvements (this batch was also the first time using the fermentation temp chamber, the first time I cold crashed, the first time using my new 3 gal Fermonster fermenters and my first NEIPA). The only hiccup I had was that the beer in connector clogged with the first batch once. The beer in the keg looks dark in the picture, but it is a nice golden color in the glass.

20190302_104904.jpg
 
I kegged my two batches of NEIPA today and checked "closed keg transfer" off my list of process improvements (this batch was also the first time using the fermentation temp chamber, the first time I cold crashed, the first time using my new 3 gal Fermonster fermenters and my first NEIPA). The only hiccup I had was that the beer in connector clogged with the first batch once. The beer in the keg looks dark in the picture, but it is a nice golden color in the glass.

View attachment 615524

Nice setup. Where does your gas line run to for the displacement?
 
I think I did a good job prevention oxygen...at least so far. The one on the left followed the recipe for the More Beer "Flashing Lights IPA" kit and was fermented with WPL001 California Ale. For the one one the right I went for more NEIPA character by swapping in 8 oz of Flaked Wheat and 8 oz of Flaked Oats, no gypsum, fermenting with WPL013 London Ale, and adding 1/3 of the dry hops on day 2. They look very similar right now but they do taste different. For being flat and 2 weeks since brew day they both are tasty, but the NEIPA version is really tasty!!

20190302_150923.jpg


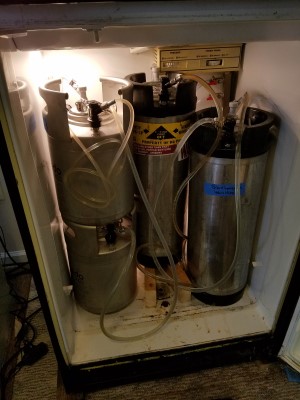
I had to add a Tee to one of my gas lines (I only have a 3 way distributor) and bottle of the last of my Porter to get the two kegs into my fridge. I guess I got a little carried away brewing hoppy beers as I have an IPA-ish, NEIPA, Rye IPA, and Pale Ale in kegs now!.

20190302_144225.jpg
 
Nice setup. Where does your gas line run to for the displacement?

The setup is very similar to the prior post (with pictures) from @LittleRiver. I basically pulled the "blow off tube" out of the jar of StarSan and hooked it up to a gas line post. I filled the kegs up with StarSan solution and pushed that out with CO2 so the keg was filled with CO2 and and, as the keg filled up, the CO2 from the keg displaced the volume in the fermenter.

Note that I felt like the dip tubes in the Torpedo kegs did not reach far enough into the bottom of the kegs to be able to push out all the StarSan so I added a small section of tubing (some gas line tubing) to the end of the tip tube.
I've been doing these transfers for a long time. Do you feel it is necessary to fill the kegs with solution first? Or purge with a few bursts of CO2, vent, and CO2 again?

I do the latter but I am curious now
 
I've been doing these transfers for a long time. Do you feel it is necessary to fill the kegs with solution first? Or purge with a few bursts of CO2, vent, and CO2 again?

I do the latter but I am curious now

I am not positive what is "necessary". I used to just do a simple "blast with CO2 + fill from lid + purge headspace" process and I thought that was fine, but I also struggled with making quality IPAs (though in years past I used a lot less hops in IPAs that is common now). My understanding is that to purge Oxygen levels in an empty keg down to a "low" amount, you have to use much more CO2 than it takes to just push out the solution from a filled keg.

I recently kegged an Irish Red, and I did not mess with a closed transfer into the keg. I never really had problems with that type of beer in the past and I figured a little oxidation might even add some expected character to the beer. I took care to limit oxygen exposure.
 
I've been doing these transfers for a long time. Do you feel it is necessary to fill the kegs with solution first? Or purge with a few bursts of CO2, vent, and CO2 again?

I do the latter but I am curious now
It takes 16 full cycles (fully pressurize with CO2, fully release) at 30 psi to purge oxygen from a keg. Even more cycles as pressure is decreased. Still will have some oxygen in there though due to inevitable impurity of our CO2. And that's a lot of gas wasted, and money with it. A liquid purge leaves nothing but your CO2 in the keg (again will have some oxygen depending on purity) in one go at as low a pressure as you like, and you need to sanitize anyway.

The best way to evacuate the last of the sanitizer is not to extend the liquid tube, but to trim the gas tube flush with or slightly recessed from the inner surface of the keg. After you've pushed all you can out the liquid side, invert the pressurized keg with the gas post at the lowest position, pop on a QD, and blow the rest out.
 
Here's an easy way to purge virtually all O2 from your keg.

Fill the keg nearly to the top with Star-San. Attach a LIQUID quick-disconnect to your CO2 gas line and attach to the liquid post. Let the lid sit cockeyed in the keg mouth, and start hitting the keg with gas. You'll create bubbles coming up from the bottom, and the star-san will create lots of foam on top. What's in the bubbles of the foam? Why, CO2 of course.

When the foam is coming out enough that you have purged the entire headspace with the foam, and covered the underside of the lid, affix the lid in place. Voila! A keg filled with mostly Star-San and the rest is Star-san foam which is composed of CO2.

Then, remove the gas from the keg. Put a gas QD on your CO2 line, and a jumper on the liquid side, and push that Star-san out into either another keg (which is what I do), or into a bucket to save for the next time.

At the end, you'll have an empty (mostly) keg purged of O2, with a couple ounces of Star-San in the bottom. i attach a Liquid QD with a piece of tubing and blow out the remaining Star san, stopping before the keg empties of pressure.

Here are a few pics showing the above:

CO2purgebubbles.jpg
jumper.jpg
jumperoneside.jpg
 
I've been using a balloon + carboy cap, but I have to babysit it as it crashes down to temp. It seems it's a dance of putting a very tiny bit of gas on vs. turning gas off and having the balloon swell (and eventually pop) vs. coming back and seeing it completely deflated, at which point I'm guessing the point of the rig has been defeated.
 
I've been using a balloon + carboy cap, but I have to babysit it as it crashes down to temp. It seems it's a dance of putting a very tiny bit of gas on vs. turning gas off and having the balloon swell (and eventually pop) vs. coming back and seeing it completely deflated, at which point I'm guessing the point of the rig has been defeated.

Is your balloon too small? Are you using an elastic balloon? If so, switch to an inelastic mylar balloon.

My balloon is about 1ft square, and gets about 8" at the thickest point when fully inflated. I've never had it completely deflate during a cold crash, so there is never a need for babysitting the rig.

The only thing I have to remember to do is open up the tube clamp going to the balloon after the first day of fermentation. I keep it clamped off for the first day or two of fermentation to give the yeast time to purge the fermenter headspace, then open the clamp so the balloon can fill with fermentation gas. There's never a worry of the balloon popping, because the pressure is so low.

The second tube in the photo below goes to the beer post of a keg. There's an airlock on the gas post. This purges the keg using fermentation gas.

IMG_20190923_172548_209.jpg
 
That's not silicone tubing, is it? Looks like it in the photo, I could be wrong.
 
Back
Top