Please poke holes in my design for a new EBIAB-basket system

Homebrew Talk - Beer, Wine, Mead, & Cider Brewing Discussion Forum

Help Support Homebrew Talk - Beer, Wine, Mead, & Cider Brewing Discussion Forum:

This site may earn a commission from merchant affiliate links, including eBay, Amazon, and others.

DawgPen Brewing

Supporting Member
HBT Supporter
Joined
Apr 16, 2020
Messages
46
Reaction score
27
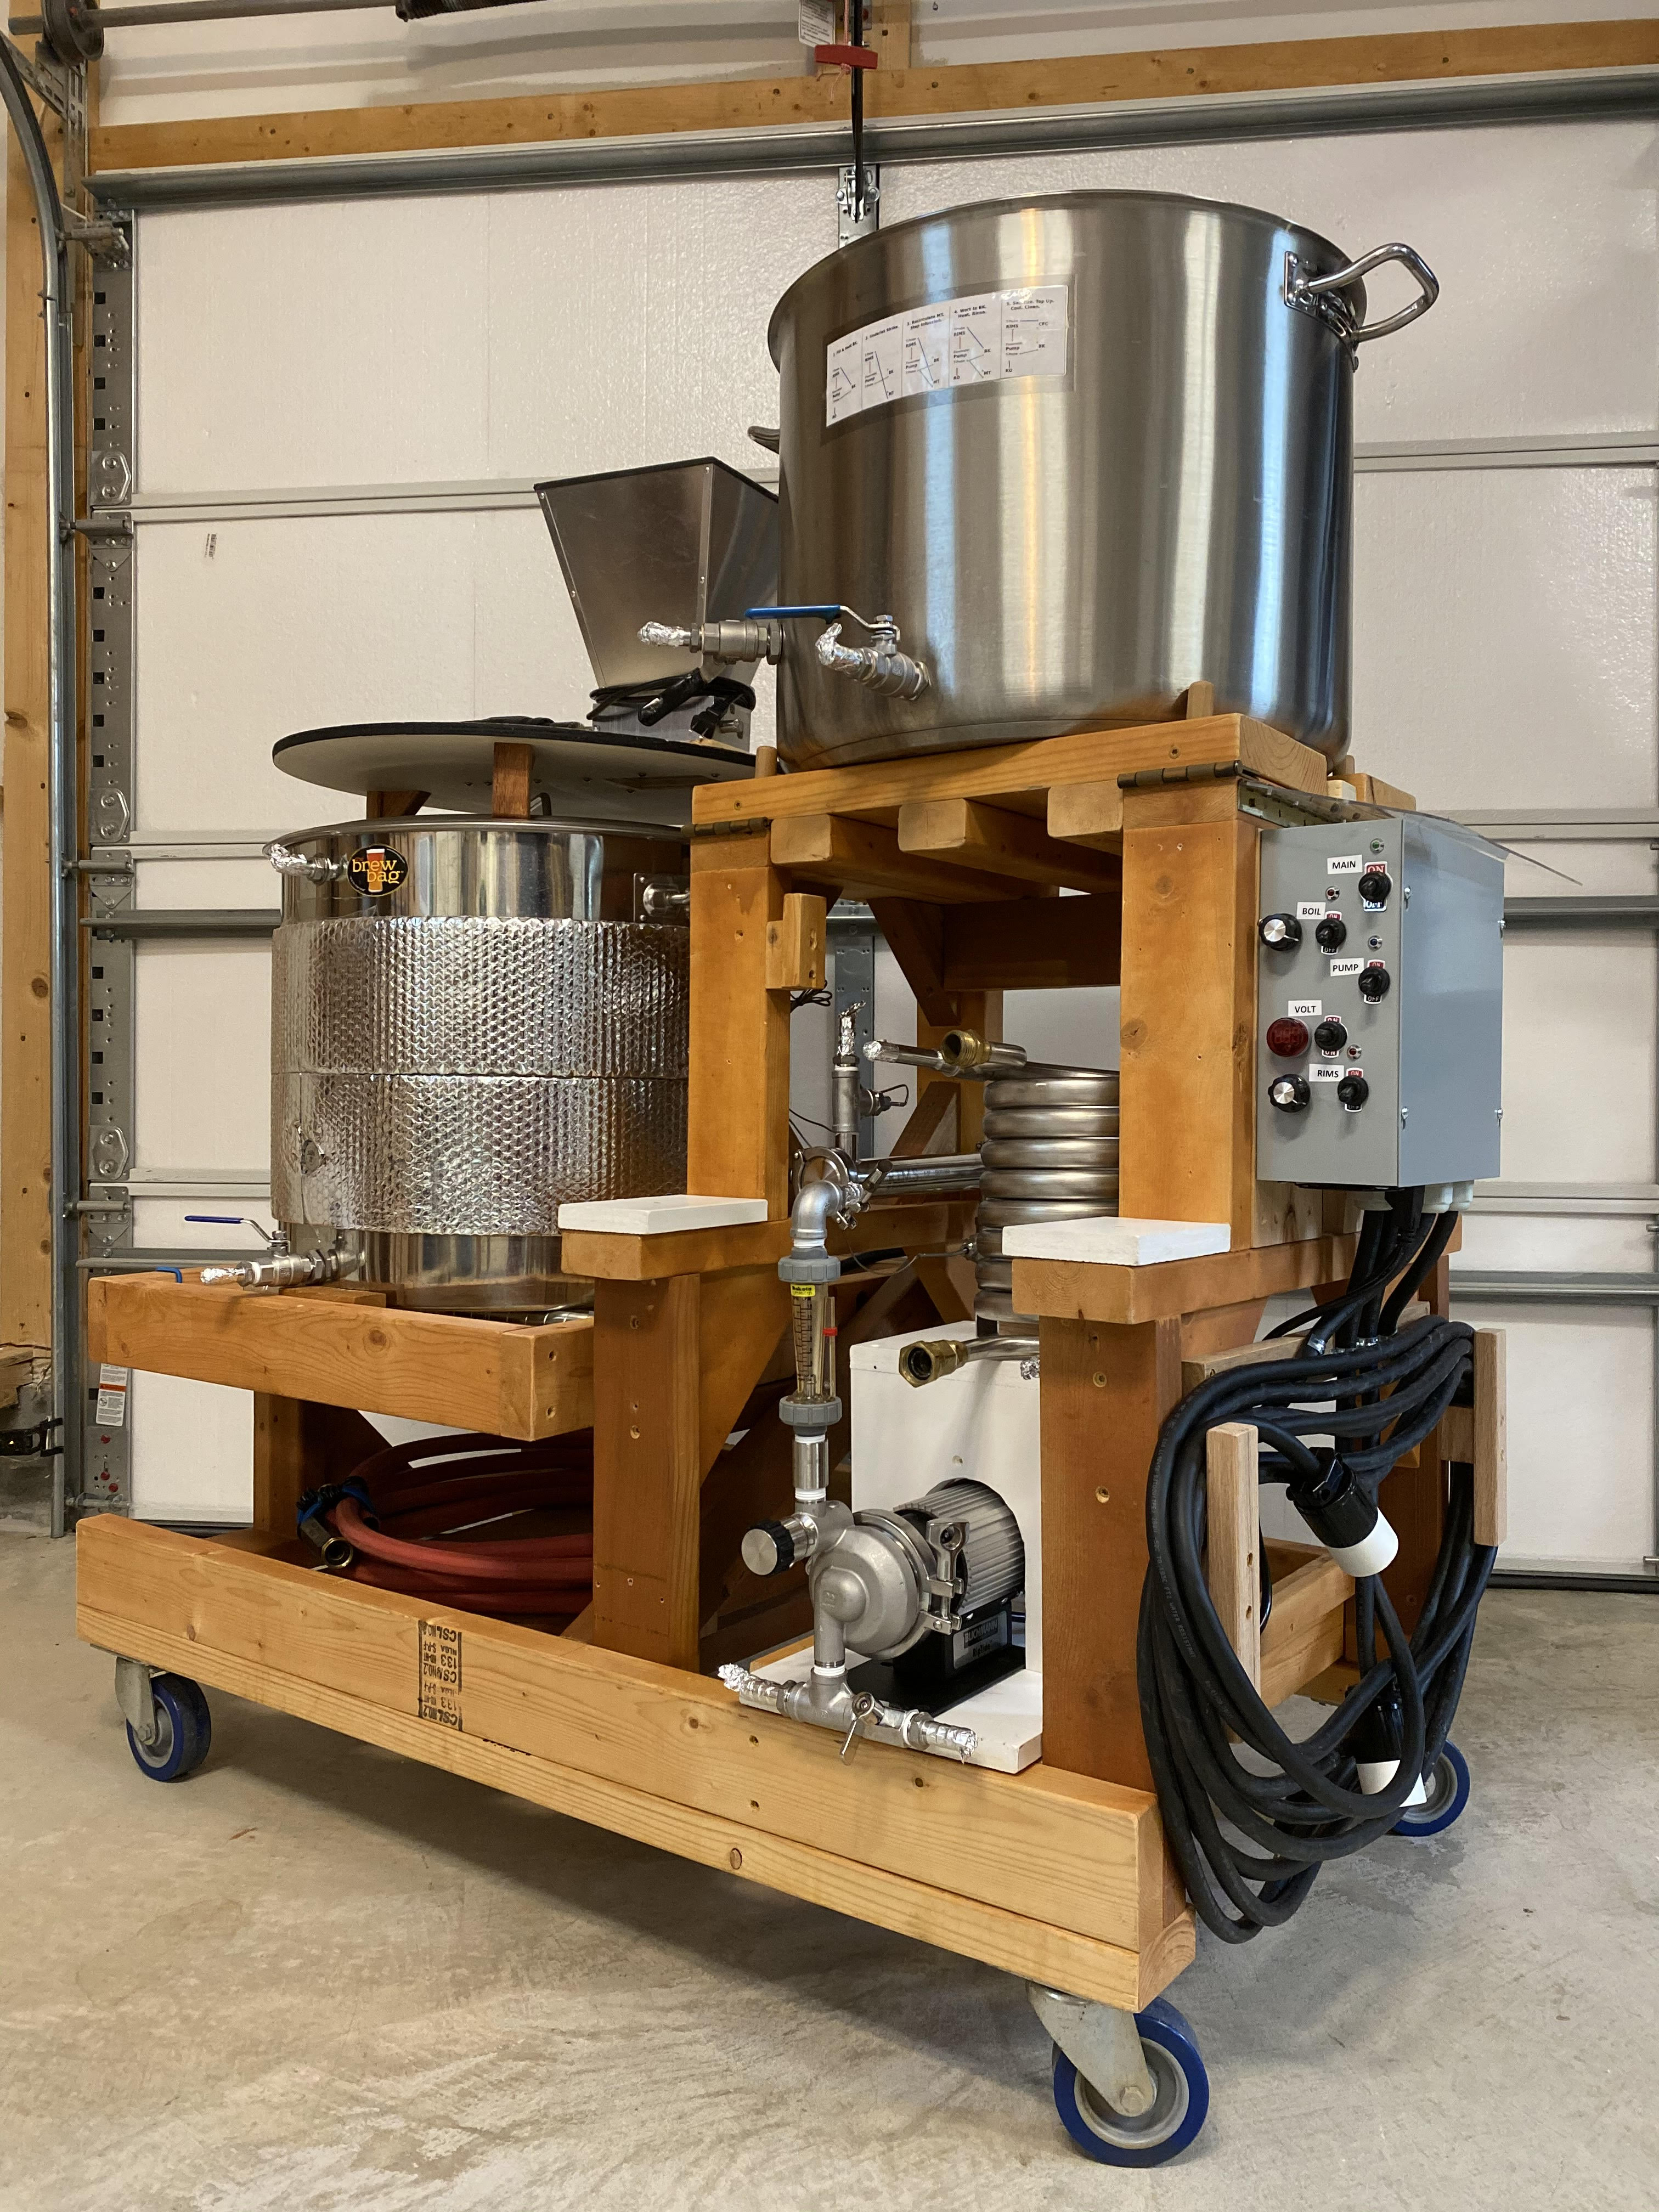
I have been reading through the forum for a couple months now wanting to build my own 10-gallon batch EBIAB basket system which will have constant recirculation from the mash forward via a spray nozzle in the lid.. I believe I finally have all of my thoughts together and want to get everyone's feedback prior to ordering my system. Just for full disclosure, I plan to order this system by the end of the week because I realize that patience is a virtue that I lack and also because I know that it will take some time to get all of my components together since they are fully custom. Admittedly, I know that I tend to greatly over-engineer systems at times so if there is anything that is COMPLETELY unnecessary, please point that out in advance.

For the controller I am going with a 240V Grounded Brewing Technology controller but using an Auber DSPR320 Boil Control in place of the Omron PID since I want to be able to step mash with a timer as well as have a delayed start option which Rex offered as a solution. I will use a 5500 W element which should work pretty well for this application from what I have read here.

https://www.groundedbrewingtechnologies.com/products/30a-biab-control-panel
Control panel.jpg


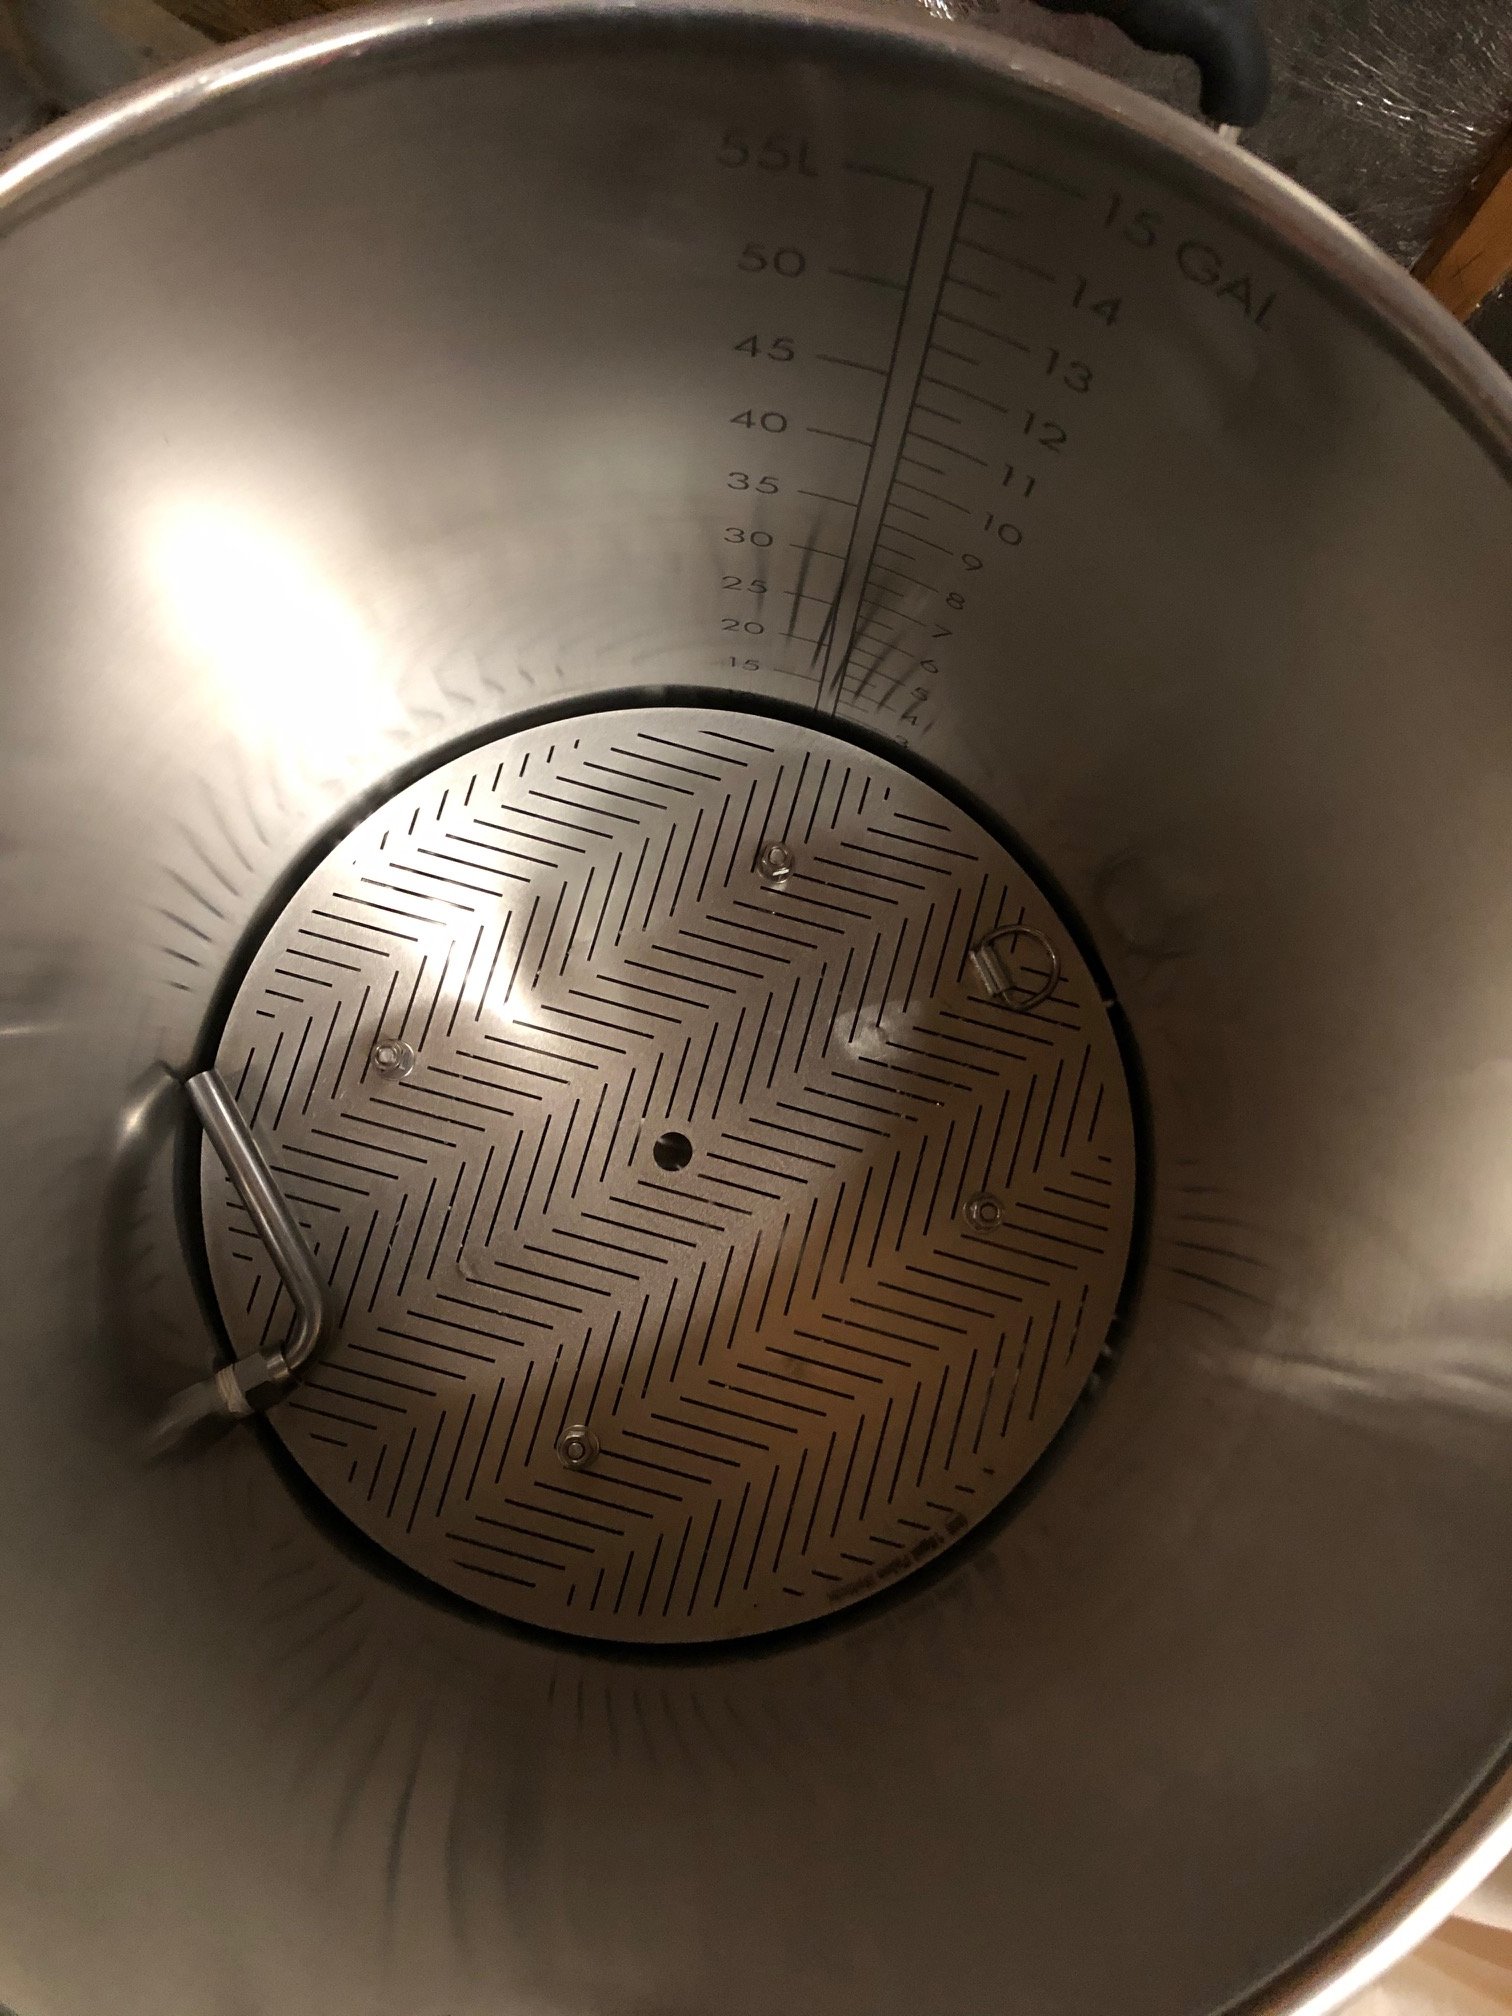
For the Boil Kettle I am ordering a 20-gallon custom kettle from Spike with all TC couplers located 2" off the bottom of the kettle to limit the amount of dead space water between the bottom of my basket and the element/pickup tubes. I want to use TC clamps so that we can clean down to the bare kettle after every brew day (realistically it will probably be every other) and I like how they function even though they are likely overkill. The configuration I am going for looks like this:

kettle.jpg


For the basket I plan to order from Utah Biodiesel Supply and it is intended to have a flange on the top which will hold the entire grain load without having feet that can hit the thermocouple and the heating element. This probably is a highly over-engineered part of my system or something that I am overthinking but I don't want to have anything that could bump those parts while we are using them and it makes more sense to me to suspend it from the top. From my math I should have approximately an inch between the heating element and the bottom of the mash basket. The metal sides are intended to prevent the recirculation water from just hitting the top of the basket and short circuiting without going through the majority of the grain bed.

EBIAB Basket.jpg


Please critique my system and let me know if there are any areas that could be improved or any potential issues. Thanks in advance guys!
 
Last edited:
What's the advantage to the custom grain basket? You're already ordering a custom Spike kettle, why not just order the 20 gallon Solo system?

Also, if there is some advantage to not using the Solo system, have you seen the Blichamann BrewCommander? Cheaper than the controller you listed and seems to have all the bells and whistles in a compact platform.

We have had a stuck sparge when using a large amount of oats even when using rice hulls from the false bottom setup like the Spike solo which is the idea behind the custom grain basket. The Spike Solo is $1,800 configured like I want it and it doesn't have some of the features I wanted. The way the grain basket tapers also loses quite a bit of potential volume that I would like to have in the grain basket for higher gravity batches.

The Blichman BrewCommander does look nice but I don't really like the idea of a touchscreen to run the system. I want to have a physical knob to be able to turn manually rather than touching a screen with wet hands.

I do like a lot of the features of a lot of systems but none of them had everything just the way I wanted it so that is why I ended up at building my own I guess.
 
If your goal is to brew high protein grain bills, I'd question the mesh used as well as the reduced area (only bottom of the basket compared to entire basket like Clawhammer Supply) before I placed an order on one. Have you seen a grain basket design like your work successfully?
 
If your goal is to brew high protein grain bills, I'd question the mesh used as well as the reduced area (only bottom of the basket compared to entire basket like Clawhammer Supply) before I placed an order on one. Have you seen a grain basket design like your work successfully?

That is a great question Apache and is the part of my design that I have actually modified quite a bit since I started trying to come up with my design. I originally had a copy of the Clawhammer type basket but after reading another post on here and looking at the Spike design it appears to me that the intent of the basket system is so that the water has to filter down through the majority of the grain rather than just hitting the top inch or so and going off to the side. In my mind I can see how a large portion in the middle of the grain would have little or no flow and the outside portions getting all of the recirculation with a mesh basket only.

As far as having seen another version built like this there are a couple similar versions on the Utahbiodiesel page like the one on the left in the image below (without a flange and with feet obviously).

UTAH Biodiesel.jpg

From UtahBioDiesel page:
Occasionally we receive requests to build a Brew In A Basket with partial mesh and partial solid sided. Here's two examples. The one on the left was a filter we built new from scratch with mesh on the bottom. The one on the right is a filter we built a while back that the customer shipped in to us to modify by adding 2" of 400 micron mesh to the top of it. In both cases we still add side supports to give the mesh structural strength. Both turned out really nice!
 
Have you considered designing your system to use a false bottom with a grain bag instead of the grain basket?

We have used a grain bag once or twice and decided that we wanted to go the basket route. No matter what we did our bag always seemed to have a bit of husk sticking out and was not fun cleaning it.
 
Last edited:
I designed/built my own like this a few years ago. I like that basket, I think it’s the best of both worlds. I started with a solid side but eventually went with a bigger basket with full mesh. I use the brewtech recirc manifold and it’s cool how it recircs under the wort in multiple places. I also highly recommend conditioning your malt, I find it makes a huge difference for recirculating.

What’s your plan for steam/boil off? One thing I love in my design is a TC port up high. I use it to recirc the mash, and then I hook up steam slayer during boil, and then use it as a whirlpool when chilling.

I built a 2 120v circuit/panel for 2 elements. I kind of stumbled into having 2 temp probes and it’s nice. I put the second one on the outflow of the pump and it controls the mash temp/element. The probe in the kettle near the elements is always 6 degrees warmer during the mash recirc.

You hit the nail on the head with the basket design I BC am going for. Trying to get the best of both worlds with ease of cleaning and decent efficiency. I need to look into conditioning my malt. Never done this before or really ever heard that term.

For steam we will have to see how things go to determine if we need a steam hood or not. My brewing space is actually a very nice barn that is about 1,000 square feet with very high ceilings. We can easily add a hood to the outside if needed since the wall behind us would vent to the outside under a canopy. May be a good idea in the South Georgia summer regardless.

The idea of two thermocouples sounds interesting. I know that the kettle will have temperature variations but did not expect it to be six degrees like you stated for your system.

Thank you for your input on my system.
 
I kind of stumbled into having 2 temp probes and it’s nice. I put the second one on the outflow of the pump and it controls the mash temp/element. The probe in the kettle near the elements is always 6 degrees warmer during the mash recirc.

I totally agree with this. OP has the TC on the opposite side of the outlet port. Wort will hardly move there and he'll be measuring wort that just came through the bed versus wort that just got warmed by the element. In my experience, the best place to put the controlling thermocouple is in the wort flow returning to the bed. With a 2nd TC in the bed itself to show its temp. But always control on the wort temp returning to the bed.
 
OP: not sure why you need all this custom stuff.

Your boil kettle is just a regular kettle with some Triclamp fittings. Buy a kettle, buy some triclamp bulkhead fittings and install them.

Not sure why the sides are open on your grain basket. As far as I am concerned, only the bottom should be open. The world has been using mash tuns with only the bottom open for 100 years. I think you made a great choice using a basket rather than BIAB. Take it a step further and close off the sides. There are ways to deal with your stuck oats mash.

If you close off the sides, just buy yourself a pot that fits inside your boil kettle and put a false bottom in it. Way cheaper and easier. That is what I did with Thing1. (Link in sig.) You can also install your own legs and a means to suspend the grain basket while sparging.

I doubt you will need full element power when mashing. I'd wire in a way to run the element on 120VAC during mash (1/4 power, 1/4 watt density) so that you don't scorch the wort.

You haven't talked about your pump, stand, chiller and plumbing yet.

I think you made a good decision going with the manual panel rather than a touchscreen system.

I was excited to see your posts on my upcoming build because I have looked through all of the pages of the THING 1 build and have read through the process of your system and many others. Your system has evolved quite a bit but I want this one to be mostly complete right from the go so I am modeling it more like a spike/clawhammer/unibrau system all blended together with some changes that fit how I think I want to brew.

"Your boil kettle is just a regular kettle with some Triclamp fittings. Buy a kettle, buy some triclamp bulkhead fittings and install them." I am fortunate enough to have a friend who is willing to fund half of this project as long as "It is exactly the way I want it and it is built to last". I know that bulkhead fittings work just fine for a long time but there is the possibility they leak and wear out so that is why I am purchasing the custom kettle.

"Not sure why the sides are open on your grain basket. As far as I am concerned, only the bottom should be open. The world has been using mash tuns with only the bottom open for 100 years. I think you made a great choice using a basket rather than BIAB. Take it a step further and close off the sides. There are ways to deal with your stuck oats mash." - My idea was to combine the mesh basket with the traditional column to provide for a more open flow that would make it more difficult (not impossible but pretty difficult) to have a stuck sparge. I recognize that people have done it the same way for a100 years but I am a tinkerer who always is looking to improve things if I can. I am an engineer by trade and a tinkerer at heart so this is my attempt at improving the system. I think it is important to strive to make small improvements or else we just keep doing things the same way because that is how it has always been done.

"You haven't talked about your pump, stand, chiller and plumbing yet." - Pump will be an existing one we have. The stand will be a 30" x 48" stainless equipment stand (24" tall) so we have a little room to work above the top of the kettle for mashing in without having to climb on a stool. Chiller will be an amalgamation of three separate wort chillers we have that now looks similar to a jaded Hydra. Luckily we have a cousin who works with metal that was able to make them all work together and does a great job. Plumbing will be QD with silicon hoses as these seem to be the ones we prefer.

"OP has the TC on the opposite side of the outlet port. Wort will hardly move there and he'll be measuring wort that just came through the bed versus wort that just got warmed by the element. In my experience, the best place to put the controlling thermocouple is in the wort flow returning to the bed. With a 2nd TC in the bed itself to show its temp. But always control on the wort temp returning to the bed." - This comment gave me the most pause by far and has me rethinking where the thermocouple needs to go and where I could add an additional Thermocouple port to my system. I realize that your system is induction which to steal a line from my kids means "the floor is lava" compared to the fire stick in the middle of my kettle since it is different than an induction system. What would be the best location in my setup to place the thermo port in the kettle if I just go with one? That is how I think I want to run the system initially and will add another port if needed down the road in the flow lines. In operation I will likely flip the Heating coil and the Thermocouple so it is closer to the outlet port or even install the thermocouple into the one for the whirlpool and connect the outlet to the one on the side so it is closer to the intake for the pump. Long answer short, I believe there is enough flexibility to make it work with a couple options.

Thanks for the input and helping me think through the process. This is very helpful and I am very appreciative!

pics of our barn/brewing area.


Last edited:
The only comment I have is that I highly recommend briskly whirlpooling the wort beneath the basket at the same time that you're recirculating back to the basket. It has a HUGE impact on temp stability. In fact, with the basket leaving a gap between the kettle and basket, this is one case where the ability to rotate your whirlpool outlet 45 degrees upward during the mash would be benefitcial as it will push heated wort up into the gap to make up for the kettle's radiant heat loss.
 
The only comment I have is that I highly recommend briskly whirlpooling the wort beneath the basket at the same time that you're recirculating back to the basket. It has a HUGE impact on temp stability. In fact, with the basket leaving a gap between the kettle and basket, this is one case where the ability to rotate your whirlpool outlet 45 degrees upward during the mash would be benefitcial as it will push heated wort up into the gap to make up for the kettle's radiant heat loss.

I love the idea of what you are saying but not sure how to effectively do a whirlpool and spray the top of the bed at the same time. Would a whirlpool be more important than to recirculation for the sytem? Should I install a 3 way valve on the pump outlet side so I can whirlpool and recirculate at the same time or rould it work well enough if the intake side were pulling from the whirlpool tube aimed at 45 degrees?

Love the idea but how do you do it in your system?
 
IMHO BIAB sucks. Yea, that'll get an uproar. A separate mash tun equipped with a false bottom and a brew bag, and recirculated will give you the clearest wort into your boil kettle. BTW grain conditioning has marginal effect especially considering the effort and rice hulls should be washed with hot water before use unless you like rice tea in your beer! Besides filtration aids are unnecessary with this setup even with high wheat malt and rolled oats percentages. The brew bag actually makes clean up easier. Study the attached photo for details. Everything shown was about $1900. The system uses SCR voltage regulators which are simpler and more intuitive to use than the more popular PID/SSR's. Notice the only temperature probes are on the brewhardware.com RIMS and not intruding into the kettles. The RIMS is always inline with the pump and the pump runs all brew day except for 75 minutes of the 90 minute boil. A 30 gallon RO water storage barrel (not shown) allows water to be pumped directly into the boil kettle for heating, and the barrel is also a great reservoir for the very slow RO system production rate. The malts are crushed directly into the mash tun avoiding the dust. The Kelco CFC doesn't clog with the copious quantities of hops used in NEIPA's. The mash tun and boil kettle tables tip to minimize the dead space volumes. BTW the RIMS helps heat the strike water, controls the mash tun temperature (of course), brings the wort to >170F while pumping to the boil kettle, and then helps bring the wort to a boil in the boil kettle. Afterwards add a BBQ cover and the cart rolls away setup and ready for the next brew day. This is an accumulation of 10 years of continuous modifications. Love the hobby as much as the beer!
 

Attachments

  • RIMS-Pump_system2.jpg
    RIMS-Pump_system2.jpg
    1.7 MB · Views: 116
I know that bulkhead fittings work just fine for a long time but there is the possibility they leak and wear out so that is why I am purchasing the custom kettle.

OK then.

My idea was to combine the mesh basket with the traditional column to provide for a more open flow that would make it more difficult (not impossible but pretty difficult) to have a stuck sparge.

You are "preventing" a stuck sparge by giving the sparge water a shortcut through the bed that will leave the grain beneath the short cut un sparged. All you've essentially done is decreased the depth of your grain bed and ensured that the bottom of the mash isn't going to get circulation.

If you want to put a short cut through the bed so that your element never runs dry, put in an adjustable down tube like Grainfather has. The beauty of a down tube is that the element never runs dry and the mash bed always has a set amount of mash liquid on it, never enough to compact it. The downtube also eliminates suction at the bottom of the grain bed. Removing the suction and limiting the depth of the mash liquids above the bed goes a long way to eliminating stuck mashes.
 
Last edited:
We have had a stuck sparge when using a large amount of oats even when using rice hulls from the false bottom setup like the Spike solo which is the idea behind the custom grain basket. The Spike Solo is $1,800 configured like I want it and it doesn't have some of the features I wanted. The way the grain basket tapers also loses quite a bit of potential volume that I would like to have in the grain basket for higher gravity batches.

How coincidental is this post. After two failed attempts brewing batches that call for the use of a fair amount of oats / adjuncts, I have come to the conclusion the Spike Solo basket is not going to handle that kind of demand being asked of it. Thus my alternative approach (see below).

Have you considered designing your system to use a false bottom with a grain bag instead of the grain basket?

This is the approach I hope solves the problem. I modified a false bottom by adding 3.5" bolts (I have a 15 gal system) to support the false bottom above the heating element. Grains will be contained in a Wilser bag. Once my mash is done I will pull the bag and remove the false bottom from the kettle prior to the boil with a little help of a piece of safety wire. Hopefully, this will solve the stuck sparge problem when using adjuncts. When I don't use them, I will just use the system as designed. I am definitely intrigued by the Utah Diesel basket but my guess is it's going to be pricey. At least it would be for me having already invested in the complete Spike system.
 

Attachments

  • False Bottom.jpg
    False Bottom.jpg
    433.4 KB · Views: 64
After two failed attempts brewing batches that call for the use of a fair amount of oats / adjuncts, I have come to the conclusion the Spike Solo basket is not going to handle that kind of demand being asked of it.

See the comment I made about the shape of the Spike Solo mash tun here:

Spike Solo Owner's Thread (post #55)
 
This is the approach I hope solves the problem. I modified a false bottom by adding 3.5" bolts (I have a 15 gal system) to support the false bottom above the heating element. Grains will be contained in a Wilser bag. Once my mash is done I will pull the bag and remove the false bottom from the kettle prior to the boil with a little help of a piece of safety wire. Hopefully, this will solve the stuck sparge problem when using adjuncts. When I don't use them, I will just use the system as designed. I am definitely intrigued by the Utah Diesel basket but my guess is it's going to be pricey. At least it would be for me having already invested in the complete Spike system.

So you had to ditch the Solo grain bucket and are now going BIAB for difficult brews ? Why don't people just build their brewing system from scratch ? Why buy these designer systems that don't really work ?

FWIW, the grain bucket on Thing1 works great. Holds 15 pounds. Mashed 30 pounds (2x15 pounds) to 7 gallons at 1.110 in the fermentor. Boil kettle is 11 gallons.

One could easily clone Thing1 to do larger batches.
 
OP: one other thing... put a sight glass on the outside of the boil kettle so you can see what the flow through the mash is doing. You can also instantly see if the pump is too fast or too slow by watching if the level goes up or down while you adjust it.

Without a sight glass, one is mashing blind.
 
I love the idea of what you are saying but not sure how to effectively do a whirlpool and spray the top of the bed at the same time. Would a whirlpool be more important than to recirculation for the sytem? Should I install a 3 way valve on the pump outlet side so I can whirlpool and recirculate at the same time or rould it work well enough if the intake side were pulling from the whirlpool tube aimed at 45 degrees?

Love the idea but how do you do it in your system?

@Bobby_M recently posted a video of his set-up. It's pretty slick. I currently do 3V HERMS 10 gallon batches. Considering building a 3-5 gallon BIAB rig for smaller test batches. If I do I'll likely follow Bobby's design.
 
How coincidental is this post. After two failed attempts brewing batches that call for the use of a fair amount of oats / adjuncts, I have come to the conclusion the Spike Solo basket is not going to handle that kind of demand being asked of it. Thus my alternative approach (see below).


This is the approach I hope solves the problem. I modified a false bottom by adding 3.5" bolts (I have a 15 gal system) to support the false bottom above the heating element. Grains will be contained in a Wilser bag. Once my mash is done I will pull the bag and remove the false bottom from the kettle prior to the boil with a little help of a piece of safety wire. Hopefully, this will solve the stuck sparge problem when using adjuncts. When I don't use them, I will just use the system as designed. I am definitely intrigued by the Utah Diesel basket but my guess is it's going to be pricey. At least it would be for me having already invested in the complete Spike system.

Reading through the Spike Solo comments about stuck sparges is one of the reasons that I wanted to modify my basket to have additional area up the sides. We do a large amount of adjuncts in several of our beers including over a pound each of rolled oats and flaked wheat. These particular adjuncts seems to be a significant culprit with stuck sparges when using our mash tun which would be similar to the Spike BIAB kettle.

While the Utah Biodiesel basket will cost more than the Spike BIAB basket it will not be prohibitively so and my design is not tapered which will allow for a bigger grain bill and eliminates the additional pressure created on the base of the mash tun from the additional weight of grain compared to relatively small bottom. The 6" side mesh side panels should help prevent this without the use of rice hulls.
 
See the comment I made about the shape of the Spike Solo mash tun here:

Spike Solo Owner's Thread (post #55)

Spot on.

So you had to ditch the Solo grain bucket and are now going BIAB for difficult brews ? Why don't people just build their brewing system from scratch ? Why buy these designer systems that don't really work ?

From a personal standpoint, because some days I just wake up and realize after the fact that - hey - I guess I'm not the all knowing. Kind of a humbling feeling actually.
 
I modified a false bottom by adding 3.5" bolts (I have a 15 gal system) to support the false bottom above the heating element. Grains will be contained in a Wilser bag. Once my mash is done I will pull the bag and remove the false bottom from the kettle prior to the boil with a little help of a piece of safety wire.
The reason I mentioned this approach is after three years of brewing on a 60-liter system I ditched the stainless steel basket completely and replaced it with a false bottom and Wilser bag. I only remove the false bottom at the end of the brew day for cleaning by the way.

2020-05-29 10.29.30.jpg
 
Sounds like the approach is working for you which makes me me feel a bit better that the approach will solve the issue. Nice looking setup btw!
 
Last edited:
From a personal standpoint, because some days I just wake up and realize after the fact that - hey - I guess I'm not the all knowing. Kind of a humbling feeling actually.

Sorry I came down so hard. I didn't mean to criticize anyone individually. It was a rhetorical question.

We all strive to make the best decisions we can and learn through our experiences doing so.

Brew on!
 
Sorry I came down so hard. I didn't mean to criticize anyone individually. It was a rhetorical question.

We all strive to make the best decisions we can and learn through our experiences doing so.

Brew on!

Peace.

Now back to regularly scheduled programming and to DawgPen’s original feedback request.
 
Sorry I came down so hard. I didn't mean to criticize anyone individually. It was a rhetorical question.

We all strive to make the best decisions we can and learn through our experiences doing so.

Brew on!

you would have liked the system at Buck Bald Brewing. Solid cylinder with a mesh bottom just as you suggested.
Reading back through the posts gave a different idea for how to put a standpipe similar to the grainfather since I ddidmt like the idea of a standpipe in the middle unsupported. I could add a standpipe attached to the wall of the cylinder that is approximately 1” lower than the top of the basket but I think I would need some way to adjust the height of the tube depending on the amount of sparge water I have in the tank.
 

Attachments

  • 94B6AB65-424A-4061-9BED-629B152E5DD2.jpeg
    94B6AB65-424A-4061-9BED-629B152E5DD2.jpeg
    3.3 MB · Views: 33
you would have liked the system at Buck Bald Brewing. Solid cylinder with a mesh bottom just as you suggested

Sitting inside a boil kettle ? I think it is the best setup because 1) the pump can't create a suction directly on the grain bed and 2) the mash tun partially sits in hot wort/the boil kettle which insulates it from the cold. And it makes use of the boil kettle to heat the mash, which works better than RIMs or HERMs.

Reading back through the posts gave a different idea for how to put a standpipe similar to the grainfather since I ddidmt like the idea of a standpipe in the middle unsupported. I could add a standpipe attached to the wall of the cylinder that is approximately 1” lower than the top of the basket but I think I would need some way to adjust the height of the tube depending on the amount of sparge water I have in the tank.

I was all excited about the standpipe too when I build Thing1. I still have the fitting installed in the false bottom to use one. But I find I don't need it. I just watch the sight glass to see how much wort is in the boil kettle and adjust the flow accordingly. Mashes in a grain pipe sitting in a boil kettle don't get hydraulic lock and compaction like mashes that the pump draws directly on. At worst the grain bed gets to atmospheric pressure while sitting in a boil kettle, but with a pump, it can be sucked down to negative pressures.

I don't use the stand pipe on Thing1 anymore. Being induction, there is zero chance of scorching the wort and I have no problems with stuck mashes.
 
IMHO BIAB sucks. Yea, that'll get an uproar. A separate mash tun equipped with a false bottom and a brew bag, and recirculated will give you the clearest wort into your boil kettle. BTW grain conditioning has marginal effect especially considering the effort and rice hulls should be washed with hot water before use unless you like rice tea in your beer! Besides filtration aids are unnecessary with this setup even with high wheat malt and rolled oats percentages. The brew bag actually makes clean up easier. Study the attached photo for details. Everything shown was about $1900. The system uses SCR voltage regulators which are simpler and more intuitive to use than the more popular PID/SSR's. Notice the only temperature probes are on the brewhardware.com RIMS and not intruding into the kettles. The RIMS is always inline with the pump and the pump runs all brew day except for 75 minutes of the 90 minute boil. A 30 gallon RO water storage barrel (not shown) allows water to be pumped directly into the boil kettle for heating, and the barrel is also a great reservoir for the very slow RO system production rate. The malts are crushed directly into the mash tun avoiding the dust. The Kelco CFC doesn't clog with the copious quantities of hops used in NEIPA's. The mash tun and boil kettle tables tip to minimize the dead space volumes. BTW the RIMS helps heat the strike water, controls the mash tun temperature (of course), brings the wort to >170F while pumping to the boil kettle, and then helps bring the wort to a boil in the boil kettle. Afterwards add a BBQ cover and the cart rolls away setup and ready for the next brew day. This is an accumulation of 10 years of continuous modifications. Love the hobby as much as the beer!

I ran a similar set up to this for a year. wasn't a fan, after all this i realized 2v system was BIAB with more cleaning.
 
that's how i feel. i wanted to make a system like the brew hog i think the name is but didn't want to buy another pump and still need to clean a mash tun.
 
I said i wanted to make one not buy it. you like to make everything about money, honestly i could spend the 3800 and it not effect me other then my wife being pissed and rightfully so.

its just a point of reference to convey the idea i had.
 
you like to make everything about money

It's not about money. These companies don't do a single original thing. DIY brewers (the only kind there were 10 years ago) built systems like that or better in their garages. Now that it has become trendy all these companies have come out of the woodwork copying what the DIYers used to do and not adding a single thing to the build.

That panel design has been around since Brutus 10. It sits on a $150 table. It's 2 brew pots with elements and pumps. And to top it off, they want $3800 for it. At least the Grainfather was a unique combination of purpose made parts.

The equipment part of this hobby has become soulless. Especially the BIAB systems, which are just a pot, element and PID. When was the last time you saw a system that had some feature(s) that were innovative and made you really want it ?

i cant argue that at all. I feel the same way. For me i feel like some of the "cool gear" cost too much or i feel i can make my own version and get the enjoyment out of it.

i like the look of nice things but i have yet to make a beer as good as my old rig did. i need to find a picture so we can all enjoy it.
 
IMG_20190120_150907151.jpg


As i brewed i cleaned up everything as i moved along. by the time i was done i had the kettle to clean and i was done
 
Sitting inside a boil kettle ? I think it is the best setup because 1) the pump can't create a suction directly on the grain bed and 2) the mash tun partially sits in hot wort/the boil kettle which insulates it from the cold. And it makes use of the boil kettle to heat the mash, which works better than RIMs or HERMs.


I was all excited about the standpipe too when I build Thing1. I still have the fitting installed in the false bottom to use one. But I find I don't need it. I just watch the sight glass to see how much wort is in the boil kettle and adjust the flow accordingly. Mashes in a grain pipe sitting in a boil kettle don't get hydraulic lock and compaction like mashes that the pump draws directly on. At worst the grain bed gets to atmospheric pressure while sitting in a boil kettle, but with a pump, it can be sucked down to negative pressures.

I don't use the stand pipe on Thing1 anymore. Being induction, there is zero chance of scorching the wort and I have no problems with stuck mashes.
Dude, almost NOBODY is scorching wort with eBIAB setups. What's with your hangup about scorching wort?
 
that's how i feel. i wanted to make a system like the brew hog i think the name is but didn't want to buy another pump and still need to clean a mash tun.
If you connect a wort pump to a RIMS tube, like I showed above, and use this setup in every phase of the brew day you will have complete control of your wort production. There is no vessel flow balancing needed, temperature control is easy and your mash will be crystal clear after 60 minutes of continuous recirculation. And all with 1 pump! As for the function and clean up of a mash tun, use a false bottom and a brew bag and never worry about a stuck mash and also enjoy the easy cleanup afforded by the brew bag.

How the RIMS-Pump System works...duh?
1. Pumps water into boil kettle (BK) (from a RO water barrel), then recirculates and assists the BK bringing the water to strike temperature.
2. Pumps strike water via underletting the grist in the mash tun. I don't stir my grist. Joy killer?
3. Recirculates and temperature controls the wort during mashing. Lots of mashing profiles are possible with the BK adding an infusion step or the RIMS temperature stepping the mash.
4. Heats and pumps finished wort at "mash out" temperature to the BK.
5. Assists heating the BK wort to the boiling point. Using the RIMS-Pump System really speeds along the brew day.
6. Incorporating a Counter Flow Chiller into the RIMS-Pump System path (RIMS left turned off, of course) allows the wort to be cooled in the BK, which means all the trub, and hot and cold break are left in the BK and not transferred to the fermenter.

I realize a lot of you all use propane. The RIMS tube I use (brewhardware.com) uses a 120 volt 1650 watt element which can easily be incorporated into a propane system especially if you already use a pump. It might even be a gateway to an all electric system some day?

The attached picture shows my process during the post boil chilling phase. The mash tun, false bottom and brew bag are already cleaned at this point. Note the RO water barrel, the tipped mash tun table, the cart wheels, the simple silicone-barb connections and my "door hood" with fan hanging on hooks in the top of the door frame. All the equipment stores away very nicely.
 

Attachments

  • WortChilling.jpg
    WortChilling.jpg
    1.7 MB · Views: 31
Last edited:
Back
Top