OP
OP


jcav said:Amazing rig! I was wondering if you were able to test the raised bracket you made to allow the hot gasses to escape and if it worked or not? Really nice system you got going. I am enjoying following your progress!
Best of luck!
John


![Craft A Brew - Safale S-04 Dry Yeast - Fermentis - English Ale Dry Yeast - For English and American Ales and Hard Apple Ciders - Ingredients for Home Brewing - Beer Making Supplies - [1 Pack]](https://m.media-amazon.com/images/I/41fVGNh6JfL._SL500_.jpg)


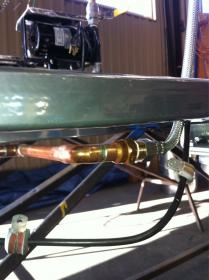
OneHoppyGuy said:To use the Auber PID to control multiple items:
Use a mechanical relay with multiple contacts.
The wiring sample that comes with the Auber PID for heating is incorrect (page 5, figure 12).
It shows the 24VAC being wired to the N.O. contact (terminals 13 & 14), which would cause the heat to come on when the set temperature is reached. The correct wiring is the N.C. Contact (11 & 13), which has the heat cycle running until the set temperature is reached.
BTW: very nice build
MaxOut said:Been watching your build and you have done amazing work with excellent attention to detail. You have a really nice set up and you must be stoked to break it in!!
I haven't brewed beer since April. I can't wait tidied this thing up.
I like the idea of the DITCHES configuration my only concern would be having to clean the outside of the boiler coil? Are you planning to have it easily removable? I know I can't get my hand behind my coil inside the HLT and would hate to have to clean hops or trub off it.
I hate the idea of cleaning anything. I do like the idea of reducing brew time. I have a Shiron plate that I was planning to use during chill, but I have no room for it to be installed. I might try the first few brews without the DITCHES, but I really like it.
I have a three kettle two pump HERMS and decided to use a large coil to fill the entire HLT. I circulate wort through the hex coil to maintain mash temps at the MLT, then I move the MLT out to the HLT out and use the HLT water for sparge and it flushes the coil prior to cool. I empty the remaining sparge water from HLT during the boil and replace with ice for cool. I cool 7 gallons in 10-15 min to 50 degrees and will melt most of the ice. Wort never touches the inside of the HLT so it is one kettle that needs little to no cleaning at the end of the day. I just add Saniclean to the melted ice water and recalculate through all lines hex coil, pumps and all that is left to clean is the MLT and BK. Not a sermon just a though. Good luck with your build!!
Snake10 said:Bryan,
Looks like your extremely close. Any fire up date yet? I'm brewing tomm morning. A 11gallon batch blue moon clone (for the chicks) to round out my selection. If your bored come on up. 9 ish til done.
Bartman