Native Python BrewPi controller

Homebrew Talk - Beer, Wine, Mead, & Cider Brewing Discussion Forum

Help Support Homebrew Talk - Beer, Wine, Mead, & Cider Brewing Discussion Forum:

This site may earn a commission from merchant affiliate links, including eBay, Amazon, and others.
Hi there,

I don't know anything about the CHIP, but if it runs Jessie then it should run Python 3, so my code will run.

Can you hook up the temperature sensors to the CHIP? I am using the w1-gpio driver for those. I am also using the RPi.GPIO driver for the relay pins. You might need to modify the code a little.

Is the CHIP powerful enough to run the webserver too? You need to run BrewPi, and the webserver and my software on the same device, otherwise there's no point.

You are welcome to try.


I already managed to get brewpi to run on the chip, so it's capable enough in then sense. I had to do some tweaking to get it installed.

Where I may lack capability is changing the python script. I'm pretty good at following instructions and getting things to work but don't know Python at all.

I'd love to give it a shot though!!
 
Ok, well, can you connect the ds18b20 sensors to the CHIP and read them somehow? That would be the first thing to look for. Controlling the GPIOs for the relays should be easy.
 
Reading up here - http://docs.getchip.com/#uart

I don't think it's quite up to it yet I guess it's the one wire element that would be the issue, shame as its a great little device

Analog to Digital Conversion
Pin 9 on header U14 provides a link for low resolution analog to digital conversion (ADC). There is no driver for this link yet. ADC is used to read continuous sensors (temperature, pots, FSR, photoresistor, etc)

1 Wire
The 1 Wire serial protocol is not yet implemented for CHIP.

UART
UART connections can be made using the UART connections on header U14.

PWM
Pulse Width Modulation is used to control motors and other devices. It is possible to use GPIO pins to drive motors, but they generally are not fast enough for robust and smooth control. PWM can be accessed through an sysfs protocol.
 
Well, the FG on the BrewFerm Abdij is 1.006, giving an abv. of about 7.6%. I'm pleased about that as a lot of my brews often don't reach their target FG. I tasted the sample and it was Really Good! I'll probably bottle it next weekend, so I'll leave the controller set to 21 degrees as it has been.

For the next brew I'll probably hook up a Pi Zero. I know my software runs, but I should try it "for real" before declaring that it works properly. I don't want to transplant the Zero into the existing Pi 2B control box, so I'll just hack a couple of outlets and extension cords to get a minimal system working.

Thanks for reading.
 
I just got my new pi, have been following with interest. If you would like another person's feedback (I'll work with water for a while) I'd be happy to help. Obviously you need someone with a certain level of ability/familiarity with BrewPi. Would you say getting BrewPi to work is that level? Must a person get the Arduino to work in order to have that level of familiarity?
 
I just got my new pi, have been following with interest. If you would like another person's feedback (I'll work with water for a while) I'd be happy to help. Obviously you need someone with a certain level of ability/familiarity with BrewPi. Would you say getting BrewPi to work is that level? Must a person get the Arduino to work in order to have that level of familiarity?

Hi there,

I have said before that this is not a plug and play solution, but I'm not really sure the DIY Arduino version is either. Fundamentally it works, so if you are familiar with Linux and you know how to get temperature sensors and relays working on the Pi, then by all means take a look. I'll PM you.

There is no support, and no warranty, of course.
 
Amazing job on the code for this! I got it installed on a Raspberry Pi earlier this evening, and (almost) everything is running smoothly. I can't yet get it to convert from degrees celsius to degrees fahrenheit, but I'm hoping some time spent digging through the code will help answer why. Thanks for releasing this!
 
Amazing job on the code for this! I got it installed on a Raspberry Pi earlier this evening, and (almost) everything is running smoothly. I can't yet get it to convert from degrees celsius to degrees fahrenheit, but I'm hoping some time spent digging through the code will help answer why. Thanks for releasing this!

Thanks for your comments. Please don't forget this is alpha code, produced by thinking "what is the simplest amount of code that will work". A lot of features are not implemented, either because I don't need them, or because they weren't necessary to get a minimal level of functionality.

Fahrenheit display is a feature that is not implemented, for both reasons.

Also, the web-based control panel won't work. All configuration is done in the Python .ini file.

Cheers.
 
Today I bottled the Brewferm Abdij beer. I am sure it will be delicious, but I have to leave it for a couple of months. Next will be Muntons Smugglers.

My $4 PSU is still fine. It's powering the Pi and the relays and I can still log in to the Pi and read data off the SD card. I have backed up my Abdij log just in case, but I am happy that the Pi did not crash or corrupt its SD card and my software did not misbehave for the entire fermentation session. Uptime is currently 31 days. Brewing time was 27 days.
 
I turned beer profile mode on, just to make sure it didn't crash. It seems to work, but has not been extensively tested at all.

Actually, the same is true for fridge constant mode. I tested it briefly.

For my real usage I have switched between beer constant mode and off mode only.
 
Hello everyone,

I have just started a batch of Muntons Smugglers Ale. I am expecting great things from this kit, based on the reviews around the web. I have poured the two cans of extract into the fermenting vessel and added water, and I will add the supplied yeast when the wort has cooled. That's it.

One thing I like about having a fermentation chamber is I can use it to cool the wort before adding the yeast. The ambient temperature is about 22 °C here now, so the wort wouldn't cool naturally. The kit instructions say to ferment between 18 °C and 20 °C, so I'll set it to 18 °C and leave it I think. It will probably be done in a few days so I'll probably bottle it in two weeks.

I did not reset the software or restart the Pi. It is still running from last time. I just stopped the previous brew in the web interface and then started logging a new one. I did not have time to wire up relays to the Pi Zero for testing. Maybe next time.
 
Have not done my cut-over yet. I'm waiting for a couple small parts and I hope to try it next weekend. Was hoping for this weekend but FedEx conspired against me.
 
Have not done my cut-over yet. I'm waiting for a couple small parts and I hope to try it next weekend. Was hoping for this weekend but FedEx conspired against me.
I have found that real life always gets in the way of what I want to do. Please let me know how you get on.
 
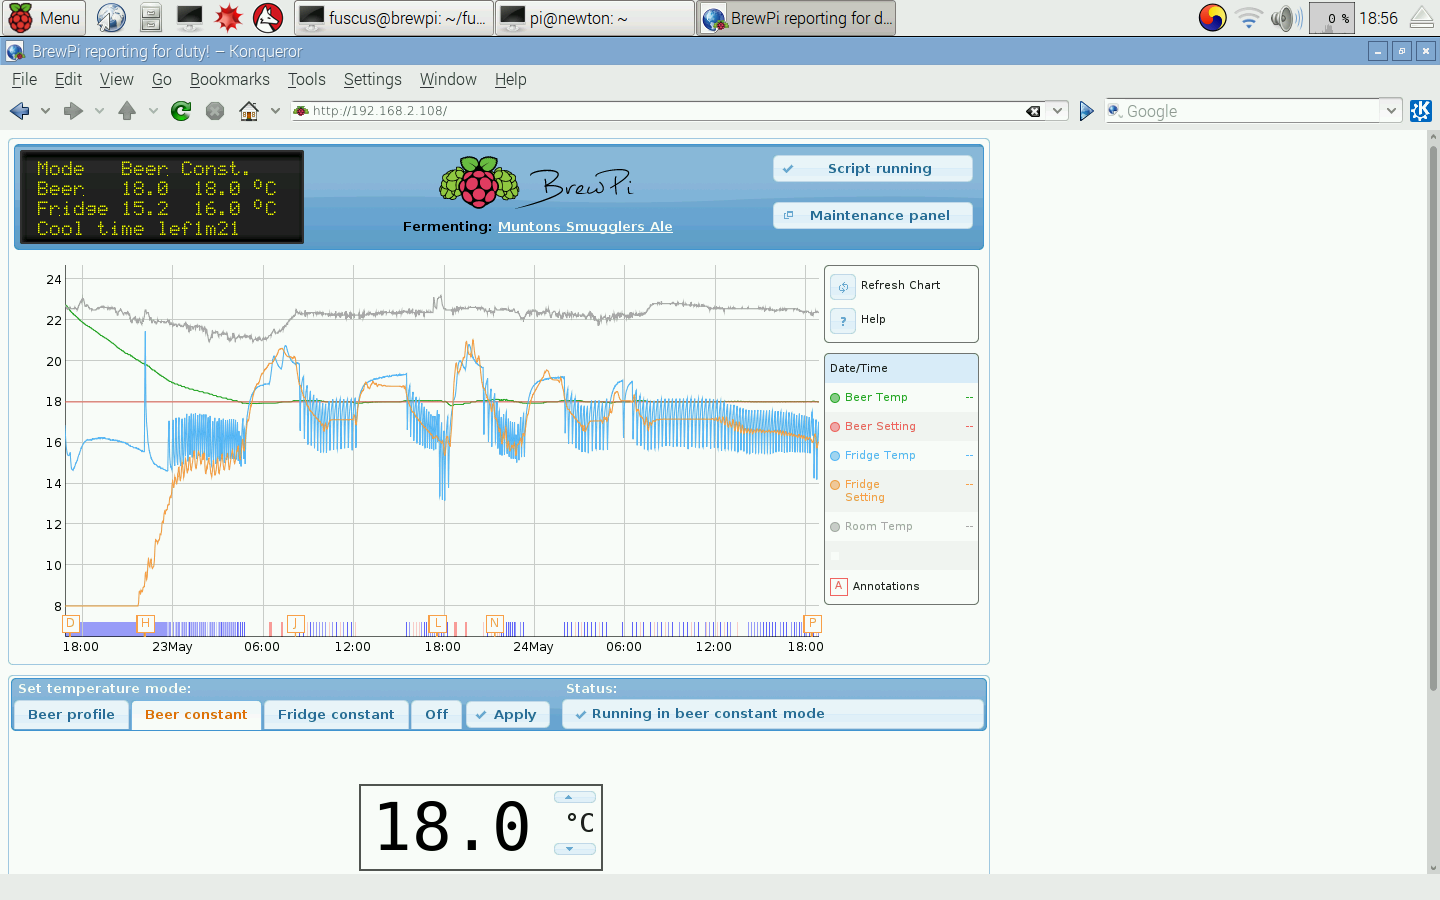
It's Tuesday evening, and the beer was started on Sunday evening. In the attached graph you can see that it took a while to drop the temperature to 18 °C. The kit instructions said ferment between 18 °C and 20 °C, so I waited until it dropped to 20 °C and pitched the yeast. Just sprinkled it on top.

You can see the spike in the fridge temperature where I opened the chamber to pitch the yeast, and the annotation "H" which was me opening the door.

Nothing happened until about noon today. You can see the fridge target starts to drop, so that the system can maintain the beer temperature (Elco's software is amazing). I guessed that this was when fermentation started, and began creating extra heat. Sure enough, when I opened the chamber to change the ice this evening the airlock was bubbling nicely.

The instructions say it will be ready in 4-6 days, when SG is constant at less than 1014. I plan to keep the temperature at 18 °C until then.

2016-05-24-185608_1440x900_scrot.png
 
Don't forget to raise it a couple of degrees before the end of fermentation this helps clean up diacetyl which you can taste (butterscotch popcorny) so when it hits 1016 just raise it to 20c to help the yeast clean itself up!
 
Don't forget to raise it a couple of degrees before the end of fermentation this helps clean up diacetyl which you can taste (butterscotch popcorny) so when it hits 1016 just raise it to 20c to help the yeast clean itself up!

Thanks for the tip. Do I have to measure SG? Can I just assume the fermentation will take 4-6 days and nudge it up to 20 °C on day 5?

I'm thinking of building a bubble counter so that I can see airlock activity as fermentation progresses. Then I can see when it starts slowing down.
 
You should take regular samples from the fermenter as this helps you understand the fermentation process as well as tracks the SG.

One of the things you mentioned you did was to cool your wort in the chamber before pitching, the yeast. Yeast needs plenty of oxygen to start a healthy fermentation so this can create a lag in fermentation and caused the yeast to become stressed and potentially produce off flavours, fruits, cloves...

My personal route would be add the wort solution and dilute whilst really aerating with a paddle (well as much as you can) then even if the wort is a few degrees over your target (maybe 24-25c) add the yeast and put it in your chamber, it will cool naturally and the yeast will start to work, without the aid of brewpi, but once you can tell it fermenting you can adjust to the temperature your aiming for. For beer ferment it until it's pretty much fermented down to it's target gravity then raise by 2c for a couple of days before cold crashing to make all the yeast drop to the bottom. (but there will still be more than enough to bottle condition well)

In terms of dactyl rest hear is white labs say. http://www.whitelabs.com/sites/default/files/Diacetyl_Time_Line.pdf

Usually the diacetyl rest is begun when the beer is 2 to 5 specific gravity points away from the target terminal gravity. The temperature is then lowered to conditioning temperature following diacetyl reduction. For ale production, the fermentation temperature is usually 65-70F, so temperature modification is not necessary. But the fermentation should still be "rested" at this temperature for two days to ensure proper diacetyl reduction. Many brewers make the mistake to quickly crash the fermentation temperature following terminal gravity. Why not? The beer is done, people are thirsty, and there is no taste of diacetyl in the beer. Even though the diacetyl can't be tasted, however, the beer may contain high levels of the precursor, acetolactate, which can be converted to diacetyl. Once the yeast is removed, there is no way to get rid of the diacetyl.
 
Wow, thanks for the detailed writeup. I have read bits and pieces related to diacetyl rest, but this puts it together quite comprehensively.

I had better read the SG after a couple of days, instead of just at the end.

Cheers!
 
All right. After 3 days it's 1.024, which is about 2% abv. I'll check again at the weekend.

It's still sitting at 18 °C, and the airlock is bubbling away. It's quite cheerful. When it stops it's kind of sad in a way.

The target is 1.014, so I'll nudge the temperature up to 20 °C at about 1.016 I suppose.

Cheers everyone.

PS the sample was delicious. I am really looking forward to drinking this beer.
 
You wait till you take the step to all grain (which isn't as great a leap as you may think) great beer and you'll be able to design your own too!!
 
I just read the BrewPi with Arduino thread and they have recently discussed calibrating their sensors. I'm am going to try this by changing the port to dev/fuscus. Think that this will work? Or is there more to it then that?
 
I just read the BrewPi with Arduino thread and they have recently discussed calibrating their sensors. I'm am going to try this by changing the port to dev/fuscus. Think that this will work? Or is there more to it then that?

Sorry, it won't work. I did not convert the code that does the calibration, so the calibration command will be ignored and the values you supply will not be stored.

Strictly speaking calibration is unnecessary. The sensors are factory calibrated to ± 0.5 °C. If you have two sensors where one is + 0.5 °C and the other is - 0.5 °C then the difference is obviously one degree, but on average two randomly chosen sensors won't be that far apart. If one was way off you could use it for the room sensor, since the value is not so important.
 
Average, schmaverage :D

No doubt I'm an outlier wrt number of ds18b20 probes on hand (close to 3 dozen last count) but last night I commissioned another BrewPi BT minion, and the probes I grabbed had a spread of 1.4°F.

So, yeah, the calibration routine can come in handy (once I figured it out - the pile of data that is BrewPi really needs someone who knows how to document a project to fix that mess).

In your case, it would be trivial to provide offset registers in the python code and just tell folks where they are and let them use them if they want. I do as much on my temperature logger - just one register per probe channel that directly offsets the read temperature value by whatever is necessary to correlate a base temperature...

Cheers!
 
Sorry, it won't work. I did not convert the code that does the calibration, so the calibration command will be ignored and the values you supply will not be stored.


Strictly speaking calibration is unnecessary. The sensors are factory calibrated to ± 0.5 °C. If you have two sensors where one is + 0.5 °C and the other is - 0.5 °C then the difference is obviously one degree, but on average two randomly chosen sensors won't be that far apart. If one was way off you could use it for the room sensor, since the value is not so important.


Thanks for the help, it will be easy enough to test the sensors in ice water and if they are off I can just offset my temp profile by that much. But like you said they come from the factory calibrated to .5 C

On another note I just read the updates to your code on github. This may be a stupid question, but how do I update brewpi to the current code on github. I've never used GitHub at all before this.

Appreciate all the work ame!
 
Well, I suppose I could do that...

Interestingly, there has been a recent increase in interest in the code base.

FuzzeWuzze helped me a lot with initial testing, and uncovered some bugs that had not appeared in my setup.

Thorrak has recently forked my github and contributed back some of the features that I didn't implement (because I didn't need them), such as Fahrenheit display.

Another user, who I don't think is on HBT, has forked my github and renamed the project. I am not sure what will happen with that.

I'd like to thank these people for their interest and help.
 
Thanks for the help, it will be easy enough to test the sensors in ice water and if they are off I can just offset my temp profile by that much. But like you said they come from the factory calibrated to .5 C

On another note I just read the updates to your code on github. This may be a stupid question, but how do I update brewpi to the current code on github. I've never used GitHub at all before this.

Appreciate all the work ame!
Um...

I haven't really used github all that much. I only use it because that's what the cool kids are doing.

Maybe:
Code:
git pull origin master

So far, it has turned out that whenever I needed to update the code I happened to need to start from scratch (don't ask). So the last couple of times I have reinstalled the OS and downloaded the code from github as described in my notes. I have not downloaded and tested the latest code.

I guess all the data belongs to 'brewpi', so erasing stuff belonging to 'fuscus' won't harm your data. You might need to keep a copy of fuscus.ini, but even that's easy to recreate.
 
Um...

I haven't really used github all that much. I only use it because that's what the cool kids are doing.

lol! Perfect - I feel the same way: daunted :D

Cheers! (If you ever feel the need for a new sibling, let me know. I have a feeling we'd get along famously ;))
 
On another note I just read the updates to your code on github. This may be a stupid question, but how do I update brewpi to the current code on github. I've never used GitHub at all before this.

Appreciate all the work ame!

I am nowhere near a git guru, but the way that I update projects controlled via git to which I have made no changes is:

Code:
git reset --hard
git pull --all
git checkout origin/master

What this is doing is:
Code:
git reset --hard
- This will force-discard any changes that you've made to ensure that you are updating to the latest version of all files. NOTE - THIS WILL ERASE FUSCUS.INI IF YOU DON'T BACK IT UP!
Code:
git pull --all
- This will update your local copy of the repo to what is on the remote server. This means that you have access to the updates - not that they're applied (yet)
Code:
git checkout origin/master
- This actually updates your active copy of the code to the latest copy in the repo.

As I said, I'm not a git expert - there's almost certainly a better way to do this - but this is what has worked for me in the past.
 
In your case, it would be trivial to provide offset registers in the python code and just tell folks where they are and let them use them if they want.

Assuming the pull request gets accepted, this should soon be supported by three new options in fuscus.ini:

Code:
fridge_offset = 0.0
beer_offset = 0.25
ambient_offset = -0.1

All are measured in degrees celsius.
 
Assuming the pull request gets accepted, this should soon be supported by three new options in fuscus.ini:

Code:
fridge_offset = 0.0
beer_offset = 0.25
ambient_offset = -0.1

All are measured in degrees celsius.
That's a brilliant way to manage it.
 
Hi everyone. My controller is still rolling along. I went away for the weekend and put extra ice in the cooling chamber so that it would keep the temperature with no intervention. When I came back I took a sample and got an SG of 1.016, which is 2 points from the target (after 6 days), so, as advised, I nudged the temperature up to 20 degrees C. The airlock is still active, so it's doing something. I can't bottle it until the weekend, so I'll leave it like that until Saturday and bottle it. SG should have stabilised by then, but in all it's a pretty fast brew.

On the software front, I will add calibration as requested. I'm going to change thorrak's proposed code and instead have an additional file for calibration, with entries based on the one-wire address. There are two reasons for this. One is that you might have a multi-chamber setup, and there might be one ambient sensor that you specify in several chambers- we don't want to duplicate the offset for each chamber. Secondly, if you change the function of the sensor (e.g. move it from ambient to fridge) you have to remember to change the offset too. If we have a single calibration file then the offset belongs to the sensor wherever it is used, or however many times it is used.

Once I have bent git to my will that's what will will see.
 
What problem are you running into?
I believe it was because the home directory was not empty. I went back to the BrewPI instructions to create the fuscus user using /dev/nul as the skeleton home directory:
Code:
sudo useradd -m -k /dev/null -G www-data,dialout brewpi
Not sure whether it needed to be a member of the groups www-data,dialout brewpi but I figured it would not hurt. Anyway, when I did that I was able to pull the repository. Now I am having the following issue/errors:
Code:
Using config file 'fuscus.ini'
Using calibration file 'calibrate.ini'
Network port: 25518 (not implemented)
No rotary encoder specified.
No LCD module specified.
Hot relay on pin 16 (inverted)
Cold relay on pin 18 (inverted)
Fridge sensor : 28-0015230d74ee
Beer sensor   : 28-00152d139cee
Ambient sensor: None
No door switch.
lcd object 6 x 20 created
Exception in thread Thread-4:
Traceback (most recent call last):
  File "/usr/lib/python3.4/threading.py", line 920, in _bootstrap_inner
    self.run()
  File "/home/fuscus/fuscus/DS18B20.py", line 119, in run
    self.temperature = temperature + self.calibrationOffset
TypeError: unsupported operand type(s) for +: 'NoneType' and 'float'

Traceback (most recent call last):
  File "/home/fuscus/fuscus/fuscus.py", line 37, in <module>
    import ui
  File "/home/fuscus/fuscus/ui.py", line 23, in <module>
    import displayLCD as display
  File "/home/fuscus/fuscus/displayLCD.py", line 25, in <module>
    from constants import *
  File "/home/fuscus/fuscus/constants.py", line 200, in <module>
    tempControl.fridgeSensor.calibrationOffset = calibrate['offset'].getfloat(ID_fridge,0.0)
NameError: name 'calibrate' is not defined
I suspect it's because the calibration code is there now and I don't have calibration.ini set up? I am not sure of the syntax of calibration.ini but I'll wing it and see what happens.

ETA: There is a calibrate.sample.ini that I copied in and edited. Still getting a couple of errors:

Code:
Using config file 'fuscus.ini'
Using calibration file 'calibrate.ini'
Network port: 25518 (not implemented)
No rotary encoder specified.
No LCD module specified.
Hot relay on pin 16 (inverted)
Cold relay on pin 18 (inverted)
Fridge sensor : 28-0015230d74ee
Beer sensor   : 28-00152d139cee
Ambient sensor: None
No door switch.
lcd object 6 x 20 created
Exception in thread Thread-4:
Traceback (most recent call last):
  File "/usr/lib/python3.4/threading.py", line 920, in _bootstrap_inner
    self.run()
  File "/home/fuscus/fuscus/DS18B20.py", line 119, in run
    self.temperature = temperature + self.calibrationOffset
TypeError: unsupported operand type(s) for +: 'NoneType' and 'float'

Traceback (most recent call last):
  File "/home/fuscus/fuscus/fuscus.py", line 37, in <module>
    import ui
  File "/home/fuscus/fuscus/ui.py", line 23, in <module>
    import displayLCD as display
  File "/home/fuscus/fuscus/displayLCD.py", line 25, in <module>
    from constants import *
  File "/home/fuscus/fuscus/constants.py", line 200, in <module>
    tempControl.fridgeSensor.calibrationOffset = calibrate['offset'].getfloat(ID_fridge,0.0)
NameError: name 'calibrate' is not defined
 
Something else I noted. When I run this in terminal mode and exit via ctrl-C an then execute a second time I get this:
Code:
/home/fuscus/fuscus/relay.py:38: RuntimeWarning: This channel is already in use, continuing anyway.  Use GPIO.setwarnings(False) to disable warnings.
  GPIO.setup(self._pin, GPIO.OUT, initial=init ^ invert)
Is there some cache that could/should be cleaned up, or should I exit the script in some other way?
This message is fine. Probably because the previous instance crashed.
 

Latest posts

Back
Top