jackyl
Well-Known Member
Fantastic, thanks! I have BG14s, so the windshield will be separate, but that's probably easy enough when I make the HD run for piping.
Sent from my iPad using Home Brew
Sent from my iPad using Home Brew

The other new feature allows you to "unfold" the top 2" X 180º of the back half of the ring. One of the issues I've run into in R&D for stands and burner mounts is getting the exhaust gas to vent rather than collect under the kettle and choke the flame. It's a particular problem with these large burners. Mounting the heat shield lower or standing the kettle higher is one way to fix the issue, but then a lot of heat wash comes forward towards your valves, hoses and sensor wires. If you design your stand so the rear longitudinal support is 2" lower than the cross/kettle supports, the exhaust gas will naturally vent to the rear, allowing the burner to breathe better and keep the front cooler.


![Craft A Brew - Safale S-04 Dry Yeast - Fermentis - English Ale Dry Yeast - For English and American Ales and Hard Apple Ciders - Ingredients for Home Brewing - Beer Making Supplies - [1 Pack]](https://m.media-amazon.com/images/I/41fVGNh6JfL._SL500_.jpg)


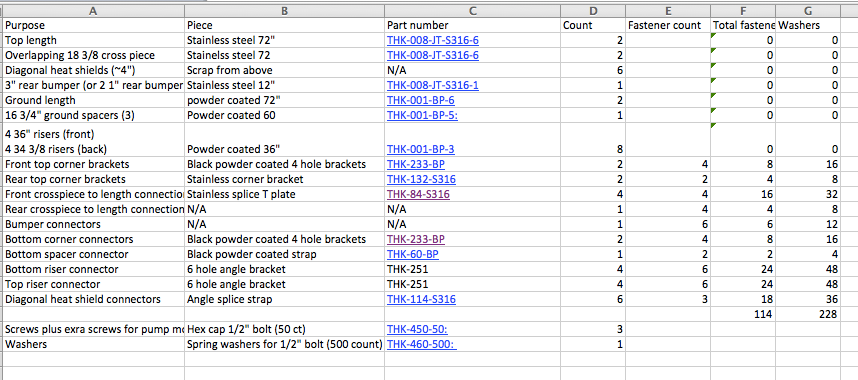
Sure thing! I'll get
you more pics and specifications in the next two weeks or so. Have a wedding to go to and drink beersbut I definitely will get you that info
You can probably find "cad"plated strut, but it can have the same concerns potentially health wise.
Have you checked an electrical supply house, for bare strut?
You can probably find "cad"plated strut, but it can have the same concerns potentially health wise.
Yea i had the same issue for a few of mine. It took a combination of tightening some at an angle and then bending a few of them. The bending can be difficult but I just attached one of the longer beams to the side that needed bending and push on it.
Another method I found useful was to get everything assembled for a section loosely and straight and then tighten each bolt one at a time while still keeping everything aligned. That way you can narrow it down to one joint that may need adjusting as apposed to several. It also helps the structure hold its own alignment
It seems that the nuts are 5/8ths and the bolts I recieved are 1/2 inch. Am I missing somthing here? I did not see a 5/8ths bolt on the websited. Everthing else seems to be in order though.
I would contact them and find out if you can swap them out, and figure out what the parts you need are. I've heard they are really good.
yes, a regulator is needed to connect the propane tank into the black pipe.what wasn't obvious to me is whether one of the original regulators was used at the intake side of the black pipe (or if it is even needed).
Just bought a kit from Gifty.

Are you asking where I got the kit from? Gifty74 has a business that he sells all the parts pre-cut.
I don't think we are supposed to be soliciting businesses on here. There is a web site and it only contains two words concatenated together and the dot com. Those two words are strut and stands.Yes. I am curious. I have not seen his kits yet. Is there a website?


