dinnerstick
Well-Known Member
Pull up a chair...
Back story: i live in an apartment, in the middle of a small (medieval) city. it's not exactly a small apartment but i don't have that much room for beer equipment. aside from a corner of a utility room where i have my storage and my little 2 tap kegerator, there's not much 'permanent' beer space; the more my equipment pile expands the thinner the ice of domestic bliss becomes, a phenomenon i'm sure many of you can relate to. i use a speidel braumeister (all-in-one herms system) which i can assemble in the kitchen or on the deck, and store in the beer corner. there's no room for a dedicated fermentation chamber, and i have for a while now been pretty sick of the 'just get a chest freezer' comments, so i have been searching for a temp control solution that fits my needs. i have never had much luck with the adding ice to a bucket technique so i decided to look into a peltier-based contraption. my father is a diy whiz and he jumped on the opportunity to knock something up. my cousin programs robots and has a lot of spare computer stuff (rabbit etc.). here's what we came up with. it's ugly (especially on the wooden frame with the water mounted above the electronics ) but it works! bear in mind i am not trying to reach lager temps in a texas summer. i will mostly be looking to maintain constant temps a little above or below ambient, and gradually ramp up or down. no sudden changes; its not for crash cooling or lagering. in fact i live in an old building that is in a row of connected 17th century thick walled stone buildings. on the ground floor in the unheated stairwell the temps are pretty moderate all year, even if it's hot upstairs or cold outside, that's where i'll be fermenting. so i hope i'll be able to maintain lager fermentation temps in the winter, but won't bother in the summer when i should be able to do ales pretty easily. that's the plan, updates will follow. i've thus far only done 1 batch (that's the one pictured, it's still in the fermenter), a very standard S05 fermentation at 18 degrees, where ambient temp was around 22.
The junk: the fermentation chamber is a corny keg. the speidel system is set up for 20L (but can go a bit higher) so a corny is sort of just big enough, with a bit of foam control. i didn't want to have anything sticking into the beer, so we soldered a copper coil around the corny as the cooling element. there's a thermistor glued to the outside of the corny, feeding temp readings to the rabbit computer which controls the whole shooting match. the wire has a clip for easy removal of the tank. in some of the test runs the temperature stratified; the cooling elements are below the thermistor and the bottom half cooled while the top half stayed warmer. as soon as i mixed it with my hand the thermistor reading dropped 4 degrees. i am hoping this won't happen with an actively fermenting beer. not sure what it will mean for after fermentation has slowed. but again, i didn't want anything sitting in the beer.
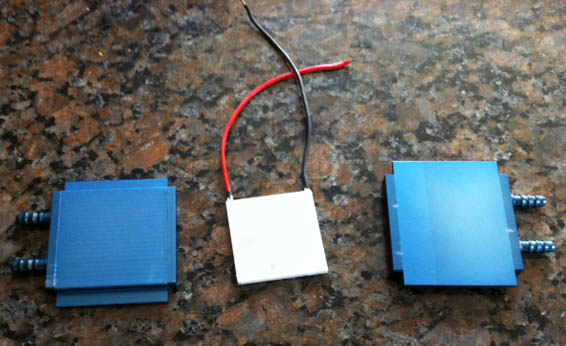
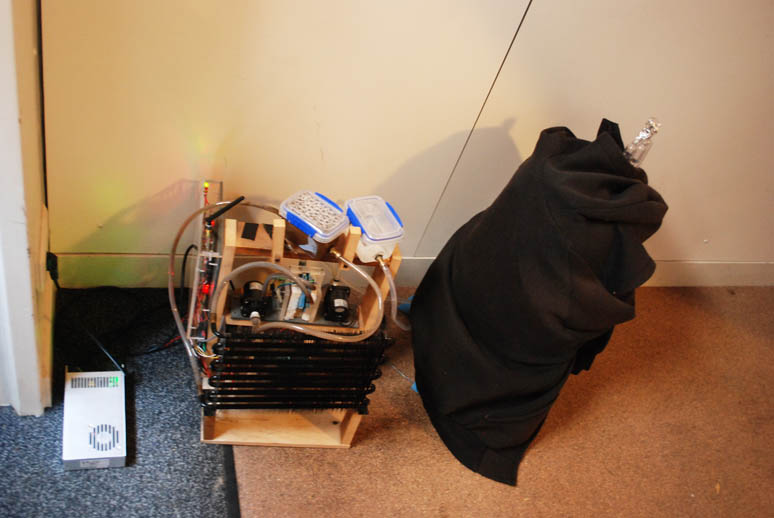
The heart of the junk is a 320 watt peltier TEC (thermoelectric cooler- largely inefficient device for turning a lot of power into a little bit of cool). on the peltier there is a 'beer side' and a 'radiator side'. each side of the peltier is flush with its own liquid heat exchanger. each side then has its own closed system with a coolant reservoir and a dc pump, powered by the rabbit via a relay. on the 'beer side' the coolant is pumped through the heat exchanger and then through the coil around the corny, back to the reservoir. on the 'radiator side', coolant is pumped through the heat exchanger, through a radiator (with a little computer fan mounted) and back to the reservoir.
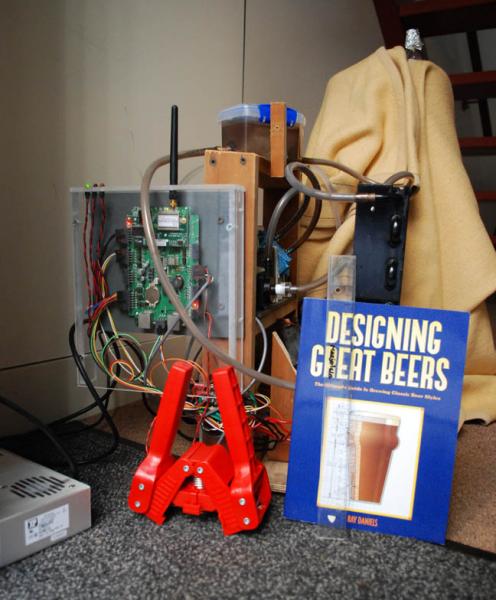
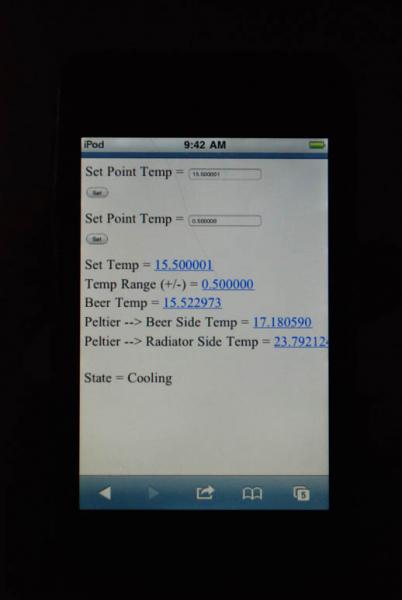
the rabbit controller is mounted on the side in a clear plexiglass box, and runs a simple program, logged into by its own ip address via the rabbit's wireless. on the control page you set a target temperature and a temp tolerance (amount of wiggle on either side of the target which the computer considers 'close enough'). the screen gives a readout of the set point and set tolerance, the actual temp reading at the tank, and the temp at each of the two heat exchangers on the peltier (each has a thermistor glued on). the program checks if the tank temp is above or below the set point, and then runs itself in either heating or cooling mode. (switching the dc current through the peltier reverses which side gets hot and which gets cold.) the rabbit has a green LED for 'cooling' and a red for 'heating', and an orange one for idle, when it has reached the set point. flash, eh?
i control everything using my ipod, via wireless. in the picture i had just turned it back on after it had been cooling for a while. that's why the cold side of the peltier is warmer than the beer temp.
when the measured temp gets within the window defined by the set point and tolerance, the power is cut to the pumps and peltier until the temp drifts back outside the tolerance on either side. that's orange LED time; that's what you want.
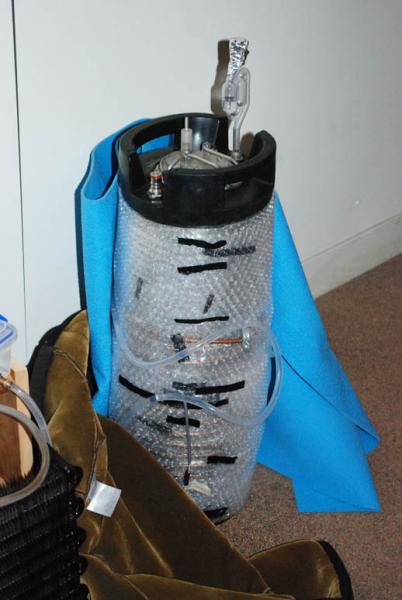
the other necessary bits are, a big enough 12v power supply, mine has a little cooling fan, and insulation. it really needs the insulation or else it's fighting a losing battle trying to cool the whole room. but for my first attempt i used a double layer of bubble wrap, a yoga mat, and a lined carhartt hoodie. that worked well. finally, the program has an overheat shutoff, if either heat exchanger reaches 50 degrees (also adjustable in the software) it shuts down the peltier.
Operation: it's a bit fiddly. i think the best bet is to get the wort as close as possible to the desired temperature first, then run off to the corny, and add fermcap. then the hoses need to be hose-clamped to the cooling coil, and the reservoir filled with water. the pumps prime more or less automatically by gravity, so you just check that everything is free of air bubbles, and wrap it in insulation. the first few tests leaked unbelievably, but now it's drip-free, knock on wood. the first real brewday i only cooled to 22 with my immersion chiller. ran off to the corny and left it overnight on the peltier, set at 18 degrees. the temp stratified as expected, and after swirling the corny it measured just under 16 degrees. good to pitch and let it free rise back to 18, then turn on the peltier again to stay at 18, +/- 0.5 deg. That batch is going now!
finally, we made the corny lid into a spunding valve by attaching a collar and screw to the existing pressure relief valve, i tested it on the CO2 tank and it works, but i'm waiting until next time to try that; this first beer is going to be dry-hopped and i don't want to try to do too much at once.
thanks for reading my long winded write-up; comments, questions, suggestions, insults welcome!
Pictures:
1: the control screen on ipod, 2: the tank after soldering, 3: close up of the reservoirs (the dark one is rust from inside the radiator... ick... suggestions on anti-rust fluid anyone??), the 2 pumps and the peltier/heat exchangers sandwich (they are all sandwiched together between pieces of styrofoam, 4: tank in its bubble wrap/duct tape jacket filled with fermenting beer and the spunding valve closed and an airlock capped with tinfoil cause the lhbs idiot gave me the wrong size cap, 'out' dip tube is removed, and 5: the whole thing in action.


