• Please visit and share your knowledge at our sister communities:
  • If you have not, please join our official Homebrewing Facebook Group!

    Homebrewing Facebook Group

My insane 25 Gal, 100 Percent Hard Plumbed Tri-Clover, Automated Tippy Build

Homebrew Talk

Help Support Homebrew Talk:

This site may earn a commission from merchant affiliate links, including eBay, Amazon, and others.
kickflip_mj said:
The parts list is almost non existent because of how expensive and how many connections there are, when I get done with some stuff I will start.

Yeah i can imagine... I only ask because someday i want to build the ultimate set up my self and i like what you got going on. I will be following until the end!
 
Some goodies

image-3669633650.jpg
 
Stainless brewing, I will definitely need a coil from you and two special order dip tubes. We are all winning here.lol
 
I'm getting ready to build a stand for myself and ditch the turkey fryer. It's got the job done for years but it takes forever to set things up and I just don't have the time anymore. Where did you come up with the stand design? Did you design it yourself?
 
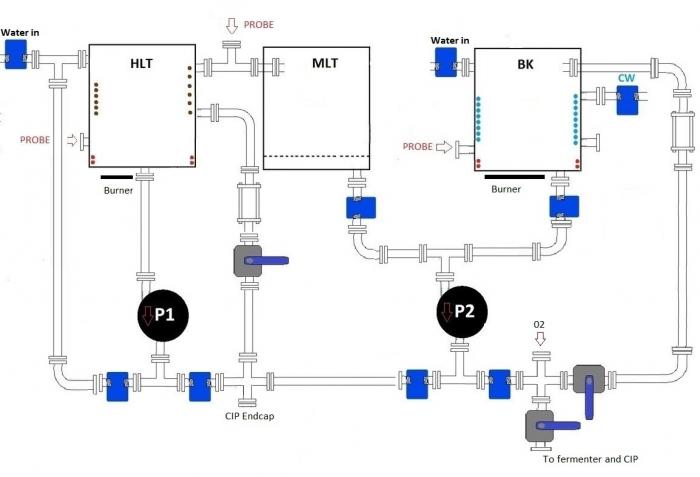
I spent about a month just designing the plumbing and piping layout, to work with the frame. A design like this cant just work with a basic frame and work the plumbing around it. On top of it everything had to flow right, and take account volume losses in certain stages of brewing. When you add a filter inline, you worry about priming, or you worry about clogs. etc. Then you have the CIP that takes some serious thought to get it to drain properly.

When I set out to design this stand I wanted to take away a lot of the hands on approach when brewing. I don't like the idea of having to watch something for 6 hours and cleaning the whole time. Brewtroller and Raspberry Pi should help with this, and maybe some engineers I know.

I work from home, but that doesn't mean Im not insanely busy. I wanted a design and stand that I could monitor off my computer/ ipad. Set the mash temps, walk downstairs, mash in and let the rig carry on from their, hopefully all the way to the chilling phase. Ideally having a hop dropper would be integrated.
 
This looks awesome! I can't wait to see it completed! Quick question. What piece of software did you use to draw your schematic?
 
I am curious how you have a hard-plumbed tippy dump? Are you just going to disconnect to dump it?
 
Barryfine,

Do you really have to ask that? ha I am well trained in many different design tools, but I went with that crappy program that comes with your computer, called "PAINT"lol

ppeg34, I plan on disconnecting one fitting. Hopefully it doesn't prove to be a pain. I originally had an elbow under the tank. I may have to go back to that design.
 
Barryfine,

Do you really have to ask that? ha I am well trained in many different design tools, but I went with that crappy program that comes with your computer, called "PAINT"lol

Haha that's great. I would have never guessed that's what you used.
 
Sorry thier has not been much action since my first post. I got really sick this week and welding just didn't seem exactly appealing. tonight im going to try to get some things done. My biggest hold up is waiting for parts to come in.
 
kickflip_mj said:
Sorry thier has not been much action since my first post. I got really sick this week and welding just didn't seem exactly appealing. tonight im going to try to get some things done. My biggest hold up is waiting for parts to come in.

Feeling any better?
 
Ok so I am feeling better and a small gift came in the mail tonight.. I should have a really large gift coming Wednesday.

image-4030580956.jpg
 
Apparently I shipped stuff to my home and not office- so found this when I get home.

image-3926190721.jpg
 
Putting in some work on the tippy dump wasteband. My little lincoln

image-835275332.jpg

weldpak 10 running to the max
 
I started working on my tippy dump tonight, this is the band that goes around the mash tun

image-1443925997.jpg

Just some welding shots

image-1678750937.jpg


image-1240313422.jpg
 
My mash tun, if you are wondering way I have a 6 inch tri clover on the bottom it's because I screwed up like 3 times welding the bottom of this pot (didn't want to admit that) but it looks cool now

image-1743862.jpg

Fitting the band around the mash tun. If you look closely you can see my vise grip pulling it together, this is because I broke my large c clamp doing this ( pot metal junk anyways)

image-112901604.jpg

Welding the bottom support to the waste band on the mash tun

image-716273815.jpg
 
Mounted the band to the frame using modified pillow blocks ( bearings inside housings)

image-627704775.jpg


image-3244980681.jpg

Almost Completed mash fun tippy dump, all that's left is a little bit of grinding.

image-2708692645.jpg


image-3023989961.jpg
 
Drilling through a 6 inch tri clover end cap was ridiculous.

image-710966618.jpg
Some piping to HLT for herms coil

image-4198074219.jpg


image-3320131018.jpg
 

Attachments

  • image-3467840144.jpg
    image-3467840144.jpg
    49 KB
haha Marc, you of all people should know there was no short cuts when getting tri clovers. I bought it right from brewershardware.com, and you know why it costs a ton when you hold the thing in your hand. basically the cap, clamp and seal will cost you $60. Do you need any 1/2 inch clamps or 1" tri clovers? I have WAY to many, oh and 1 1/2 and 2 inchers.lol
 
Oh so shinny! I just ran out of clamps, elbows and tubing.. Nothing like a $300 order. Damn building is WAY more expense than anticipated. Cheers

image-1709348539.jpg


image-2469569475.jpg
 
kickflip_mj said:
haha Marc, you of all people should know there was no short cuts when getting tri clovers. I bought it right from brewershardware.com, and you know why it costs a ton when you hold the thing in your hand. basically the cap, clamp and seal will cost you $60. Do you need any 1/2 inch clamps or 1" tri clovers? I have WAY to many, oh and 1 1/2 and 2 inchers.lol

Heh! I need 6 sets of those! Damn. Send me a PM with what you've got, I need to piece together my hoses, looks like 1.5" everywhere should do
 
Back
Top