You are using an out of date browser. It may not display this or other websites correctly.
You should upgrade or use an alternative browser.
You should upgrade or use an alternative browser.
My Brutus 9 1/2
- Thread starter Simphoto02
- Start date

Help Support Homebrew Talk:
This site may earn a commission from merchant affiliate
links, including eBay, Amazon, and others.
J,
Looks sweet so far. I sent some pics your way. Its amazingly simple but when one gets a closer look there is more too it! Little stuff here and there. Its a pain but is worth it. You about finished yet? I want to see your pilot light set-up. I just drilled two tiny holes in a brass cap flared fitting. It works but if its windy, its tough to keep them lit.
Bart
OP
OP
Simphoto02
WoodyBlue
Pics are of the Boys, the keggles welded and ready for action. Other pics are of the Sparge set-up I plan to try. Trying to stick with Lonnie's original design so I am going to try a flying sparge arm.
Took the white plastic piece it comes with and cut it down to fit inside the center hole of a sanke top. Works great in my hand.

Have configured a 1.5" Sanitary Triclamp fitting, which I will use on the entire system (alot of them from good ol Swagman himself). and I think once I get the lids welded with a lip to keep them from falling into the keggles, it will work out great.


I ain't no tree hugger or environmentalist or nuthin. Not afraid of waste these things but I just wanna use as much of the keg as I can. I can always go out and get lids and convert them if these don't work out. Gonna have all three welded I hope and then finish the Brutus rig and see what this puppy can do.
Sawdustguy
Well-Known Member
Why do you feel so compelled to Fly Sparge?
Boerderij_Kabouter
Well-Known Member
Because fly sparging is awesome. That's why 
How are you going to circulate the mash? Those whirlygigs are pretty and all, but I just don't see the practicality of them???
How are you going to circulate the mash? Those whirlygigs are pretty and all, but I just don't see the practicality of them???
OP
OP
Simphoto02
WoodyBlue
Because fly sparging is awesome. That's why
How are you going to circulate the mash? Those whirlygigs are pretty and all, but I just don't see the practicality of them???
Like he said...
I don't know. I am new to AG and since I am jumping into this head first i thought i might as well set this up like Lonnie did his and THEN test other options and see what works for me.
I will re-circulate the mash the way Lonnie does. I will use a lid with a curved manifold that gently rolls the mash back along the walls. when it is time to sparge, i move that lid to the Boil Keggle and move the fly sparge lid to the mash tun. Time the sparge water from the HLT with the mash going to the Boil and.....
That is pretty much the way the guy who designed this thing does it, isn't it?
Just kill the pumps, move the lids and fire em up and throttle back the floow so they match and have a home brew. then boil and have another HB.
Did I get any of that wrong?
The practicality is simple, you are not soaking and creating channels with your sparge water as it spins it sprays ALL OVER the grain bed, not just in a few spots, besides it's cool


$33.99 ($17.00 / Count)
$41.99 ($21.00 / Count)
2 Pack 1 Gallon Large Fermentation Jars with 3 Airlocks and 2 SCREW Lids(100% Airtight Heavy Duty Lid w Silicone) - Wide Mouth Glass Jars w Scale Mark - Pickle Jars for Sauerkraut, Sourdough Starter
Qianfenie Direct


$22.00 ($623.23 / Ounce)
AMZLMPKNTW Ball Lock Sample Faucet 30cm Reinforced Silicone Hose Secondary Fermentation Homebrew Kegging joyful
无为中南商贸有限公司

$479.00
$559.00
EdgeStar KC1000SS Craft Brew Kegerator for 1/6 Barrel and Cornelius Kegs
Amazon.com


$10.99 ($31.16 / Ounce)
Hornindal Kveik Yeast for Homebrewing - Mead, Cider, Wine, Beer - 10g Packet - Saccharomyces Cerevisiae - Sold by Shadowhive.com
Shadowhive

$719.00
$799.00
EdgeStar KC2000TWIN Full Size Dual Tap Kegerator & Draft Beer Dispenser - Black
Amazon.com


$7.79 ($7.79 / Count)
Craft A Brew - LalBrew Voss™ - Kveik Ale Yeast - For Craft Lagers - Ingredients for Home Brewing - Beer Making Supplies - (1 Pack)
Craft a Brew

$56.70
Wilbur Curtis Thermal Dispenser Seamless Pourpot, 64 Oz, Ss Exterior/Liner, Brew-Thru Lid - Commercial Airpot Pourpot Beverage Dispenser - CLXP6401S100 (Each)
BEACON HILL ( ALL Serial NUMBERS recorded)


$58.16
HUIZHUGS Brewing Equipment Keg Ball Lock Faucet 30cm Reinforced Silicone Hose Secondary Fermentation Homebrew Kegging Brewing Equipment
xiangshuizhenzhanglingfengshop

$53.24
1pc Hose Barb/MFL 1.5" Tri Clamp to Ball Lock Post Liquid Gas Homebrew Kegging Fermentation Parts Brewer Hardware SUS304(Gas MFL)
yunchengshiyanhuqucuichendianzishangwuyouxiangongsi


$176.97
1pc Commercial Keg Manifold 2" Tri Clamp,Ball Lock Tapping Head,Pressure Gauge/Adjustable PRV for Kegging,Fermentation Control
hanhanbaihuoxiaoshoudian


![Craft A Brew - Safale S-04 Dry Yeast - Fermentis - English Ale Dry Yeast - For English and American Ales and Hard Apple Ciders - Ingredients for Home Brewing - Beer Making Supplies - [1 Pack]](https://m.media-amazon.com/images/I/41fVGNh6JfL._SL500_.jpg)
$6.95 ($17.38 / Ounce)
$7.47 ($18.68 / Ounce)
Craft A Brew - Safale S-04 Dry Yeast - Fermentis - English Ale Dry Yeast - For English and American Ales and Hard Apple Ciders - Ingredients for Home Brewing - Beer Making Supplies - [1 Pack]
Hobby Homebrew

$53.24
1pc Hose Barb/MFL 1.5" Tri Clamp to Ball Lock Post Liquid Gas Homebrew Kegging Fermentation Parts Brewer Hardware SUS304(Gas MFL)
Guangshui Weilu You Trading Co., Ltd

$20.94
$29.99
The Brew Your Own Big Book of Clone Recipes: Featuring 300 Homebrew Recipes from Your Favorite Breweries
Amazon.com


Boerderij_Kabouter
Well-Known Member
I had forgotten about how the Brutus 10 worked I R DUM
Sorry, that sounds like a great plan.
I R DUMSorry, that sounds like a great plan.
OP
OP
Simphoto02
WoodyBlue
I had forgotten about how the Brutus 10 worked
Sorry, that sounds like a great plan.
No biggie. Uz Aint Dum. HELL I am the newby.
OP
OP
Simphoto02
WoodyBlue
Well had a VERY productive weekend. After a minor set-back where I was inserting a Stainless Steel 3 1/2 inch bolt for the swing arm and severally damaging one of the burner module wires and then had to re-fish a new one to the HLT burner module and the Gas valve.
After that I was up and running on the copper plumbing. Got a cheap flare tool and tube bender from Harbor Frieght. The flare tool worked great but the tube bender was a piece of crap. The remebered I had a whole set of tube springs and switched and away I went.
Anyway here it is so far. Getting closer:


The Gas Modules and valves that Kladue talked me into using were a serious expense but with his help I got some good prices on Ebay and got them wired up and WOW they are way freakin cool. Hit the power, switch to manual, and the valve click and the pilots spark like mad and fire up then the valve clicks again once it knows there is a pilot and flows gas to the burner and away we go.
Can't wait to let em rip on the PID's and sit back and let em cook.
Things left to do:
1. Fit lids and/or re-work cut off tops with sparge arm, and re-circulating fittings.
2. siphon for HLT.
3. boil screen of some sort. Saw Bobbys on her the other day. a strong possibility.
4. Labels for the control panel.
5. programing the PID's.
6. Spark lighter for boil burner.
7. buy grain, hops and yeast
Get to cooking beer....
More to come.
THANK YOUR GUYS!!!!!!!!!!!!
After that I was up and running on the copper plumbing. Got a cheap flare tool and tube bender from Harbor Frieght. The flare tool worked great but the tube bender was a piece of crap. The remebered I had a whole set of tube springs and switched and away I went.
Anyway here it is so far. Getting closer:
The Gas Modules and valves that Kladue talked me into using were a serious expense but with his help I got some good prices on Ebay and got them wired up and WOW they are way freakin cool. Hit the power, switch to manual, and the valve click and the pilots spark like mad and fire up then the valve clicks again once it knows there is a pilot and flows gas to the burner and away we go.
Can't wait to let em rip on the PID's and sit back and let em cook.
Things left to do:
1. Fit lids and/or re-work cut off tops with sparge arm, and re-circulating fittings.
2. siphon for HLT.
3. boil screen of some sort. Saw Bobbys on her the other day. a strong possibility.
4. Labels for the control panel.
5. programing the PID's.
6. Spark lighter for boil burner.
7. buy grain, hops and yeast
Get to cooking beer....
More to come.
THANK YOUR GUYS!!!!!!!!!!!!
Sawdustguy
Well-Known Member
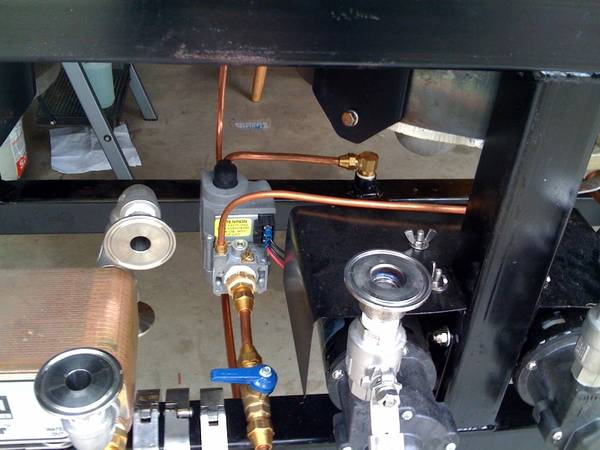
Your system looks very nice but I do have three questions. Are your thermocouples or RTD's mounted out on the end after the valve and the tee?
If that is true do you get accurate temp readings of what is in the keggle? The second question I have is I see you have the sensors plugged into a nice connector on your control panel. Are the connectors designed for the sensors? Lastly, are you using the S8610U intermittent pilot gas valves?
If that is true do you get accurate temp readings of what is in the keggle? The second question I have is I see you have the sensors plugged into a nice connector on your control panel. Are the connectors designed for the sensors? Lastly, are you using the S8610U intermittent pilot gas valves?
OP
OP
Simphoto02
WoodyBlue
Your system looks very nice but I do have three questions. Are your thermocouples or RTD's mounted out on the end after the valve and the tee?
If that is true do you get accurate temp readings of what is in the keggle? The second question I have is I see you have the sensors plugged into a nice connector on your control panel. Are the connectors designed for the sensors? Lastly, are you using the S8610U intermittent pilot gas valves?
First question: Yes they are AFTER the ball valves, for now. I might move the ball valves to before the Triclamp fitting and after the RTD's. In discussing the set-up with Kladue i determined that this set-up might be good since we have the Gas Valves and modules set-up to run on manual for the initial heat up, then switch to "Auto" and open the valves and start re-circulating for some very accurate readings and do final adjustments to the temp with the PIDS.
Second Question: The connectors for the probes on the control panels are Re-Purposed CB mic plugs. Larger versions of the ones from Auber. Seamed to make sense and work like a champ. The PIDS read them and LOVE em.
Last question: Yes, that is what makes this whole system so freaking cool. that think will do it all, might even drink the beer.
Like I said, just preliminary testing so far but ALL worked great.
Brewme
Well-Known Member
How did you attach the heat shields? It looks like they are just attached with a bolt and nut and fit tight around the burner.
Any issues with using steel sheet?
Any issues with using steel sheet?
OP
OP
Simphoto02
WoodyBlue
Not that detailed. I just cut the depth, formed a circle and dropped them in, once in I clamped with vise locked and then drilled and riveted. Not attached by anything but gravity. No need for anything else. where the hell are they gonna go? No real special engineering here
Brewme
Well-Known Member
Going on my two burners. Should help with heat loss and keep from melting my valves.
OP
OP
Simphoto02
WoodyBlue
The other good aspect of the heat shields are the Low pressure hurricane burners really like the wind shield. It also benefits in containing the gas from the burners and much quicker ignition from the pilot lights.
Brewme
Well-Known Member
I use high pressure propane and each jet burner is about 125 BTU's! Anyone think I will have issues with this method? I am planning on picking up some sheet metal today after work.
OP
OP
Simphoto02
WoodyBlue
I am getting close to an actual full water test. I have the control panel all wired and ready. I am waiting for a couple more barbed fittings for my hoses. all the gas is plumbed and sealed and works great.
Decided to go with off the shelf 12" dia. lids instead of working with the old cut-outs. Started to do a full water test this weekend but discovered that one of the RTD probes was defective and throwing false readings. Called Abuer Inst. and discussed it with them. This was the second malfunction of the 4" RTD Liquid Tight QD probes and I asked them to send me the 2" versions. The customer service from them has been good. I unfortunatl;y was not able to get them in time for a weekend test run.
The probes should be here today. Once the barbs fittings show up we are going to get rolling. Pictures coming soon.
Simphoto,
I initially put rings around my banjos, it worked great right up until I put my keggles onto the stand . The keg acted like a lid and contained the gases. The flame was disrupted bigtime and just swirled underneath the keg. It licked my frame and screwed it up. I fixed it by raising my kegs up and allowing them to exhaust.
I would test just one burner and keg first that way you just screw up one area of your frame. Anyway, I hope none of this happens and your machine passes your test with flying colors.
Snake10
OP
OP
Simphoto02
WoodyBlue
Simphoto,
I initially put rings around my banjos, it worked great right up until I put my keggles onto the stand . The keg acted like a lid and contained the gases. The flame was disrupted bigtime and just swirled underneath the keg. It licked my frame and screwed it up. I fixed it by raising my kegs up and allowing them to exhaust.
I would test just one burner and keg first that way you just screw up one area of your frame. Anyway, I hope none of this happens and your machine passes your test with flying colors.
Snake10
I thought of all that when I made the rings. They do not go all the way up to the bottom of the keggles. It has about two to three inches to the bottom of the keggles.
The burners are not "Banjo" burners in that they are not high pressure. They are Low Pressure hurricane burners. They all seam to LOVE the rings because they do cut down, by a huge amount the cross breeze that can mess with the flames.
But I will let you know. Plan a test burn this week.
OP
OP
Simphoto02
WoodyBlue
Well I am in the water test stages. During the first test I discovered the pitfalls of running my wires through the frame with the burner configuration I have.
Recap:
Frame made of 2x2x1/8 mild steel. The burners are hurricane burners.
Discovered that the direct connection of the burners to the upper frame allows for a much higher heat transfer to the frame.
Melted the insulation on a couple of wires. Luckily i discovered it before any shorts.
Re-wired and all is well, KIND OF.
Using 2 Honeywell Y8610U. Intermittent gas flow valves with pilot lights with Honeywell control modules.
Problem I am having is this...
I fill the keggles with 8-9 gallons of water. no leaks thank god... Plug in the RTD leads. Hit the main power switch. Beast comes to life. PIDS glow and all is WAY COOL!!
Throw the switch to the HLT gas valve to auto, Pilot sparks and lights. Valve clicks open and feeds gas to the burner, PRESTO I am cooking water.
Open the ball valves and prime the march pumps and the recirc begins. water temp comes up and all is way cool.
Same procedure for the MT. After a minute i notice the PID is flashing off and back on again which is causing the module to malfunction shutting off the gas and killing the burner. After as second or two the PID comes back to life and fires the pilot then the burner. Then dies again. I figure OKAY a bad PID. No problem get another one and lets rock.
Then after a home brew and sitting there watching the HLT continue to work properly. and VERY puzzled, The HLT hits a test temp of 150*f and shuts down just as it is supposed to do. I am VERY excited now. Pump still going on the HLT Temp stays at 150-151 FOR EVER it seemed. (I liked this)
I think HEY lets try the MT again. So I fire it up and it comes to life at 90*f and runs perfectly for about 10 minutes. The HLT drops to 149*f No Problems. No flashing PID, No flame out, PERFECTLY.
UNTILL, you guessed it, the HLT drops below 148*f and the PID calls for heat and the gas valve fires the pilot light and then the burner. Right on que, the MT PID and gas valve go into vapor lock and I have to shut it down.
I am VERY concerned at this point.
HLT: Works PERFECTLY, PEROID
MT: Works perfectly as long as the HLT burner is not running. With the HLT running PERFECTLY it has an attitude display.
What the hell is going on here?
What I know:
All is wired correctly
No Shorts during the melt down.
When each is fired individually they work perfectly.
When are fired together, the HLT continues to work perfectly and the MT has a fit.
Burners are running at MAYBE 20%, not throttled all the way up by any means.
Can anybody please give me some ideas?
I was thinking that the gas is low and thus causing the gas valve, which monitors pressure and will shut down if it is too low, to malfunction and cause the problem. but why just the MT and not both? Is it that simple? can the "Down Stream" burner be affected this easily?
I have ONE transformer to power both modules and PIDS and gas valves. MORE than enough power to cover all that. It acts like a power failure, but again why not BOTH? Why just the MT set-up?
Sorry for the book here
Please help.
More Pics in my Gallery
There are 2 possibilities, the output is selected for SSR, or the internal power supply is going to give up the magic smoke. Check the "outY" setting and make sure it is set to 4, if so pull connections to #4 & #5 and watch to see if it continues to cycle on and off. If it is set correctly then it probably needs a replacement unit as there is probably an internal power supply problem.
OP
OP
Simphoto02
WoodyBlue
By replace the unit you mean the PID?
Would low gas pressure make thedownstream gas valve shut off?
Would low gas pressure make thedownstream gas valve shut off?
Sawdustguy
Well-Known Member
I have ONE transformer to power both modules and PIDS and gas valves. MORE than enough power to cover all that. It acts like a power failure, but again why not BOTH? Why just the MT set-up?
Sorry for the book here
Please help.
More Pics in my Gallery
Sure sounds like you have a wiring problem to me. It has nothing to do with gas pressure. The first indication of an electrical problem is the PID's flashing on and off. You indicate that you are powering the PID's from 24 VAC. Should it not be 120 VAC? The 24 VAC should only power your S8610. There should be no connection from your Transformer directly to the Gas Valve. The S8610 powers the Gas Valve. I would check our your AC wiring and make sure the wiring is as below:

I believe the problem has been found and changes are under way.
Sawdustguy
Well-Known Member
I believe the problem has been found and changes are under way.
What was it Kevin?
Minor power supply issue that was corrected, all appears to be working correctly now from last report.
OK , here is my first post. I have been lurking for a while now. And amassing my brutus 10 build parts. I thought that I had everything except that I am waiting for the out of stock hurricanes from NB. My plan was to go ng without any electronic controls for now, but I am re-thinking that approach. What was involved in your semi-automation? What parts did yuse guys use and who were your sources? I have read a lot, but may need someone to repeat instructions /advice very slowly and in simple terms.
Thanks,
Ed
Thanks,
Ed
Sawdustguy
Well-Known Member
Minor power supply issue that was corrected, all appears to be working correctly now from last report.
Glad to hear it is fixed and is now working. You are the best Kevin!
Sawdustguy
Well-Known Member
OK , here is my first post. I have been lurking for a while now. And amassing my brutus 10 build parts. I thought that I had everything except that I am waiting for the out of stock hurricanes from NB. My plan was to go ng without any electronic controls for now, but I am re-thinking that approach. What was involved in your semi-automation? What parts did yuse guys use and who were your sources? I have read a lot, but may need someone to repeat instructions /advice very slowly and in simple terms.
Thanks,
Ed
Actually it is not too difficult, especially when you can get lots of help from the great guys that hang out in the forums. There are alot of ways to go but I chose to use a Honeywell S8610U Intermittent Pilot kit, Q345A1313 Pilot Burner and 390686-1 orifice. I like the Intermittent Pilot Valve, because if the Pilot Blows out it will automatically re-lite itself. The S8610U will work with Natural Gas or Low Pressure Propane. This is helpful if you plan on brewing in the garage with propane (I highly discourage it) as an extra safety measure, because if the pilot goes out, it does not spew propane out the unlit pilot burner. If you choose the S8610U and use propane you will need to adapt your hurricane burners for low pressure propane and use a low pressure propane regulator (<11 WC). I control the S8610U with an Auber Instruments PID and "J" thermocouple. Do a google search on the Honeywell Parts to find the best prices. I bought mine from a local supplier named Patriot Supply and they have an Ebay store. Go to post #53 in this thread for a diagram on how to hook it up. Also read the information contained in https://www.homebrewtalk.com/f51/gas-temperature-control-dummies-116632/.
OP
OP
Simphoto02
WoodyBlue
I will second SawdustGuy's post. These guys took me through the entire process and All that is left for me to do is cook some beer.
I was worried about the semi automated controllers too. I really love the way they worked yesterday in my last test. I have a minor Temp calibration issue to deal with. Other than that I am ready to rock, Thanks to Kevin and Sawdustguy. They were both able to point me to the necessary equipment, most of which came off ebay, and then get me all connected. It was like Christmas in July around here as the USPS and UPS brought a piece here and there and slowly it all came together.
YOU GUYS ROCK!!!!!!
Now that I am a seasoned pro.....
I will be glad to help anyway I can.
One tip I have...
If you build out of Mild Steel, like I did, and use the Hurricane Burners (which I like alot) and directly connect them to the frame as I did, then DO NOT run your wires through the frame. Just go ahead and run them through an external conduit and protect them from the heat. Stainless Steel does not radiate the heat the same way mild steel does.
If you look at the Original Brutus, Lonnie used those wok burners and supported them with the gas pipe nipples and fittings and not suspended by the frame like Mine and Sawdustguy's are. Our direct connection transfers more heat to the frame, especially with Mild Steel. The ONLY down side to using the Hurricane is this. Because of their size and method of support they require the mounts to be something like mine and sawdustguy's.
First tool you will need as you start your build is a digital camera.
I have a couple more tweaks left then I will post a photo spread of the set-up I have and field questions.
Similar threads
- Replies
- 1
- Views
- 3K
- Replies
- 1
- Views
- 1K
- Replies
- 2
- Views
- 1K
- Replies
- 9
- Views
- 2K
