You are using an out of date browser. It may not display this or other websites correctly.
You should upgrade or use an alternative browser.
You should upgrade or use an alternative browser.
Motorized Grain Mills: Time to show them off!
- Thread starter SAMPLER
- Start date

Help Support Homebrew Talk:
This site may earn a commission from merchant affiliate
links, including eBay, Amazon, and others.
WOW! that's a beautiful rig
heckels
Well-Known Member
We're witnessing something special here, a mill in its natural habitat. Extremely rare sighting! (Said with an Aussie accent)
aeviaanah
Well-Known Member
- Joined
- Jul 1, 2012
- Messages
- 1,686
- Reaction score
- 217
WOW! that's a beautiful rig
Thankyou sir! It was quite fun to plan, model and build!
We're witnessing something special here, a mill in its natural habitat. Extremely rare sighting! (Said with an Aussie accent)
Haha! Ay mate!
fusa
Senior Member
Finally took the time to complete my mill stand.


$53.24
1pc Hose Barb/MFL 1.5" Tri Clamp to Ball Lock Post Liquid Gas Homebrew Kegging Fermentation Parts Brewer Hardware SUS304(Liquid MFL)
yunchengshiyanhuqucuichendianzishangwuyouxiangongsi


$28.98
Five Star - 6022b_ - Star San - 32 Ounce - High Foaming Sanitizer
Great Fermentations of Indiana


$33.99 ($17.00 / Count)
$41.99 ($21.00 / Count)
2 Pack 1 Gallon Large Fermentation Jars with 3 Airlocks and 2 SCREW Lids(100% Airtight Heavy Duty Lid w Silicone) - Wide Mouth Glass Jars w Scale Mark - Pickle Jars for Sauerkraut, Sourdough Starter
Qianfenie Direct

$7.79 ($7.79 / Count)
Craft A Brew - LalBrew Voss™ - Kveik Ale Yeast - For Craft Lagers - Ingredients for Home Brewing - Beer Making Supplies - (1 Pack)
Craft a Brew

![Craft A Brew - Safale BE-256 Yeast - Fermentis - Belgian Ale Dry Yeast - For Belgian & Strong Ales - Ingredients for Home Brewing - Beer Making Supplies - [3 Pack]](https://m.media-amazon.com/images/I/51bcKEwQmWL._SL500_.jpg)


$20.94
$29.99
The Brew Your Own Big Book of Clone Recipes: Featuring 300 Homebrew Recipes from Your Favorite Breweries
Amazon.com


$58.16
HUIZHUGS Brewing Equipment Keg Ball Lock Faucet 30cm Reinforced Silicone Hose Secondary Fermentation Homebrew Kegging Brewing Equipment
xiangshuizhenzhanglingfengshop


$53.24
1pc Hose Barb/MFL 1.5" Tri Clamp to Ball Lock Post Liquid Gas Homebrew Kegging Fermentation Parts Brewer Hardware SUS304(Liquid Hose Barb)
Guangshui Weilu You Trading Co., Ltd

$22.00 ($623.23 / Ounce)
AMZLMPKNTW Ball Lock Sample Faucet 30cm Reinforced Silicone Hose Secondary Fermentation Homebrew Kegging joyful
无为中南商贸有限公司


$176.97
1pc Commercial Keg Manifold 2" Tri Clamp,Ball Lock Tapping Head,Pressure Gauge/Adjustable PRV for Kegging,Fermentation Control
hanhanbaihuoxiaoshoudian

$10.99 ($31.16 / Ounce)
Hornindal Kveik Yeast for Homebrewing - Mead, Cider, Wine, Beer - 10g Packet - Saccharomyces Cerevisiae - Sold by Shadowhive.com
Shadowhive


Stealthcruiser
Well-Known Member
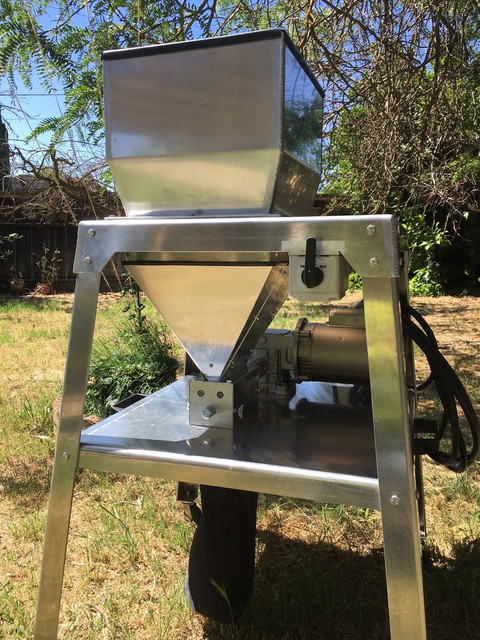
Finished mine up.
Only additions to be: A sock or chute from the roller discharge to reach the grain bucket .
And maybe a piece of plexi in the side , to see the level in the bucket.
![IMG_0341[1].jpg](https://cdn.homebrewtalk.com/data/attach/360/360560-IMG-0341-1-.jpg "IMG_0341[1].jpg")
![IMG_0342[1].jpg](https://cdn.homebrewtalk.com/data/attach/360/360561-IMG-0342-1-.jpg "IMG_0342[1].jpg")

Only additions to be: A sock or chute from the roller discharge to reach the grain bucket .
And maybe a piece of plexi in the side , to see the level in the bucket.
Stealthcruiser
Well-Known Member
Info Y'all, Monster Brewing posted up a sale post on that F B thingy:
https://www.facebook.com/MonsterBre...sNi57lnfDsP2xp_EChL87Zj246hjj58JK1x8Q&fref=nf
https://www.facebook.com/MonsterBre...sNi57lnfDsP2xp_EChL87Zj246hjj58JK1x8Q&fref=nf
Finished mine up.
Only additions to be: A sock or chute from the roller discharge to reach the grain bucket .
And maybe a piece of plexi in the side , to see the level in the bucket.
What connection is that from the motor to mill?
Stealthcruiser
Well-Known Member
What connection is that from the motor to mill?
It's a Lovejoy coupling.
https://www.mcmaster.com/#lovejoy-couplings/=1a7hyxy
Looks like a gear box, or thats what Im talking about anyway.. looks like motor-gear box-coupling
Stealthcruiser
Well-Known Member
Looks like a gear box, or thats what Im talking about anyway.. looks like motor-gear box-coupling
It's a gearmotor....Motor is sold with reduction gear / right angle gearbox as a unit.
Motor is a fractional horsepower motor, A C power.
The connection from the gearmotor assy., is a Lovejoy coupling.
Brewpastor
Beer, not rocket chemistry
I like belt drives on my mills, its just what I know and have always done. My latest mill is the first one I have bought (well except for that Corona 30 years ago)! I have a 3 roller Monster and LOVE it. I have built mills in the past but none have worked as well as this one.
When it comes to belts, I like the linked, adjustable ones Harbor Freight sells.
My mill is currently set up to utilize a standard 5 gallon bucket to collect the crushed drain.


When it comes to belts, I like the linked, adjustable ones Harbor Freight sells.
My mill is currently set up to utilize a standard 5 gallon bucket to collect the crushed drain.


I'm a motor-and-pulley guy, too. I had originally mounted my MM-2 on this unwieldy wooden thing on legs that I built from 2x4s. Bulky and it took up a lot of space. I took out all the guts and did this (I kept the original DIY hopper). Just 3/4" plywood, some corner braces and threaded rod to make it rigid. Same 1/4 HP motor. I also installed a couple pillow blocks and attached a shaft extension, to eliminate side-loading on the MM, since the mill has sleeve bearings. Back in business, and I can carry the mill around like a suitcase. I will get some 1/4 wire mesh and make some guards later.


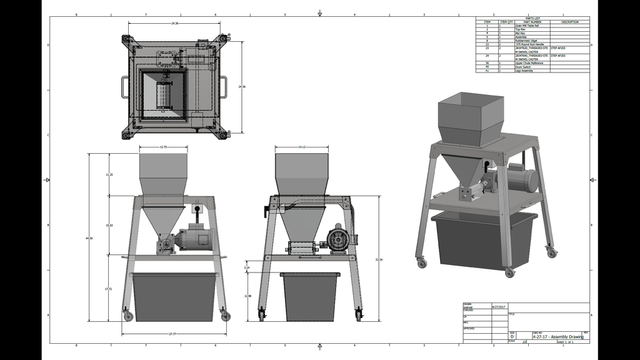
Based on this post and a few others I built my own lil mill. Not as pretty as aeviaanah's, but it'll get the job done. Thanks everyone for the inspiring posts.
View attachment 549827 View attachment 549828 View attachment 549829 View attachment 549830 View attachment 549831 View attachment 549832
Based on this post and a few others I built my own lil mill. Not as pretty as aeviaanah's, but it'll get the job done. Thanks everyone for the inspiring posts.
Nice job--that's a beast!
Combination of Monster Mill 3-Roller and American Ale Works motor. It's a beast!


Combination of Monster Mill 3-Roller and American Ale Works motor. It's a beast!
How hard was hooking up the wiring?
Stealthcruiser
Well-Known Member
How hard was hooking up the wiring?
That motor probably has a good set of instructions, but I don't own that brand.
How hard was hooking up the wiring?
Not that hard. If you can wire an outlet in a wall, you can do this. The wires are labeled, the instructions say where to connect them. The only thing the instructions were slightly off on was that you should disconnect them all at the outset, then wire them as they note.
If I get a chance I'll take a pic of how it looks and post it here.
How hard was hooking up the wiring?
Attached is the pic. The key to the wiring is getting ring terminals--you'll not be able to wrap the wires around the screws. The wires it comes with had those attached, but your power cord will need them.
It isn't perfectly clear from the instructions, but you essentially have to remove all the wires, then reattach as per the instructions. I told the owner at AAW about that--he said he'd revise the instructions. Still, not that hard to figure out, and not now, especially.
In the pic, you can see my power cord coming up from the bottom of the wiring compartment. There's a pinch grommet there that you can't see that will secure it. Then three of the wires on top are connected to one terminal, three to the other, then the "hot" and "neutral" wires are connected to the bottom of those terminals as well. All of those wires have numbers on them so it's pretty easy from the instructions to see what goes where.
The instructions suggest a particular nut (like 6mm IIRC) to tighten the ground wire to the frame, but I just reversed the screw so it tightened from the inside and attached the ground that way. Saved me a trip for a nut. Had to use one of those short right-angle screwdrivers to do it, but it's done and I like the elegance of it.

augiedoggy
Well-Known Member
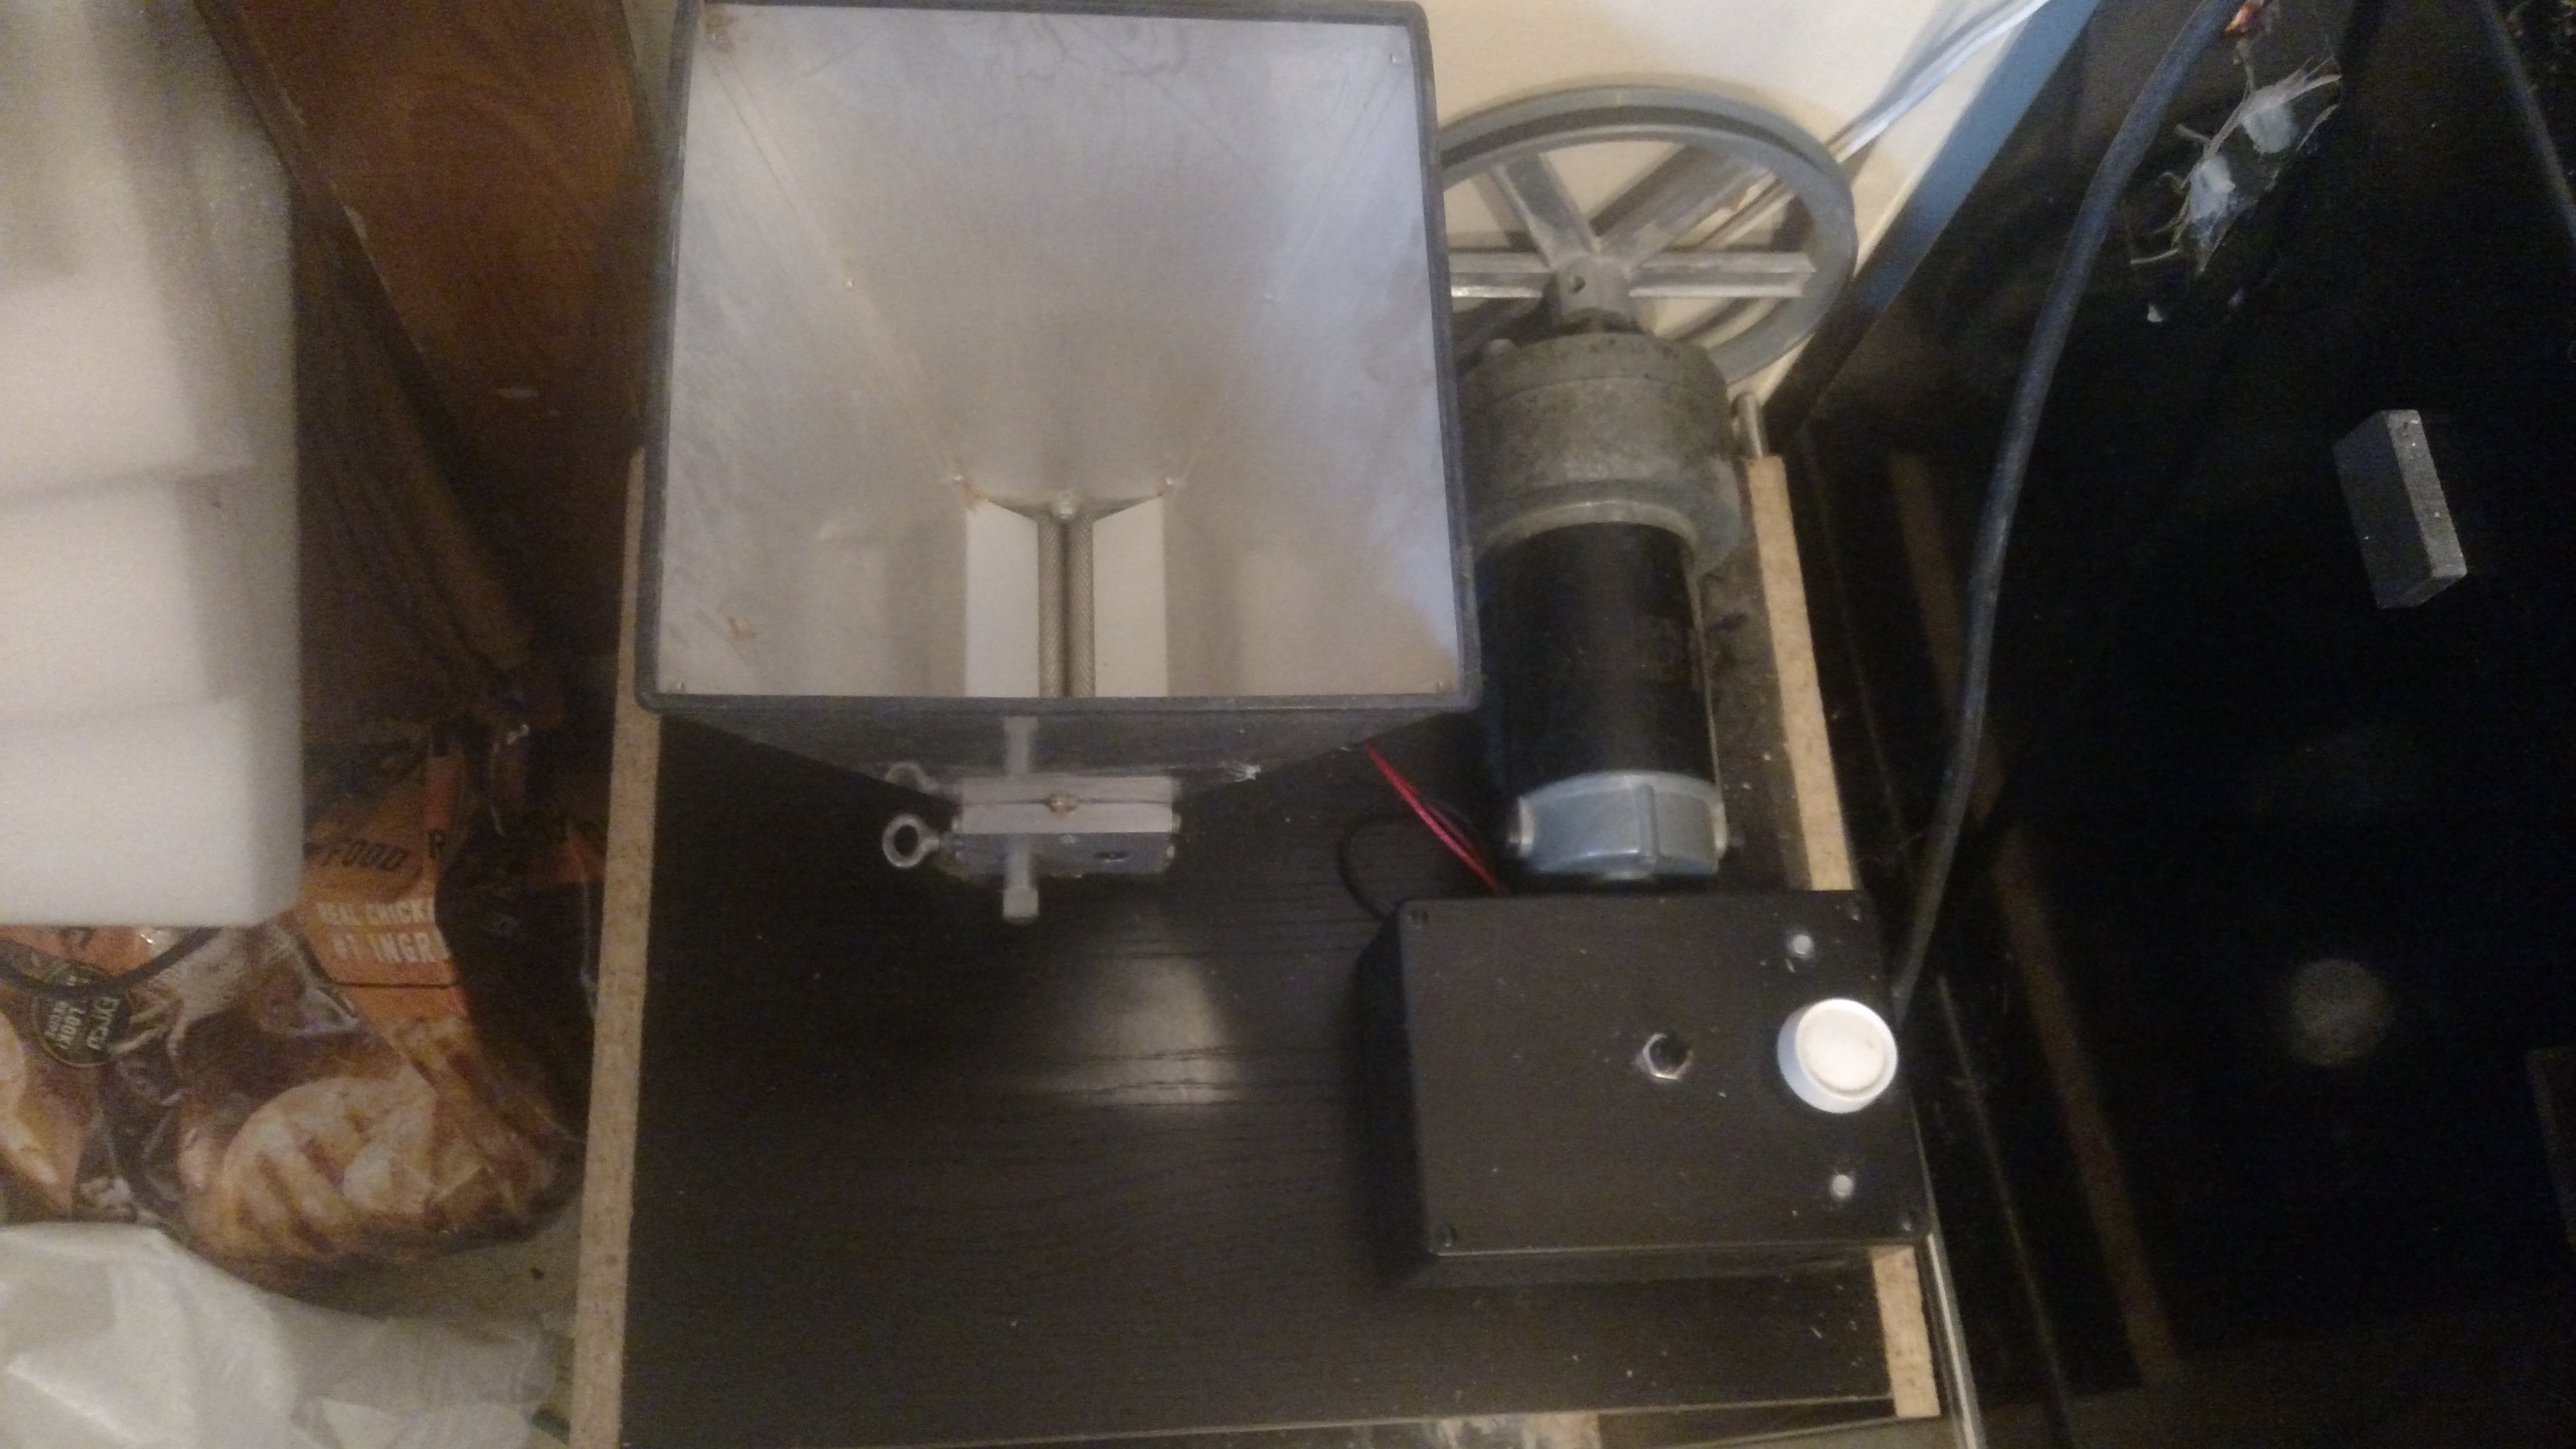
My homebrew mill, a cereal killer I bought 4 years ago hooked up to an old 110v dc gear reduction motor from a blueprint machine, wired up with a $7 wall dimmer for speed control to a $3 bridge rectifier to take the ac power and convert to a crude dc wave the to keep the motor happy. pulleys and belt from TSC store. (These mills use real bearings so sideload is not a problem). I repurposed some partical board from an old entertainment center I scrapped into a stand that holds the 5 gallon bucket... (wish I would have set it up for a 6 gallon bucket) It have worked very well for the last few years to mill grain. still a touch on the slow side though..
Attachments
Last edited:
Thank You. Guess I am going to put this motor off my want list and put it on my need list. The wiring was my only hold up.
TD
I struggled with the difference in cost between the AAW motor and some others you can find that are about $75-120 less. That's not a trivial price difference to me. But they didn't come with Lovejoy connectors that would have fit my MM3, so I would have had to spent time trying to get the right ones, at additional cost, and without certainty I was getting the correct ones.
The AAW is more heavy-duty, and the Lovejoy connectors were a perfect fit once I specified the diameter of my mill's shaft. I knew that in the long run I'd be much more satisfied with this, and once I bought it I was unlikely to ever need another.
Deadserious
Active Member
- Joined
- Dec 25, 2016
- Messages
- 33
- Reaction score
- 8
Here is my setup. An old drill I had laying around the garage. Added a switch, I control the drill speed with a worm clamp.

brad2157
Well-Known Member
Monster Mill MM-2 project that I just finished last night.

I like it - a lot! Nicely done 


TANSTAAFB
Well-Known Member
Nothin fancy but finally got something set up. I picked up the cart (along with a nice level, a straight edge, a vacuum gauge, vacuum pump, and 11 gal pressure tank...anyone know what to do with a vacuum pump?!) for $20! My old cheap 1/2" drill, some u bolts and I've almost got a mill cart. Need to run a tap through the set screw holes and pick up some new thumb screws. Also need to install a little chute/ funnel from the mill to the bucket.

TANSTAAFB
Well-Known Member
Finished it up with a chute to keep grain going into the bucket, tightened everything down, and at home in the brewery.


Similar threads
- Replies
- 0
- Views
- 376
- Replies
- 7
- Views
- 877
