• Please visit and share your knowledge at our sister communities:
  • If you have not, please join our official Homebrewing Facebook Group!

    Homebrewing Facebook Group

Modular Electric Brewery

Homebrew Talk

Help Support Homebrew Talk:

This site may earn a commission from merchant affiliate links, including eBay, Amazon, and others.
Thanks for letting me buy all of the stuff. I have already put some of it to good use.

I am glad you liked the system. There were a lot of ideas in it that you helped with. And hey, bouncing ideas back and forth is half the fun of these builds. Start out with the craziest thing you can come up with and tone it down until it can actually be built....

Drop by any time; you are always welcome in Bloomington.

Joshua
 
The electric boil kettle is going to get built out this week for the big version of the system. Should be fun. Then all that is left is the MLT and some minor revisions to the control box.
 
I will be updating this thread in a few weeks, but I got sidetracked by a full renovation of my garage into a brewery space (two systems, temp controlled space for fermenting and storage, and yeast storage and propagation). I am also modifying the system in post one to be a two tier BrewTroller controlled system. It turns out the two pumps were a little hard to balance with such small volumes and such powerful pumps.

If you have any specific questions feel free to ask.

Joshua
 
Thanks.

One other thing I forgot to mention and got asked about is that the footprint of it without the control box is 20"W x 14"D x 36"H. The control box has a 50' cord on it, so I can brew on my patio (shown), in the garage when it is done, or in my kitchen.

What are the dimentions of the control box? I really like that idea.

Also, did you put heat sincs inside the box?
 
I think the box is 16"x16"x6". The heat sinks are in the box and holes have been cut for fans for airflow.

It is compact, but I am also remaking that part soon. The brewery is no longer going to be strictly portable, but installed in my garage. I am also changing the controls over to a brewtroller, so the PID will go for either a portable control box, or sous vide cooker fo my kitchen so I dont have to run out to the garage to cook sous vide.

J
 
Awesome!
In the same footprint as most brew rigs, you have 2 rigs.
Keep posting, this is getting interesting.
 
Thanks. The next update should happen a lot quicker. I am going to redo the entire controls layout in order to make room for some more automation. I am excited for that to happen.

Joshua
 
Minor update:

I brewed a 10 gallon batch of American Amber this weekend and the system performed beautifully. Mash in temperature for 15 gallons was reached in about 40 minutes, and the recirculation went very well. I had about a 1F differential between the tanks, and that is without any insulation on the MLT (it will be on there soon, though)

I also tried something new this week and really liked it. I conditioned the malt, which only took about 5-10 extra minutes before the brew day started. I used about 2% of the total grain weight as a guide for how much water to add.

My last batch I did not condition the malt and crushed at 0.037" and was 18% off of my theoretical maximum efficiency (actual 72%, theoretical 89%). This week I conditioned and crushed at 0.031". It left a flour with nearly entirely intact husks. I was 3% off of my theoretical maximum efficiency (actual 83%, theoretical 86%). I was also able to recirc at a decent clip without any sticking of the mash or rice hulls. I am not going to chase after efficiency, but it taught me about my system and a little more about brewing.

The theoretical maximum for a no sparge system is based on 100% conversion and is limited by lauter efficiency, which decreases as the wort moves to higher specific gravities. Assuming that lauter efficiency was at its theoretical maximum (a reasonable assumption for this system), for the last batch I achieved 81%conversion efficiency, and for the conditioned batch this week I was at 97% conversion efficiency. It is amazing to me what a single parameter like crush can do to overall brewhouse performance.

Joshua
 
Sounds great! I have been watching your progress, as I am in the final designing my rig as we speak
That info on conditioning the malt is very interesting.
 
I'm not too far from you, up in Indy. When I get some cash together I'll be hitting you up for advice. In the meantime, if you have some homebrewing stuff that needs a new home (*wink-wink*), give me a chance to make an offer. ;)
 
Thanks.

It is working really well. I added a bottom drain to the boil kettle, and have been playing with some things to shorten brew day even more. Had a nice, leisurely, brew day this weekend and was cleaned up in 3:40. Worked great.
 
I have a 15 gal BCS Controlled RIMs .. but I really enjoy brewing small seasonal beers. Using cornies for vessels is a great idea. Why did you cut the tops off? I'd think it would help keep the heat in, and there are already 2 posts you could use. Also, by using a keg parka you could probably get away with only one element. Sorry, I'm an engineer .. I can't help but see things and trying to improve them .. I can't help it, don't take it personal. Great build!
 
Thanks for the compliments. Where can I find your build?

Using cornies was simply a function of them being the most compact and cheapest stainless vessels around. I cut the tops off because I cannot get my arm into a corny keg to reach the bottom, and I wanted to be able to do that for cleaning.

It is quite possible to brew on a single 2kW element, but not having to wait, and being ale to more convincingly step mash is very nice. I typically insulate both vessels for brewing, there are just no photographs of that.

I am actually in the middle of a controls redesign, and will post some more when I get around to getting that done. The big system is the one that gets a lot more use now, and I want to add capacity for a second large element. It is amazing how not waiting for heating can save time through a whole brew day. I had one recently that was under 4 hours and it made me very happy.

Joshua
 
My build has yet to materialize on the forums .. stay tuned.

I assumed cleaning and arms length was the reason for cutting the tops off. I'm not worried about cleaning .. pbw and saniclean work wonders. No matter how hard I pull my arm it won't get any longer though :) I am hoping I can figure out a device that would reach to the bottom and hold the elements. That way I could leave the top in tact. I'm wondering if having the top on and pressurizing would help bring up temps faster. I know this would be dangerous, so probably wouldn't be a good idea .. however with the pressure relief valve and monitoring could be made safe.

I am all about saving time .. I've got 3 kids under 5 and a wife .. I barely have time to do anything.

I brew alot of small batches of Mead, Cider and Wine. I'd like to start brewing more small batches of beer.
 
The guys at Ska were awesome. They sold me two kegs after contacting them through probrewer. They just stuck fedex labels on the outside of the kegs and shipped them to my door. The Fedex guy was amused.

I would not pressurize the vessels. It is not going to get you there any faster than just setting a lit on top.

For speed, I really recommend the recirculating no sparge system, and adequately powering the system. The recirculating no sparge with the electric makes it really easy to brew and makes it easy to have portions of the brew day unattended (water coming up to temp, mashing, portions of the boil if you use anti-foam). Making sure you are adequately powered is vital as well. The less time you spend in transitions, the better; there is nothing at all gained from taking longer to com up to mash in or to a boil. Are you going for 5 gallons or 10?
 
Joshua,
Couple questions about your process...
- So you don't sparge, total boil volume goes into the BK/HLT right away?
- You recirc just the MLT first to set the grainbed?
- Once set (runnings clear), you swap hoses (QD's?) and recirc through the BK?
- If you are moving around hoses, do you think one could get away with just a single pump initially?

BTW - great job on the compact footprint. Just the ideas I've been looking for.

Thanks.

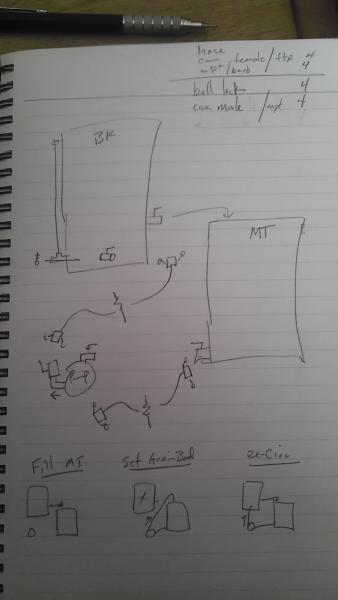
The total volume initially goes directly into the BK/HLT. It gets heated to strike temperature, and then I mash in with a portion of that water (usually about 8 of 14-15 gallons). I then leave it at temperature for 20 minutes. At that point I recirculate back on itself until I am free of debris (1-2 minutes). I then take the output hose from the MLT and put it in the BK. The MLT feeds the boil kettle through the pump, and the BK gravity feeds back into the MLT. It is now recirculating and the BK is controlling the overall system temperature using its PID controller. When you want to mash out, just change the temperature on the PID and wait 15-20 minutes. When you want to fill the BK, just close the BK side valve and it will fill up.

You can certainly get away with one pump. The pump on the boil kettle is just extra. It is nice to have for whirlpooling, but is by no means needed.

Thanks. I have really enjoyed the compact system. It was a fun build and there are a lot of ideas that were from, or worked out with, people on this forum.

If you have any other questions, just let me know.

Joshua
 
Hope you don't mind the additional questions. Your compact design rocks and I am trying to piece together a parts list. With possibly even fewer moving/external parts.

When you whirlpool, which port feeds the pump?

What would you think about having a "side" pick-up tube on the internal end of the BK to MT drain? When trying to whirlpool, attach the output of the pump to that and run reverse flow to get circulation.

Thanks,
Todd.
 
Ask as many questions as you like.

I have changed the way that I whirlpool and drain the kettle since the photographs were taken. I now have a bottom drain that feeds the pump on the BK. The whirlpooling motion is only used for chilling, not for settling hop material or trub. When it is cooled, I then pump it out through the bottom drain into a nylon paint strainer over my fermenter. This saves me about 30 minutes, and I cant tell a difference in the finished product. I also get a better yield on my finished product.

The side pickup is a fine idea, and it would do you very well if you were whirlpooling. I would not implement it at this point on my system, because I am not.

I would say, though, that the bottom drain is a must for any tank. It makes cleaning so very easy. A hose drops from the bottom drain into a bucket, everything gets washed out, and the bucket gets dumped. Done.
 
Reading over your write-up again. You mentioned that one of the kegs is set up with a bottom drain. Are both?
Would you set up both that way if you could do it over? If so, would you flip the keg, cut the actual bottom and use the existing bung as the bottom drain?

Thanks again,
Todd.
 
I have now set up both of the kegs with a bottom drain. It makes cleaning very nice, and fully emptying the kegs with a gravity feed possible.

And yes, if I were to do it again I would flip the keg and use the sanke fitting as the bottom drain. I did not know about that when I built the system.

Where are you at in your system build?
 
I've got two kegs. One untouched, one I acquired with the top cut out already; and my 10gal round cooler MT that I was planning to still use for that purpose.

Main elec power is in place. I have a project box/control panel on the way.

Still piecing together/deciding on exactly how I want the keggle set up (ports, probes, elem, etc.) Single pump, 1 1/2 tier based on your design.

In my head, I know what needs to be done during the different steps of the brewing process, just how to best set it up. Whirl-pooling, side pickup vs center bottom; soldered vs welded vs weldless; etc. You can only cut or drill once!

I think I have actually read over too many post and am trying to combine the best of too many systems. This is a good thing (learning from others), but to a point.

I was originally thinking about both ports on the HLT/BK to be side pickups pointing the same direction. That way you could re-circ as you bring up to a boil, and then whirl-pool when complete. Just change the QD's.

Then I read some posts on using the existing bung as a bottom center drain. Wonder how that would work with this setup? Whirl-pool then filter, kinda defeats the purpose, doesn't it?

Have you run into any problems "sucking" wort from under the mash back up to the HLT/BK? Do you think some sort of false bottom a must (more than a stainless braid)?

I appreciate your responses. It is still the main design I'm going after.

Todd.

IMAG0214.jpg
 

Latest posts

Back
Top