You are using an out of date browser. It may not display this or other websites correctly.
You should upgrade or use an alternative browser.
You should upgrade or use an alternative browser.
# Moding a KRS-2100 to put the CO2 tank on the outside.
- Thread starter dbarrm
- Start date

Help Support Homebrew Talk:
This site may earn a commission from merchant affiliate
links, including eBay, Amazon, and others.
It turns out that some of the caulk I used expired in 2011. Doh! So I don't think it will cure and harden. I put plastic over it and turned the kegerator on. Put my three kegs in and will deal with the caulk issue next weekend. Always check the use by date on caulk! 
Following this closely stonebrewer ... very interesting. I looked at mine yesterday, and drilling all those edges off doesn't look so easy and definitely looks time consuming and messy. How long did it take?
Also do you know what the purpose of them is? Just decorative and protection? (No actual cooling impact)
I guess you can't leave holes in the edges once done, because the insulation wouldn't be good enough and heat would get in?
PS Photos with three kegs in would be interesting to see... I'm wondering how easily they fit in. Some corny kegs are not even the same diameter either which might be an issue..
Following this closely stonebrewer ... very interesting. I looked at mine yesterday, and drilling all those edges off doesn't look so easy and definitely looks time consuming and messy. How long did it take?
Also do you know what the purpose of them is? Just decorative and protection? (No actual cooling impact)
I guess you can't leave holes in the edges once done, because the insulation wouldn't be good enough and heat would get in?
PS Photos with three kegs in would be interesting to see... I'm wondering how easily they fit in. Some corny kegs are not even the same diameter either which might be an issue..
It took about an hour to remove the plastic and caulk it up. Not bad once I got over the fear of destroying things! Biggest time suck was fixing the vacuum cleaner that I clogged cleaning the mess up. Fancy Dyson thing the wife loves, so I had to fix it!
I "think" this model is used for both a fridge and kegerator by changing the door. The grooves must be for shelves...on the fridge. They serve no purpose I can determine as a kegerator.
I would definitely seal up the unit once you remove the plastic to keep the insulation from getting wet, degrading, and probably molding as well.
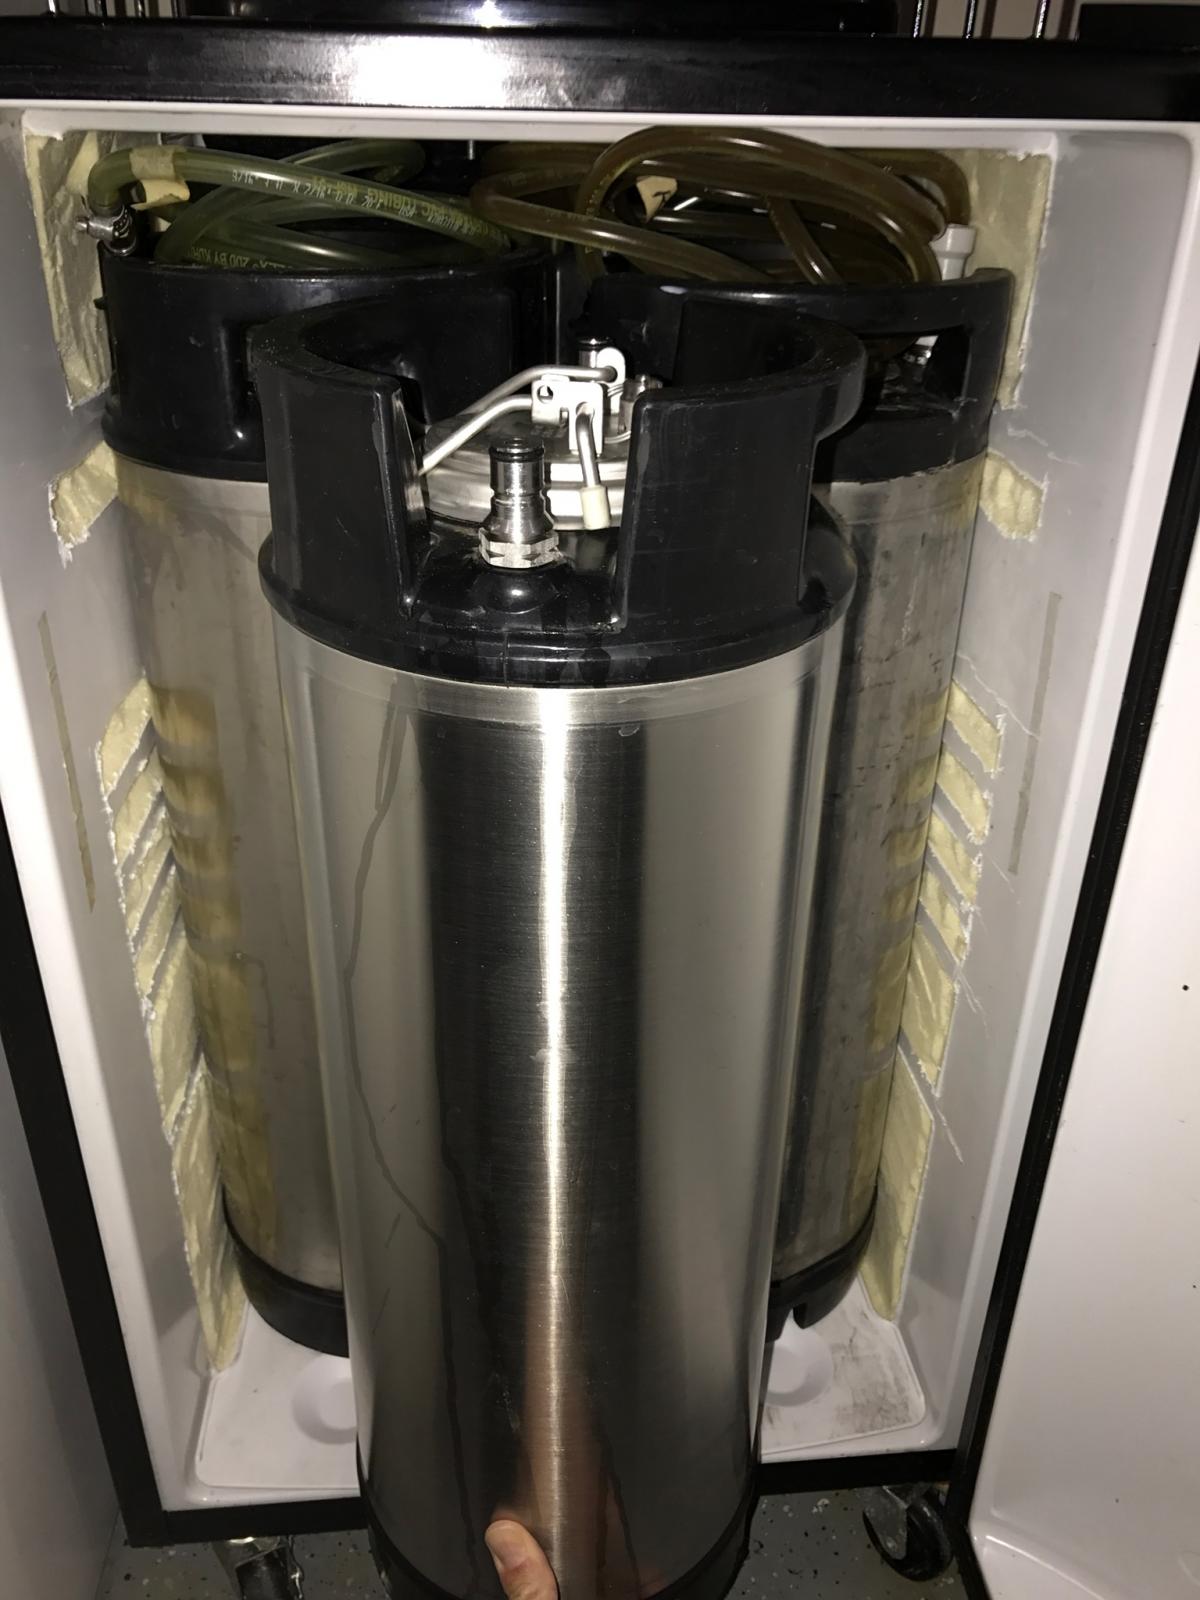
Pictures are hard as you really have to put the third keg on the door, hold it while closing, and letting go to shut the door. The third keg will not sit on the floor by itself...it needs the door space to stay put. I have about 3-4 different style cornies and put the largest ones in. Fits fine, but it is pretty snug! Here's a picture of two side by side, though:

I have so many brewery stickers I'm wondering if I can stick them over the holes made?! 
Seriously though, I read about fridge lining repairs and it's not exactly simple and can get expensive. How is your caulking coming along?
Seriously though, I read about fridge lining repairs and it's not exactly simple and can get expensive. How is your caulking coming along?
Caulk is holding up great after three days, but I really want to see what it looks like in a month or so before I decide if this was the correct way or if I am going to do something else. Second choice would be to glue on a thin layer of plastic sheeting. It might not look all that great but then who looks into the kegerator other than me? <shrug> I am pretty stoked so far as I now have three beers on tap in my signature. Fridge is holding temps, and beers are pouring great. 

$27.29 ($13.64 / Count)
$41.99 ($21.00 / Count)
2 Pack 1 Gallon Large Fermentation Jars with 3 Airlocks and 2 SCREW Lids(100% Airtight Heavy Duty Lid w Silicone) - Wide Mouth Glass Jars w Scale Mark - Pickle Jars for Sauerkraut, Sourdough Starter
Qianfenie Direct

$58.16
HUIZHUGS Brewing Equipment Keg Ball Lock Faucet 30cm Reinforced Silicone Hose Secondary Fermentation Homebrew Kegging Brewing Equipment
xiangshuizhenzhanglingfengshop

$176.97
1pc Commercial Keg Manifold 2" Tri Clamp,Ball Lock Tapping Head,Pressure Gauge/Adjustable PRV for Kegging,Fermentation Control
hanhanbaihuoxiaoshoudian

$10.99 ($31.16 / Ounce)
Hornindal Kveik Yeast for Homebrewing - Mead, Cider, Wine, Beer - 10g Packet - Saccharomyces Cerevisiae - Sold by Shadowhive.com
Shadowhive

$172.35
2 Inch Tri Clamp Keg Manifold With Ball Lock Posts, Pressure Gauge, PRV (0-30 PSI) – Homebrew, Fermentation, Kegging System
wuhanshijiayangzhiyimaoyiyouxiangongsi

$20.94
$29.99
The Brew Your Own Big Book of Clone Recipes: Featuring 300 Homebrew Recipes from Your Favorite Breweries
Amazon.com

$7.79 ($7.79 / Count)
Craft A Brew - LalBrew Voss™ - Kveik Ale Yeast - For Craft Lagers - Ingredients for Home Brewing - Beer Making Supplies - (1 Pack)
Craft a Brew

$53.24
1pc Hose Barb/MFL 1.5" Tri Clamp to Ball Lock Post Liquid Gas Homebrew Kegging Fermentation Parts Brewer Hardware SUS304(Liquid Hose Barb)
Guangshui Weilu You Trading Co., Ltd

$22.00 ($623.23 / Ounce)
AMZLMPKNTW Ball Lock Sample Faucet 30cm Reinforced Silicone Hose Secondary Fermentation Homebrew Kegging joyful
无为中南商贸有限公司

$53.24
1pc Hose Barb/MFL 1.5" Tri Clamp to Ball Lock Post Liquid Gas Homebrew Kegging Fermentation Parts Brewer Hardware SUS304(Liquid MFL)
yunchengshiyanhuqucuichendianzishangwuyouxiangongsi

$28.98
Five Star - 6022b_ - Star San - 32 Ounce - High Foaming Sanitizer
Great Fermentations of Indiana
I did some reading online about fridge liner repairs and it seems a lot of people use some quite serious stuff (including repair kits sold by fridge manufacturers). Some of it was expensive too, like $150+ for a kit! It made me wonder how "good enough" a repair can be done on the cheap.. especially when it's a few hundred bucks of kegerator that could end up screwed up if I get it wrong (so this needs to be a pretty safe and cheap option). Looking forward to hearing more about how this holds up stonebrewer!
Also I'd have to do the mod to get the CO2 on the outside first.. And I have a double regulator in there right now so I'd be looking to find a way to continue to maintain independent pressure per line... and therefore need 2 (or if modded more, 3!) CO2 lines drilled out the back... More potential for screw ups! But if I am going to tackle this... stonebrewer do you remember what the pieces are that you used for the CO2 mod? It would really help to know specifically what you did there... or perhaps with a close up photo of the front and back I could work it out.
Thanks again for sharing the ideas and experiences and info!
Thanks. Sounds like this kind of thing http://www.homebrewing.org/14-MFL-Bulkhead-Adaptor-4-Long_p_3373.html
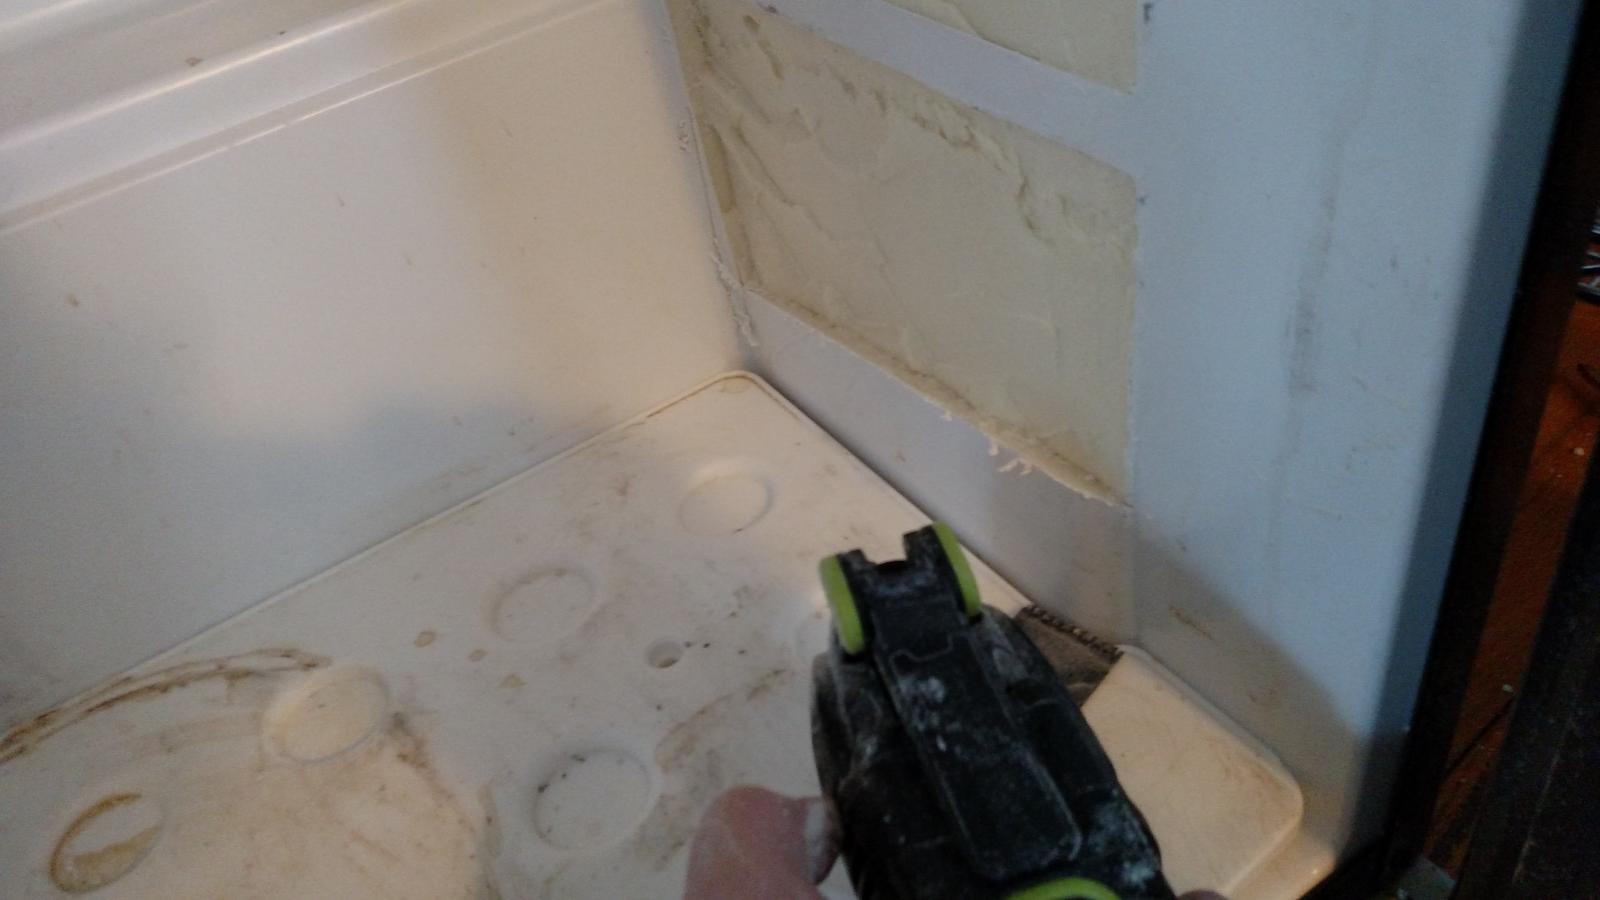
I spent a few hours working on the kegerator this weekend. Like @stonebrewer I used an oscillating tool to remove the ribs. I have one similar to this: https://www.lowes.com/pd/ROCKWELL-S...orded-3-5-Amp-Oscillating-Tool-Kit/1000039771
It's a tool that was gifted to me. I don't think I would have ever purchased one for myself but since I've had it I have found so many things to use it for. There are so many little jobs that I've made simple with this tool. Anyway...
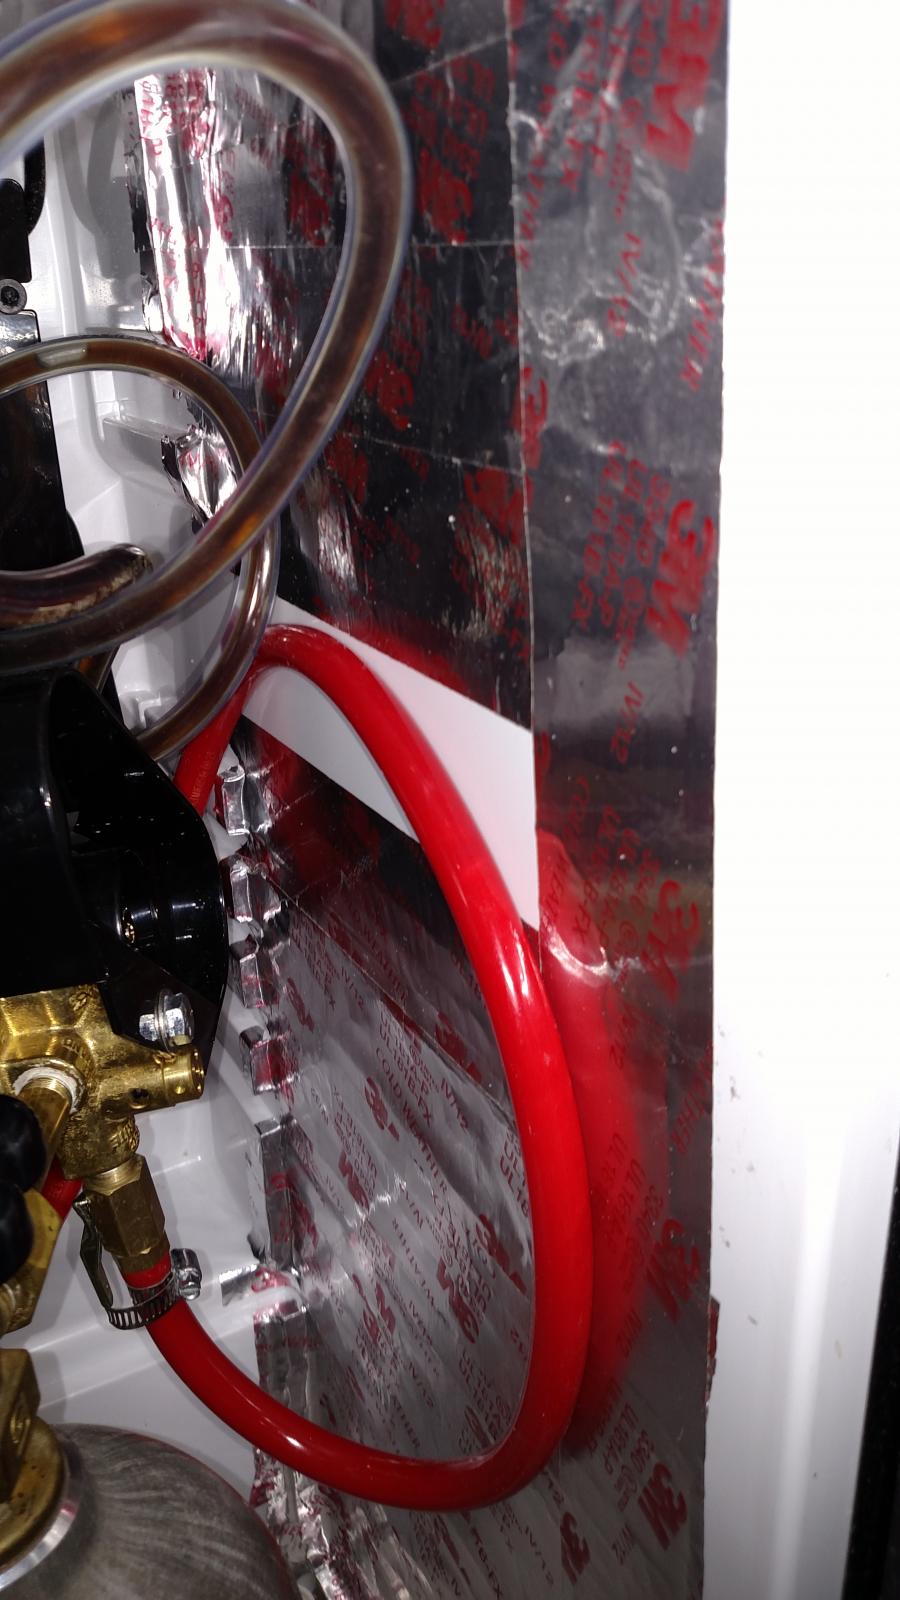
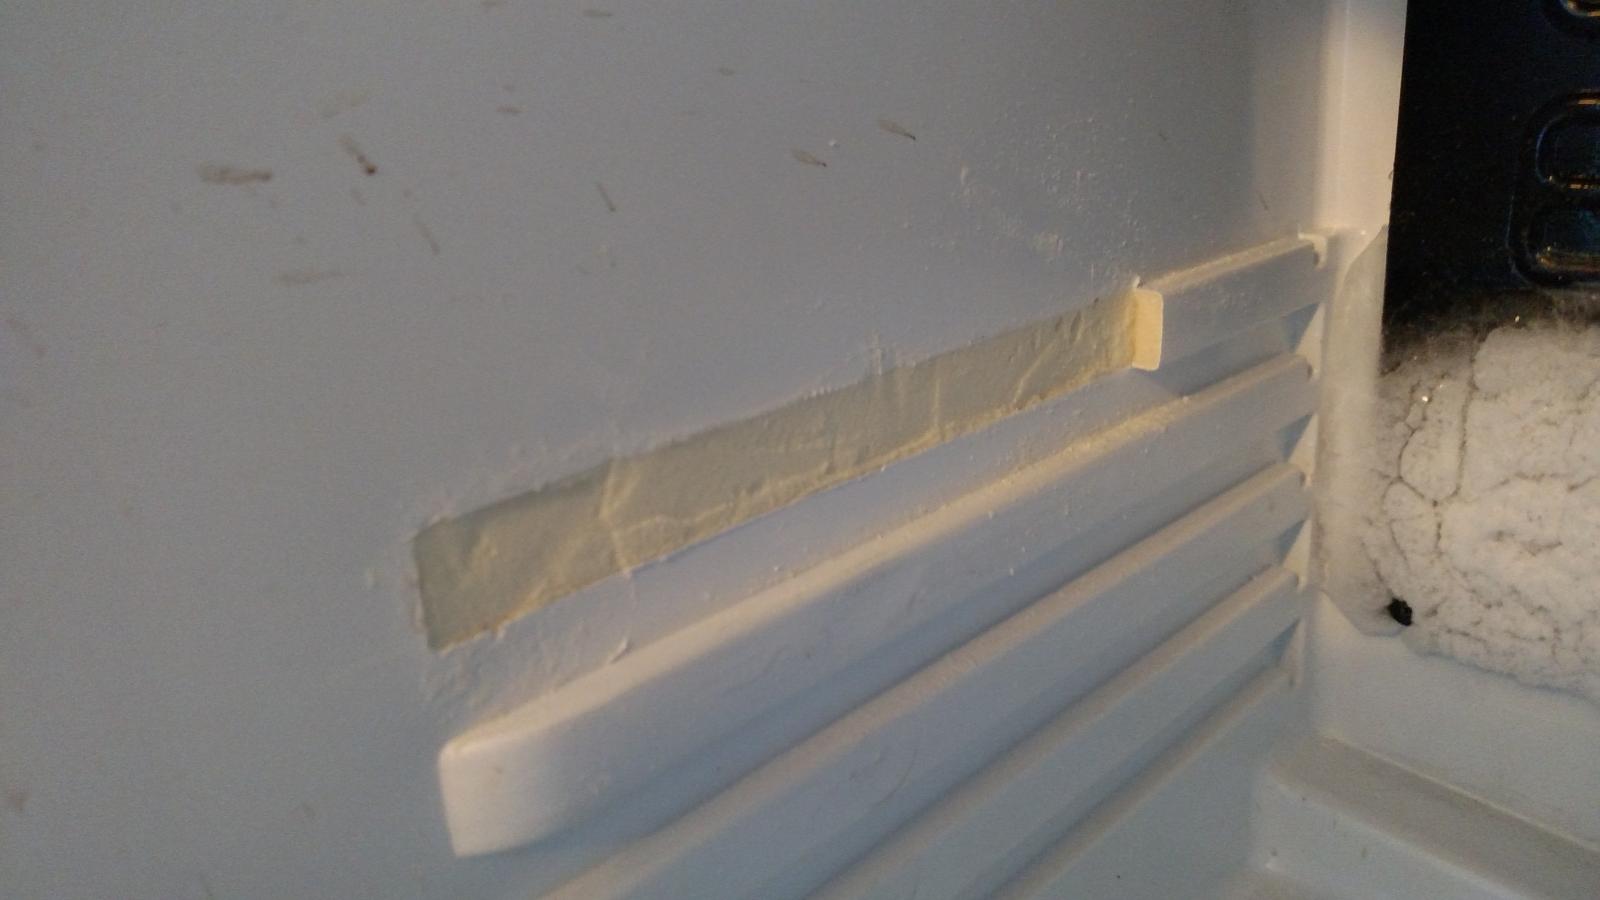
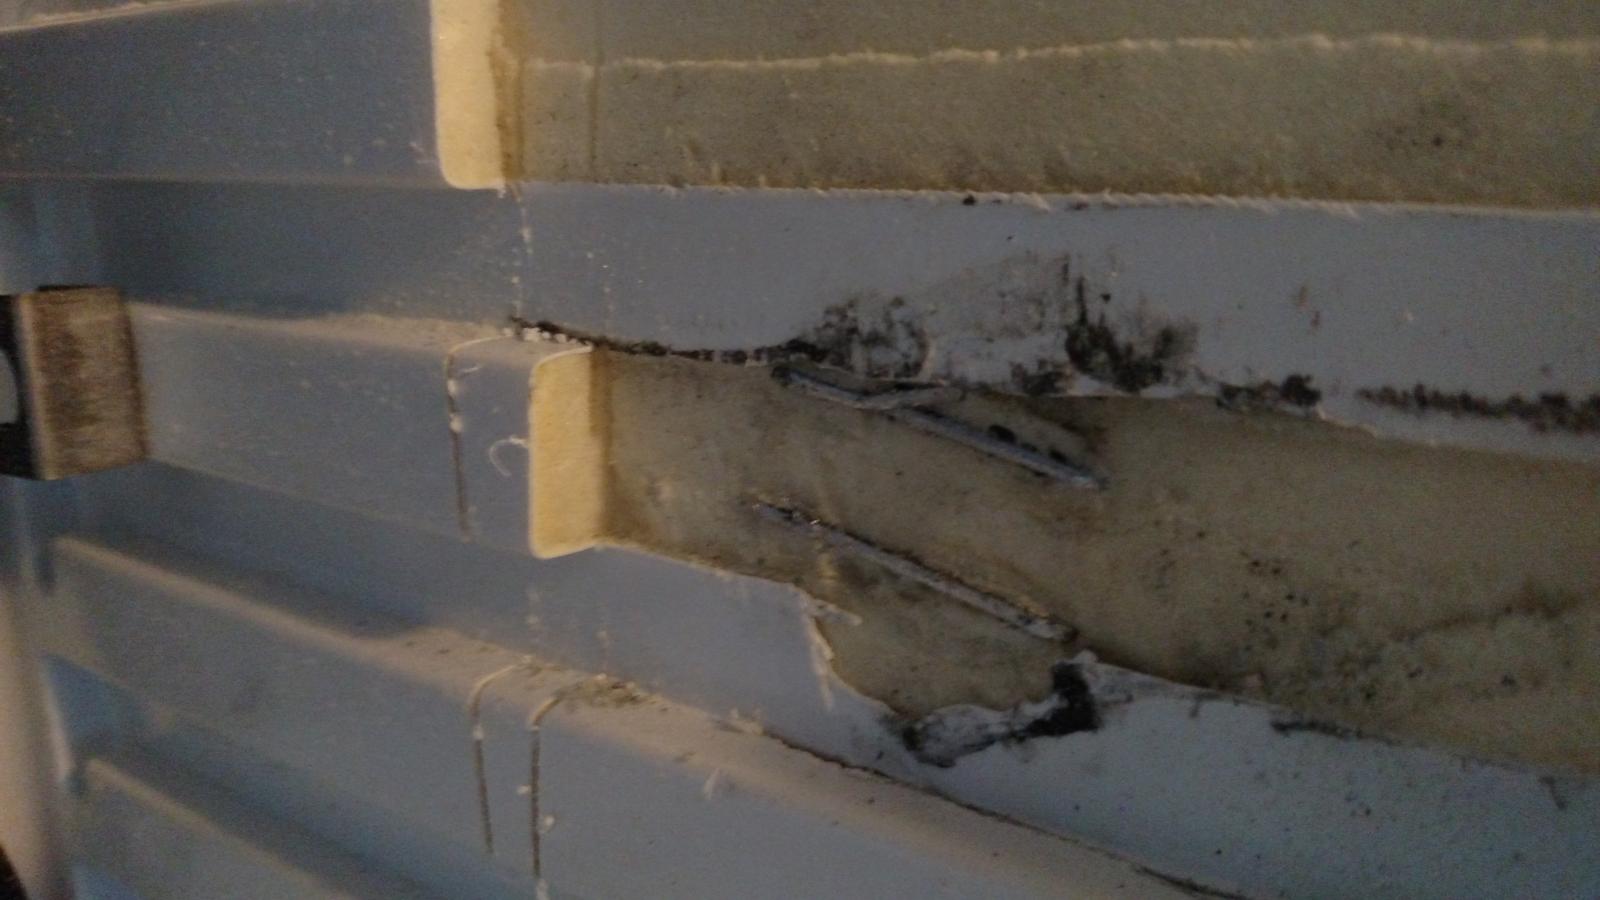
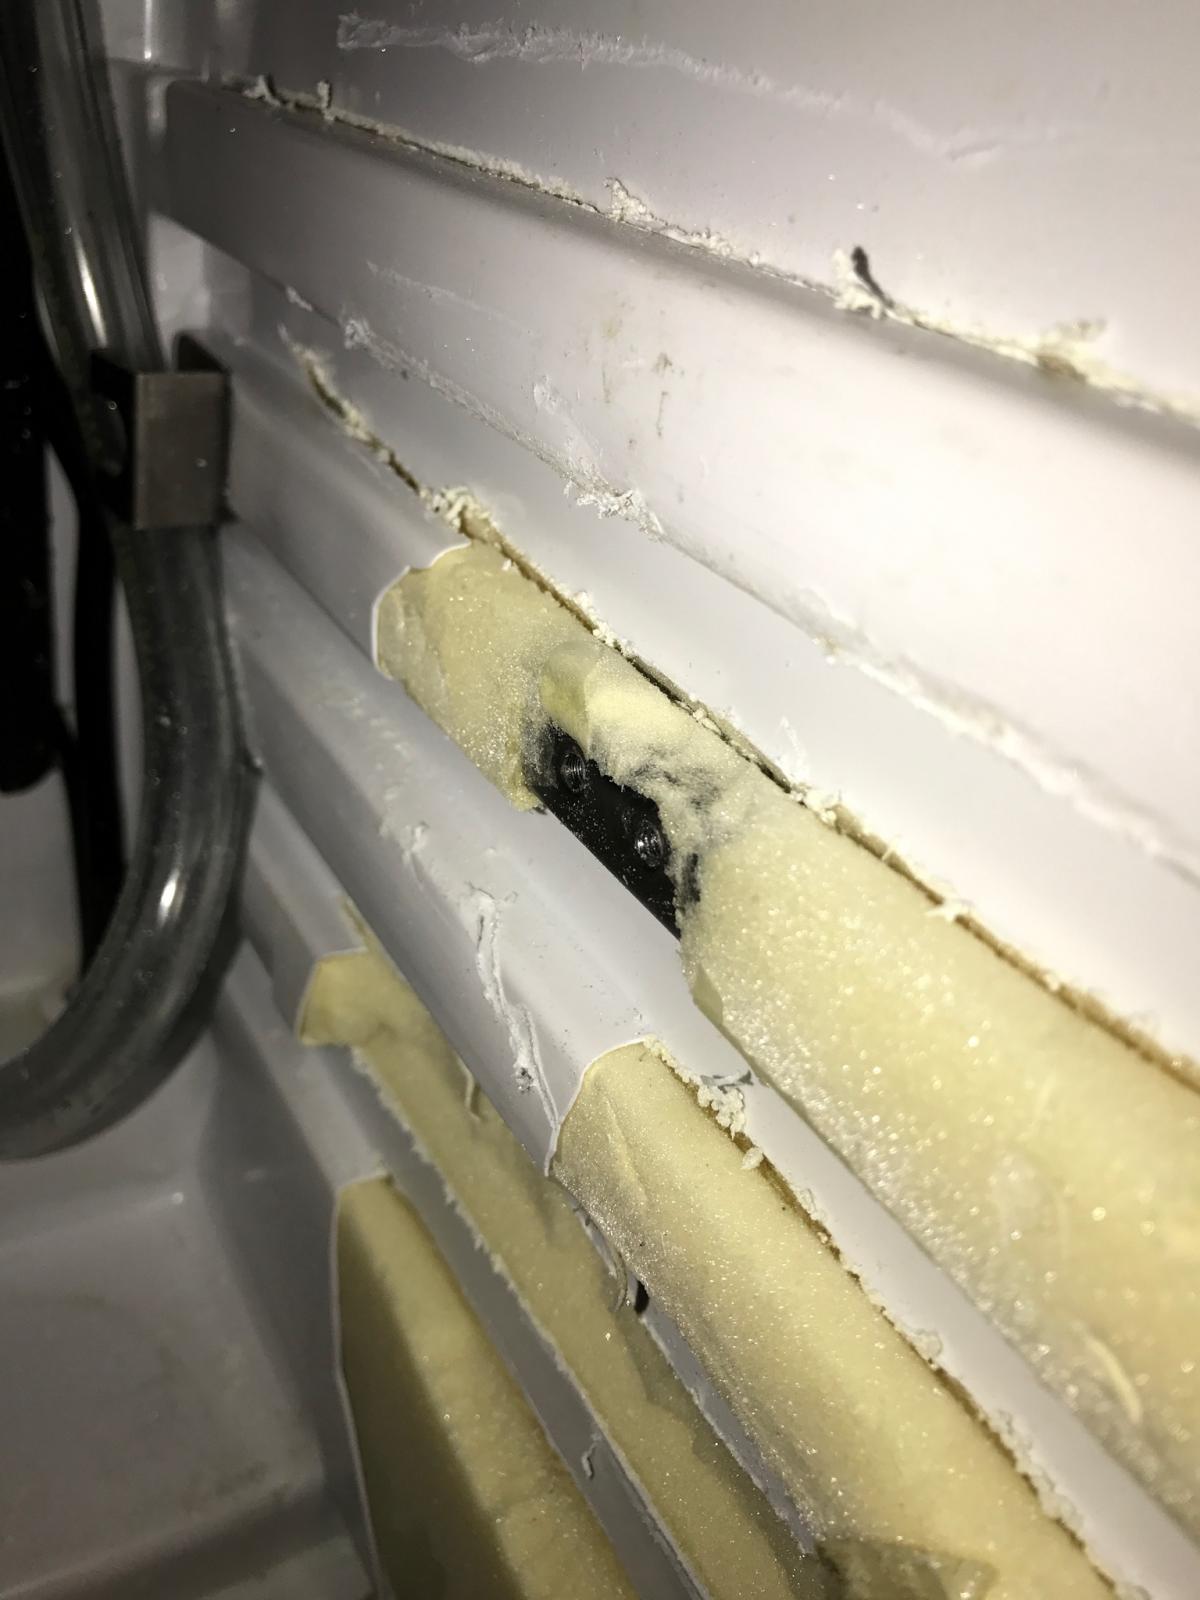
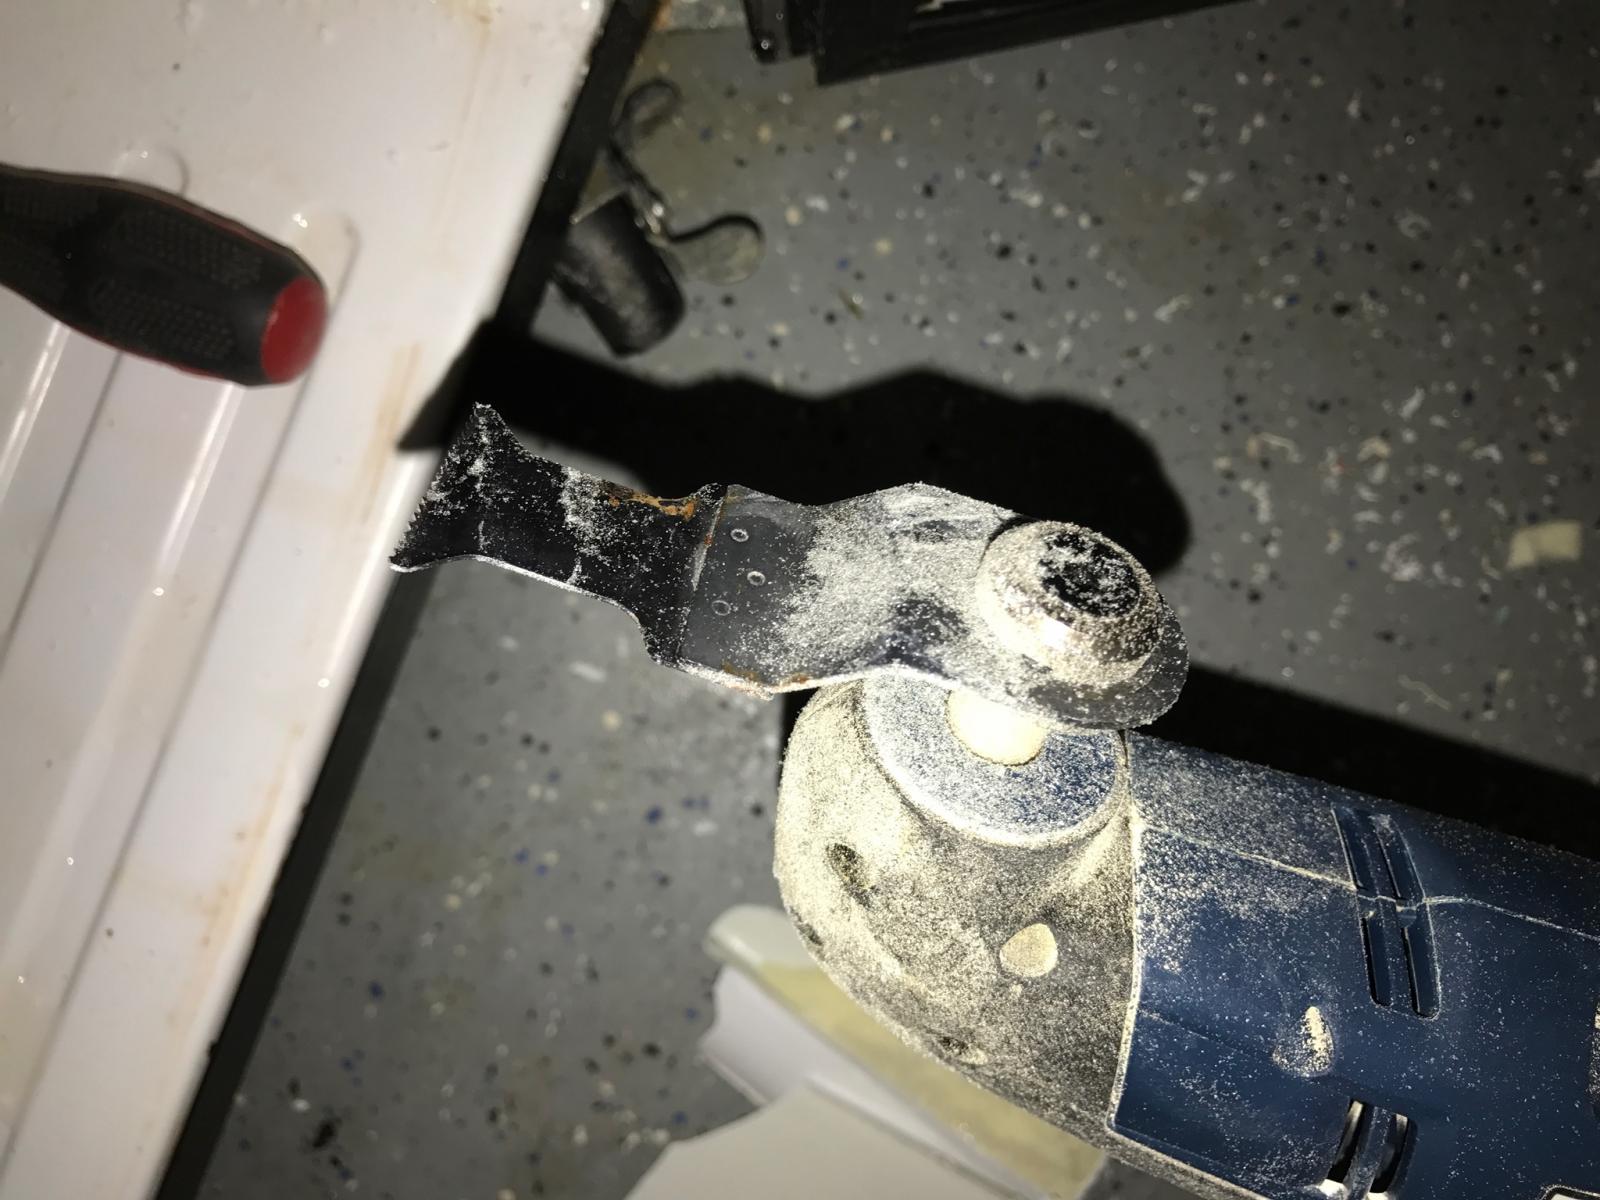
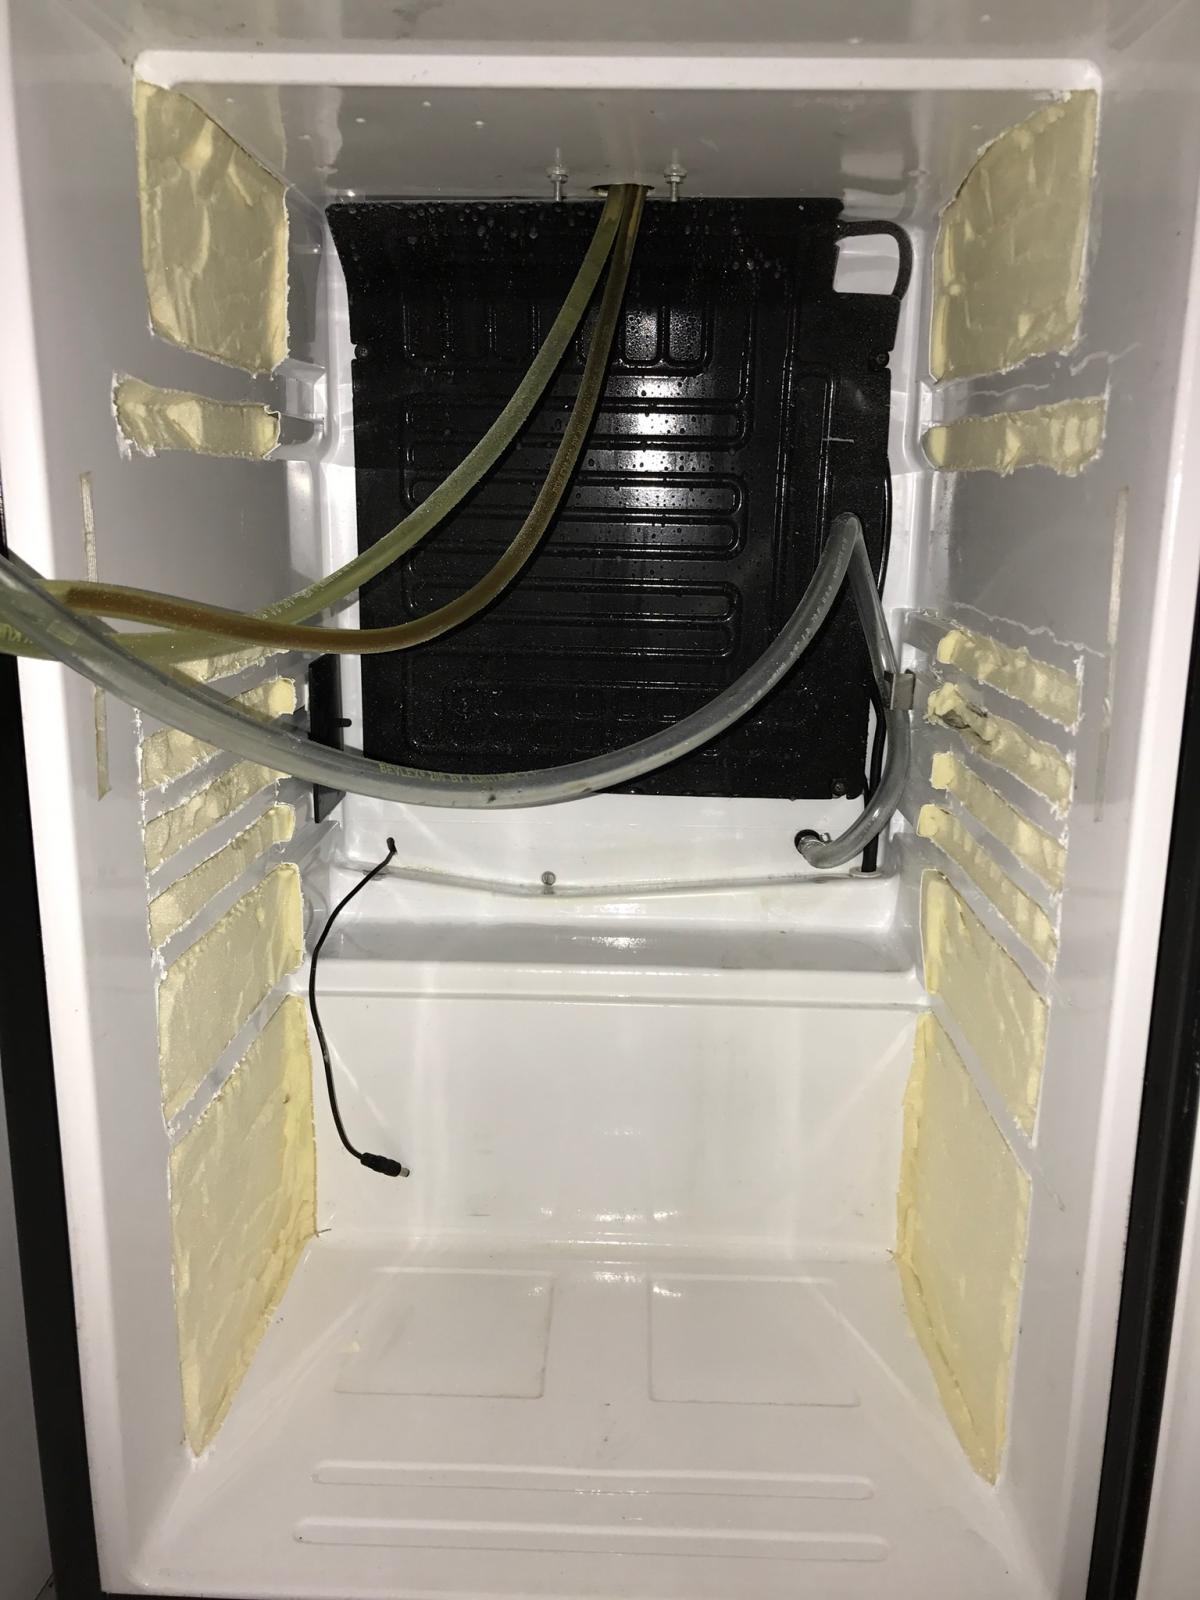
In the pics below you can see how it ripped right through the ribs. I used a coarse wood but and set it to the lowest speed. I also attached a picture of the metal bracket. For that I changed over to a metal bit and chewed right through it. I decided to use "speed tape" instead of caulk. (Something like this: https://www.amazon.com/dp/B00O9R4K7O/?tag=skimlinks_replacement-20) It's rated for cold temps and works in high humidity environments. It was a little work getting it to wrap the ends of the ribs but I think it looks good.
I still need to drill a hole to get the CO2 tank outside. I've almost talked myself into using a couple of grommets for the hose instead of an MFL bulkhead adapter. It may not be as clean of an install but I don't think it would look bad either. I've used grommets for hose in a jockey box build and they worked really well. I also haven't tried to fit two sanke kegs either. I'll report back when I finish up.


Last edited by a moderator:
Aluminum plating, I like it! Looks like you used https://www.amazon.com/gp/product/B00DY9IXFI/?tag=skimlinks_replacement-20
Got some in the mail....!
Got some in the mail....!
Last edited by a moderator:
Jorb: Brilliant!! I have a couple of rolls of that I used for other projects. I think I will tape over the caulking cuz it looks a lot better!! Thanks for the update!
BTW, I never used a bulkhead adapter for my CO2 hose. I think it is overkill. I have had my rig like this for years with no problems. I just drilled the hole so that it was a really tight fit, put some keg lube on the CO2 hose, and slid it in. No leakage and no issues with damage to the line.
BTW, I never used a bulkhead adapter for my CO2 hose. I think it is overkill. I have had my rig like this for years with no problems. I just drilled the hole so that it was a really tight fit, put some keg lube on the CO2 hose, and slid it in. No leakage and no issues with damage to the line.
Success! I got the CO2 tank moved outside the fridge last night. I started the hole with a small metal bit from inside the fridge. Then I opened it up with a larger bit until I could fit a step bit in. From there it opened up to 7/8" (the size of my grommets). The grommets are a snug fit against the hose. As you can see there are now two sanke kegs in the fridge. Before removing the ribs they would fit but the door would not stay shut. With the extra little bit of room it is perfect. Now I need to work on a two tap tower and order some nice faucets.
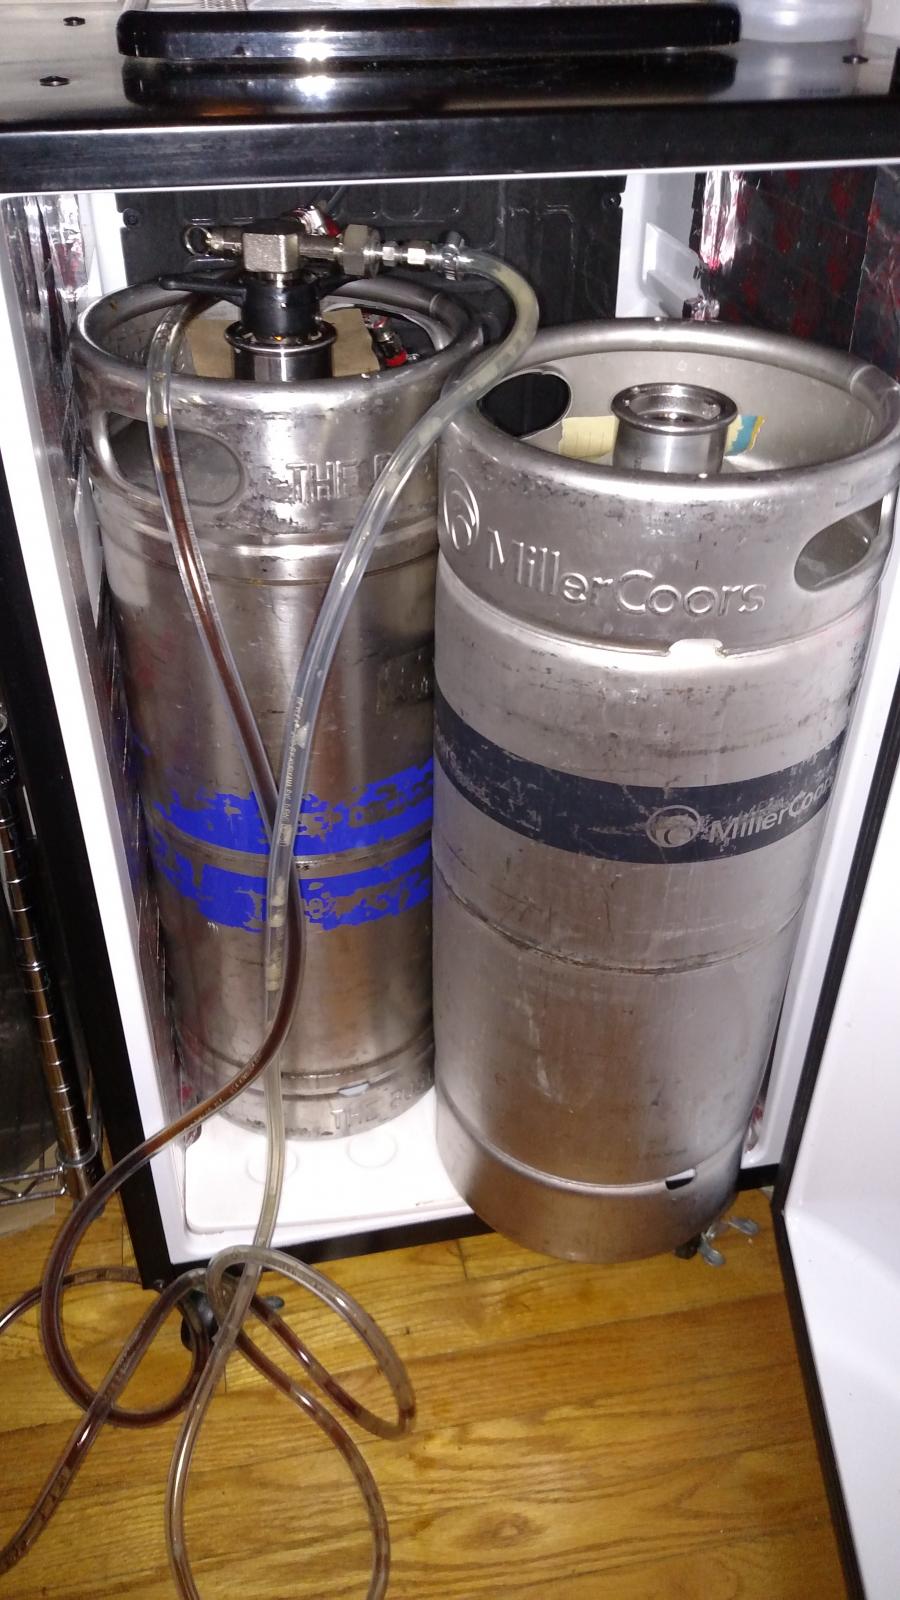
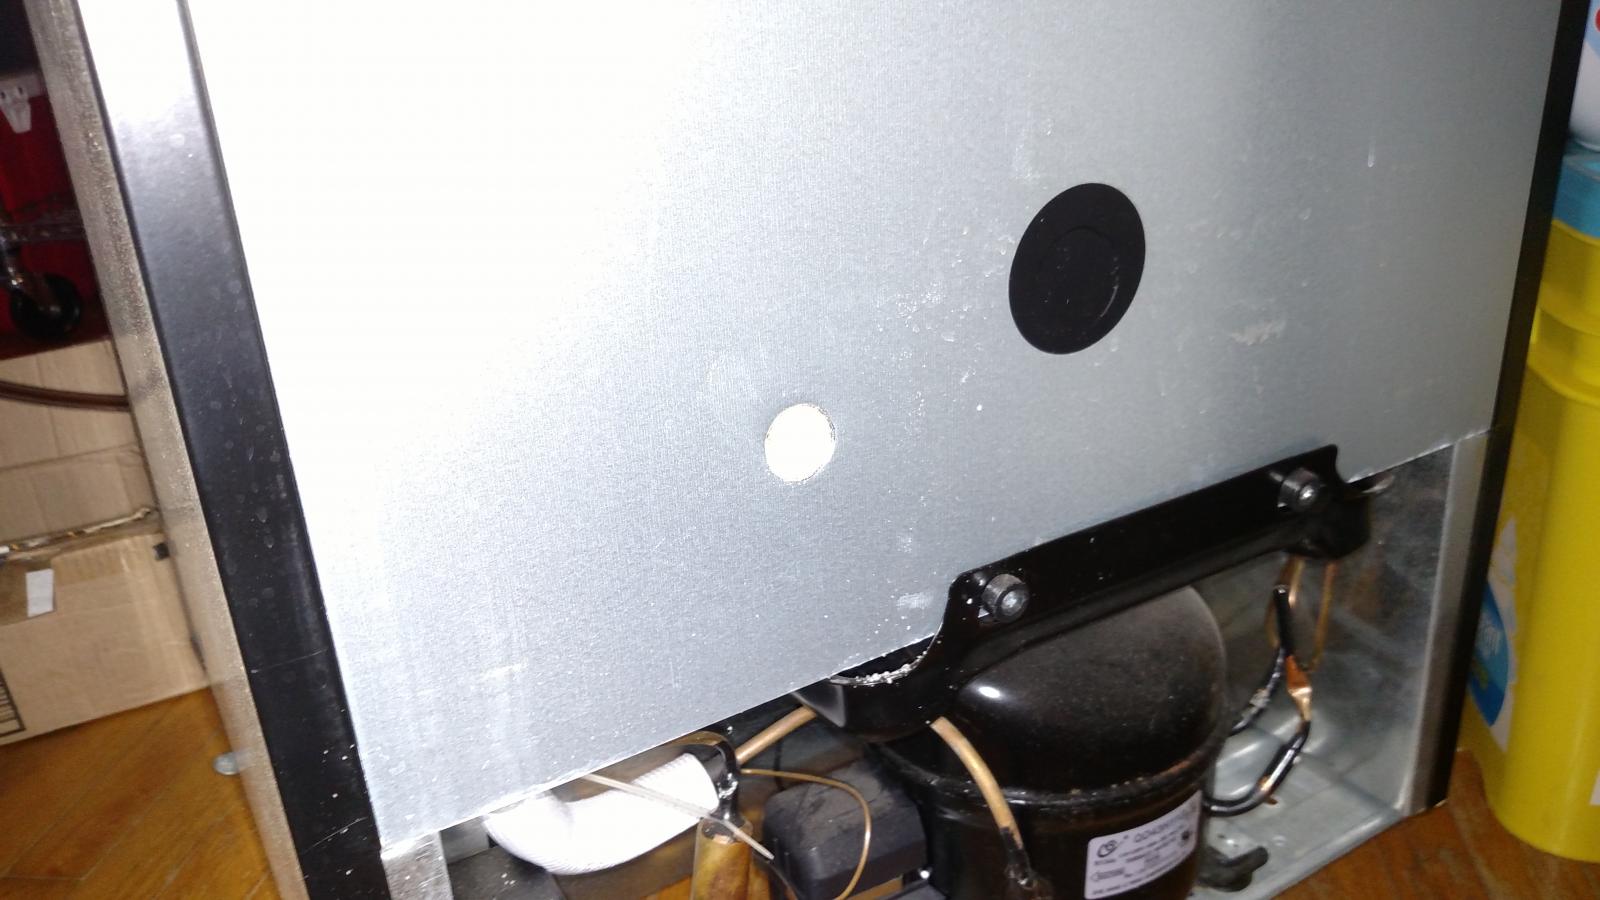
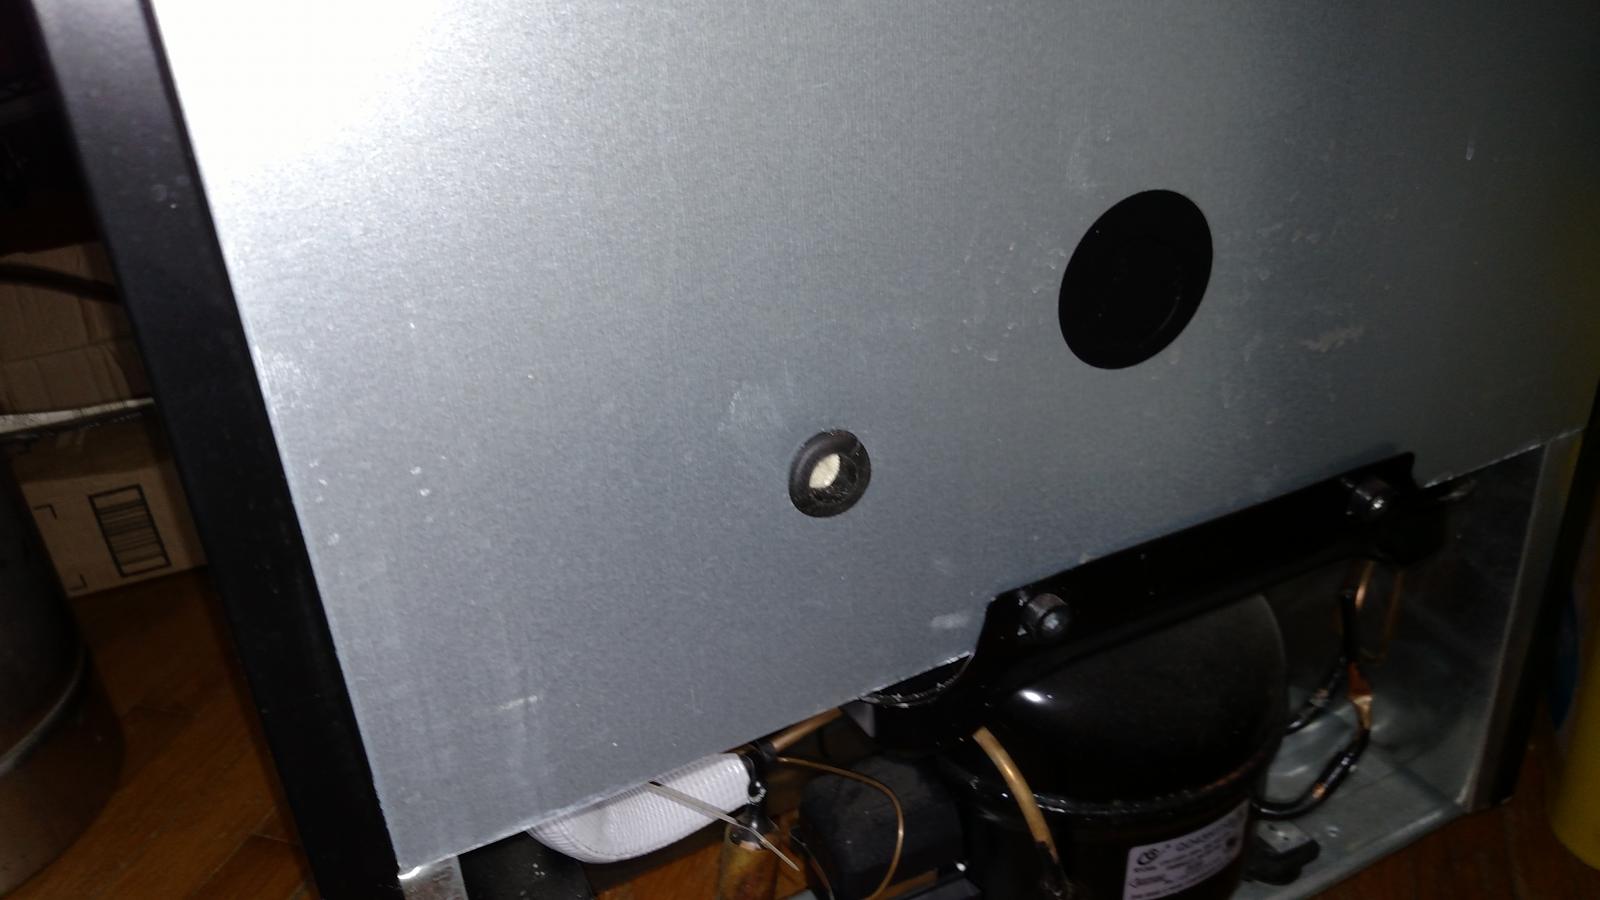
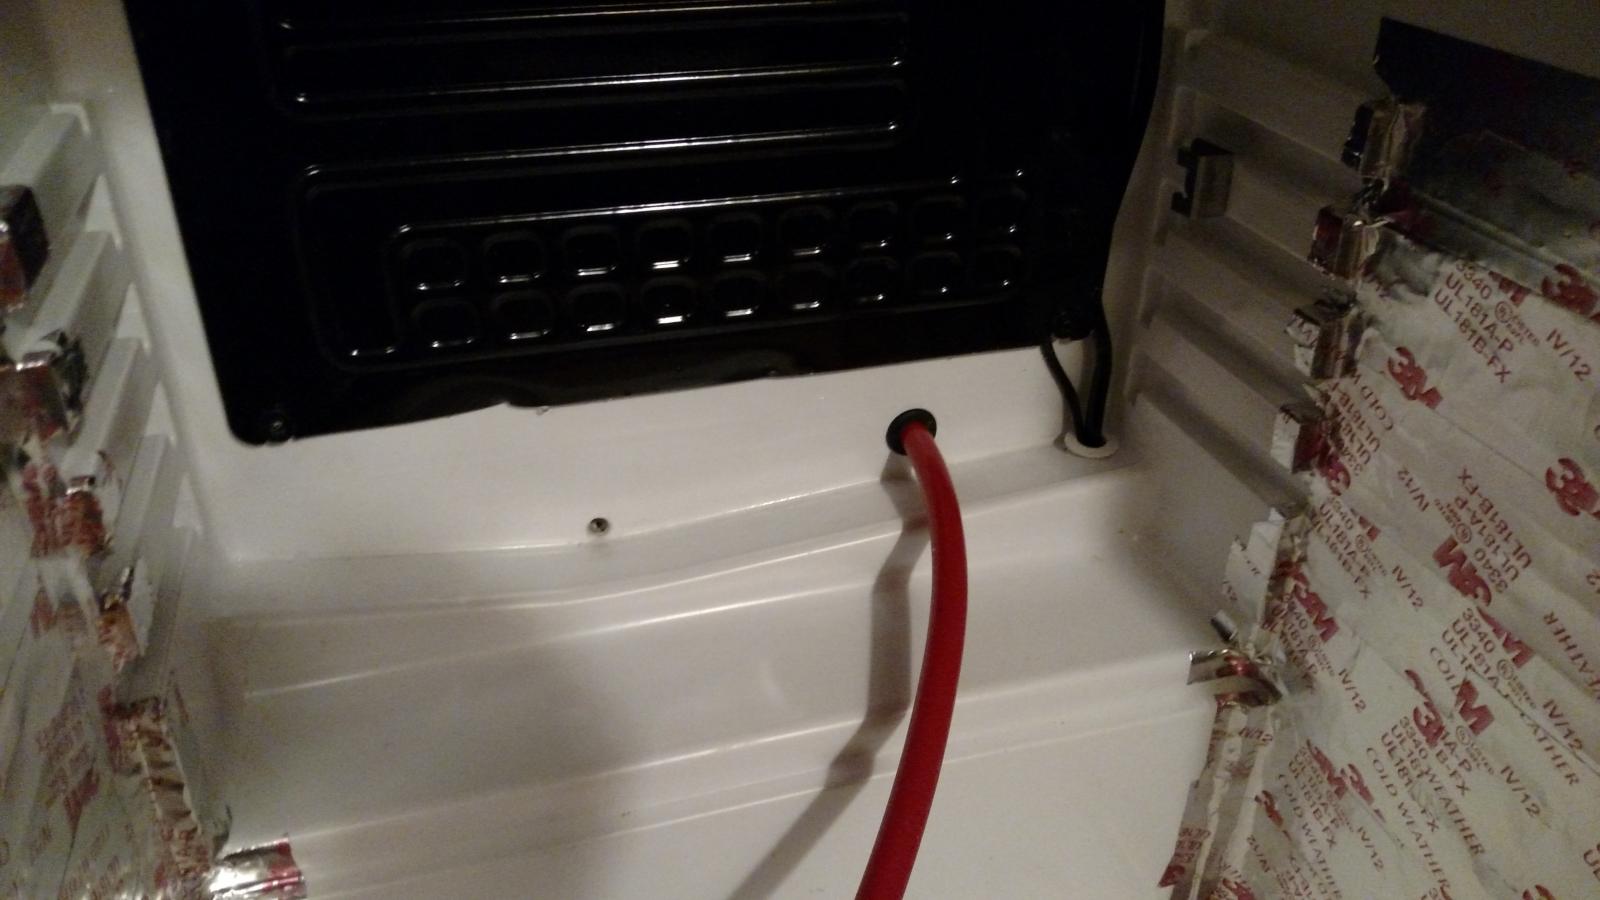


Beautiful! Enjoy that second tap bud! I know I am loving having another one after waiting all these years...why? I think I was scared to ruin the rig and I was being a bit lazy.
Oh, one other tip. See how that drain hole is about 1/4 inch off the bottom of that dip? I drilled that out a bit more and I have less ice damming than I used to...
Cheers!
Oh, one other tip. See how that drain hole is about 1/4 inch off the bottom of that dip? I drilled that out a bit more and I have less ice damming than I used to...
Cheers!
It's a fine line between being inspired by someone, and following someone off the edge of a cliff! Hopefully I managed the former, thanks to the tips and ideas from here. I was going to just experiment a bit with the Dremel tonight but this is the kind of job you probably should finish once started. I captured a few photos to try and add to what's already been shown.. close ups of what it was like to cut into, of the metal bracket on the right, of my Dremel (really a Lowes own brand), and of the final three Corny squeeze!
I tried to cut off the plastic and peel it away, but that maybe wasn't too smart because it tended to pull off chunks of foam from underneath, whereas the Dremel could perhaps have more smoothly done this. And I still had to pass over with the Dremel to smooth out after the plastic was removed anyway.
I'm leaving the taping to another day. It's in the 20s farenheit tonight here and my garage will be cool enough for a while I expect, plus I'm not sure the plastic liner is super important anyway. But most of all I'm just too exhausted for finishing that part tonight!
Thanks again for the inspiration and tips and info!


It looks great. All it took was stonebrewer jumping off into the void and we've all gone over the cliff with him.
I think the plastic is more of a moisture barrier than anything. I'd tape it up just to make sure that no water gets into the lining.
I'm leaving the taping to another day.
I think the plastic is more of a moisture barrier than anything. I'd tape it up just to make sure that no water gets into the lining.
So we are all a bunch of beer drinking lemmings, eh? 

I agree on the plastic being a moisture barrier. I think this particular kegerator is pretty simply designed, and thus was pretty much what I wanted for my needs, both the drinking and tinkering ilk. Cheers and enjoy the plunge!!
PS - love them shiny kegs!!
I agree on the plastic being a moisture barrier. I think this particular kegerator is pretty simply designed, and thus was pretty much what I wanted for my needs, both the drinking and tinkering ilk. Cheers and enjoy the plunge!!
PS - love them shiny kegs!!
Ha shiny keg #3 was brand new. I have 4 taps and storage for 5 kegs now. My friend thinks I should turn the levers for tower into a triple tap but I'm not sure... that would be more money and time. He also suggested a nitro tap which might be a good "one day" idea.
I wish I could remember but I think I paid $250 for this kegerator, from a floor sale at BJs (like Costco). Has been a great deal.
PS makes sense about the tape and moisture. Will get it taped up by the weekend.
I wish I could remember but I think I paid $250 for this kegerator, from a floor sale at BJs (like Costco). Has been a great deal.
PS makes sense about the tape and moisture. Will get it taped up by the weekend.
I bought mine on Amazon with free shipping a number of years ago.
https://www.amazon.com/s/ref=nb_sb_noss_1?url=search-alias=aps&field-keywords=nostalgia+kegerator
https://www.amazon.com/s/ref=nb_sb_noss_1?url=search-alias=aps&field-keywords=nostalgia+kegerator
My friend thinks I should turn the levers for tower into a triple tap but I'm not sure... that would be more money and time.
Check out the earlier part of the thread on making a triple tap using cheap PVC piping. That is what I did and it was really cheap to do. Of course, I already had a couple of extra Perlick faucets laying around, so that made it a lot cheaper.

lorne17
Well-Known Member
- Joined
- Jan 14, 2013
- Messages
- 360
- Reaction score
- 30
Ok, I’m going to bring this thread back to life. First of all, this thread rocks. HBT is amazing because of users like all of you! So helpful all the time!
I'll ask my questions up front with the back story to follow:
1. How's the Customization holding up nearly a year later? Are the ribs and caulking/tape leaking at all? Any mildew problems?
2. Can someone please tell me which MFL bulkheads were used for gas line? I would buy the MFL bulkhead adapter but they are $18 and i don't feel like spending $54 just for three adapters!
I'm bringing this one back nearly a year later becauae this KRS-2150 kegerator came up on Craigslist and I think I’m going to buy it tomorrow for $150. Seems like a good purchase. Mostly because my current keezer is rusting like crazy on the inside. It’s not going to last much longer. I already dremmeled away (what i thought was all the rust) and sprayed it with an anti rust inhibiter paint followed by a white epoxy appliance spray paint. Here i thought it would last. Didn't make it 2 years and the rust is back and more pissed than ever!
Anyways, I appreciate the post because I just expanded my current keg and tower to three taps. So this kegerator needs to work with (2) standard corny kegs 8.5" DIA and (1) torpedo keg - 9.25" DIA. I plan to bring the CO2 to the outside of the fridge and bringing in all three lines separately. I have a manifold regulator on the gas already.
Thanks,
Lorne
fwiw, I've used 1/4" MFL-MFL bulkheads from chicompany.net in various lengths, including three panel mounts for my keezer and the 4" versions on my two fridges. Assuming you're in the States, 3 of them should ship for well under that $54.
Cheers!
Cheers!
Customization is holding up well. Mine gets daily use and I have had no issues. Very happy with having capacity for three kegs as I am often finding myself with three or more beers in the pipeline. No mold or other issues with the rib removal.
I did not use the bulkhead adapters...I cut a hole the diameter of my gas line and put a manifold on the inside, which made the most sense at the time. It can be a pain to turn off/on the gas at the manifold with kegs in the way, but to be honest I rarely do that. I cut the gas off at the tank when not "charging" my tanks. Now that I ferment and carbonate in the keg, I rarely use gas at all...
Good luck and let us know if you have any other questions!
lorne17
Well-Known Member
- Joined
- Jan 14, 2013
- Messages
- 360
- Reaction score
- 30
Success! I got the CO2 tank moved outside the fridge last night. I started the hole with a small metal bit from inside the fridge. Then I opened it up with a larger bit until I could fit a step bit in. From there it opened up to 7/8" (the size of my grommets). The grommets are a snug fit against the hose. As you can see there are now two sanke kegs in the fridge. Before removing the ribs they would fit but the door would not stay shut. With the extra little bit of room it is perfect. Now I need to work on a two tap tower and order some nice faucets.
Hey Jorb,
What is that 3M product you used on the side walls?
I’ve taken the plunge! Bought this bad boy with 3 large kegs for $150 on Craig’s! Returning the kegs for $30 each to my local liquor store to make it $60 in the end. Boo ya!
I’m concerned though, I have two regular corny kegs and one torpedo keg. I’m concerned I’ll need to buy a third regular keg and can’t refrigerate the torpedo keg since it’s a larger diameter. We’ll see.
Already started to cut so no turning back now!
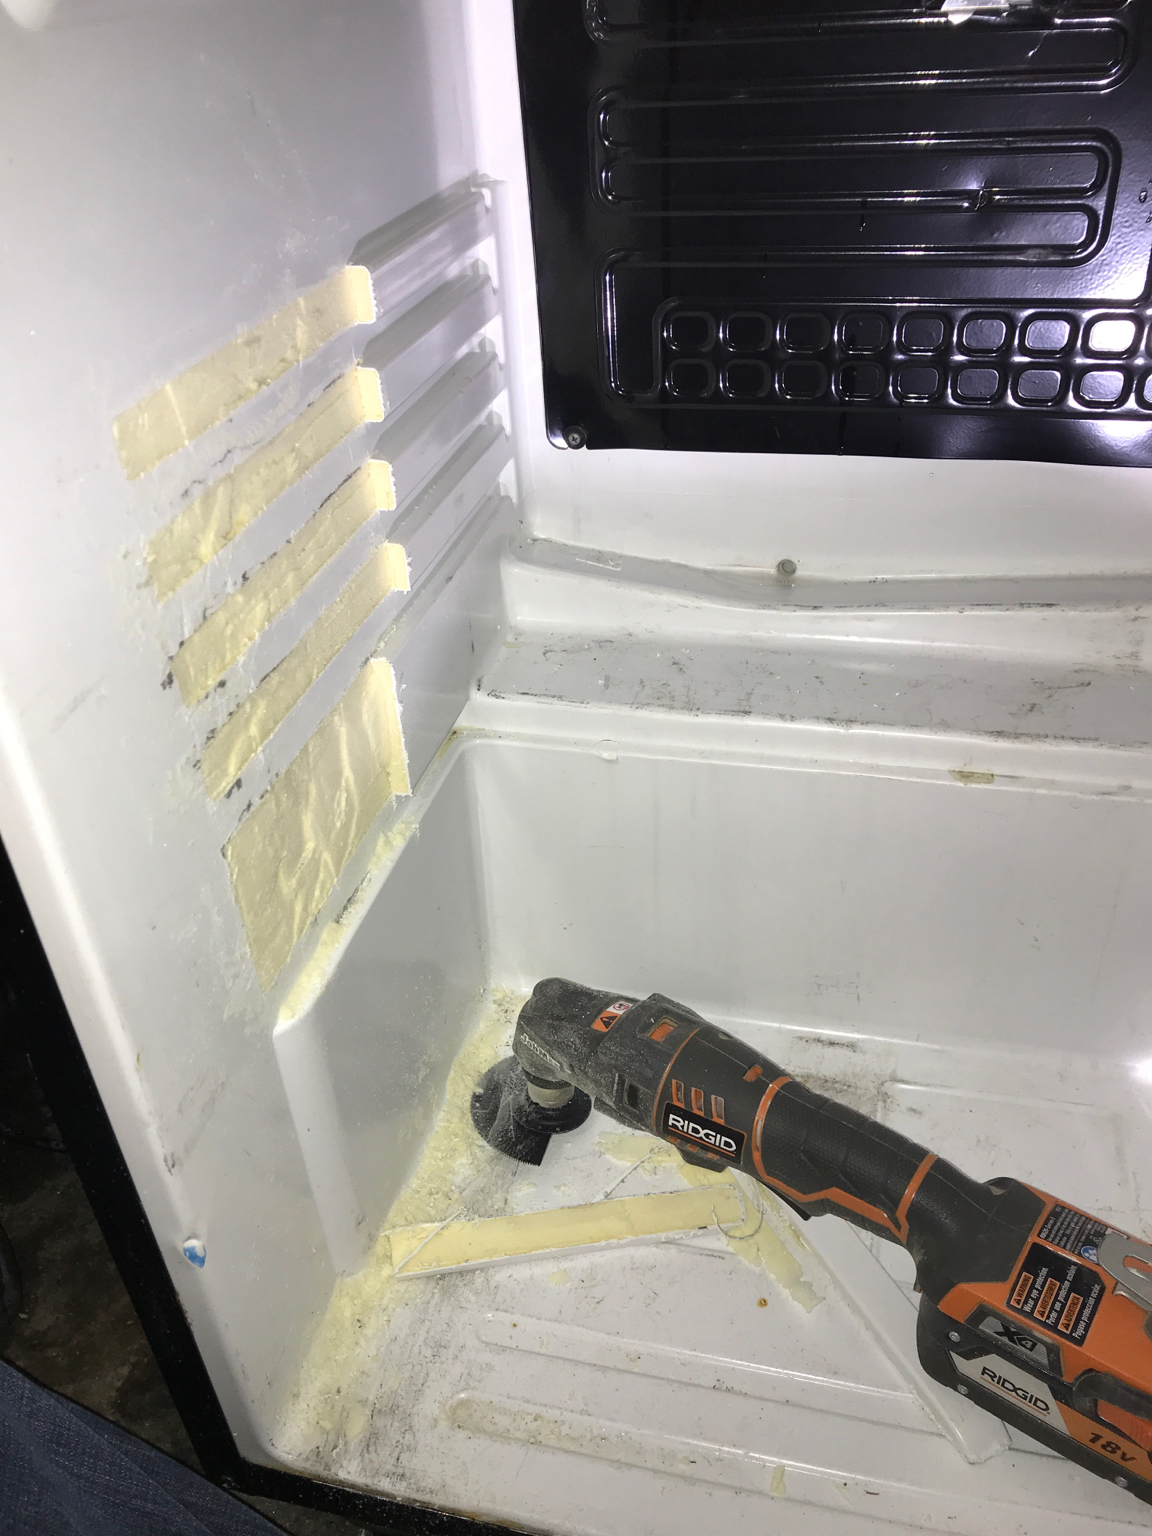
lorne17
Well-Known Member
- Joined
- Jan 14, 2013
- Messages
- 360
- Reaction score
- 30
Ok all ribs are cut out! Now I need to clean it all up. Then I think I will caulk it and sand smooth. I think I may spray the inside with an epoxy spray that is used for refinishing tubs and sinks. Make it nice and smooth in there!

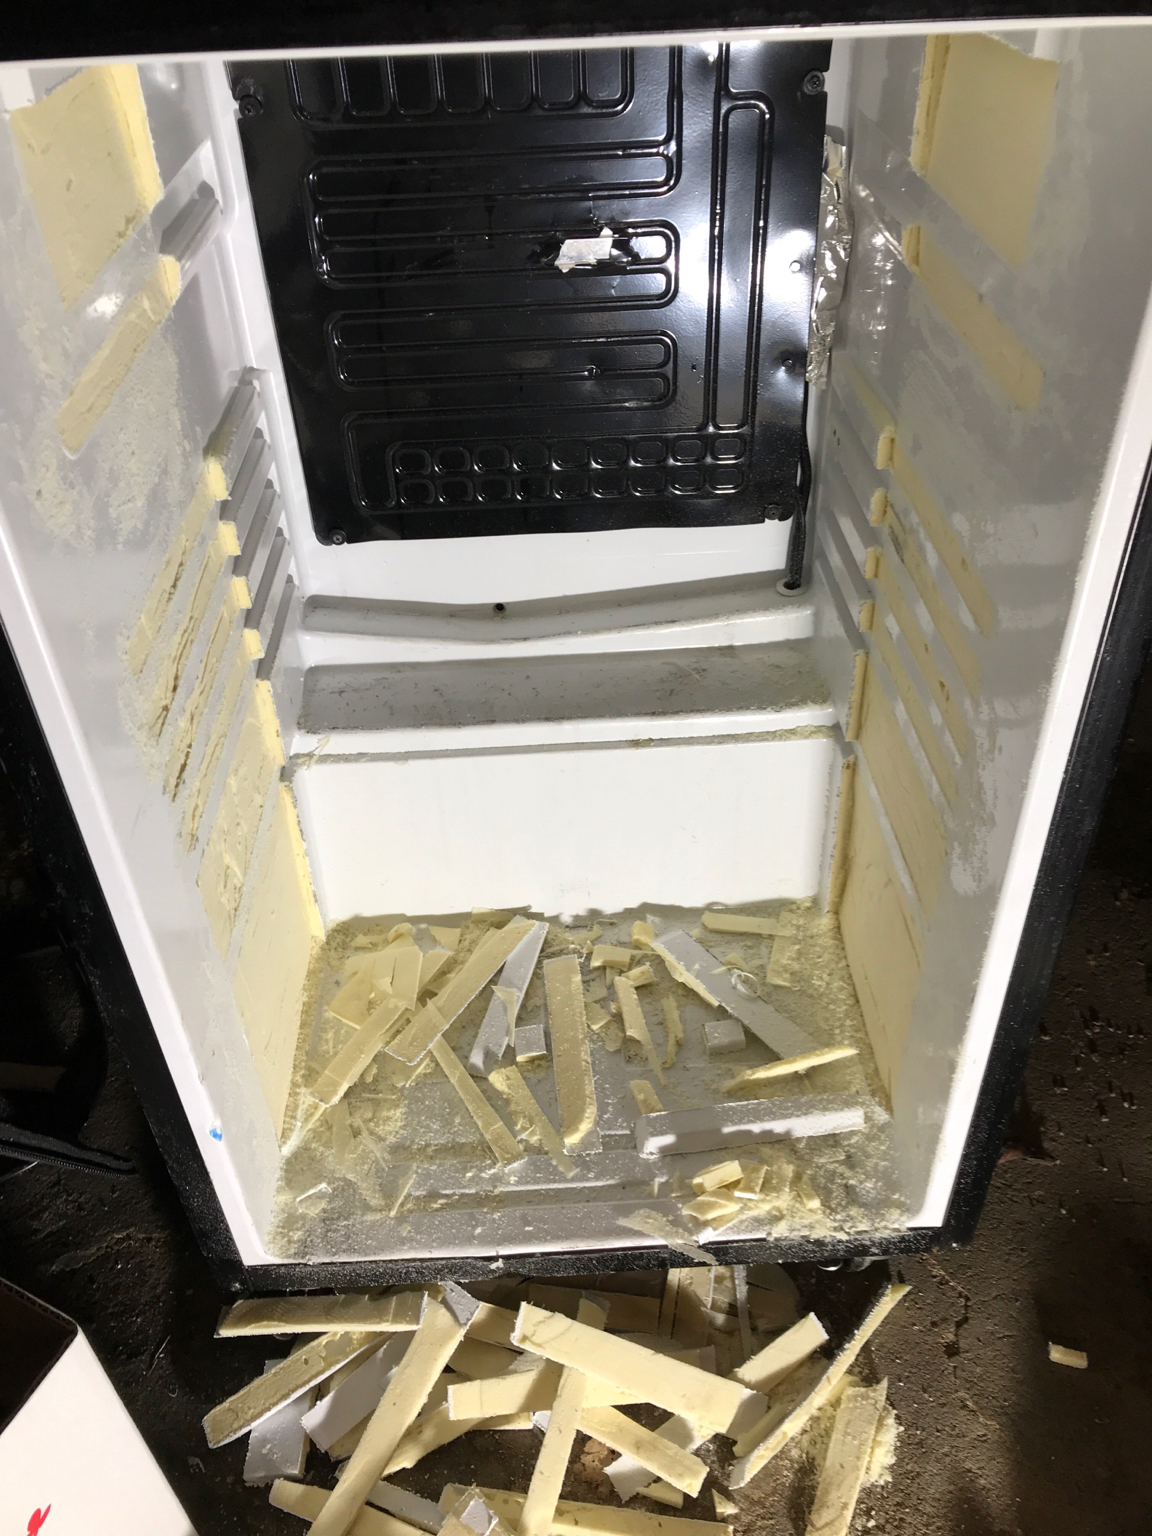


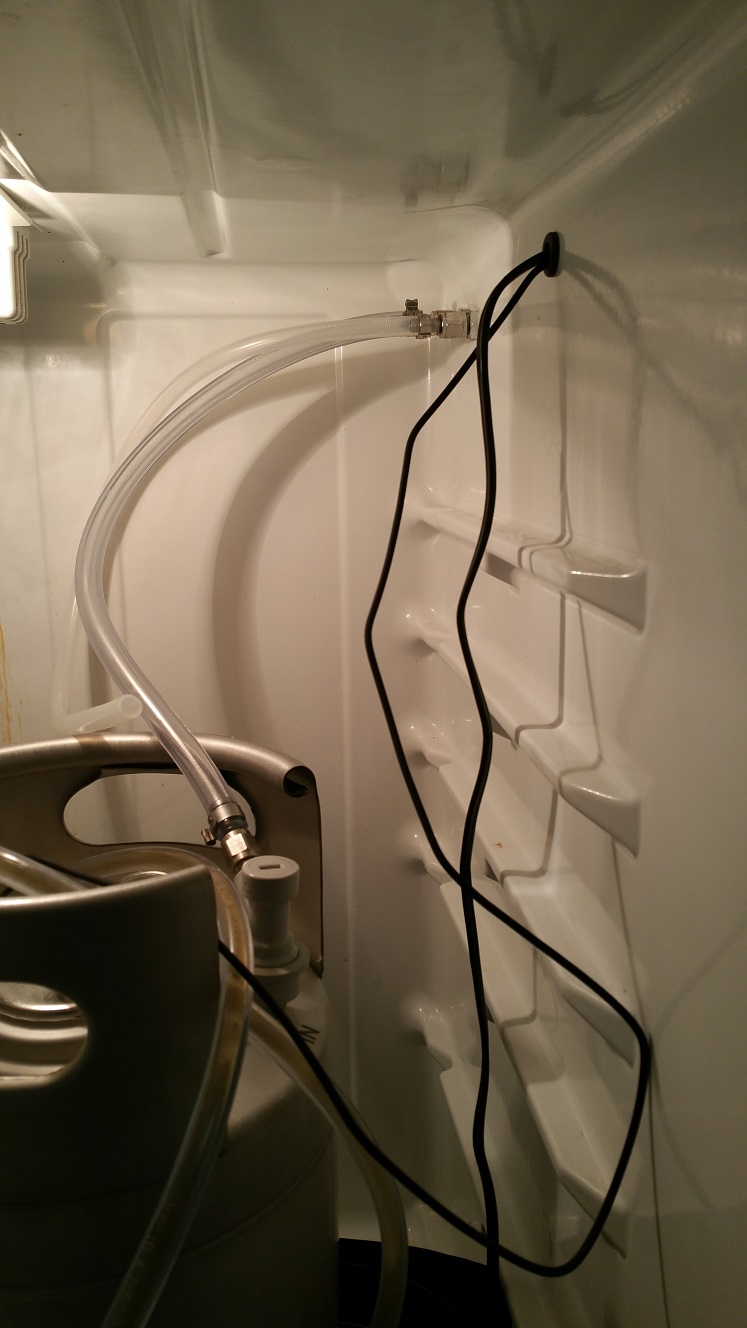
Chi Company sells three different bulkhead shanks, which is what these things are called. They allow you to "pass gas" (sorry) through a bulkhead--keezer collar, refrigerator side, etc.
https://www.chicompany.net/index.ph...dqepjoh8a3q7g0&keyword=bulkhead+shank&x=0&y=0
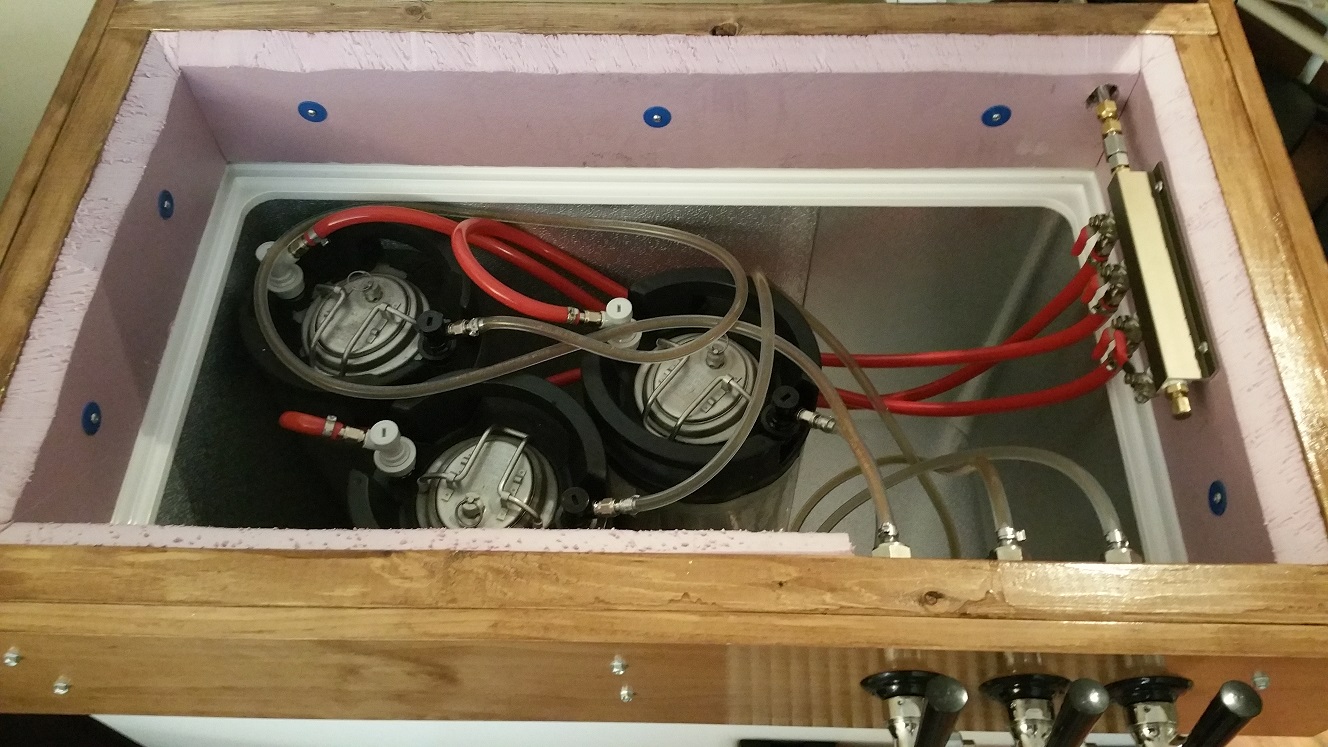
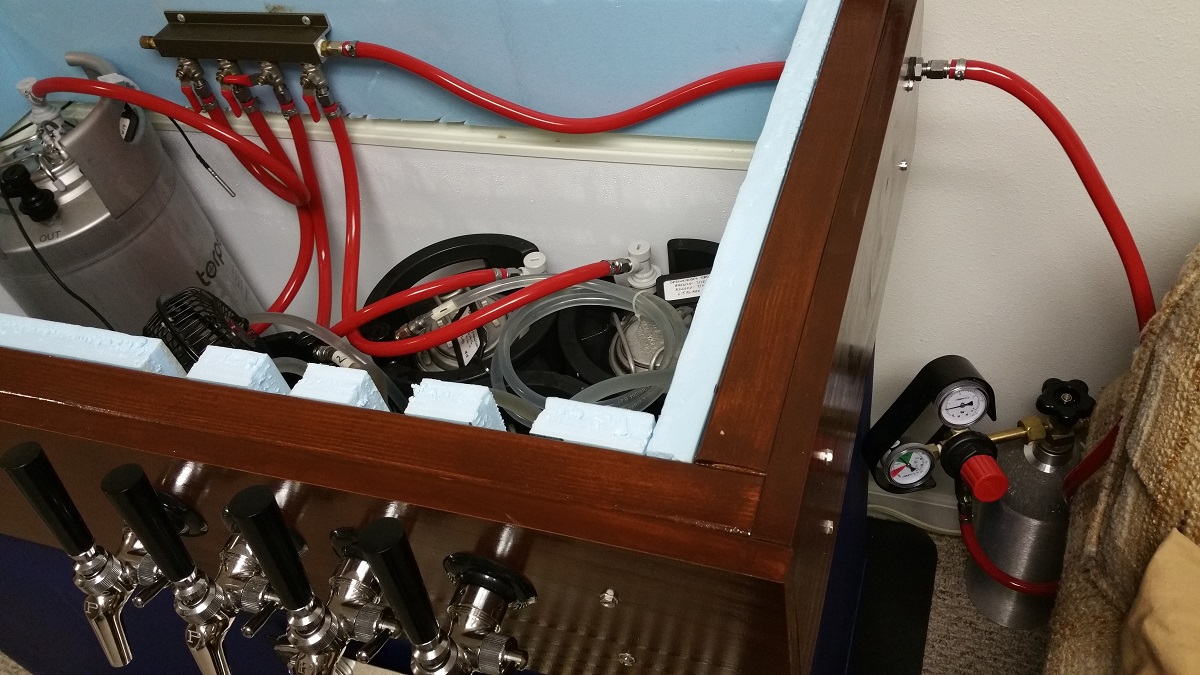
I've used the 4" bulkhead shank on two keezers, as shown below. I've also used a couple of the 2 7/8" shanks on my ferm chamber, one to allow me to get carbonation gas from regulator to quick-disconnect inside the ferm chamber, and another to allow me to move fermentation gas outside the ferm chamber to jars that harvest it and act as an airlock.
The 2 7/8" shanks barely fit going through the side of the ferm chamber if I took off the black rubber washer. But they fit.
You can see the silicone line coming from a second ferm chamber below to the airlock jars, which is how I do the ferm gases coming from the camo refrigerator.
WORD OF CAUTION: If you use these, make sure to get the small nylon flare washers to seal the connection or you'll have a leak. Get the smallest one in that link. Also, get a few extras. If the person installing them is fumble-fingered these can easily be dropped or fall out of the fitting. They'll bounce and end up in an inaccessible area if they are dropped. Don't ask me how I know.


Last edited:
Similar threads
- Replies
- 11
- Views
- 996
- Replies
- 3
- Views
- 836
- Replies
- 0
- Views
- 680


![Craft A Brew - Safale BE-256 Yeast - Fermentis - Belgian Ale Dry Yeast - For Belgian & Strong Ales - Ingredients for Home Brewing - Beer Making Supplies - [3 Pack]](https://m.media-amazon.com/images/I/51bcKEwQmWL._SL500_.jpg)


