# Moding a KRS-2100 to put the CO2 tank on the outside.

Homebrew Talk - Beer, Wine, Mead, & Cider Brewing Discussion Forum

Help Support Homebrew Talk - Beer, Wine, Mead, & Cider Brewing Discussion Forum:

This site may earn a commission from merchant affiliate links, including eBay, Amazon, and others.

dbarrm

Well-Known Member
Joined
Mar 10, 2011
Messages
109
Reaction score
1
Location
Cape Coral
Has anyone done this. I want the line to come out the back or bottom. A friend of mine did his out the side but I dont like the look of it. I dont want to just start drilling holes and mess it up so Im hoping someone has already done this.

I took a few pics to help show what I'm talking about. In the first pic you can see a hole on the back of the fridge. It had a around sticker covering it the same color as the sides. Behind the outer wall and visible in the hole is what looks to be an inner aluminum wall. This is the area where I would like to drill the hole for the CO2 Line.

IMG_6485Large.jpg


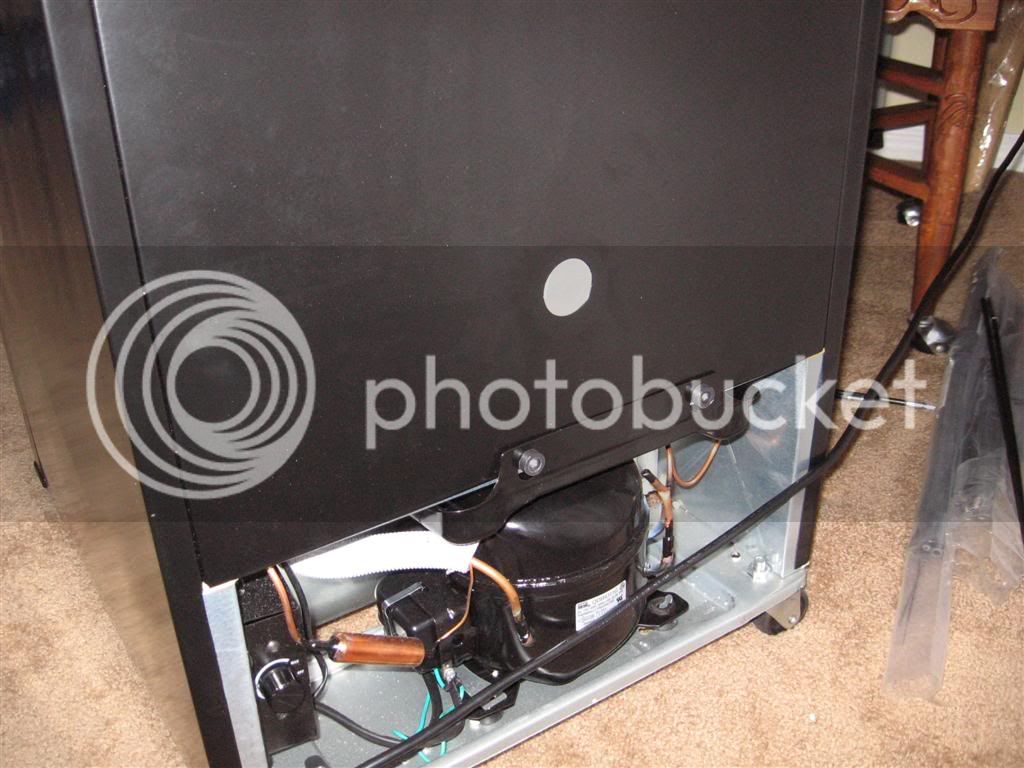
Now looking inside the fridge the placement of the hole in the back is just below the cold plate. This unit has coils in the sides, you can feel them get warm/hot when the unit is running.

IMG_6484Large.jpg


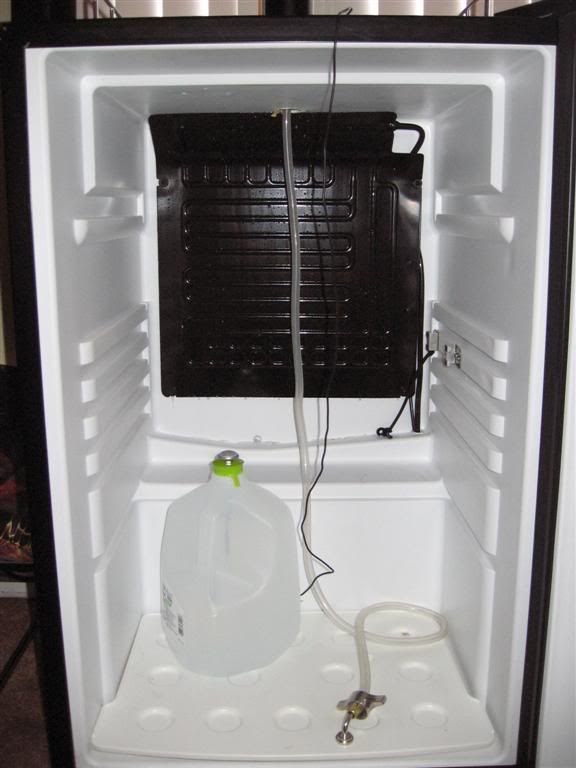
I am hoping that behind the aluminum plate is the inner plastic wall of the fridge but am still worried about drilling into something that will ruin the fridge.

With these pics can anyone tell me if its safe to drill here or not??

Dan
 
You could take a dremel and very carefully take off the surface sheet metal to expose whatever may be underneath. Other than that, without knowing exactly where everything goes it's hard to know for sure. I am in the process of making my kegerator and I chose a rather innocuous spot to put my spout on. There weren't any coils there but the power cable that ran to the temp controller just happened to be embedded in the insulation right where I wanted to cut. Luckily I used a dremel first and not a hole saw.
 
Yes, this can be done. First thing I did was decide where I wanted to do my penetration test. Looking at the design and wiring, I came to the conclusion that this kegerator does not have refrigeration lines throughout the shell like a refrigerator does. I may be WAY wrong on that, but following the lines from the compressor into the shell, they all seem to lead to and from the black refrigeration panel in the back of the unit. So based on that, I decided to boldly go where no man has gone before or some such nonesense.

First, I carefully drilled a pilot hole from the inside:

2mms28n.jpg


Closeup view is next. I actually drilled just enough to make it throught the plastic and probed around with a piece of wire. Not hitting anything but foam on either side, up, down or forward, I drilled until I hit the back wall. The lower hole on the left is the drain that doesn't work worth a crap, reason being is it is not flush with the lowest point on that little shelf so the water pools and freezes instead of draining...

auzakz.jpg


From the back it looked like this:

10wmnwj.jpg


Using my drill with a 1/2 inch bit, I forged ahead and completed my preliminary hole:

288v2vo.jpg


I used a dremel tool and an old chain saw sharpening bit to slowly open the hole up on both sides until the hose JUST fit through. I used keg lube on the hose to help get it through. Here is a picture of the bit and the hose installed:

1p6wc9.jpg


Here is what it looked like on the inside once I finished. Note that I removed the black screw on the top holding the refrigeration panel in place and used a longer screw with a few washers to ensure the same depth to hold up my (oversized for this kegerator) CO2 manifold.

164aqq.jpg


And from the outside, once I put everything back together:

2rq0ug6.jpg


Total time to mod the kegerator was about 10 minutes, going slow as to not break the darn thing. I may be wrong about the refrigeration lines but I think this cheap Chinese kegerator actually may be as simple as I described above.

I would like to do 2 more modifications to this unit. First, I am going to remove the tower and replace it with a two or three faucet tower. Second, I am thinking about removing and replacing the internal plastic walls. If I can get about 1/2" more space, I believe I can fit 3 5 gallon Cornies versus the current two in this kegerator. I have no time in the next month or two to take on these projects, but when I do I will be sure to post on here for anyone else with this unit.

Stonebrewer
 
Oh, there was a third thing. I removed the temperature controller tonight and adjusted the screw to get it colder. There is a great thread on HBT that talks about how this is done. I turned it several turns in a counterclockwise direction and it appears that it is keeping my beer colder than the 40-42F degrees it was. We will see over time if it is where I want it to be (around 36-38F).
 
What are the advantages or disadvantages to having the CO2 bottle inside the fridge or outside the fridge?
 
More beer on the inside!

With this kegerator, I believe I will be able to squeeze 3 Cornies in, but the only way that will ever be possible is to get the CO2 tank out first. Other reasons I have are:

* I use a 5 lb tank now. They vary in height and some will not fit standing up in the kegerator with the regulator in a convenient position. If my supplier only has the tall ones, it becomes a pain to get things to fit.

* I want to use a 20 lb tank in the future which definitely will not work inside the kegerator.

* Outside, the tank is not behind 2 or more kegs. So it is easier to get at the controls without moving kegs around. This has the added benefit of not having the door open and saves energy and $$$.

* Gets cold inside, so changing it out means working with cold metal. Not a major reason, but not having that cold, wet cylinder to deal with is a small plus.

* With the tank on the outside it is easier to control since I don't have to move things. So, if I want, after I charge up my Cornies I can turn off the CO2 until pressure drops, then recharge. I have experienced leaks before that I have not been able to track down. This will help me eliminate this, I hope.

* I can put the tank on a scale and monitor how much CO2 is left.

Those are my main reasons for putting it on the outside.:mug:
 
I mean in relation to the CO2 itself. Does it CO2 act differently when in a refridgerated environment?
 
I mean in relation to the CO2 itself. Does it CO2 act differently when in a refridgerated environment?

https://www.homebrewtalk.com/f35/refrigerated-co2-16513/

See above for discussion of that. I think what I take out of the posts is that there is little real affect other than pressure increases in the bottle and perhaps the high pressure gauge may give you more notice that you are running out of CO2? Read and see what you get out of it.
 
Thanks for the link. That cleared up a few things. Based on what I pulled out of that, I believe that a hole in the back of my new serving fridge is the way to go...:)
 
Thanks for the link. That cleared up a few things. Based on what I pulled out of that, I believe that a hole in the back of my new serving fridge is the way to go...:)

Not a problem, that is why I love HBT! In the last year I have had a thousand questions about some aspect of brewing and to date all but one has been answered by searching the site or asking a direct question. Gotta love this place!:mug:

Good luck with your mod and post a picture if you get a chance. Might help someone some day...:rockin:
 
Just found this thread, this is exactly what I was looking to do I have the same kegerator! Thanks for the write up! BTW did you ever put in more taps? If not check out my bar build thread I put 4 tap tower in mine
 
I ended up only adding one additional tap as that tower was a PITA to step drill through! I have done dozens of kettles and never had as much effort to get through a kettle wall as I did that tower wall. What is that made of, submarine steel? :D

Anyhow, I browsed halfway through and have not seen where you talked about your 4 taps. Why 4 by the way? I can't get but 2 cornies in now and can only see 3 at most fitting...maybe I should just finish reading your thread and see if the answers are there...

Cheers!
 
OK so I saw what you did...nice! I should have gone that route instead of drilling the tower! Is that PVC square tubing with a couple of end caps, painted black? I need to look into getting a third keg in mine again. May steal your tower idea if I can get another keg in there! Mind explaining how you constructed and attached yours? Cheers!

Are you local to Victory? Man they make some good beers. Just had their Hop Ranch and love Dirt Wolf!
 
Its a pic pipe with a upside down floor drain to mount it. Then the top is PVC fence post with 2 end caps everything painted black. Yeah love victory we've gone to a few special releases/breakfast their food is as good as their beer
 
Sweet. Thanks for the pixs and description. Looks like I could make a similar change to mine and get the 3 taps I am looking for, assuming that when I shave off the plastic inside the kegerator I can get a third keg in...looks like your mod for the gas is a bit more pro than mine. Grin!

Cheers!
 
Awesome mods. Did you do anything to actively cool the new tower?
Nothing fancy I just have the lines run through copper pipe seems to be working fine for now

Sweet. Thanks for the pixs and description. Looks like I could make a similar change to mine and get the 3 taps I am looking for, assuming that when I shave off the plastic inside the kegerator I can get a third keg in...looks like your mod for the gas is a bit more pro than mine. Grin!

Cheers!

I'm using a 2 1/2 gallon keg as my third had to make a little shelf out of wood for it

20140121_170824.jpg


20140121_170804.jpg


20140121_170742.jpg
 
I think I've read every thread on the internet about moving the CO2 out of this kegerator, and upgrading the tower, and this is the best by far! Thanks!

hungry4hops - do you have any more details about the way you moved the CO2 (and nitro!) outside? I've seen all the photos, but I'm not sure what parts you used for the line connectors you've installed into the back wall, and what connectors go onto the lines to attach to that. Part numbers or links would be great if you can please?

Thanks again.
 
Hungry: I have the same kegerator make and model. Are there any coolant or electrical lines running through the back of the kegerator to worry about (other than the compressor, etc. which are exposed on the back)? I just ordered the bulkhead parts shown in your photos and would like to the put the gas lines in the same area shown on your kegerator. Looks like the perfect location. Thanks again for the information and photos.
 
Hungry: I have the same kegerator make and model. Are there any coolant or electrical lines running through the back of the kegerator to worry about (other than the compressor, etc. which are exposed on the back)? I just ordered the bulkhead parts shown in your photos and would like to the put the gas lines in the same area shown on your kegerator. Looks like the perfect location. Thanks again for the information and photos.

I don't think there are. I think the cooling is done by that thing in the back of the freezer. I have drilled holes in the back and unless they have changed the design, you should be okay. Just go slow and probe after you get past the metal shell...that is what I did and had no issues. Post pix of what you do!! Cheers!
 
Will try to get pix up sometime but I completely modified this kegerator as I said I would. I added a tower very similar to hungry4hops design (thanks!) and I modified it to run colder. I also did this to a friend's kegerator when his wife gave him the same one that I have out of pure chance. This is an easy to modify kegerator and mine has been going strong for a few years now. I did replace the regulator as mine was a PoS!! I kept blowing through CO2 and one night I caught it in the act...the regulator was blowing out so much CO2 it frosted up. Must have done this over and over...anyway I bought a nice dual regulator and I have been on the same 20 pound tank for well over a year! So if you find yourself blowing through CO2, ditch the regulator and get a new one.
 
Brilliant. I just came up with the same problem. Your photos helped me put my line in. Thanxs a ton for sharing. SSG Allen army
 
Updating an old thread...

I finally got around to the last modification to my KRS-2100: Fitting 3 kegs inside!!

Not sure that this was the wisest of ideas yet, so don't follow what I did until at least a month from now when I will post an update. I really wanted a third keg in my kegerator, but as anyone who has one knows it is impossible to put three regular size cornies in this fridge. The sidewall bumpouts do not allow two kegs to fit side by side, freeing up enough room for the third to ride on the door and squeeze in the middle space. We are talking a matter of on an inch or so!

What I did:

* Found my trusty dremel oscillating tool.
* Carefully remove the plastic bumps on the side walls, back to where the hump starts. NOTE: There is a metal bracket on the right side. I used a dremel with a metal cutting disk to remove it...
* Filled the openings with silicone caulk made for outdoor use, which will not freeze.

I *think* this is going to work. I may also spray it over with a silicon grout spray or the like once the caulk is fully cured. I did verify I could fit three kegs into the kegerator with no issues. Since I had a mess anyway, I decided to take this time to remove the @hungry4hops inspired tap tower I made and finally paint it black to match the kegerator, removed all the beer lines and replaced them with new ones, add in the new third line and associated tap handle, and thoroughly clean the kegerator, inside and out.

jrwmix.jpg

fe411t.jpg
 
Looks good Tony. I've had my oscillating tool sitting next to the kegerator for a month now and haven't gotten to this yet.

Were the ribs filled with foam or hollow? Just trying to gauge how big of a mess I'm going to make.
 
The ribs are filled with foam, and it makes a mess. You probably want to wear a dust mask as the oscillating tool makes a bit of dust. It took me about an hour to do this. Use a putty knife to get the caulk spread smooth. Some of the caulk still has not dried, so I have not used the kegerator yet. I hope it dries by tonight so I can fill it up and give it a test run (bottom half is dry, top is not??). One rib on the right side has a 1" metal bracket, so you will need to dremel that off. I am super psyched to be able to have another beer on tap and not have to rotate a keg from my lagering freezer when I want a different beer! I put the hoses in a bucket cuz the cats got in there and were playing with them and messed up my caulking job. Grrrrr!
 
It turns out that some of the caulk I used expired in 2011. Doh! So I don't think it will cure and harden. I put plastic over it and turned the kegerator on. Put my three kegs in and will deal with the caulk issue next weekend. Always check the use by date on caulk! :D
 
Following this closely stonebrewer ... very interesting. I looked at mine yesterday, and drilling all those edges off doesn't look so easy and definitely looks time consuming and messy. How long did it take?

Also do you know what the purpose of them is? Just decorative and protection? (No actual cooling impact)

I guess you can't leave holes in the edges once done, because the insulation wouldn't be good enough and heat would get in?

PS Photos with three kegs in would be interesting to see... I'm wondering how easily they fit in. Some corny kegs are not even the same diameter either which might be an issue..

It took about an hour to remove the plastic and caulk it up. Not bad once I got over the fear of destroying things! Biggest time suck was fixing the vacuum cleaner that I clogged cleaning the mess up. Fancy Dyson thing the wife loves, so I had to fix it! :D

I "think" this model is used for both a fridge and kegerator by changing the door. The grooves must be for shelves...on the fridge. They serve no purpose I can determine as a kegerator.

I would definitely seal up the unit once you remove the plastic to keep the insulation from getting wet, degrading, and probably molding as well.

Pictures are hard as you really have to put the third keg on the door, hold it while closing, and letting go to shut the door. The third keg will not sit on the floor by itself...it needs the door space to stay put. I have about 3-4 different style cornies and put the largest ones in. Fits fine, but it is pretty snug! Here's a picture of two side by side, though:

o0cumg.jpg
 
I have so many brewery stickers I'm wondering if I can stick them over the holes made?! :)

Seriously though, I read about fridge lining repairs and it's not exactly simple and can get expensive. How is your caulking coming along?
 
Caulk is holding up great after three days, but I really want to see what it looks like in a month or so before I decide if this was the correct way or if I am going to do something else. Second choice would be to glue on a thin layer of plastic sheeting. It might not look all that great but then who looks into the kegerator other than me? <shrug> I am pretty stoked so far as I now have three beers on tap in my signature. Fridge is holding temps, and beers are pouring great. :D
 
I use sanke kegs so this will definitely let me fit two in the fridge. I doubt I'll make three work. Hopefully I'll have time to mess with this project this weekend.
 
I did some reading online about fridge liner repairs and it seems a lot of people use some quite serious stuff (including repair kits sold by fridge manufacturers). Some of it was expensive too, like $150+ for a kit! It made me wonder how "good enough" a repair can be done on the cheap.. especially when it's a few hundred bucks of kegerator that could end up screwed up if I get it wrong (so this needs to be a pretty safe and cheap option). Looking forward to hearing more about how this holds up stonebrewer!

Also I'd have to do the mod to get the CO2 on the outside first.. And I have a double regulator in there right now so I'd be looking to find a way to continue to maintain independent pressure per line... and therefore need 2 (or if modded more, 3!) CO2 lines drilled out the back... More potential for screw ups! But if I am going to tackle this... stonebrewer do you remember what the pieces are that you used for the CO2 mod? It would really help to know specifically what you did there... or perhaps with a close up photo of the front and back I could work it out.

Thanks again for sharing the ideas and experiences and info!
 
I've looked into the hardware and haven't easily found it. Most are called MFL bulkhead adapters.
 
Back
Top