In theory the boiler is getting more of the burner heat converted into steam than waste heat up the stack, and the calandria is passin most of the steam energy into the wort. Without a flowmeter in the gas flow to a burner under a conventional brew stand burner all we have to go by is how many brew sessions from a tank. It seems like a lot of the burner output goes up the side of the keggles and pots and efficiency is probably not great at high firing levels. It is going to be interesting to meter water into boiler and monitor temperature to get to a rough heat flow number for the steam system. Wish I had time to modify the phase2 system to test this as both gas and water parameters are controlled and logged by the plc system.
You are using an out of date browser. It may not display this or other websites correctly.
You should upgrade or use an alternative browser.
You should upgrade or use an alternative browser.
Mk-i
- Thread starter GreenMonti
- Start date

Help Support Homebrew Talk:
This site may earn a commission from merchant affiliate
links, including eBay, Amazon, and others.
Mista_Sparkle
Well-Known Member
To determine efficiency, you could use a combination of your flame temperature, exhaust gas temperature, water in temp, and water out temp and flow rate. The calandria should be able to completely condense the steam without any problem. From there, you could work out an approximate efficiency. I imagine it could be quite a bit higher than a regular pot on a stove as thats something like 20% if I remember correctly from my thermo book... If you have #'s I would be glad to do some number crunching in the interest of beer
GreenMonti
Well-Known Member
- Joined
- Nov 29, 2009
- Messages
- 1,268
- Reaction score
- 67
To determine efficiency, you could use a combination of your flame temperature, exhaust gas temperature, water in temp, and water out temp and flow rate. The calandria should be able to completely condense the steam without any problem. From there, you could work out an approximate efficiency. I imagine it could be quite a bit higher than a regular pot on a stove as thats something like 20% if I remember correctly from my thermo book... If you have #'s I would be glad to do some number crunching in the interest of beer
I have tried to get a temp reading on the exhaust temps but it was kinda all over the place. It was very dependent on where I had my probe. I suppose if I had a longer exhaust stack I could get you better numbers. But IIRC I was getting in the range of 350-500 on the exhaust. I even had to get the probe down in there about 2 inches to get those readings. I am afraid I can't give you solid info. Not yet.
 Just wait till I build the stand/system.
BrewBeemer
Well-Known Member
Tell me about it. I just don't have the space right now. I don't have the cash for one either, but if I had the space I would probably find the cash.
I have a great friend with a 16" x10' bed Pratt & Whittney lathe, damn and I rebuilt Pratts in an engine shop and never knew they made a lathe. It's big and heavy I can cut rims.
I sure would make a space and home for it if I had a chance. The 12" x 36" is ok but one needs two sizes to be in the production or building business.
GreenMonti
Well-Known Member
- Joined
- Nov 29, 2009
- Messages
- 1,268
- Reaction score
- 67
I have a great friend with a 16" x10' bed Pratt & Whittney lathe, damn and I rebuilt Pratts in an engine shop and never knew they made a lathe. It's big and heavy I can cut rims.
I sure would make a space and home for it if I had a chance. The 12" x 36" is ok but one needs two sizes to be in the production or building business.
I weld parts for Pratt and Whitney. In fact the cone on my hat is a section from the tail cone for the F-135 engine. I had no idea they made lathes either. I do have a wood lathe but it is of no use for my metal work. A 12 x 36 would be sweet. I just need to turn small parts. I am by no means a machinist. I can only do rudimentary cuts on a metal lathe.
BrewBeemer
Well-Known Member
Yup that floored me reading the name on this lathe after working in an engine rebuilding shop years ago. We rebuilt 1830 and 2800 Pratts, I got on teststand and run up breaking in rebuilds. We also rebuilt 501-D13 Allision turboprops for C130's.
You really want to expand your business get a Bridgeport then you can take on more bid projects.
Don't cut yourself short, expand when you can.
You really want to expand your business get a Bridgeport then you can take on more bid projects.
Don't cut yourself short, expand when you can.

$33.99 ($17.00 / Count)
$41.99 ($21.00 / Count)
2 Pack 1 Gallon Large Fermentation Jars with 3 Airlocks and 2 SCREW Lids(100% Airtight Heavy Duty Lid w Silicone) - Wide Mouth Glass Jars w Scale Mark - Pickle Jars for Sauerkraut, Sourdough Starter
Qianfenie Direct


$7.79 ($7.79 / Count)
Craft A Brew - LalBrew Voss™ - Kveik Ale Yeast - For Craft Lagers - Ingredients for Home Brewing - Beer Making Supplies - (1 Pack)
Craft a Brew


$49.95 ($0.08 / Fl Oz)
$52.99 ($0.08 / Fl Oz)
Brewer's Best - 1073 - Home Brew Beer Ingredient Kit (5 gallon), (Blueberry Honey Ale) Golden
Amazon.com

$53.24
1pc Hose Barb/MFL 1.5" Tri Clamp to Ball Lock Post Liquid Gas Homebrew Kegging Fermentation Parts Brewer Hardware SUS304(Liquid Hose Barb)
yunchengshiyanhuqucuichendianzishangwuyouxiangongsi


$58.16
HUIZHUGS Brewing Equipment Keg Ball Lock Faucet 30cm Reinforced Silicone Hose Secondary Fermentation Homebrew Kegging Brewing Equipment
xiangshuizhenzhanglingfengshop
![Craft A Brew - Safale S-04 Dry Yeast - Fermentis - English Ale Dry Yeast - For English and American Ales and Hard Apple Ciders - Ingredients for Home Brewing - Beer Making Supplies - [1 Pack]](https://m.media-amazon.com/images/I/41fVGNh6JfL._SL500_.jpg)
$6.95 ($17.38 / Ounce)
$7.47 ($18.68 / Ounce)
Craft A Brew - Safale S-04 Dry Yeast - Fermentis - English Ale Dry Yeast - For English and American Ales and Hard Apple Ciders - Ingredients for Home Brewing - Beer Making Supplies - [1 Pack]
Hobby Homebrew


$719.00
$799.00
EdgeStar KC2000TWIN Full Size Dual Tap Kegerator & Draft Beer Dispenser - Black
Amazon.com

$176.97
1pc Commercial Keg Manifold 2" Tri Clamp,Ball Lock Tapping Head,Pressure Gauge/Adjustable PRV for Kegging,Fermentation Control
hanhanbaihuoxiaoshoudian

$20.94
$29.99
The Brew Your Own Big Book of Clone Recipes: Featuring 300 Homebrew Recipes from Your Favorite Breweries
Amazon.com


$53.24
1pc Hose Barb/MFL 1.5" Tri Clamp to Ball Lock Post Liquid Gas Homebrew Kegging Fermentation Parts Brewer Hardware SUS304(Gas MFL)
Guangshui Weilu You Trading Co., Ltd


$76.92 ($2,179.04 / Ounce)
Brewing accessories 1.5" Tri Clamp to Ball Lock Post Liquid Gas Homebrew Kegging Fermentation Parts Brewer Hardware SUS304 Brewing accessories(Gas Hose Barb)
chuhanhandianzishangwu


$479.00
$559.00
EdgeStar KC1000SS Craft Brew Kegerator for 1/6 Barrel and Cornelius Kegs
Amazon.com


$22.00 ($623.23 / Ounce)
AMZLMPKNTW Ball Lock Sample Faucet 30cm Reinforced Silicone Hose Secondary Fermentation Homebrew Kegging joyful
无为中南商贸有限公司

$44.99
$49.95
Craft A Brew - Mead Making Kit – Reusable Make Your Own Mead Kit – Yields 1 Gallon of Mead
Craft a Brew


GreenMonti
Well-Known Member
- Joined
- Nov 29, 2009
- Messages
- 1,268
- Reaction score
- 67
Yup that floored me reading the name on this lathe after working in an engine rebuilding shop years ago. We rebuilt 1830 and 2800 Pratts, I got on teststand and run up breaking in rebuilds. We also rebuilt 501-D13 Allision turboprops for C130's.
That's just sweet.

I wanna say we have parts on the C130's also. I don't weld them but I think they are in the stainless cell. They are the cooling ducts that blow air. We call them the elephant ducts.
BrewBeemer
Well-Known Member
Nothing beats trimming a carb on an idling 2800 up next to the test prop except pulling max power at night with the stacks glowing with nice white exhaust flames. I hate jets and turbos i'm into piston pounders. Dad was lead mech on 38's and 51's in WWII plus we had a couple high time 1710's in storage. I get goose bumps daily as a 51 flies out of Oakland for his daily 14 minute little flight. Love that sound. My Corsair owner passed away, I was a wrench on his 2800 plus my A&P license. Miss that guy and plane, the family sold it.
I'll get a picture of the lathe as well his early 1900's marine engine with roller OHC, nothing new.
This person scratch built a GPU turbine into a SkiDoo. Spare engine and another hull in the makings.
My friends are not normal, seems I have a pattern going on.
I'll get a picture of the lathe as well his early 1900's marine engine with roller OHC, nothing new.
This person scratch built a GPU turbine into a SkiDoo. Spare engine and another hull in the makings.
My friends are not normal, seems I have a pattern going on.
GreenMonti
Well-Known Member
- Joined
- Nov 29, 2009
- Messages
- 1,268
- Reaction score
- 67
I am really curious as to if this will save propane or natural gas compaired to direct firing the "normal" way. I read that you used about a quart/min at full gas to boil before. Are you predicting any improvement and possibility in turning the gas down? I know you are working on recycling your condensation which will help, but what about insulating the kettle? With all this do you think you could lower your gas bill? Very very curious about less gas usage. You guys have my attention in this build, and I am thinking in copper now for my own.
Alright, I am now boiling a batch the "normal" way. I have the burner turned up just past 2 full turns. So, the fact that I can get and maintain a hard boil using the flash boiler right now with 2 full turns on my regulator........I am at the same point before I started the build. The flash boiler with copper coils is the same in fuel usage as direct firing.:rockin:
Yeah, or like these bad mofo'sI suppose with a rig like that, insulation would be somewhat easy, like an electric build. Wrap the thing in fiberglass and a blanket
!!! I wish I had a kettle to match them. Maybe I will in the not to near future.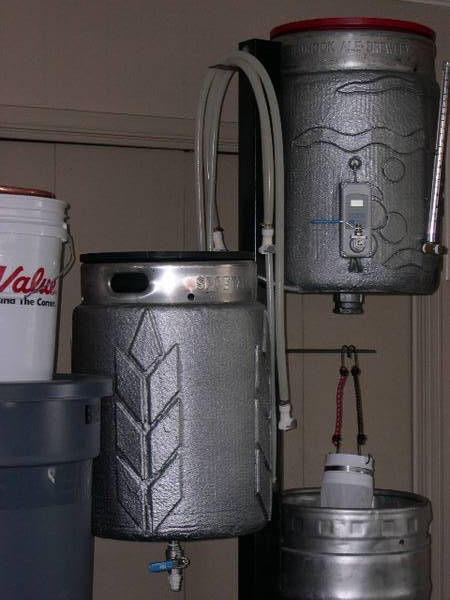
These are two layers of Reflectix then shot with Line-X truck bed liner. Might have to think of using something other than the Reflectix but... you get the idea.
That's some beautiful work you've done there. subscribed!
Swagman
Well-Known Member
Just waiting for the other shoe to drop. Great craftsmanship just checking for updates.
Dominus Vobiscum
Swagman
Dominus Vobiscum
Swagman
BrewBeemer
Well-Known Member
A big thud heard for miles.
GreenMonti
Well-Known Member
- Joined
- Nov 29, 2009
- Messages
- 1,268
- Reaction score
- 67
I spoke with the laser guy yesterday. With any luck he will burn out my parts this weekend. At least one of them. I gave him a couple different patterns.
P-Lay
Well-Known Member
Sorry if this is off-topic but, while reading up on calandria designs, I came across this thread regarding hop utilization for some different boiling techniques. It says that your utilization might go up 20-25% when using an internal calandria for boiling.
http://www.beersmith.com/forum/index.php?topic=2921.0
I have no experience with this so, take it as you will. Just something to think about. Might be interesting to do some testing when this thing is up and running.
BTW, I'm on the edge of my seat with this one...:rockin:
http://www.beersmith.com/forum/index.php?topic=2921.0
I have no experience with this so, take it as you will. Just something to think about. Might be interesting to do some testing when this thing is up and running.
BTW, I'm on the edge of my seat with this one...:rockin:
I should have a package headed north tomorrow with some tube and components to contribute to the build, looking forward to seeing how this will workout.
GreenMonti
Well-Known Member
- Joined
- Nov 29, 2009
- Messages
- 1,268
- Reaction score
- 67
Sorry if this is off-topic but, while reading up on calandria designs, I came across this thread regarding hop utilization for some different boiling techniques. It says that your utilization might go up 20-25% when using an internal calandria for boiling.
http://www.beersmith.com/forum/index.php?topic=2921.0
I have no experience with this so, take it as you will. Just something to think about. Might be interesting to do some testing when this thing is up and running.
BTW, I'm on the edge of my seat with this one...:rockin:
I have followed your thread. I seen a couple of new posts in there today. I understand you want a compact system however, I think using the boiler of Kladues design and something like this or even the copper coils I used in my Flash boiler thread to boil with is the way to go. Less danger IMO and all the benefits of steam. My flash boiler kicks some butt. I hope you get some good direction and I wish you the best of luck on the path you choose. Please stick around to see if I fail or succeed.
I should have a package headed north tomorrow with some tube and components to contribute to the build, looking forward to seeing how this will workout.
Kladue that sounds outstanding. I can't thank you enough for all your generosity. Prost.
You should have 2 packages on wednesday, it was too heavy for one box so I split it into 2 boxes with tubing from 1/2" -6" and various reducers.
GreenMonti
Well-Known Member
- Joined
- Nov 29, 2009
- Messages
- 1,268
- Reaction score
- 67
You should have 2 packages on wednesday, it was too heavy for one box so I split it into 2 boxes with tubing from 1/2" -6" and various reducers.
I look forward to receiving them. Thank you Friend.
Huh-huh, those two are doin' it! And by doin' it I mean making a bad a$$ boiler baby together, lol. Glad you didn't use protection and the thing has been concieved and is on it's way . Sorry, had to, just had to. Both you guys are INSANE in my book. Maybe the two of you could get together for a picture I could make a hero poster out of for my wall, lol. Keep on rockin' it guys, you're the best..est..es. Such a cool build!
. Sorry, had to, just had to. Both you guys are INSANE in my book. Maybe the two of you could get together for a picture I could make a hero poster out of for my wall, lol. Keep on rockin' it guys, you're the best..est..es. Such a cool build!Biggest problem I forsee is what frontier is next, we have the flash boiler front under control, GreenMonti is going to build an internal calandria, and I think I have the automation front covered. The question is what aspect of brewing is there to conquer next, perhaps designing a continous mash and sparge system coupled with continous boil and cooling system.
jfkriege
Well-Known Member
I say you should try to perfect an external calandria with wort spreader, and size it to be able to work with a pilot system (3-5 gallons) and a production system (1/2 - 1 barrel).
You could also play with pressurized steam systems where the condensate feeds back into the boiler system.
Just some ideas that have been in my head....
You could also play with pressurized steam systems where the condensate feeds back into the boiler system.
Just some ideas that have been in my head....
I guess that after GreenMonti has the internal calandria working it would only be a matter of some tri-clover fittings and elbows to move the calandria outside the boil kettle. Without GreenMonti's dedication to this effort none of this would have happened as I am working away from home for an extended period of time again and do not have the equipment to fabricate anything here.
GreenMonti
Well-Known Member
- Joined
- Nov 29, 2009
- Messages
- 1,268
- Reaction score
- 67
If an external unit is what we should try next, then an external unit shall be built. We'll get this one up, and kicking some butt first. Then I'm all for an external build. I already have an idea..............
We'll get this one up, and kicking some butt first. Then I'm all for an external build. I already have an idea..............sethful
Well-Known Member
Gorgeous work!! Between you and Klaude, this sh!t is serious!
Keep the updates coming!
Keep the updates coming!
jfkriege
Well-Known Member
I think the external calandria would allow a lot of flexibility in BK choice and also batch size, making it a very versatile thing to have. I would imagine you could go from a small batch size to quite a large one with the same heating setup and controls, and only alter steam input to tune the batches. It makes me want to go and build one, but I have to finish the one I started before I do that or my wife will shoot me.
Joshua
Joshua
mplutodh1
Well-Known Member
Greenmonti - been enjoying the build - looking forward to seeing the final product.
PS - clean out your PMs!
PS -
clean out your PMs!GreenMonti
Well-Known Member
- Joined
- Nov 29, 2009
- Messages
- 1,268
- Reaction score
- 67
Pm's clean for now.
I talked with the laser guy today and no parts have been cut.
However, he came to me this time and had questions about the drawing. He said they will be cut tonight. I guess I will find out tomorrow morning. I am really getting pumped up about this build. I have a spare test keegle waiting to have the MK-I installed for the test run. I have all the other parts I need to finish this up except the end plates. Once I get them I should be done in a pretty short time.
I talked with the laser guy today and no parts have been cut.
However, he came to me this time and had questions about the drawing. He said they will be cut tonight.
I guess I will find out tomorrow morning. I am really getting pumped up about this build. I have a spare test keegle waiting to have the MK-I installed for the test run. I have all the other parts I need to finish this up except the end plates. Once I get them I should be done in a pretty short time.GreenMonti
Well-Known Member
- Joined
- Nov 29, 2009
- Messages
- 1,268
- Reaction score
- 67
Game On!
To no surprise I didn't get the plates when he said he would deliver them. However I was handed them this morning. Time to get back to work.
To no surprise I didn't get the plates when he said he would deliver them. However I was handed them this morning. Time to get back to work.
GreenMonti
Well-Known Member
- Joined
- Nov 29, 2009
- Messages
- 1,268
- Reaction score
- 67
Well, I will charge up the camera battery since it is dead. I will also polish the last weld I have to. The MK-I is now done. The test keggle is done. The boiler is back together from the coil re-positioning. I just need to set it up and build a new steam line and light the fire.
kmack747
Well-Known Member
Get that battery charged and light the fire this build is freaking sweet. Cant wait to see how it performs. Keep up the good woork
BrewBeemer
Well-Known Member
Well, I will charge up the camera battery since it is dead. I will also polish the last weld I have to. The MK-I is now done. The test keggle is done. The boiler is back together from the coil re-positioning. I just need to set it up and build a new steam line and light the fire.
The steam engine comes to life, pictures! You have too much spare time or not married it shows. LOL!
GreenMonti
Well-Known Member
- Joined
- Nov 29, 2009
- Messages
- 1,268
- Reaction score
- 67
The steam engine comes to life, pictures! You have too much spare time or not married it shows. LOL!
LOL. I am in fact married. I stayed late at work to finish it up tonight. I have a very understanding and giving wife. She is the best.
BrewBeemer
Well-Known Member
Just don't push them beyond their limit of maximum tolerance or you have to pay big time. Don't ask. Congrats on the project sounds like the rewards are near.
GreenMonti
Well-Known Member
- Joined
- Nov 29, 2009
- Messages
- 1,268
- Reaction score
- 67
Picture time.
The over all finished MK-I.

A close up of the reducer at the top. I sized it up so it would just fit over the main body to make welding easier.

This is just a view down through the tubes where the wort will boil.

This is the bottom. I welded the 1/2" coupling on the inside before welding the bottom to the MK-I body.

A view from the top with out the wort spreader in place.

Here is a closer shot of inside the top. I fusion welded the top of the coupling to the plate to keep nooks and crannies down. I also welded this coupling on the other side before the plate was attached to the body. You can also see a SS washer I suspended inside just below the coupling. This was done to help with laminar flow of the steam when it enters the calandria. I used dip tubes for my exchanger pipes. There 1" od and a wall thickness of .025". Should give me nice heat transfer.

The over all finished MK-I.
A close up of the reducer at the top. I sized it up so it would just fit over the main body to make welding easier.
This is just a view down through the tubes where the wort will boil.
This is the bottom. I welded the 1/2" coupling on the inside before welding the bottom to the MK-I body.
A view from the top with out the wort spreader in place.
Here is a closer shot of inside the top. I fusion welded the top of the coupling to the plate to keep nooks and crannies down. I also welded this coupling on the other side before the plate was attached to the body. You can also see a SS washer I suspended inside just below the coupling. This was done to help with laminar flow of the steam when it enters the calandria. I used dip tubes for my exchanger pipes. There 1" od and a wall thickness of .025". Should give me nice heat transfer.
jfkriege
Well-Known Member
That is art. I am nothing but impressed with that. Wow.
BrewBeemer
Well-Known Member
Great photos and workmanship GreenMonti, your talent is an understatement.That thigs too nice to use, build a wooden base
and display it. My friend made a old style coke bottle with the narrow
waist out of stainless it looks like chrome in his shop. Why, no reason
just him as well a GPU turbine he installed in a SkiDoo that's trick.
and display it. My friend made a old style coke bottle with the narrow
waist out of stainless it looks like chrome in his shop. Why, no reason
just him as well a GPU turbine he installed in a SkiDoo that's trick.
klyph
Well-Known Member
Great craftsmanship!
Wow, very nice workmanship, looking forward to finding out how it will work so I can refine the calculations. Is that built with the 3" tubing?, or the 4" tubing.
Similar threads
- Replies
- 0
- Views
- 475
- Replies
- 63
- Views
- 3K
- Replies
- 0
- Views
- 380
- Replies
- 1
- Views
- 465
