• Please visit and share your knowledge at our sister communities:
  • If you have not, please join our official Homebrewing Facebook Group!

    Homebrewing Facebook Group

Miller / Coors Home Draft to regular or paintball CO2

Homebrew Talk

Help Support Homebrew Talk:

This site may earn a commission from merchant affiliate links, including eBay, Amazon, and others.
Did you have to cut down the cartridge housing at all to screw in the 1/4" pipe because I did on the Coors one. Thanks I will see if I can screw it in further.

Also, I forgot to ask some of you who have done this. Can you force carb with the methods you've tried?

I did not have to cut down the cartridge housing at all. I did screw the street elbow onto the pipe first then used a wrench on that to screw the pipe into the tap.

I'll take some pics of the finished product.
 
i'm not sure that i clearly see what we are doing here. the air chuck hack is simply so you can charge the keg with CO2 without having to use the 16g cylinders?

can i just buy one of these and fill it with homebrew and charge it a 16g cylinders and have a "mini-keg" for my beer?
 
i'm not sure that i clearly see what we are doing here. the air chuck hack is simply so you can charge the keg with CO2 without having to use the 16g cylinders?

can i just buy one of these and fill it with homebrew and charge it a 16g cylinders and have a "mini-keg" for my beer?

Yes, lots aof videos on youtube that show you how. I think the hack here is just to bypass the 16gram cartridges. They can add up in $ and can be hard to find for some. I have also seen videos of someone who cut the 16 gram cart. to be a sleeve for an 8 gram cart. So the 8 gram cart. can fit. They are cheeper and easier to find for some.
 
Thanks for that clarity. I guess it could be an easy way to begin a keg operation. So you've definitely got my attention. Thanks for sharing the knowledge!
 
Here is a picture of my solution.

Using the original part of this thread with the 1/8" MIP x 1 1/2" pipe and the 1/8" MIP street elbow is the key for me. From there my CO2 charger connects right up.

Nice and easy.

DSC06491.jpg


DSC06492.jpg


DSC06493.jpg
 
Thanks for the pics. I know exactly what I did wrong and will correct it.

So are you able to force carbonate with this method?
 
Thanks for the pics. I know exactly what I did wrong and will correct it.

So are you able to force carbonate with this method?

I believe I could force carbonate if I wanted. In my case I fill from my keg and go from there.
 
I couldn't help myself and I threw together two video's on youtube for those whom may not be mechanically inclined on how to tear down and rebuild the Coors/Miller home brew system. It was a first go at it and after drilling - i found a small plastic plunger that likely is a check valve to limit potential liquid leaching to the air cylinders. That said, there was no leaking when removed... Also, just want to point out that the Watts copper/brass connectors have lead (Pb) at 0.25% or greater... it's an assumption that simple air flow through the pipes will not transfer Pd (likely a decent assumption), however if they get any back-wash particularly if your brew is acidic - won't kill you but over long term contact... not good for ya!

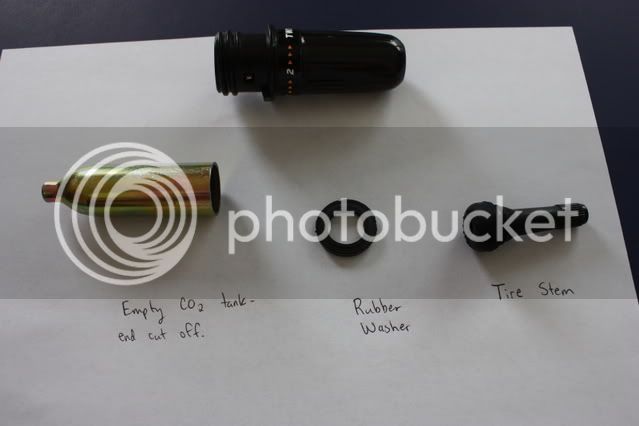
Part 1 shows how to break down the device, the parts needed, and how to remove the side cap and drill it out. [ame=http://www.youtube.com/watch?v=ibdSq7bhy5Y]Coors (R) Home Draft Modification - Part 1 - dissassembly of CO2 cartridge - YouTube[/ame]

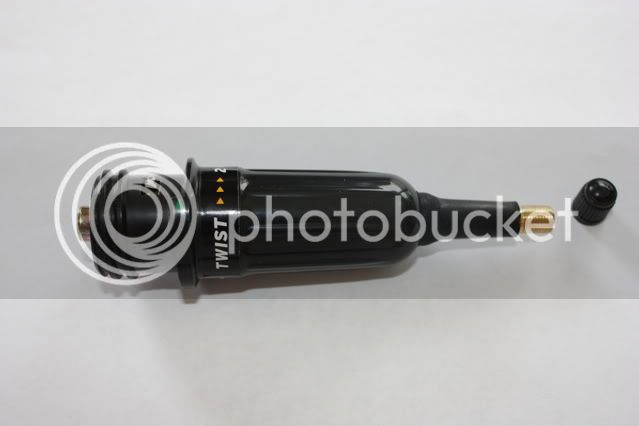
Part 2 is the step by step rebuild to link to a quick valve... let's not forget to purge any O2 which is also discussed. [ame=http://www.youtube.com/watch?v=2080DlBRs-0]Coors (R) Home Draft Modification Part 2 - Building CO2 Bypass - YouTube[/ame]

I hope they are helpful to anyone looking to do a tear-down more than just the CO2 cartridge replacement... (oh - saw some chatter regarding non-food grade vs. food grade... they usually put a silicon oil in the airsoft/paintball systems - you'll probably get a foul taste and an oil slick - which will kill head retention.)
 
Great vid!

I have a couple of these that I was planning on hooking up to co2 by modding a spent cart, but after just 3 carts in one the seal was already starting to fail, so I think this method is going to be a lot more reliable.

That regulator you got there is one of a few that I can get locally. What size fitting does that screw on to? It doesn't look like it'd fit on my 2.5lb co2 tank without some sort of conversion.
 
I've seen a few different ways of hooking these up to CO2 regulators. Has anyone figured out how to hook them up to a standard beer facet? I have a few of these that I'd like to start using for small experimental batches and be able to hook them up to a faucet on my keezer.
 
I've seen some posts that suggest our standard CO2 tanks (2.5, 5#, etc..) have 1/2" NPS (straight thread) fitting; while paintball tanks are 5/8"-18 UNF (also straight thread). I'm fairly certain the connector for the paintball tanks are PIN inject and O-ring. I've done some initial searching for a - 1/2" female NPS to 5/8"-18 male adapter with not a lot of luck (w/o going to a custom manufacture).

we've all seen these paintball tank adapters to regular CO2 regulators, The Adapter - CO2 Regulator to Paintball Tank Adapter; however we need the inversion of this adapter... I'm not seeing an easy fix at this time...

OPTIONS - could consider re-building the entire CO2 tank valve - remove the entire assembly and rebuild swappting a paintball tank connector (?). easy to say here - but i've not done that... (yet).

On the other note - careful how "front heavy" you get with these partyballs... if you go with to much added weight on the front end - as the system gets lighter - it will topple over!

cheers!
GT
 
Oops! Got 1/4 inch instead of 1/8". Will have to head back to home depot after my trip to the dealership for service. Also I'm afraid I may have drilled too far. We'll see as soon as I get my regulator.
 
Oops! Got 1/4 inch instead of 1/8". Will have to head back to home depot after my trip to the dealership for service. Also I'm afraid I may have drilled too far. We'll see as soon as I get my regulator.

There is a small plastic valve inside the system, that I too, drilled to far and it came out. I think I show it in the first video, but edited some of it out due to size... In the end - as long as you didn't drill all the way to the main "valve housing" (the black plastic section with the tap), you'll probably be okay.

Once opened, I took one of my small picks, and slid it into the housing and you can see where the air passes through... there is no internal regulators, or other complex systems (other than that plastic valve)... which leads me to believe it was a one way check valve... My guess, if pressure goes low, it helps close the system so liquids don't enter the air compartment, but as long as there's positive pressure, that will do the same...

cheers
GT
 
Did this the other day. only needed the 1/8 fitting as I had all the rest. I also picked up a small o-ring that fit in the opening before I taped and threaded the 1/8 fitting in. Not leaking at all and I did not put a lot of tape on. I may pick up another so I can have one that hooks up to my paintball co2 tank and one to hook up to an injector for when the beer is going to be gone in a few hours and I dont want to lug the tank and regulator.
excellent idea - thanks
 
does this mod allow the use of reg co2 cartridges also? i was looking to mod the actual cartridge itself cause i was hoping to be able and keep both ways of carbonizing just in case.
 
If you make this mod then this is the only method available to carbonate. You cannot have both available at the same time using this method.
 
Back
Top