Knotty Pine and Cedar Log Keezer Build

Homebrew Talk - Beer, Wine, Mead, & Cider Brewing Discussion Forum

Help Support Homebrew Talk - Beer, Wine, Mead, & Cider Brewing Discussion Forum:

This site may earn a commission from merchant affiliate links, including eBay, Amazon, and others.
No problem man....glad my thread helped! :mug: I'll jump onto your thread later this evening and give it a peek. Welcome to the keezer club... congrats!
 
Ok...things have been functioning well with the keezer, but I've had an issue as of late. I pulled my keg of amber out of the keezer, because it kicked last week. I swapped it out with my Cedar Pale Ale late last week. I switched my gas lines around a bit, so that the Cedar Pale Ale was on the single regulator and the other 3 existing kegs were on the 3 way manifold off of the second regulator of my dual body regulator. I purge all of the kegs and slowly dialed both regulators up to 9 psi, since my regulators seem to overshoot by around 2 psi over time.

This weekend, I noticed that my Bonzai Wheat, Blood Orange Hefe, and 60 min IPA (all off of the 3 way manifold from one of the regs) all seemed overcarbed with foaming issues. I opened the keezer and the regulator for the 3 way manifold read 14 psi and the regulator for the single keg read 16 psi. I turned off the CO2 to each keg and purged the three kegs periodically throughout the day on Saturday. By Sunday the carbonation levels were back on track, so I slowly dialed up the regulator back up to 9 psi, knowing when everything settles, they typically overshoot by 2 psi. Last night during Monday night football (Go Lions!!!) I tried to pull a pint of the wheat and frickin' foam... again. I opened the keezer again and the body for the 3 way manifold read 16 psi and the single body was at 19 psi. WTF! Any suggestions as to why my regulators would be overshooting.....never had these issues before.

I'm being very careful to slowly dial up the psi on the regulators and I keep a watchful eye on them until they seem to stabilize at 9 psi, but over time they seem to be overshooting by almost double. Are my regulators malfunctioning? It it due to the fact that my CO2 and regulators are inside the keezer? Last night I purged again and set a 5 psi, so I could pull a couple of pints during the game, which obviously created a very slow pour, but the foaming was manageable. Based on this, the beer didn't seem to be overcarbed again....yet, because there was minimal foaming at the very low serving pressure. Overtime, however, if I don't keep opening the beast up and purging + dialing them back, they will overcarb. Any suggestions would be great! :mug:
 
update....called kegconnection.com and they are sending me a regulator re-building kit. They think that it is not sealing all of the way and it may have a bad diaphram :drunk:. It may be an issue with the regulator being housed inside of the keezer. He said that moisture can build up in the regulator and make the diaphram go bad. I'm going to rebuild this thing as soon as I receive the kit and hopefully get my carbonation levels stabilized.

Tattooman was nice enough to offer me a 10lb. CO2 cylinder that he got from his buddy. I figured, what the hell....I should be able to fit it in my keezer and I've been looking for a spare tank. He brought it in today and it wasn't a 10lb. cylinder....it was a 20lb. cylinder. Unfortunately, there isn't a snowball's chance in hell of this thing fitting into my keezer after measuring it....it's big, almost the size of a 5 gallon keg! Now I have a different plan (like I need another project :eek:). I now plan on putting the 20 lb. cylinder, with regulator in my pantry and running a longer gas lines through the wall, behind the fridge, into the coffin, and down into the keezer. That way I'll have instant access to the regulator for adjustments. Unfortunately, I will have to take all of the insulation out of the coffin and drill holes down through the bottom of the coffin and through the freezer lid to get the new gas line ran to the kegs. What a PITA, but it may help prevent the diaphram from going bad in the regulator. Thanks Tattooman! Any suggestions on running gas lines longer distances?
 
I'm not educated enough to offer guidance but isn't there some conversion to use when your co2 is at room temp but the beer is cold?

...like 20 psi at room temp is 8 psi at 40 degrees? Something like that. Or was it the other way around?
 
Hmmmm.....I'm not sure really, but maybe I'll do a little search to see what I can find. I'm still pretty new to the kegging scene and at this point, my regulators and CO2 have been housed in my keezer. I'll see what I can dig up. :mug:
 
Hey Hopp.. if your going to be putting your CO2 tank outside of the keezer maybe you would want to look into one of these:

http://www.austinhomebrew.com/product_info.php?products_id=10234

I have one for my build, but I have not done the plumbing yet so you probably havent seen it. I have it going through my collar so I can attach a gas line on each side and not have to worry with a hose hanging out of my keezer if I ever need to take it out of the base. And it should be easier to seal up than just a hose too.
 
Nice! I just may give it a shot. I have to have my 20 lb. CO2 cylinder sent out for hydro-testing and recertification, so I won't start tackling this project for a few weeks. Couldn't find anyone around here that could do it on the spot. My HBS can send it out and although it takes a couple of weeks, they can have it re-certified and filled for $40. I haven't come up with an exact plan for running the gas lines as of yet, but this may be a helpful fitting to use. Thanks Bentley! :mug:
 
Nice build Hoppo! I just did a quick browse through your thread looking at all the pics. This is something I hope I can work towards after I get my AG system up and running.
 
Thanks! Once you start your keezer build, let me know if I can help at all along the way. Good luck with the AG system....that's my next project! :mug:
 
I need a hand with my kreezer build. You interested in helping me haul a freezer out of my aunt's basement and stuffing it into a trailer?
 
I need a hand with my kreezer build. You interested in helping me haul a freezer out of my aunt's basement and stuffing it into a trailer?

Depends on where and when. I'm happy to help, if I can. I remember you said that you had family in Michigan, but I don't recall where. I'm back to working 14 hour days three days per week and 8 hours two days per week, so if would have to be over a weekend that I'm free. Let me know.
 
this build looks amazing. I hope my project I'm working up comes close to your results. I feel I should grow a rat tail on the side of my head, quit my job, and learn from your Jedi like wood shop skills.
 
LOL!....that's some funny sh*t! I'm certainly not a master in the woodshop....that's for sure. Working with cedar logs and knotty pine paneling is very forgiving, because you just cover everything up with these materials. In fact, before I started my rustic basement build, I have never worked with log and panel construction before. The beauty of a rustic build is that mistakes actually give the piece more character. :D A lot of the other guys on HBT have waaaaay more woodshop skills than me, with all of their dovetailing and mitering and what not. I'm just a guy with a draw knife, a miter saw, a table saw, and a drill, making it up and slapping it together as I go. To be honest, I'm shocked that the keezer turned out as good as it did. Had I tried to build an elegant pieces with nice milled trim and precision construction, it wouldn't have stood up to many of the builds on HBT.

Have you started a thread yet for your build? I would love to follow your progress and offer any advice or help along the way. I think that you should still go for the rat tail on the side of your head.....I know a good plastic surgeon. :mug:
 
Great job on the keezer, I would love to make one of these someday. You are no doubt proud of the hard work you put in. Congratulations on that masterpiece of art! Keep it up!
 
Thanks for the compliment. If you need any advice or have any questions when you start your build....please let me know, I'm happy to help in any way that I can.

Well, it's official....the slate floors in the bar are grouted and sealed. I'm moving the keezer into it's final resting spot very soon. Take a peek at the last page in my Basement Bar Build thread to see the floors. Once I get the keezer in place, I'll snap some pics. Still trying to talk my wife into letting me cover the white refrigerator with thin knotty pine paneling to match the keezer, but she's not going for it. I may suggest selling the white side by side fridge and purchasing a stainless steel one, but who knows. Until I can talk her into covering the fridge with wood, it's going to stick out like a sore thumb in the bar. :eek:
 
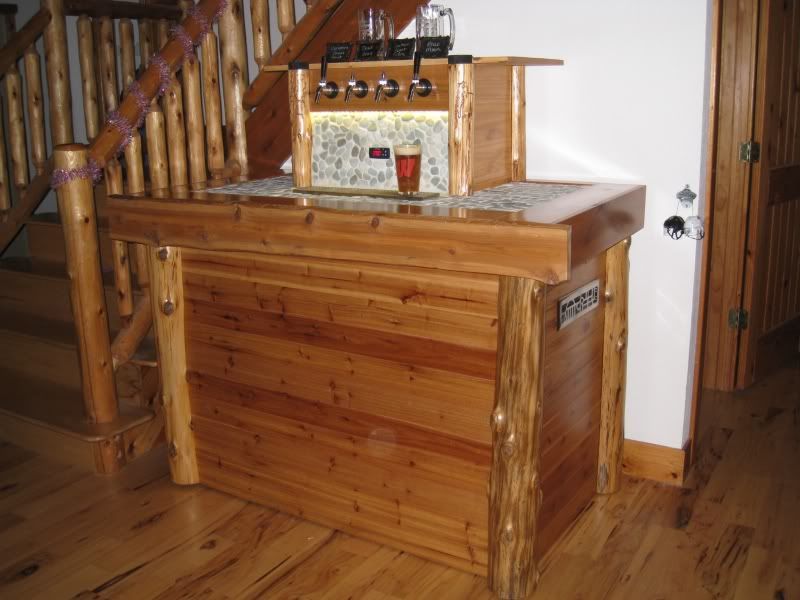
Here is our version of the finished "hoppo" rustic keezer clone. Missing a couple tap handles a few more coats of poly and it'll be all set.
Your thread and your answers to my PM's were very helpful in making this happen. Thanks.

keezer073.jpg


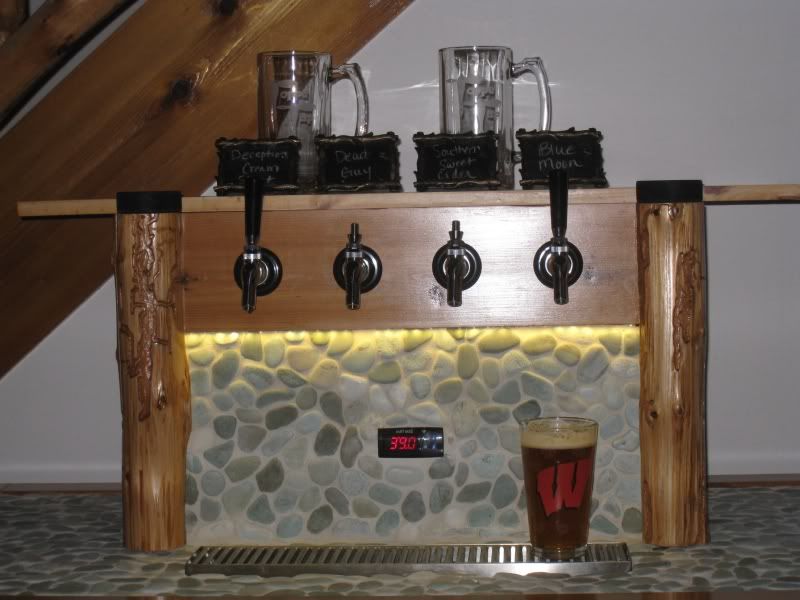
Close up pic along with the mugs my wife bought me for my bday. (too bad the Wisconsin glass didn't help out bucky in the rosebowl)
keezer076.jpg
 
Sweet! Glad I could help you along the way....it was my pleasure. :mug: I forgot to post final pictures of my keezer in it's final resting spot, so I'll try to do so tomorrow. Nice work.....you did us "rustic keezer" builders proud! :rockin:
 
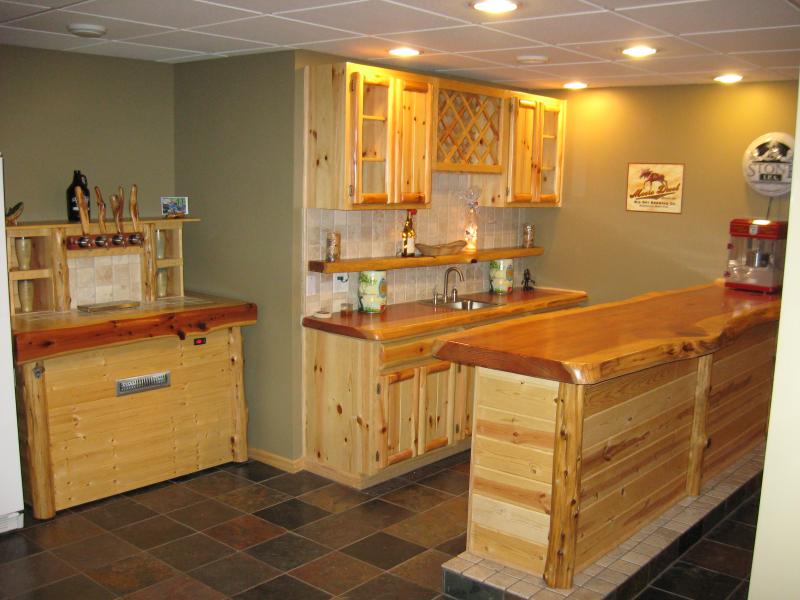
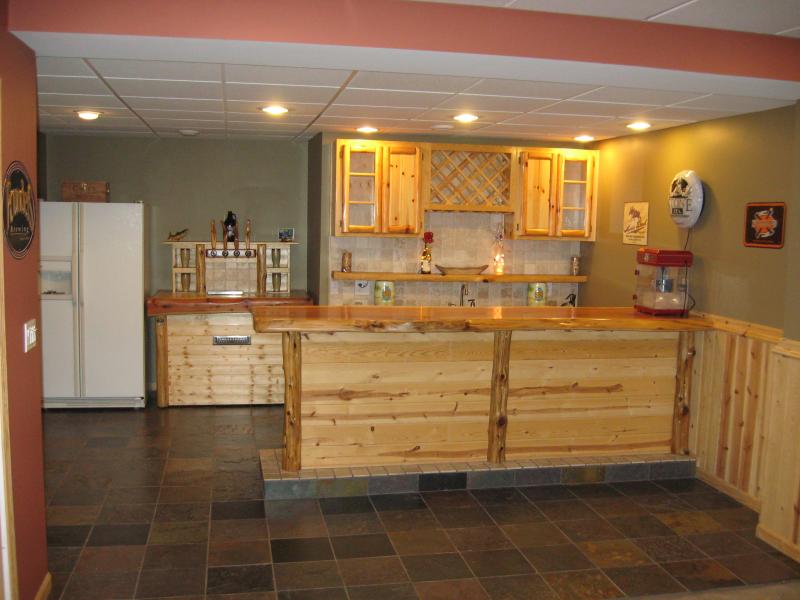
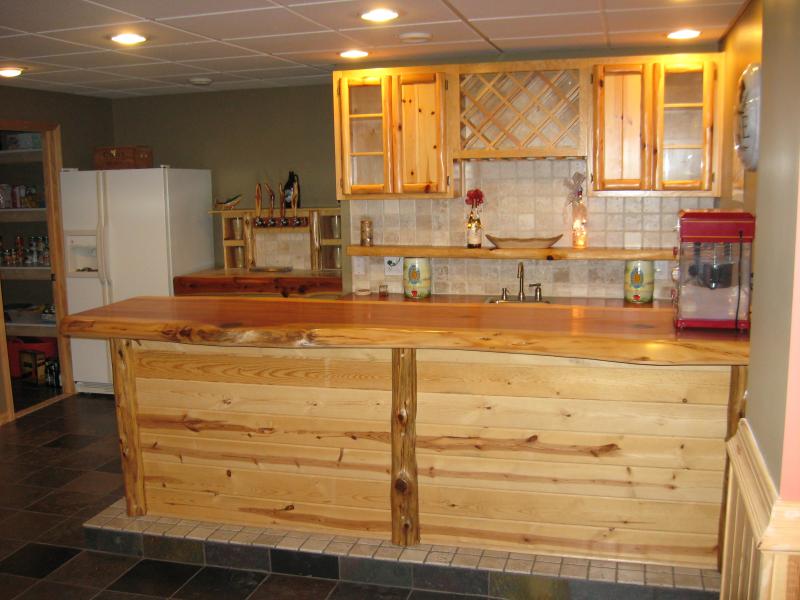
Here are the last of the pics of the keezer in it's final resting spot in my "rustic bar". I still need to get a longer drip tray after converting to 4 taps. I also still am trying to find the time to get the finish on the cedar log bar stools for the redwood bar. I plan on building a cedar log framed chalk board for over the keezer to display the tap line up as well. Thanks to everyone that has followed my long drawn out thread! :mug:

IMG_2345.jpg


IMG_2343.jpg


IMG_2344.jpg


IMG_2346.jpg
 
Hey Hoppo I noticed in an earlier thread you mentioned using cement board as a base for the tile (or somthing like that) but didn't see it get incorporated. Did you end up using this, and do you think it's necassary or not?
 
Hey Hoppo I noticed in an earlier thread you mentioned using cement board as a base for the tile (or somthing like that) but didn't see it get incorporated. Did you end up using this, and do you think it's necassary or not?

Others may have a differing opinion, but I would say it is definitely necessary, otherwise you are attaching tile to a wood substrate and wood tends to move and warp over time, thus it could produce cracks in the tiling.

For the extra $10 for the backer board and maybe $10 for the mortar to attach it to the wood (and maybe the extar 1-2 hours of work and 1 day to wait until attaching the tile), its worth it.
 
In this application, the benefit of the cement board would be more in that it wont suck the moisture out of the thin-set like wood would.... both should work fine though. Plywood probably wouldn't warp too much.

With either cement board or wood, it's a good idea to moisten the material slightly prior to spreading the adhesive.
 
Sorry guys....it's been a few days since I have been on.

Oatstraw: Yes I did use cement board over the 3/4" plywood. I treated this application just like I would for tiling over a plywood subfloor. I used 1/4" cement board and attached it with mortar (1/4" notched trowel) and RockOn screws every 6 to 8 inches over the entire field. This is what give the rigidity to the subsurface, so there is no risk of cracking your tiles/grout lines/ etc. It also helps to create a moisture proof barrier as indicated by Jota21. Just like Jeebas said, for an extra 10 bucks, I would rather have the piece of mind knowing that my tile and or grout lines aren't going to crack.

Tatooman: Thanks for the compliment! Sometime we need to arrange a brew day together. You have turned into a brewing machine my man! :mug:
 
Hoppo, I have a question about your liquid lines. I was able to pick up on craigslist 3 cornies, a dual guage dual regulator, and a full 10# co2 tank for $145, so I have been researching the rest of what I need to get the kegs running. (have yet to get a chest freezer though...) I found a post about people concerned/complaining about a vinyl/plasticy taste on their first 2 ounces or so when the beer sits in the line for a day or two. Do you notice any of that with your liquid lines?
 
Hey Joenads....absolutely no problems with what you are describing. I think that one issue with this problem stems from the fact that some people purchase clear vinyl tubing/hose from places like Lowe's or HD, which is not foodgrade material. The acidity of the beer sitting in the lines over time can leach the off flavors of the vinyl hose if it's not food grade. My lines came from www.kegconnection.com and they are foodgrade tasteless and odorless lines specifically for beer systems. Here is the description of their product copied from their website:

3/16 ID X 7/16 ID Beer Line Hose. American Made, dual layered, tasteless and oderless hose for superior beer dispensing. 3/16 hose gives you the proper restriction for beer dispensing without the foam. 5' of this hose is recommended per beer line. This is commercial quality, American Made hose. This hose is twice the thickness of some hoses offered by other companies. Sold by the foot.

I remember reading a study that someone on HBT conducted by leaving water in various compositions of tubing from many sources for various periods of time and at different temperatures to see which ones created off flavors. The generic clear vinyl tubing and several others for that matter created off flavors, while the foodgrade BevEx lines that KC sells leached very little. Again, I have had no issues with my system and I have had beer sitting in some of the lines of my less popular beers for upwards of a couple of weeks at a time. Hope this helps.
 
Wow, have to say jealousy does not begin to describe what I am feeling. Recently had to put several projects on hold due to a recent theft.

When i was reading through I noticed you used inline (bathroom evac?) fans. Also you mentioned something about 80mm PC case fans and were wondering about how to possibly wire them.

Probably beating a dead horse as it no longer matters but the easy solution is finding an old cell phone charger that is somewhere between 5-12v and wiring them to that. You could probably even use a 15v one as well if the mA output is appropriately low enough.

I used an old PC fan, magnets from some old crashed hard drives, and a cellphone charger, as the main components from my handy little DIY stirplate.

On another note when can I come over and stress test your tap handles for you?
 
Sorry to hear about the thefts....that sucks! :(

I used 110v, 80 cfm, 4" inline Inductor fans for my coffin intake and exhaust. They are designed as booster fans for HVAC applications to install inline in existing ductwork to boost airflow. Since they were not DC, rather AC, they were really simple to wire. I used a 14 guage extension cord to wire them both to, which is plugged into a 110v outlet controlled by my Love Temp. Controller. I'm not sure where you read about me using DC computer fans, because that was never my intent....I wanted to maximize airflow. I imagine that somewhere along the line in this ridiculously long thread, multiple people had suggested using them, but I had planned on using the Inductor fans the entire time. I purchased the fans at www.homedepot.com for something like $15 each, which was 1/2 of the price of them in the store. Now that I think about it, I think that they price matched it in the store, but were reluctant, because they felt that the on-line price was not accurate. I checked a while back and they are still $15 each.....they are $28 in the store, so order on-line! :mug:
 
Well maybe it wasn't you and perhaps it was another poster. Either way it is still an excellent idea considering PC fans are meant for use in applications where they may be on for hours or even days at a time, they are super cheap (usually people have a couple sitting in a computer they don't use), they are usually whisper quiet when mounted substantially, and offer similar flow rates.

I have another wiring question actually however. Are you running multiple cords out of the back or do you have a single cord out the back and some sort of splitter mounted within?
 
I didn't realize that the pc fans could move a similar volume of air. Your right....I have 3 old computer towers in the storage room of my basement. The Inductor fans that I used are pretty quite, but I suspect they are louder than pc fans. I sound proofed my coffin, so you can here a subtle hum when they kick on, but nothing offensive. OK...onto your question:

I don't recall if there is a picture of the back of my keezer or not. Basically what I did was install 3 electrical outlets mounted on the back of the keezer cabinet. I have one power cord (a cut 12 guage extension cord) that plugs into the wall outlet behind the keezer, which is a dedicated 20 amp. outlet. That cord feeds power to the Johnson Love Controller. I have a TSS2 controller, which is a Dual Input/Dual Output controller, meaning it has two seperate temperature probes and can supply controlled power for two seperate applications.

Channel #1 off of the Love controller is wired to the first outlet mounted on the back of the cabinet and it's temp. probe is inside of the freezer compartment. Channel #1 controls the temperature control for the freezer compressor itself, so the freezer plugs into that first outlet.

Channel #2 off of the Love controller is wired to my second outlet on the back of the cabinet and it's temp. probe is located inside of the coffin.
Channel #2 provides the temp. controll for the coffin and the two Inductor fans are wired together into another cut extension cord. This extension cord plugs into the second outlet.

Here's where it got a little tricky. I have LED lights, so I installed a light switch on the side of my keezer. I used another cut extension cord to provide power to the light switch. This cord plugs into the wall electrical outlet behind the keezer along with the cord that supplies the Love controller's power. I then wired the switch to the third outlet on the back of the cabinet to provide a switched outlet. My LED strip plugs into the third outlet on the back of the keezer, so I can turn them on with the installed switch.

So basically, I have two power cords plugged into the wall behind the keezer, one for the Love controller, which controls two seperate outlets.... one for the freezer compressor and one for the coffin fans to plug into. The other provides power to the switch, which controls the outlet in which my LED lights are plugged into.

Make sense, or do I have you totally confused now? Let me know if you need some pics. and I'll try to hunt them down. :mug:
 
Just read through this entire thread. This may be the greatest thing I've ever seen related to brewing. You, sir, inspire me to be a better brewer.
 
I appreciate the compliment, but lets not get too carried away there big fella! I'm just a guy with a few tools, widdling away at some logs. Look around the DIY threads some more and you will find a lot of builds that put mine to shame. I may have one of the more creative builds, but it's a far cry from the quality of work that some of these guys knock out. :mug:
 
I also need a keezer....I just got off craigslist 3 cornies, a full 10# CO2 tank, and a dual gauge, dual regulator for $145. Ordered the rest of the needed hardware and taps to start a 4 tap keezer but I am still waiting for the right chest freezer to pop up on craigslist. Currently, I have kegged and carbing a IIPA in my garage fridge with a picnic tap...
 
I also need a keezer....I just got off craigslist 3 cornies, a full 10# CO2 tank, and a dual gauge, dual regulator for $145. Ordered the rest of the needed hardware and taps to start a 4 tap keezer but I am still waiting for the right chest freezer to pop up on craigslist. Currently, I have kegged and carbing a IIPA in my garage fridge with a picnic tap...

Wow thats a lucky find! I checked craigslist for two months before giving in and buying from a retailer. Good luck with the keezer!
 
I also need a keezer....I just got off craigslist 3 cornies, a full 10# CO2 tank, and a dual gauge, dual regulator for $145. Ordered the rest of the needed hardware and taps to start a 4 tap keezer but I am still waiting for the right chest freezer to pop up on craigslist. Currently, I have kegged and carbing a IIPA in my garage fridge with a picnic tap...

Sounds like you are well on your way......$145 is a great deal. Did it come with the 3 way manifold? You will need a 3 way manifold off of one of the regulator bodies to accommodate 4 kegs. Also, are you housing the 10# CO2 tank inside or outside of the keezer? If inside, you will certainly need a larger freezer than I used (7 cu ft) or at least a substantial collar, so one of the cornies can sit on the hump.

Good luck and keep me posted on how it goes. If you have any questions, I'm happy to help the best I can. :mug:
 
Could you post a picture of the inside now that it is holding 4 kegs? I am just curious to see how everything sits. I am on the fence to see if this size freezer is good enough or if I should go up a step. Decisions, decisions... :)
 
Here you go.....here's the pic. of the inside of the keezer with all 4 kegs and the 5lb. CO2 cylinder. Good timing on the request, because I needed to swap out kegs tonight anyway. I'm retiring my Cedar Infused IPA, which was average at best and replacing with a fresh keg of my Red "Rye".P.A. There is only about a gallon left of the Cedar IPA, so I may just dump it and move on. It was certainly drinkable, but I got carried away with the cedar tea that I topped the batch off with and it created a strong resin quality that was strange. I though about bottling the rest with my bottling wand and putting it in my cold storage room, but decided to just dump it and move on. As you can see, it's a tight squeeze inside of the keezer compartment, but works just fine. I plan on moving the CO2 cylinder and dual body regulator out of the keezer and into the adjacent pantry for direct access for adjustments without having to pull this beast out everytime I want to make adjustments.

IMG_2364.jpg


IMG_2362.jpg
 
I plan on moving the CO2 outside of the keezer all together. One of my patients and now homebrewing maniac...."Tattooman" gave me a 10 lb. CO2 cylinder, so my plan is to move the CO2 and regulators out of the keezer and into the adjacent pantry. I plan on punching though the adjacent wall and running my gas lines behind the fridge, through the coffin, and down into the freezer compartment. I did a light sanding to the CO2 cylinder and then gave it several coats of stainless steel spray paint to clean it up. Still need to get it re-certified and filled, but I plan on getting to it in the very near future. :mug:

IMG_2358.jpg


IMG_2360.jpg
 
Back
Top