• Please visit and share your knowledge at our sister communities:
  • If you have not, please join our official Homebrewing Facebook Group!

    Homebrewing Facebook Group

HOWTO - Make a BrewPi Fermentation Controller For Cheap

Homebrew Talk

Help Support Homebrew Talk:

This site may earn a commission from merchant affiliate links, including eBay, Amazon, and others.
Status
Not open for further replies.
I think you are making this too complicated. Is there a reason you want the SSR?
Well, I'm open to ideas, but the problem that I'm trying to solve is that my cooling device (True GDM-23) has ruined two sain smart relays recently so it is assumed that the commercial refrigerator is overloading that circuit (at startup presumably).

I'm using the SSR on the cold circuit because it can handle the increased load (also because I happened to have an extra one on hand).

I looked into the relay that @hinkensj suggested, but they appear to be out of stock.
 
Okay, that's fair. Then how did you get to using a relay to drive the SSR? (you may have covered this previously)
 
Okay, that's fair. Then how did you get to using a relay to drive the SSR? (you may have covered this previously)
From the sounds of it, it isn't the ideal situation. Based on what @day_trippr and @hinkensj suggested I may be able to drive the SSR (cold circuit only) directly from my Leonardo board...but my lack of electrical engineering knowledge is preventing me from understanding that option.
 
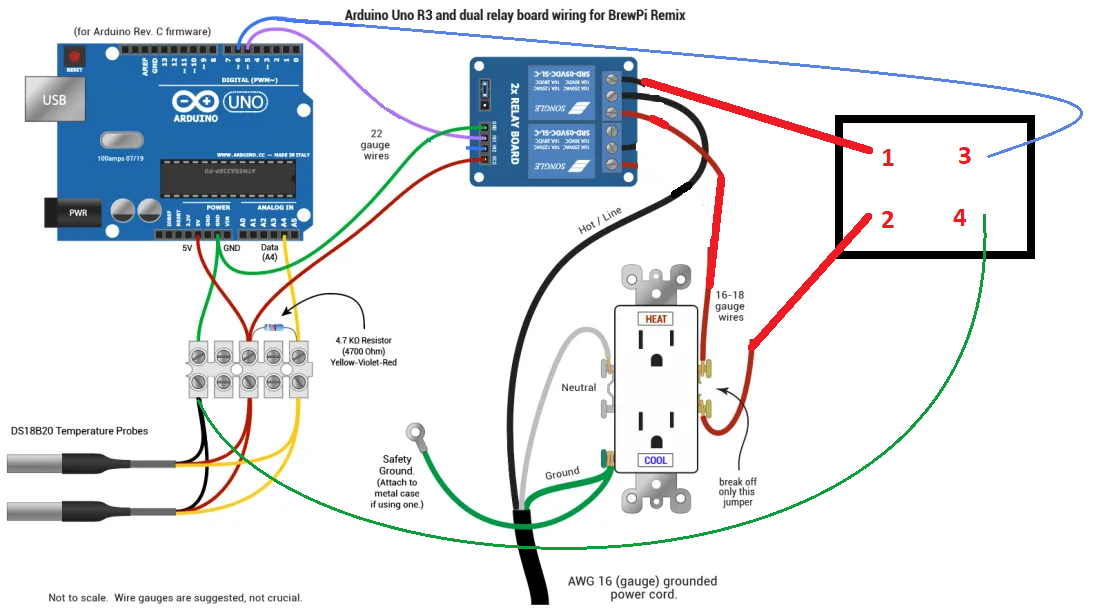
I don't use an SSR, but from those who do, I understand you wire the pin to SSR low voltage (3 in your pic) and then SSR (4 in your pic) to ground. When you set up the control point you set it up as non-inverted (which is a silly double-negative). That should be all you need there.

You would still need a relay for your heating side.

I read up above where we went down the road of using a relay on the low voltage side, not really sure how we got there.
 
Along with more rationale ways to go I did indeed throw in the "run the SSR off the relay" comment. The relay point bounce thing would make that a last-resort imo.
If the Inkbird model pictured isn't what's actually in hand, if the OP could provide the actual make/model of the SSR we could see if the control input would work directly driven as I mentioned as well...

Cheers!

[edit] fwiw, looking at the Inkbird SSR40DA spec (pdf linked) it looks like it could be directly controlled from an Arduino GPIO. Might not work directly driven by an RPi though...
 
Last edited:
Dave if there's a current draw issue, I think the Arduino can sink more than it can supply? If so, supplying 5VDC (or whatever is avail) and sinking that through an inverted point would work, wouldn't it?
 
Along with more rationale ways to go I did indeed throw in the "run the SSR off the relay" comment. The relay point bounce thing would make that a last-resort imo.
If the Inkbird model pictured isn't what's actually in hand, if the OP could provide the actual make/model of the SSR we could see if the control input would work directly driven as I mentioned as well...

Cheers!

[edit] fwiw, looking at the Inkbird SSR40DA spec (pdf linked) it looks like it could be directly controlled from an Arduino GPIO. Might not work directly driven by an RPi though...
@day_trippr the SSR that I have on hand is the InkBird SSR-40 DA

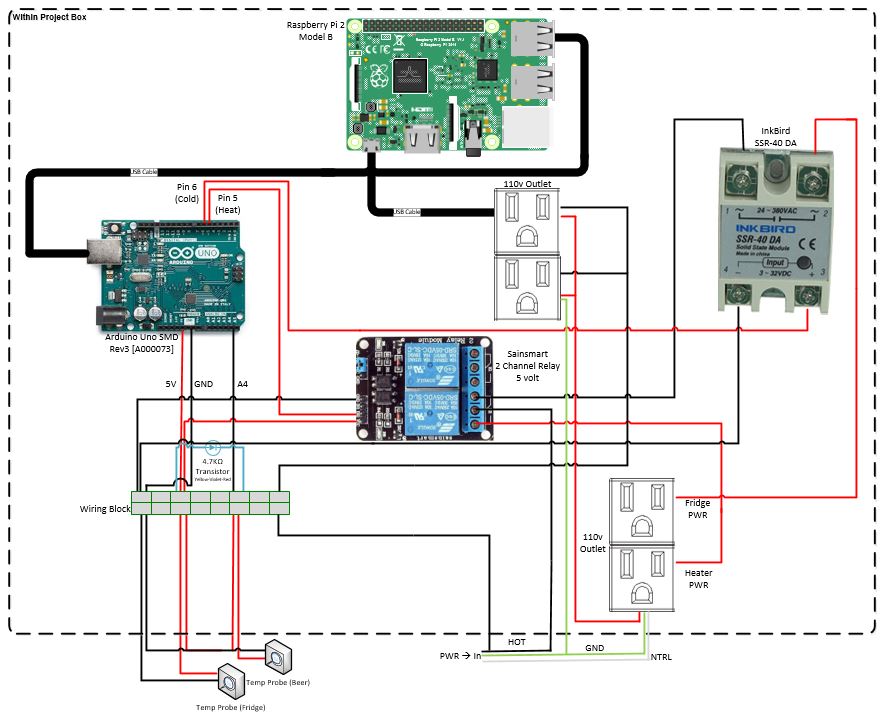
I've added a few labels for clarification
*Note that I swapped out the Leonardo for my Uno (I didn't realize I had my old setup pictured)*
Cold_Circuit_Issues_v2.JPG
 
Lee: yes, to the pin limit and then total package limit, an open drain output could be used with a 5v pull-up resistor...

Cheers!
 
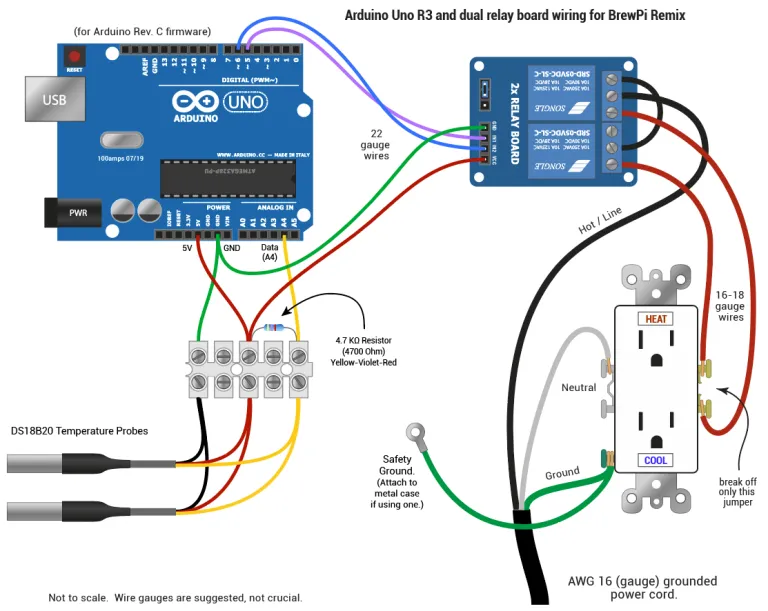
@H0phead I think you are making it more difficult than it needs to be. I think that any time I need to get out a whiteboard to follow someone's wiring diagram, it's too complicated. Here's an updated basic diagram from the BrewPi Remix website:

1592336993061.png


Note that for the high voltage, the hot leg only is run through the relay. The common or neutral (which is grounded anyway in most locales) is not run anywhere except for the outlet. I'm not sure what you have there will work.

Then for your cool side, the same thing applies. You will run your hot leg to one side of your SSR (1) and then the other side (2) will go to the hot side of the outlet. In the diagram I've posted, run the jumper from NC on the first relay up to the SSR (1) instead of the second relay, and the red/hot leg to the SSR (2) - that will prevent both from coming on at the same time. I think heat and cool might be reversed in the diagram, but you can figure that part out.

Now you have the relay directly controlling Heat, and the SSR controlling Cool (with nothing controlling the SSR yet.) Run whatever pin you are using to control cooling to the low side of the SSR (3) and then run the other side (4) to ground.

Now when you set up the Heat control point, it will be the typical "inverted" and the Cool will be "non-inverted."

... at least I think I have all that right. :)

ETA: There's a reason why I leave this to the experts, but this is what I mean (I think):

1592338382910.png
 
Last edited:
@LBussy Based on your suggestions I've revamped my wiring diagram and think I have things sorted. I have an active fermentation going at the moment, but when it's finished up I'll rewire everything and report back.
Cold_Circuit_Issues_v3.JPG
 

Attachments

  • Cold_Circuit_Issues_v3.JPG
    Cold_Circuit_Issues_v3.JPG
    102.2 KB
I think so? For some reason, I find it hard to follow those straight lines. I think I traced all of them though, can't find a problem.
 
If I’m following this right, I don‘t think the SSR pin 1 should connect to the NC contact on the relay. This will still draw all the startup current through that contact and there is no need to do so unless you are trying to guarantee heating and cooling are not on at the same time. The software does a fine job of that... Instead, run pin 1 of the SSR straight to hot.
 
If I’m following this right, I don‘t think the SSR pin 1 should connect to the NC contact on the relay. This will still draw all the startup current through that contact and there is no need to do so unless you are trying to guarantee heating and cooling are not on at the same time. The software does a fine job of that... Instead, run pin 1 of the SSR straight to hot.
You are correct, that's how I showed it. I don't think however that it poses the risk to the relay you are suggesting. The current will not be switched, and therefore not (potentially) arc which is what damages the relays. Yes, one could make the change you suggest. I guess it's a belt and suspenders thing.
 
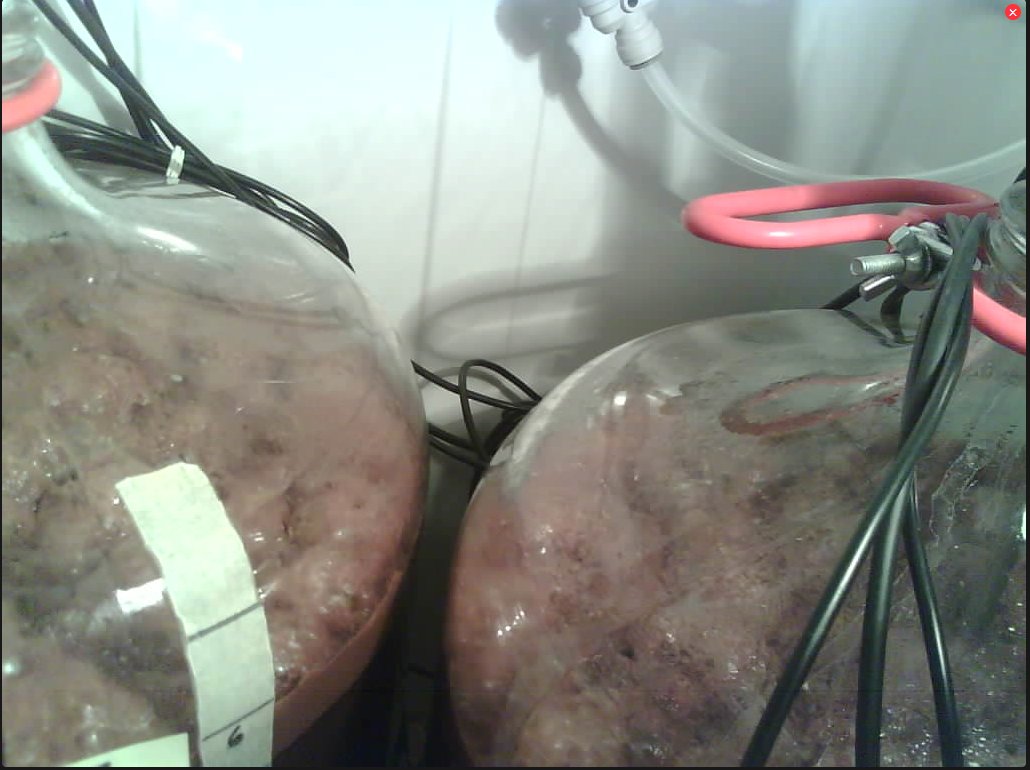
I'm doing some experimentation with using fermenter-produced CO2 to purge kegs and because the tubing I'm using (EVAbarrier 5mm ID) is so skinny there's the existential thread of krausen plugging it up and causing perhaps exciting results. There are two carboys chugging away, and I do have a solution that will mitigate krausen issues if needed - wide bore blowoffs leading to a 1/2 gallon PET bottle that has a outlet port for the thin tubing, but I'd prefer not to use it yet.

So, I have an esp32-cam trained on the exhaust bottle at the very end of the line, and I just stuck another one in the ferm chamber. Which, of course, gets very dark when the door is closed, so what to do?

BrewPi is the answer!

I disconnected my chamber heater ('cuz I sure as heck won't need it for awhile), plugged in a small lamp that I could perch on a door shelf - next to the esp cam - then changed the BrewPi setting for GPIO6 from Chamber Heater to Chamber Light. Et voila! By toggling the Pin type setting between Inverted/Non-inverted I can turn the light on and off remotely!

fermcam.jpg


Now I can periodically turn on the light and check the carboys. If that krausen gets close to the neck it'll be time to implement Plan B.

btw, no issues having the esp32 inside the fridge, even though its access point is a room away...


Cheers! (BrewPi! Is there anything it can't do? :D)
 
I'm doing some experimentation with using fermenter-produced CO2 to purge kegs and because the tubing I'm using (EVAbarrier 5mm ID) is so skinny there's the existential thread of krausen plugging it up and causing perhaps exciting results. There are two carboys chugging away, and I do have a solution that will mitigate krausen issues if needed - wide bore blowoffs leading to a 1/2 gallon PET bottle that has a outlet port for the thin tubing, but I'd prefer not to use it yet.

So, I have an esp32-cam trained on the exhaust bottle at the very end of the line, and I just stuck another one in the ferm chamber. Which, of course, gets very dark when the door is closed, so what to do?

BrewPi is the answer!

I disconnected my chamber heater ('cuz I sure as heck won't need it for awhile), plugged in a small lamp that I could perch on a door shelf - next to the esp cam - then changed the BrewPi setting for GPIO6 from Chamber Heater to Chamber Light. Et voila! By toggling the Pin type setting between Inverted/Non-inverted I can turn the light on and off remotely!

View attachment 687521

Now I can periodically turn on the light and check the carboys. If that krausen gets close to the neck it'll be time to implement Plan B.

btw, no issues having the esp32 inside the fridge, even though its access point is a room away...


Cheers! (BrewPi! Is there anything it can't do? :D)
You should have a look at BrewPiLess pressure sensors
 
Right now I guesstimate the system pressure is well under 0.1 psi, based on flow characterization using a 0.4 psi CO2 source.
A skim of the linked discussion leaves the impression the sensor referenced has major accuracy issues up in the dispensing range.
I doubt it would be of any use down where I'm working :)

Cheers!
 
I think (and not trying to sound like I am bashing another product because I am not) that forcing a controller to monitor/actuate something that works perfectly fine in analog mode is asking for trouble. Freeze or heat a beer, that's one thing. Overpressure a fermentor and that's another.
 
I've been away for a while... is there a way to show the Tilt Gravity reading in addition to, or in lieu of, the Tilt Temp on the status board? I'd love to have a quick at-a-glance reading.
 
is there a way to show the Tilt Gravity reading in addition to, or in lieu of, the Tilt Temp on the status board?
You mean you'd prefer it shown up in the title bar vs in the chart? Not in the current code, no. I can look at maybe adding that the next time I get in there.
 
You mean you'd prefer it shown up in the title bar vs in the chart? Not in the current code, no. I can look at maybe adding that the next time I get in there.

Probably not instead of in the chart... just an added feed of the current gravity to go along with the battery age and current temp from the Tilt would be perfect.

BTW, thanks for all your work on this! I remember a few years back, trying to cobble together all the different instructions trying to get this to work was a major chore. Your effort, along with Elco's, is greatly appreciated by us all!
 
Last edited:
I love BrewPi, I could not see it die (although I'm sure Elco wishes it would.) I'm happy to give back to the community. A few years ago I was one of those folks looking for help.

I have the SG in the object already, I think I just need to add it to the scroll. I just tried looking and noticed my mule system died sometime last night so ... :p
 
is there a way to show the Tilt Gravity reading in addition to, or in lieu of, the Tilt Temp on the status board?
I just pushed this to a development branch. You can check it out (if you are comfortable doing this) by issuing the following commands:
Code:
cd /home/brewpi
sudo git fetch origin
sudo git checkout -b tilt_sg origin/tilt_sg
(assuming nothing here breaks ... continue)
Code:
sudo /home/brewpi/utils/doPerms.sh
sudo systemctl restart brewpi
Let me know if you are able to test. Otherwise, "It Works Here™". :)

(Tracking as #128 in the Scripts repo)
Received an error on the third command.
Your local changes to the following files would be overwritten by check out: brewpi.py
Please commit your changes or stash them before you switch branches.

it could very well have to do with my installation, or maybe updates?

EDIT: Worked like a charm after getting every updated and back on track.
 
Last edited:
If I'm running Fermentrack currently, can I install BrewPi on the same RPi and play around with one or the other with different ferments? Or would I need to erase everything and start fresh?
 
Interesting question. I suspect they would conflict on perhaps a couple of levels, depending on hardware configuration.
If both programs target the same controller (which would have to be an Uno) you're going to have a bad time. One of the two would have to be steered away from pinging the Uno allowing unfettered access by the program you want running. Might be as simple as editing the config file that defines the RPi port used by the controller in the program you don't want to get in the way of the other.

The other possible gotcha is the web service. I don't know enough about Fermentrack (apologies to Thorrak ;)) and don't know what server and port it runs on. A work-around there might be to use a file-level fully qualified url to access the particular web page...

Cheers!
 
If I'm running Fermentrack currently, can I install BrewPi on the same RPi and play around with one or the other with different ferments? Or would I need to erase everything and start fresh?
Technically you can, but I think John and I both defaulted towards the "it's just easier to tell people no." Fermentrack uses nginx and BrewPi Remix uses Apache. Both of the default to using port 80 which is what you get when you use your web browser by default. One or the other would need to be changed manually to use a different port. Then there are the potential serial port conflicts. I am not sure how Fermentrack makes assumptions about serial port availability.

So, I'll give you two answers:
  1. You would absolutely need to do a manual BrewPi Remix install (thus eliminating one of the parts that make this Remix so attractive.) You would have to follow these instructions, and leave out any part about removing nginx. I would also move nginx off port 80 before you start. Otherwise, Apache will throw a fit.
  2. I need to figure this out anyway since John and I do help each other on occasion. If you are not the sort who takes apart a new toy before playing with it, you may not enjoy the first answer. Give me a little time and I'll report back.
 
If I'm running Fermentrack currently, can I install BrewPi on the same RPi and play around with one or the other with different ferments? Or would I need to erase everything and start fresh?
Okay, I enabled this functionality in the installer. New post/release announcement coming momentarily.
 
Last edited:
Minor Feature Release / Bugfixes 0.5.4.3

This is a minor feature + bugfix rollup release.

‼With this release, BrewPi Remix may be installed on the same system as Fermentrack.‼

Changes

- Clean up socket error handling
- Append stderr
- Handle temperature conversion from external API
- Fix pin definitions for brewpi-esp8266
- Update apt keys
- Allow reconfiguring nginx if present to alternate port
- Add Tilt and iSpindel to Header
- Add ISO8601 Date format as an option
- Address missing ack in socket comms
- Make SG report 3 decimals

Upgrading

Existing users of BrewPi Remix 0.5.3.0 and above may upgrade with:
Code:
sudo /home/brewpi/utils/doUpdate.sh

If you are not on version 0.5.3.0 or above, use the following command to upgrade to the latest version:
Code:
curl -L upgrade.brewpiremix.com | sudo bash

This must be run from within your /home/brewpi directory or from each chamber directory in multi-chamber mode.

SPECIAL NOTE:

If you have installed a non-master version of BrewPi Remix (such as if you worked with me on a fix or feature) you may revert back to the master branch using these commands:
Code:
cd /home/brewpi
sudo git fetch origin
sudo git checkout -b master origin/master
If the last command gives you the error fatal: A branch named 'master' already exists., use this command:
Code:
sudo git checkout master

Then, proceed with:
Code:
sudo git pull
cd /var/www/html
sudo git fetch origin
sudo git checkout -b master origin/master
If the last command gives you the error fatal: A branch named 'master' already exists., use this command:
Code:
sudo git checkout master

Then, proceed with:
Code:
sudo git pull
cd ~
sudo /home/brewpi/utils/doPerms.sh
sudo systemctl restart brewpi
 
Last edited:
Status
Not open for further replies.
Back
Top