• Please visit and share your knowledge at our sister communities:
  • If you have not, please join our official Homebrewing Facebook Group!

    Homebrewing Facebook Group

HOWTO - Make a BrewPi Fermentation Controller For Cheap

Homebrew Talk

Help Support Homebrew Talk:

This site may earn a commission from merchant affiliate links, including eBay, Amazon, and others.
Status
Not open for further replies.
Still trying to learn how to use my brewpi. One thing I note is that the power plugs being controlled by the unit are connected to the 'normally on' connectors of the relay switch. Both relays are engaged, which means, the plugs would not be getting power if the unit was connected to power. This is confirmed in that both input signals to the relays are at 5v. Does this mean that if the brewpi should lose power, would both the heater and chiller be engaged? I'm not sure that's the best design.
WRT the software, I have some questions on the web display. For example, the top graph lines have boxes with letters on them. So far I see G, F, and I. What do these mean? I note the legend to the right has a reference to 'state', but I can't seem to get the state to display. How can I make that happen? Lastly, according to my test profile, the chiller should be engaged, but that doesn't seem to be happening. The bottom chart shows my test profile and the status indicates "Running beer profile test", so I think the profile should be active. Thoughts?

Do you mean "normally on" or "N/O" (or "N/C")?

What relays are you using? Many of the common relay modules are active low, which means that a 5V signal would cause the relay to not be energised. If your relays are energised when 5V is present then you need to invert the output signals.

The little boxes with letters in them are annotations. They show that some event happened at that time. Hover the mouse over them to see the note of the event.
 
Still trying to learn how to use my brewpi. One thing I note is that the power plugs being controlled by the unit are connected to the 'normally on' connectors of the relay switch.

"NO" is "Normally Open" - not "Normally On".
"NC" is "Normally Closed".

The Cool and Heat AC switched AC feeds should be routed through the "NO" contacts - and the actuators set for "Inverted" in the Device Configuration panel.

As for the rest:

- The boxes (Annotations) indicate when you made some change to the controller (like, changed the temperature).

- State is always displayed (that's the bottom-most plot that shows when either Cool or Heat actuators are active).

- My guess is you have the relays wired wrong and haven't set the Inverted state for the actuators...

Cheers!
 
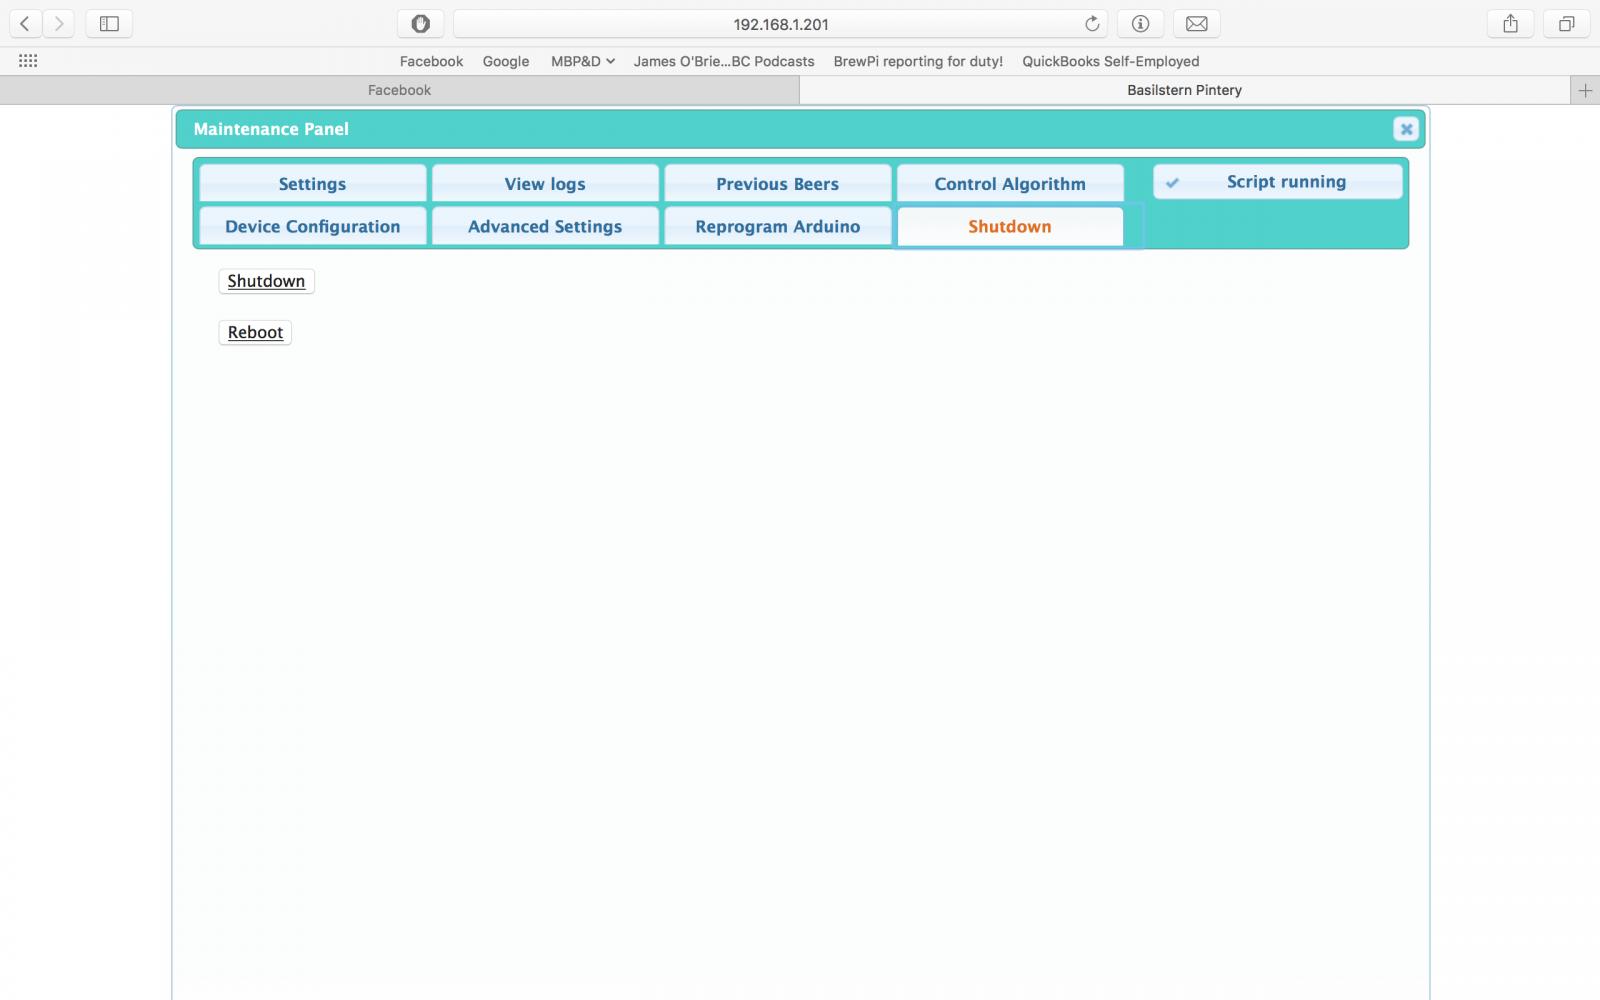
I got tired of having to log into my computer, open terminal, ssh into the brewpi, and then run a command to power it down. So I did something about it! I made an extra option on the maintenance panel to shutdown and reboot the system. I also am wiring up a switch so I can turn it off (or on) with a much of a physical button on the brewpi housing.

I know it is fairly cheap to run a brewpi 24/365, but I still like to unplug it when I'm not using, or when we get a lightning storm coming through. If anyone is interested, I can try to put together a tutorial on how to do it.

EDIT: Tutorial is here, and just a few posts down from here.

Screen Shot 2017-05-09 at 12.21.41 PM.jpg
 
I got tired of having to log into my computer, open terminal, ssh into the brewpi, and then run a command to power it down. So I did something about it! I made an extra option on the maintenance panel to shutdown and reboot the system. I also am wiring up a switch so I can turn it off (or on) with a much of a physical button on the brewpi housing.

I know it is fairly cheap to run a brewpi 24/365, but I still like to unplug it when I'm not using, or when we get a lightning storm coming through. If anyone is interested, I can try to put together a tutorial on how to do it.
I'm interested in a tutorial.
 
I got tired of having to log into my computer, open terminal, ssh into the brewpi, and then run a command to power it down. So I did something about it! I made an extra option on the maintenance panel to shutdown and reboot the system. I also am wiring up a switch so I can turn it off (or on) with a much of a physical button on the brewpi housing.

I know it is fairly cheap to run a brewpi 24/365, but I still like to unplug it when I'm not using, or when we get a lightning storm coming through. If anyone is interested, I can try to put together a tutorial on how to do it.

Interested too. Post it up.
 
I got tired of having to log into my computer, open terminal, ssh into the brewpi, and then run a command to power it down. So I did something about it! I made an extra option on the maintenance panel to shutdown and reboot the system. I also am wiring up a switch so I can turn it off (or on) with a much of a physical button on the brewpi housing.

I know it is fairly cheap to run a brewpi 24/365, but I still like to unplug it when I'm not using, or when we get a lightning storm coming through. If anyone is interested, I can try to put together a tutorial on how to do it.


Saw this the other day, seems like a pretty cool hack…
https://youtu.be/A08IrJ3ECuA
 
Saw this the other day, seems like a pretty cool hack…

https://youtu.be/A08IrJ3ECuA
Ghostery prevented a redirect from
go.skimresources.com to go.redirectingat.com,
which is part of SkimLinks.

This tag appears to redirect to
http://go.redirectingat.com/?id=824...om/search.php?searchid=37633641&xtz=420&abp=1
If this link doesn't look right and you'd like to proceed, click on the icon below to allow SkimLinks and reload.
Allow tags once until final destination is reached. Always allow and reload.
 
Shutdown/Reboot HTML Buttons
DISCLAIMER: I am not responsible for the loss of life, limb, Raspberry Pi, or the love of your family. Proceed at your own risk. Back up your stuff, yada, yada, yada.

1. Give www-data access to run the commands
First off, we need to give the webpage (www-data) access to run the shutdown and reboot commands.

From the command line type
Code:
sudo visudo

Scroll down until you see this:
Code:
#includedir /etc/sudoers.d
pi ALL=(ALL) NOPASSWD: ALL

Directly below that type in
Code:
www-data ALL=NOPASSWD: /sbin/reboot, /sbin/shutdown

Press Ctrl-X to save, Y to confirm, and then Enter to confirm the file name

2. Create the PHP pages that will be run by the buttons
I did this step through the GUI, but I suppose you can do it through the command line as well.

Navigate to /var/www/ (if you're running Jessie, it might be /var/www/html)

Create a new empty file, name it reboot.php, and inside it type the following
PHP:
<?php system('sudo /sbin/reboot'); ?>

Create a new empty file named shutdown.php, and inside it type
PHP:
<?php system('sudo /sbin/shutdown -h now'); ?>

3. Add the buttons to the maintenance panel
Still in /var/www/ or /var/www/html/, open the maintenance-panel.php page

Near line 59 you'll seen an unordered list (designated by <ul>). At the bottom of this list, after the line <li><a href="#reprogram-arduino"><span>Reprogram <span class="boardMoniker">controller</span></span></a></li> enter the following
Code:
<li><a href="#shutdown"><span>Shutdown</span></a></li>

Following the closure of that list (designated by </ul>) enter
Code:
<div id="shutdown">
<script type="text/javascript">
function shutdownonclick()
{
shutdown_window = window.open("shutdown.php",
"shutdown_window","status=1,width=350,height=150");
setTimeout("shutdown_window.close()", 2000);
}

function rebootonclick()
{
reboot_window = window.open("reboot.php",
"reboot_window","status=1,width=350,height=150");
setTimeout("reboot_window.close()", 2000);
}
</script>
	<button><a href="javascript: shutdownonclick()">Shutdown</a></button>
		<br>
		<br>
	<button><a href="javascript: rebootonclick()">Reboot</a></button>
</div>

4. Test it
Refreshing your BrewPi page should be all that is required for this to work, but maybe you'll have to reboot the whole Pi as well.

How these buttons work
It took me about 48 hours to figure out how I wanted these to work. Originally I just created the php pages, and linked to them. The problem was that if the pages were open on my phone, I didn't want them to refresh when opening Safari after an extended duration and having them rerun the command. Instead, the buttons use javascript to create a new window with the PHP page, wait two seconds so that the command can be run, and then closes the page. The beauty of this is that the script is run on the webpage rather than the server, so once the Pi shutdown or begins rebooting, the page can finish processing the script to close the window.

Shutdown/Boot Physical Button
For this I really just used these instructions:
http://www.instructables.com/id/Simple-Raspberry-Pi-Shutdown-Button/

I used Pi pin 5 (on my RPi 2 ver B that was GPIO pin 3) and Pi pin 6 (a ground). Using these (maybe just using 5 with any ground) gives you the ability to boot it when it is off but hasn't been unplugged. I used female jumper wires on the pins, and then soldered the ends to a momentary switch (specifically this one: https://www.adafruit.com/product/559).

Following the switch directions and code leaves you with a floating GPIO pin, and this caused me to get false triggers when the freezer compressor would kick on, shutting down the BrewPi. I added a pull up resistor to the circuit, connecting the GPIO pin to a +3.3v pin.
 
And a hot tip: Do NOT edit sudoers manually!

Code:
pi@brewpi:~ $ sudo su -
>>> /etc/sudoers: syntax error near line 33 <<<
sudo: parse error in /etc/sudoers near line 33
sudo: no valid sudoers sources found, quitting
sudo: unable to initialize policy plugin

Use 'sudo visudo' instead. visudo will not allow you to save a corrupted sudoers file ... which would do bad things.

don'taskmehowIknowthis
 
And a hot tip: Do NOT edit sudoers manually!

Code:
pi@brewpi:~ $ sudo su -
>>> /etc/sudoers: syntax error near line 33 <<<
sudo: parse error in /etc/sudoers near line 33
sudo: no valid sudoers sources found, quitting
sudo: unable to initialize policy plugin

Use 'sudo visudo' instead. It will not allow you to save a corrupted sudoers file.

don'taskmehowIknowthis

Thanks for that, I've updated the steps.
 
Ghostery prevented a redirect from

go.skimresources.com to go.redirectingat.com,

which is part of SkimLinks.


This tag appears to redirect to

http://go.redirectingat.com/?id=824...om/search.php?searchid=37633641&xtz=420&abp=1

If this link doesn't look right and you'd like to proceed, click on the icon below to allow SkimLinks and reload.

Allow tags once until final destination is reached. Always allow and reload.


Um… don't know what problem you encountered or what special firewall software you're running… but it's a YouTube link…
 
Shutdown/Reboot HTML Buttons
Thanks for posting this, it works great.

Remember to change ownership (chown) the two new files so that they are owned by www-data like the rest of them to avoid issues. They probably should also be chmod'ed to 674 like the rest.

If someone prefers a "paste and go" approach to creating these files (and to chmod and chown the files) here it is:

Code:
sudo echo "<?php system('sudo /sbin/reboot'); ?>" > "/var/www/html/reboot.php"
sudo chmod 674 /var/www/html/reboot.php
sudo chown www-data:www-data /var/www/html/reboot.php

sudo echo "<?php system('sudo /sbin/shutdown -h now'); ?>" > "/var/www/html/shutdown.php"
sudo chmod 674 /var/www/html/shutdown.php
sudo chown www-data:www-data /var/www/html/shutdown.php

... the above is for Jesse. If you still have Weezy you probably know enough to remove the html from the path.

Also a paste and go solution for the sudoers file:

Code:
sudo sh -c "echo \"www-data ALL=NOPASSWD: /sbin/reboot, /sbin/shutdown\" >> /etc/sudoers"

I was looking at different ways to script the changes to the maintenance-panel.php file but I got a little sidetracked. :)
 
I'm a very technically inexperienced brewer looking to attempt this project as my first foray into the technical world. I'd have someone who knows what they're doing help me on the actual assembly, but in the meantime, how did all of you acquire the knowledge/skill to understand how to wire up the controller? Any special equipment required? Sorry if these questions are stupid :p
 
I'm a very technically inexperienced brewer looking to attempt this project as my first foray into the technical world. I'd have someone who knows what they're doing help me on the actual assembly, but in the meantime, how did all of you acquire the knowledge/skill to understand how to wire up the controller? Any special equipment required? Sorry if these questions are stupid :p

I probably started out at the same level as you having never touched a circuit board (or at least not since school). google, youtube, searching this thread are great ways to build up your knowledge, I did little more than that and now am quite confident in being able to knock something together, it may not be pretty but it might work some of the time.
 
I'm a very technically inexperienced brewer looking to attempt this project as my first foray into the technical world. I'd have someone who knows what they're doing help me on the actual assembly, but in the meantime, how did all of you acquire the knowledge/skill to understand how to wire up the controller? Any special equipment required? Sorry if these questions are stupid :p
Read the thread (yes it's huge but a lot of good info here), make notes while you do so. For instance there's some instructions which are replaced by those coming later.

Get yourself a Raspberry Pi and play around with it some. The project assumes you are at least passingly familiar with working with a Pi. There are a lot of beginners and "for Dummies" books out there. You will also learn here that the technology out-strips the documentation fairly quickly so a secondary goal here is to get familiar with Googling for the answer.

When you get your Pi, learn things like networking it at your home, accessing it from another computer (both X/RDP and SSH). Set up and play with the web server. These are things you need to be able to at least converse upon when you start the project.

Understand the difference between a microcomputer and a microcontroller. This will lead to more Googling, but spend some time doing it.

Finally, approach this only when you have time and patience. You can't just pick up the phone and call one of us for help, so in many cases it's going to take starting over again from the top and making sure you do everything right. When you do ask for help, include log messages whenever possible. If you don't know what or where a log message is, there's more learning to do. :)

There's a pretty steep learning curve up front, but this is a small project and easily accomplished if you follow some directions. You could probably pull it off with none of the knowledge I just mentioned as a matter of fact, but having it will make your life a whole lot easier when something doesn't work as it's supposed to.

Good luck!!

And ill add once you get the hang of it a whole new world of DIY opens up to you. Hell i built a 17" digital picture frame that hangs on our kitchen wall hooked up to our network storage with thousands of family pictures for like $100. An equivalent product(which doesnt really exist) would be around $300.
 
I'm a very technically inexperienced brewer looking to attempt this project as my first foray into the technical world. I'd have someone who knows what they're doing help me on the actual assembly, but in the meantime, how did all of you acquire the knowledge/skill to understand how to wire up the controller? Any special equipment required? Sorry if these questions are stupid :p


Just bornt that way I guess
 
With the setup in the wiki/first page, am I right in assuming that the fridge and heating tool can be plugged into each of the sockets and powered that way? I'd prefer to avoid messing with the compressor/temp controller of the fridge itself.

Also, is the "eurostyle" connector mentioned in the schematic one of these? https://www.amazon.com/dp/B008X0NNEY/?tag=skimlinks_replacement-20

Edit: I've got a spare computer lying around which I'm probably going to use in place of the raspberry pi.
 
Last edited by a moderator:
- Yes, you don't have to hack anything, just plug the fridge into the Cool AC circuit and your heater into the Heat AC circuit, set the fridge to the coldest it will go, and let BrewPi run the show.

- And those terminal blocks would work fine.

- Downside of using a full-blown peecee: it'll burn a lot more power than the couple of watts an RPi uses...

Cheers!
 
I'm a very technically inexperienced brewer looking to attempt this project as my first foray into the technical world. I'd have someone who knows what they're doing help me on the actual assembly, but in the meantime, how did all of you acquire the knowledge/skill to understand how to wire up the controller? Any special equipment required? Sorry if these questions are stupid :p

I'd say it comes from all of my time with picture books and Ikea directions, backed up by some exposure to server knowledge. This thread, and the linked to Wiki in the first post are very helpful in walking you through the process.

Tweaking it comes from having a little bit of comfort with how everything works together and a lot of Googling.
 
Quick question: If I want to move my BrewPi setup to a Raspberry Pi Zero, can I just move the SD card over?
 
If you have a Model B/B+, you have a full size SD card, while the Zero/Zero-W, 2B and 3B all use microSD cards.

Aside from that, from what I have gathered as long as you do not have the "experimental" OpenGL driver enabled before sneaker-netting the SD card, the Pi Zero should boot fine - whether Jessie or Wheezy.

Of course, being single-core with half the RAM, the Zero may seem slow compared to pretty much any other RPi, but that's what you get for $5 :)

Cheers!

I'd be going from a Pi 2B, so all good on the card type. Hopefully the decreased processing power doesn't have too much of an impact, but I guess I'll find out!
 
I'd be going from a Pi 2B, so all good on the card type. Hopefully the decreased processing power doesn't have too much of an impact, but I guess I'll find out!


I can't say I notice a huge difference between any of the RPIs I use in terms of speed. I think the key is a decent connection via wifi or Ethernet probably has a greater impact
 
Was having some problems with a pizw staying online for more than a couple minutes at a time… turns out I had cracked the regulator coil when I was designing a case for it… so now waiting for another…
 
The Zero will do fine but with larger logs (longer ferments) you will notice a decrease in speed while rendering the web page. Still, it's a fine solution.
 
I would definitely not recommend using a pi zero for anything but a single fermenter setup. the pi3 is definitely the way to go for multiple vessels
 
I can't say I notice a huge difference between any of the RPIs I use in terms of speed. I think the key is a decent connection via wifi or Ethernet probably has a greater impact

Pull up a month-log BrewPi log on your fastest and slowest RPi's.
Or, open up the Pour table inside a three-year-long RaspberryPints database.

As for network throughput, afaik every RPi IO device talks through the same internal USB2 port on the SOC.
Not exactly a fat pipe...

Cheers!
 
Hey all, been a while.

So, my laptop Brewpi rig is feeling a little under the weather. Pretty much on its death bed actually. And I need help getting it running properly.

It never did run really well. It was always slow and unresponsive, but it got the job done. So I clearly didn't have it all configured right from the get-go. I recently succumbed to the temptation to click the notification that said I have 300+ updates available. Since then it has become terminally ill, and now, it's dead.

As mentioned, it's a laptop, and old-ish Acer that runs well. It has wheezy installed. I remember modifying the original RPi installation script to install/configure it at the beginning, which was probably 3-4 years ago.

I'm not a linux whiz. I used it and played with it 15-20 years ago. A lot has changed since then, especially my memory, I'm getting old. So I can't remember how to configure or troubleshoot this. I checked through some logs in /var/logs and didn't see anything helpful.

Symptoms: Iceweasel just crashes halfway through loading the Brewpi page. Some elements show up, then it chokes and I have to kill the browser's process to regain control.

So, brain trust, :rockin:, what's the first step?

-- 100amps
 
Status
Not open for further replies.
Back
Top