You are using an out of date browser. It may not display this or other websites correctly.
You should upgrade or use an alternative browser.
You should upgrade or use an alternative browser.
HOWTO - Make a BrewPi Fermentation Controller For Cheap
- Thread starter FuzzeWuzze
- Start date

Help Support Homebrew Talk:
This site may earn a commission from merchant affiliate
links, including eBay, Amazon, and others.
- Status
- Not open for further replies.
I´m looking to power my arduino from 220(relay power input). I currently have my MC on wifi and want to cut the need for a USB connection. Anyone here with a great solution to share?
Use one of these.
It works from 110-240VAC.
I use the same thing (sans the plastic casing and hard-wired) inside my Bluetooth and Wifi BrewPi "minions"...
Cheers!
Last edited by a moderator:
CadiBrewer
Well-Known Member
Mikmonken
Well-Known Member
- Joined
- Mar 28, 2013
- Messages
- 423
- Reaction score
- 101
Here are the LCD related lines from the style.css file in the instance of brewpi that I am trying to embed the LCD from. Any idea which of these lines would need to be changed to add the black background?
View attachment 391757
just under LCDDisplay, the obvious one i think you can change is margin, if you change it from 5 to 0px it should remove it completely i think.
Although it could be the gradient filling the box in which case try adjust the 2% #000000 to a higher value, maybe 100% (you will only need to change for the browser youre using)
CadiBrewer
Well-Known Member
Thanks for the help. Neither of those did it. I'll fiddle with it in earnest tonight and see what else I can find.
Use one of these.
It works from 110-240VAC.
I use the same thing (sans the plastic casing and hard-wired) inside my Bluetooth and Wifi BrewPi "minions"...
Cheers!
How exactly do you pop the casing off of those? I was wanting to do this recently myself.
Last edited by a moderator:

$44.99
$49.95
Craft A Brew - Mead Making Kit – Reusable Make Your Own Mead Kit – Yields 1 Gallon of Mead
Craft a Brew

$10.99 ($31.16 / Ounce)
Hornindal Kveik Yeast for Homebrewing - Mead, Cider, Wine, Beer - 10g Packet - Saccharomyces Cerevisiae - Sold by Shadowhive.com
Shadowhive

$28.98
Five Star - 6022b_ - Star San - 32 Ounce - High Foaming Sanitizer
Great Fermentations of Indiana

$22.00 ($623.23 / Ounce)
AMZLMPKNTW Ball Lock Sample Faucet 30cm Reinforced Silicone Hose Secondary Fermentation Homebrew Kegging joyful
无为中南商贸有限公司

$20.94
$29.99
The Brew Your Own Big Book of Clone Recipes: Featuring 300 Homebrew Recipes from Your Favorite Breweries
Amazon.com

$58.16
HUIZHUGS Brewing Equipment Keg Ball Lock Faucet 30cm Reinforced Silicone Hose Secondary Fermentation Homebrew Kegging Brewing Equipment
xiangshuizhenzhanglingfengshop

$76.92 ($2,179.04 / Ounce)
Brewing accessories 1.5" Tri Clamp to Ball Lock Post Liquid Gas Homebrew Kegging Fermentation Parts Brewer Hardware SUS304 Brewing accessories(Gas Hose Barb)
chuhanhandianzishangwu

$53.24
1pc Hose Barb/MFL 1.5" Tri Clamp to Ball Lock Post Liquid Gas Homebrew Kegging Fermentation Parts Brewer Hardware SUS304(Liquid Hose Barb)
yunchengshiyanhuqucuichendianzishangwuyouxiangongsi

$53.24
1pc Hose Barb/MFL 1.5" Tri Clamp to Ball Lock Post Liquid Gas Homebrew Kegging Fermentation Parts Brewer Hardware SUS304(Liquid Hose Barb)
Guangshui Weilu You Trading Co., Ltd

$33.99 ($17.00 / Count)
$41.99 ($21.00 / Count)
2 Pack 1 Gallon Large Fermentation Jars with 3 Airlocks and 2 SCREW Lids(100% Airtight Heavy Duty Lid w Silicone) - Wide Mouth Glass Jars w Scale Mark - Pickle Jars for Sauerkraut, Sourdough Starter
Qianfenie Direct

$159.50 ($26.58 / Count)
3M High Flow Series System BREW120-MS, 5616001, For Brewed Coffee and Hot Tea, Valve-in-Head Design
Amazon.com

$7.79 ($7.79 / Count)
Craft A Brew - LalBrew Voss™ - Kveik Ale Yeast - For Craft Lagers - Ingredients for Home Brewing - Beer Making Supplies - (1 Pack)
Craft a Brew

$176.97
1pc Commercial Keg Manifold 2" Tri Clamp,Ball Lock Tapping Head,Pressure Gauge/Adjustable PRV for Kegging,Fermentation Control
hanhanbaihuoxiaoshoudian

$719.00
$799.00
EdgeStar KC2000TWIN Full Size Dual Tap Kegerator & Draft Beer Dispenser - Black
Amazon.com

$479.00
$559.00
EdgeStar KC1000SS Craft Brew Kegerator for 1/6 Barrel and Cornelius Kegs
Amazon.com
There's a single screw at one end and a tab/slot thing at the other.
Pull the screw and the two pieces of the case can be removed.
The line cord strain relief is captured between the two case sections so once the case is removed the cord comes free...
Cheers!
Pull the screw and the two pieces of the case can be removed.
The line cord strain relief is captured between the two case sections so once the case is removed the cord comes free...
Cheers!
If it were me, I'd change every one of those #000000 instances to #FFFFFF and see what happens. It looks like each line is made to handle the peculiarities of different browsers.Thanks for the help. Neither of those did it. I'll fiddle with it in earnest tonight and see what else I can find.
My brewpi has been running fine for the last year or so. Recent accessed brewpi remotely only to find I could not view the control panel. Had to hard reset my pi.
I now get this, where it hangs indefinitely,
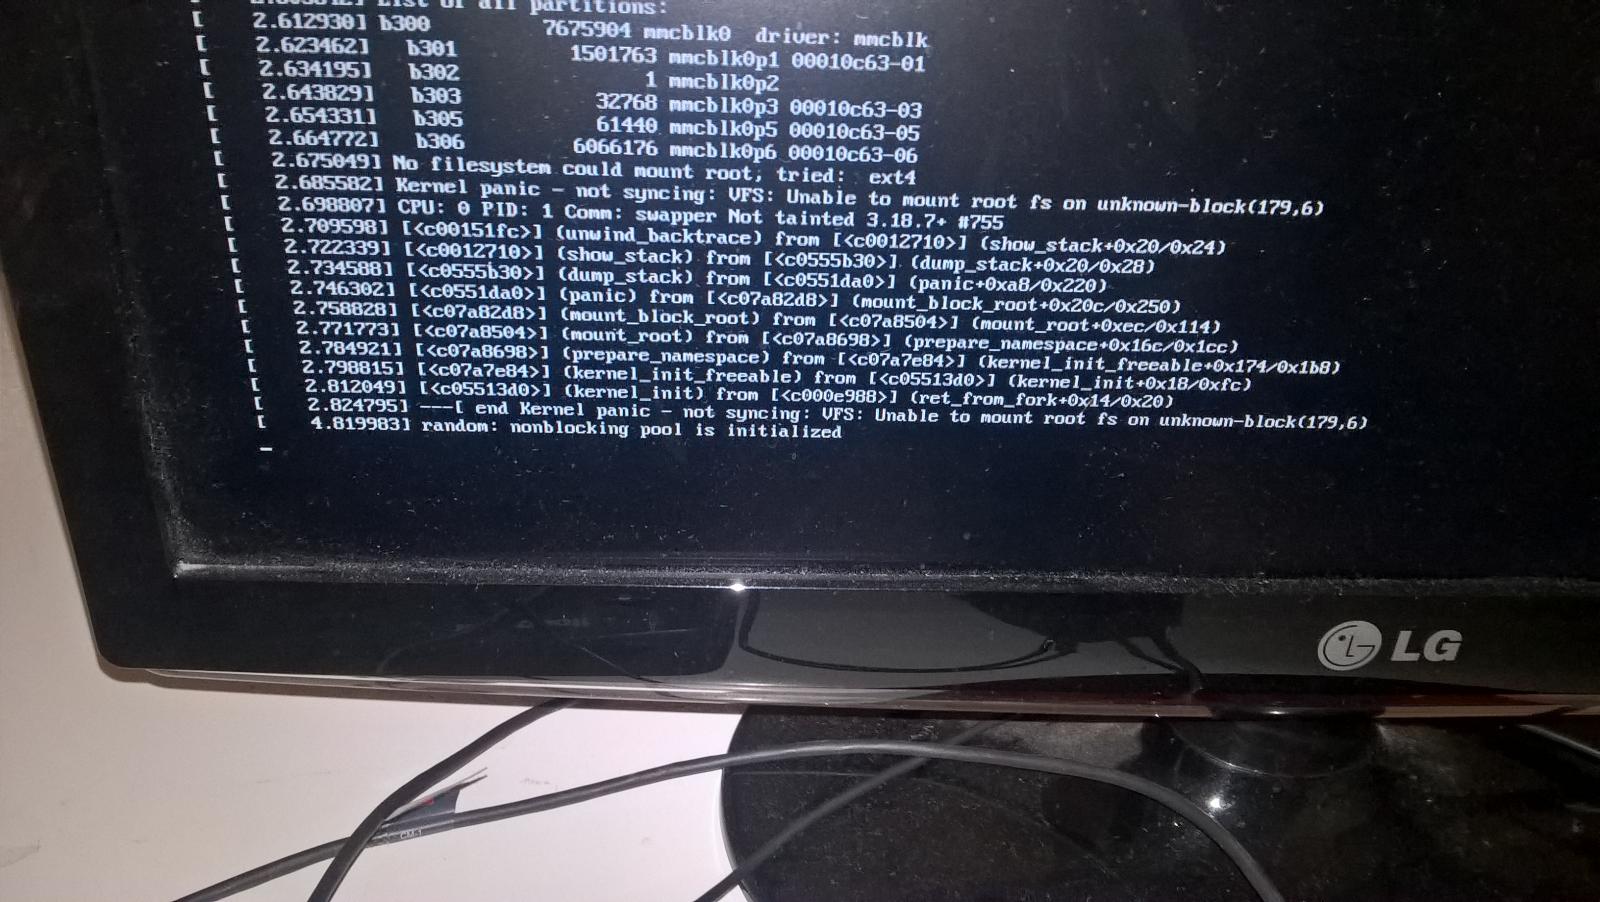
I now get this, where it hangs indefinitely,

There's a single screw at one end and a tab/slot thing at the other.
Pull the screw and the two pieces of the case can be removed.
The line cord strain relief is captured between the two case sections so once the case is removed the cord comes free...
Cheers!
Mine, while shaped like yours, have no screws. Here comes the chisel and hammer.
CadiBrewer
Well-Known Member
Mine, while shaped like yours, have no screws. Here comes the chisel and hammer.
That was the case for mine as well. Just be careful because the two wires connected to the outlet plugs are very precariously soldered on the board. Ask me how I know.
Also, if you decide to shorten the lead that plugs into the Uno, check the polarity before you plug it in. Ask me how I know that one, too.
CadiBrewer
Well-Known Member
My brewpi has been running fine for the last year or so. Recent accessed brewpi remotely only to find I could not view the control panel. Had to hard reset my pi.
I now get this, where it hangs indefinitely,
I had that same thing about a month ago. You have a borked SD card. Time to find out if your back up process is solid...
If it's the SD card I probably won't bother keeping my brewpi as its something that is likely to reoccurre. SD cards are one highly unstable.
I will probably go with a programmable on/off stat and a data logger.
I will probably go with a programmable on/off stat and a data logger.
CadiBrewer
Well-Known Member
I should have been a bit clearer. My SD card was fine, it was just the files that were corrupted. The Pi doesn't like having the power cut without properly shutting down. Just reformat the card and restore from a backup. It shouldn't take more than the amount of time to write an SD card image from your computer. Easy peasy.
Here are the LCD related lines from the style.css file in the instance of brewpi that I am trying to embed the LCD from. Any idea which of these lines would need to be changed to add the black background?
View attachment 391757
I'll prefece this that I'm a php/css/webdev noob. Your post actually inspired me to look into this. Make sure you have the the embedded LCD code in R-Pints .php pointing towards the correct .css file. I would also cut down on a lot of the cruft (background gradient, boarder) for something simpler / cleaner looking.
This is the code thats embedded into my RaspberryPints.php, just above </div> <!-- End Header Bar -->
Note I had my stylesheet in "/rp/style.css" as this file sits in my parent directory. I also changed my refreshLcd time to 10000ms due to my system shooting me an error every once in a while when refreshing @ 5000 ms (default)
EDIT: after some quick googling - the intermitted disconnect / not connected to LCD is due to a Safari bug. 10000 ms seems to help in iOS.
https://community.brewpi.com/t/communication-between-browser-and-pi-fails-intermittently-on-safari/601
<!-- Wes -->
<html>
<head>
<title>BrewPi LCD</title>
<link type="text/css" href="/rp/style.css" rel="stylesheet"/>
<script type="text/javascript" src="js/jquery-1.11.0.min.js"></script>
</head>
<body>
<div id="lcd" class="lcddisplay"><span class="lcd-text">
<span class="lcd-line" id="lcd-line-0">Live LCD waiting</span>
<span class="lcd-line" id="lcd-line-1">for update from</span>
<span class="lcd-line" id="lcd-line-2">script...</span>
<span class="lcd-line" id="lcd-line-3"></span>
</div>
<script type="text/javascript">
function refreshLcd(){
"use strict";
$.post('socketmessage.php', {messageType: "lcd", message: ""},
function(lcdText){
var $lcdText = $('#lcd .lcd-text');
for (var i = lcdText.length - 1; i >= 0; i--) {
$lcdText.find('#lcd-line-' + i).html(lcdText);
}
}, "json")
.fail(function() {
var $lcdText = $('#lcd .lcd-text');
$lcdText.find('#lcd-line-0').html("Cannot receive");
$lcdText.find('#lcd-line-1').html("LCD text from");
$lcdText.find('#lcd-line-2').html("Python script");
$lcdText.find('#lcd-line-3').html(" ");
}).always(function() {
window.setTimeout(refreshLcd,10000);
}
);
}
$(document).ready(function(){
"use strict";
refreshLcd();
});
</script>
</body>
</html>
<!-- Wes -->
Appended to the end of my R-Pints style.css is the following, I truncated the width and height due to the entire header being too wide on my iPad -- to make the box bigger change "width: 220px; height: 90px" under .lcddisplay; to change the font size change "font-size: 16px;" under .lcd-line
}
.lcddisplay {
width: 220px;
height: 90px;
float: left;
margin: 1px;
background: #000000; /* Old browsers */
}
.lcddisplay .lcd-text{
float:left;
margin: 1px 1px;
}
.lcd-line{
float:left;
clear:left;
font-size: 16px;
font-weight: normal;
font-style: normal;
font-family: '5x8LCDHD44780UA02Regular', monospace;
color: #FFFF00;
white-space: pre;
}
My current r-pints, displayed on an old iPad mounted to my keezer:

CadiBrewer
Well-Known Member
I'll prefece this that I'm a php/css/webdev noob. Your post actually inspired me to look into this. Make sure you have the the embedded LCD code in R-Pints .php pointing towards the correct .css file. I would also cut down on a lot of the cruft (background gradient, boarder) for something simpler / cleaner looking.
This is the code thats embedded into my RaspberryPints.php, just above </div> <!-- End Header Bar -->
Note I had my stylesheet in "/rp/style.css" as this file sits in my parent directory. I also changed my refreshLcd time to 10000ms due to my system shooting me an error every once in a while when refreshing @ 5000 ms (default)
Appended to the end of my R-Pints style.css is the following, I truncated the width and height due to the entire header being too wide on my iPad -- to make the box bigger change "width: 220px; height: 90px" under .lcddisplay; to change the font size change "font-size: 16px;" under .lcd-line
My current r-pints, displayed on an old iPad mounted to my keezer:

Awesome! I'll try your edits when I get a chance. Your taplist shows exactly what I'm going for. I'm trying to hide the BrewPi box under my keezer and with the lcd displayed on the taplist, I can still monitor the BrewPi without having to open up a different window on my monitor.
My brewpi has been running fine for the last year or so. Recent accessed brewpi remotely only to find I could not view the control panel. Had to hard reset my pi.
I now get this, where it hangs indefinitely,
I'm willing to bet your reset procedure involved pulling the power and plugging it back in, which will inevitably corrupt the SD card. As @CadiBrewer mentioned, a proper shutdown command should always be used.
I'm willing to bet your reset procedure involved pulling the power and plugging it back in, which will inevitably corrupt the SD card. As @CadiBrewer mentioned, a proper shutdown command should always be used.
Yeah I get that. But I only have done this once and that was in response to brewpi hanging.
I can't recall the countless times I have hard reset windows over the years. never have I had a file system failure.
A Windows OS running on a HDD is a far cry from Raspbian running on an SD card. I'm guilty of hard resets on both systems. Sometimes it is unavoidable. But, as you've found out with the Pi, once is all it takes.
A corrupted SD card is one of the reasons I moved my BrewPi server over to an old laptop running Debian Wheezy.
A corrupted SD card is one of the reasons I moved my BrewPi server over to an old laptop running Debian Wheezy.
thyirishmen
Well-Known Member
To run the backup sd script. Do you just put the script on the pi. Run the script and have a Sd in a USB reader attached to the pi?
TheFlangerBeer
Active Member
- Joined
- Feb 18, 2017
- Messages
- 39
- Reaction score
- 18
Hy guys.
I have a refrigerator combi model "Teka NF 350 with a single compressor.
The only thing missing me to have the brewpi functioning (level hacking of the refrigerator 3 :rockin is to bypass or override the thermostat.
Can someone tell me what to do?
Attached some technical drawings of the refrigerator and photos.
My knowledge of electricity and electronics are almost nil ... but I dare with everything . I followed Elco's hacking tutorial on brewpi.com.
I just hope that does not exploit all to connect to electricity
(Please, I do not know if it's off topic in this forum, if so I ask moderators move where applicable).
Thank you!
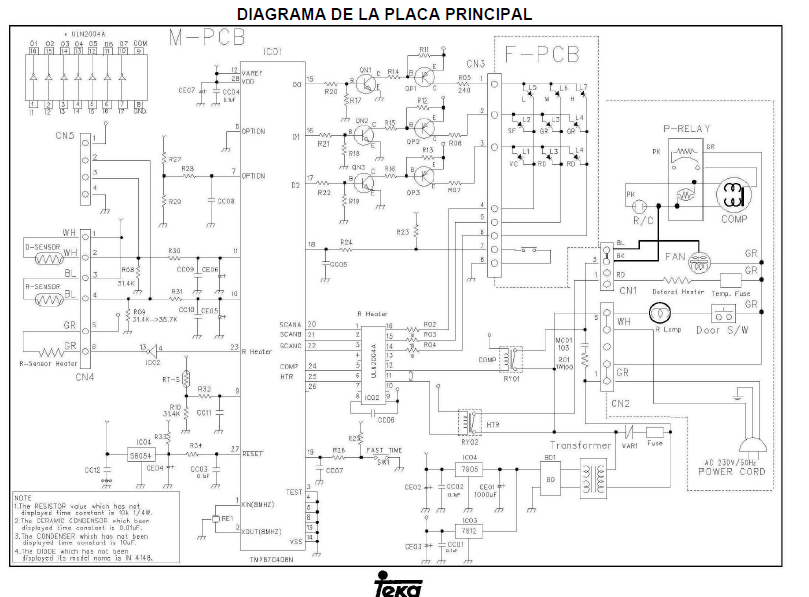
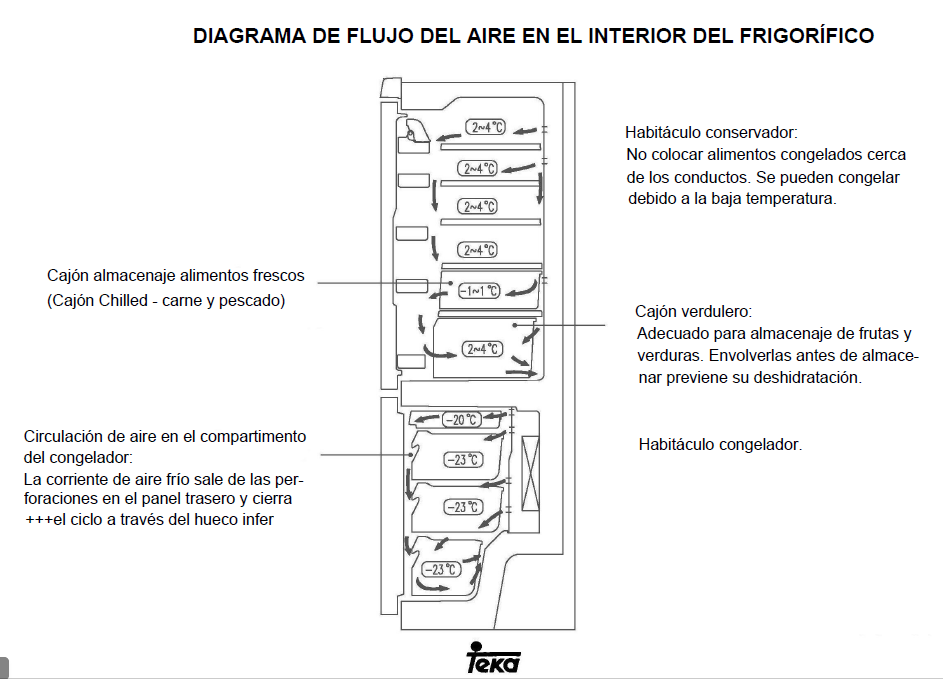
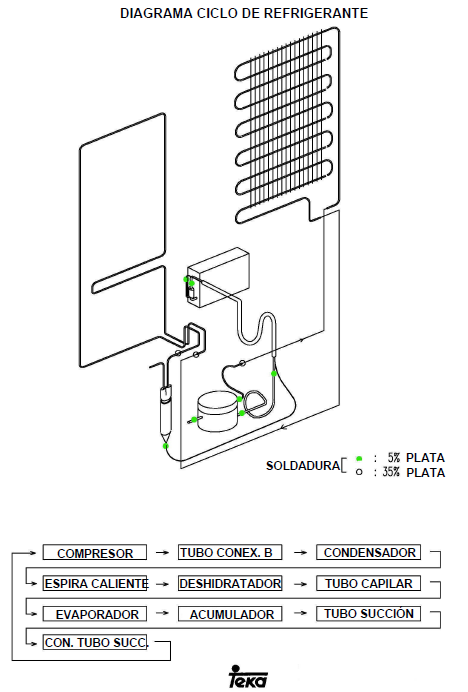

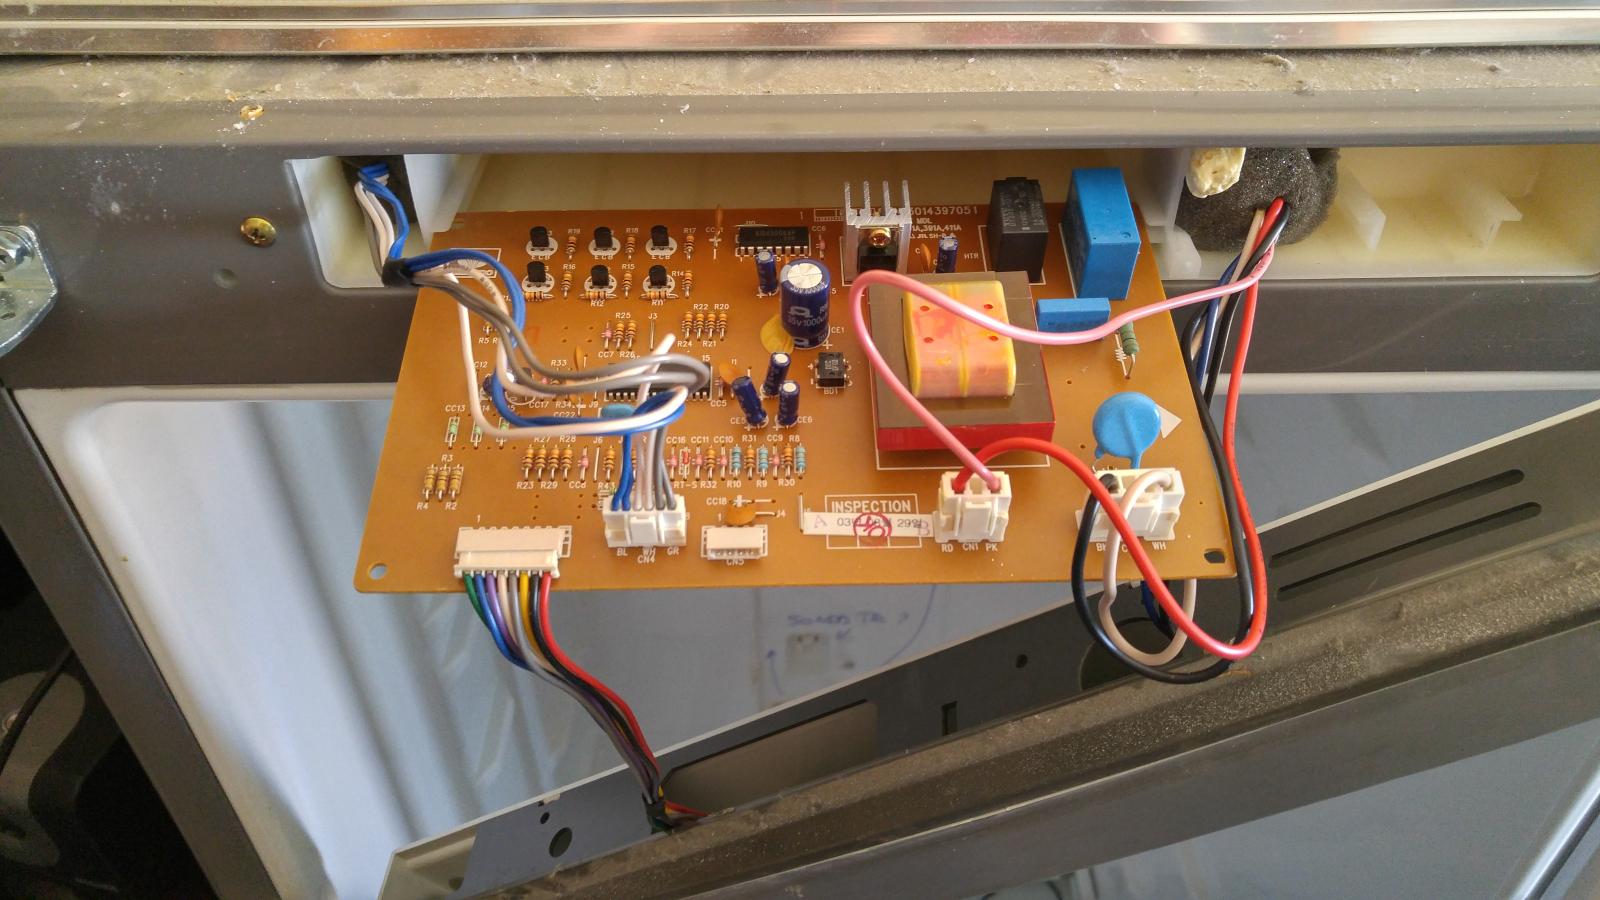
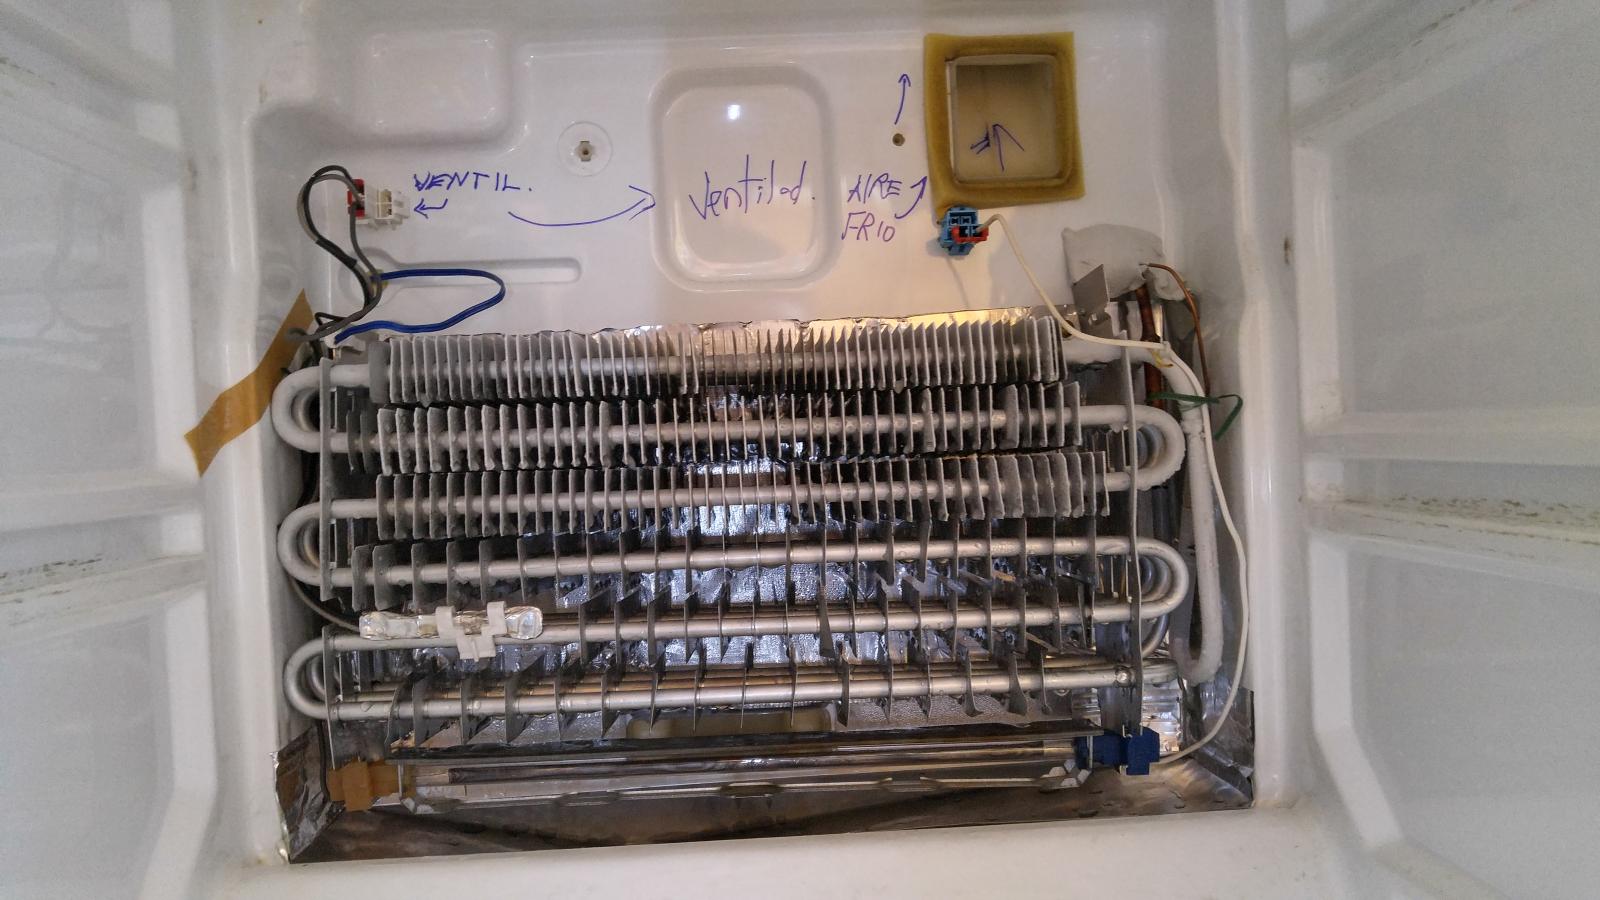
I have a refrigerator combi model "Teka NF 350 with a single compressor.
The only thing missing me to have the brewpi functioning (level hacking of the refrigerator 3 :rockin
Can someone tell me what to do?
Attached some technical drawings of the refrigerator and photos.
My knowledge of electricity and electronics are almost nil ... but I dare with everything
I just hope that does not exploit all to connect to electricity
(Please, I do not know if it's off topic in this forum, if so I ask moderators move where applicable).
Thank you!


To run the backup sd script. Do you just put the script on the pi. Run the script and have a Sd in a USB reader attached to the pi?
Yup, that's all there is to it. Totally automagic...
Cheers!
JDL
Well-Known Member
Hello Everyone,
I know I am late the brewpi party but am about to place my order and will be following the Wiki. Wanted to at least throw the items up here and maybe some glaring error can quickly be found which will save me a headache in the future.
I have wired up a control box with an SSR to power a 110v e-kettle before but that is the extent of my electrical experience.
I will be using a mini fridge and a ssbrewtech brewmaster brewbucket that has the thermowell already in it. I will be using 100AMPs wiring diagram included in the Wiki to wire everything.
I have read through about half of this thread and took notes so below is what I am ordering.
1- Arduino Uno board from Amazon
2- Raspberry Pi 3
3- SainSmart 2 Channel Relay Module
4- 4.7k Ohm Resistors (pack of 25 from amazon)
5- Cal-Hawk Wire Connectors (from amazon)
6- Lasko Personal Heater
7- Leviton Power Outlet from Home Depot
8- Power Cord – I have from an old PC
9- Extra SD Card to do a backup on it as corruption seems like a guarantee while setting it up.
10- SD Card Reader
First question is temperature sensors, can someone link to a good site to get them as I keep reading that there are issues with them being made different now and want to ensure I get the right ones.
Second Question: I want to not have to Solder and was hoping someone could show me what additional parts are needed to use connector wires instead.
Thanks in advance,
Jeff
thestraw0039
Active Member
https://www.amazon.com/gp/product/B01LZF1ZSZ/?tag=skimlinks_replacement-20
That's what I used, worked well. You have to buy way more than you'll ever need but I didn't have to do any soldering.
That's what I used, worked well. You have to buy way more than you'll ever need but I didn't have to do any soldering.
Last edited by a moderator:
thestraw0039
Active Member
I also bought these in January and they are working fine as well. https://www.amazon.com/gp/product/B00CHEZ250/?tag=skimlinks_replacement-20
Last edited by a moderator:
Hey all,
Thanks for all of the help getting this set up to make it a pretty easy process for me. I did notice a couple of things as i put it together and wanted to add my 2 cents where applicable.
First off the "Publicly accessible BrewPi" code linked in the first post appears to need some updating. I found that it would never actually display any graphs or fill out the LCD display. so I dug in and updated the code provided by FuzzeWuzze. See below:
- Goto /var/www
sudo mv index.php admin.php- Create a file with vi or nano called index.php and add the contents of the code block below (Mostly fixes in the Javascript section of the file)
[/LIST]
I just installed brewpi and am trying to start a publicly accessilble brewpi, but I am having trouble with step one. The only files in /var/www is an html folder and do_not_run_brewpi. There is a index.php file in the html folder but I did not find an admin.php file.
any suggestions. Thanks dan
CadiBrewer
Well-Known Member
Newer versions of the raspberry pi operating system install the files in /var/www/html. Use that location in your command.
- Status
- Not open for further replies.
Similar threads
- Replies
- 10
- Views
- 2K
- Replies
- 3
- Views
- 2K


![Craft A Brew - Safale BE-256 Yeast - Fermentis - Belgian Ale Dry Yeast - For Belgian & Strong Ales - Ingredients for Home Brewing - Beer Making Supplies - [3 Pack]](https://m.media-amazon.com/images/I/51bcKEwQmWL._SL500_.jpg)


