HOWTO - Make a BrewPi Fermentation Controller For Cheap

Homebrew Talk - Beer, Wine, Mead, & Cider Brewing Discussion Forum

Help Support Homebrew Talk - Beer, Wine, Mead, & Cider Brewing Discussion Forum:

This site may earn a commission from merchant affiliate links, including eBay, Amazon, and others.
Status
Not open for further replies.
Fuzzewuzze thank you for giving me the info about the wiring I will promptly go home and fix that and I just ordered those exact sensors so I'm hoping those work. I'm really hoping those fix the issue. Did they come with Chinese writing about the wiring? Also all I should need to do is just connect 2 sensors to the terminal block correct?
 
These are the sensors I bought on Amazon. Work perfect and both tested exact in ice bath. No issues with wiring up. They are 3M too nice and long

DROK® DS18B20 Temperature Sensor Digital Temp Probe Waterproof Thermal Cable Stainless Steel Probe 3 Meter Thermometer Gauge Thermistor Detector Sensor Indoor Outdoor Lab Car Usage https://www.amazon.com/dp/B00KLZQ0P8/?tag=skimlinks_replacement-20
 
Last edited by a moderator:
So I just went through the install on a clean RPi 3 with the latest Jessie a couple times and believe it can be distilled down pretty simply[...]

All of my RPi's are running Wheezy, but inevitably there will come a time where upgrading to Jessie is going to happen.
So I'm building another RPi2 system using Jesse and will slowly get everything running that I have on my other systems.
When I'm done hopefully all my systems can share a single (Jessie) image like they do now (with Wheezy).

My systems all support multiple BrewPi instances so that's in the playbook for this build.
I decided to use the auto-magic installation process this time around and see if it handles multiple-instances on its own.

I followed your outline, pointed the installer to use /home/brewpi/brewpi1 and /var/www/brewpi1 for the root folders, and it almost worked perfectly.

The process completed without any obvious issues, but when I tried to fire up BrewPi it couldn't start the script, and wouldn't talk to the UNO.
The log panels showed :
"Cannot open log file /home/brewpi/brewpi1/logs/stderr.txt"
"Cannot open log file /home/brewpi/brewpi1/logs/stdout.txt"

So going through the normal debug process led me to the fly in the ointment:

The installer runs $SCRIPTPATH/utils/updateCron.sh which is supposed to create a cron task at /etc/cron.d/brewpi with the correct setting for SCRIPTPATH.
In my case, SCRIPTPATH should have been set to /home/brewpi/brewpi1, but instead it was set to /home/brewpi.

And as one could imagine, that broke a hella lot of code :D

A quick edit and restart of the Cron manager and everything sprung to life!

So, the positive news is the BrewPi installer and updater can be used with a multi-instance configuration, you just have to remember to check/fix the cron file(s) for a freshly installed instance (and possibly an updated instance - I'll have to check that when I get a chance).

That said, from a practical viewpoint, it's likely quicker to just clone the two root folders for each added instance than to rerun the installer multiple times...

Cheers!

ps: If there is ANY redeeming quality to Jessie, it's the SD Card Copier program included in the LXDE desktop.
It's sooo much easier to live-clone a working card before plunging onward during the build - so if you fat-finger something and need to retreat it's easy peasy...

pps: otoh, LXDE includes a Bluetooth Manager panel that works - except that the underlying Services support sucks.
I can link an HC-05 - but the host doesn't support Serial service.
<Sigh>
Later today (!) I'll install bluez-utils and all the rest of the Blue Tooth stuff I used under Wheezy and see what happens...
 
I followed your outline, pointed the installer to use /home/brewpi/brewpi1 and /var/www/brewpi1 for the root folders, and it almost worked perfectly.
I'm glad to hear your report. I was going to try the multi-home setup and that's what got me to trying different things for the installation. I figured if I was going to screw it up I needed to be able to get good at installing it.

Seems to me that an installer should let you install anywhere correctly, especially if it gives you a choice. That being the case I'd see the scriptpath thing as a bug.
 
A long time lurker, seldom poster, here.

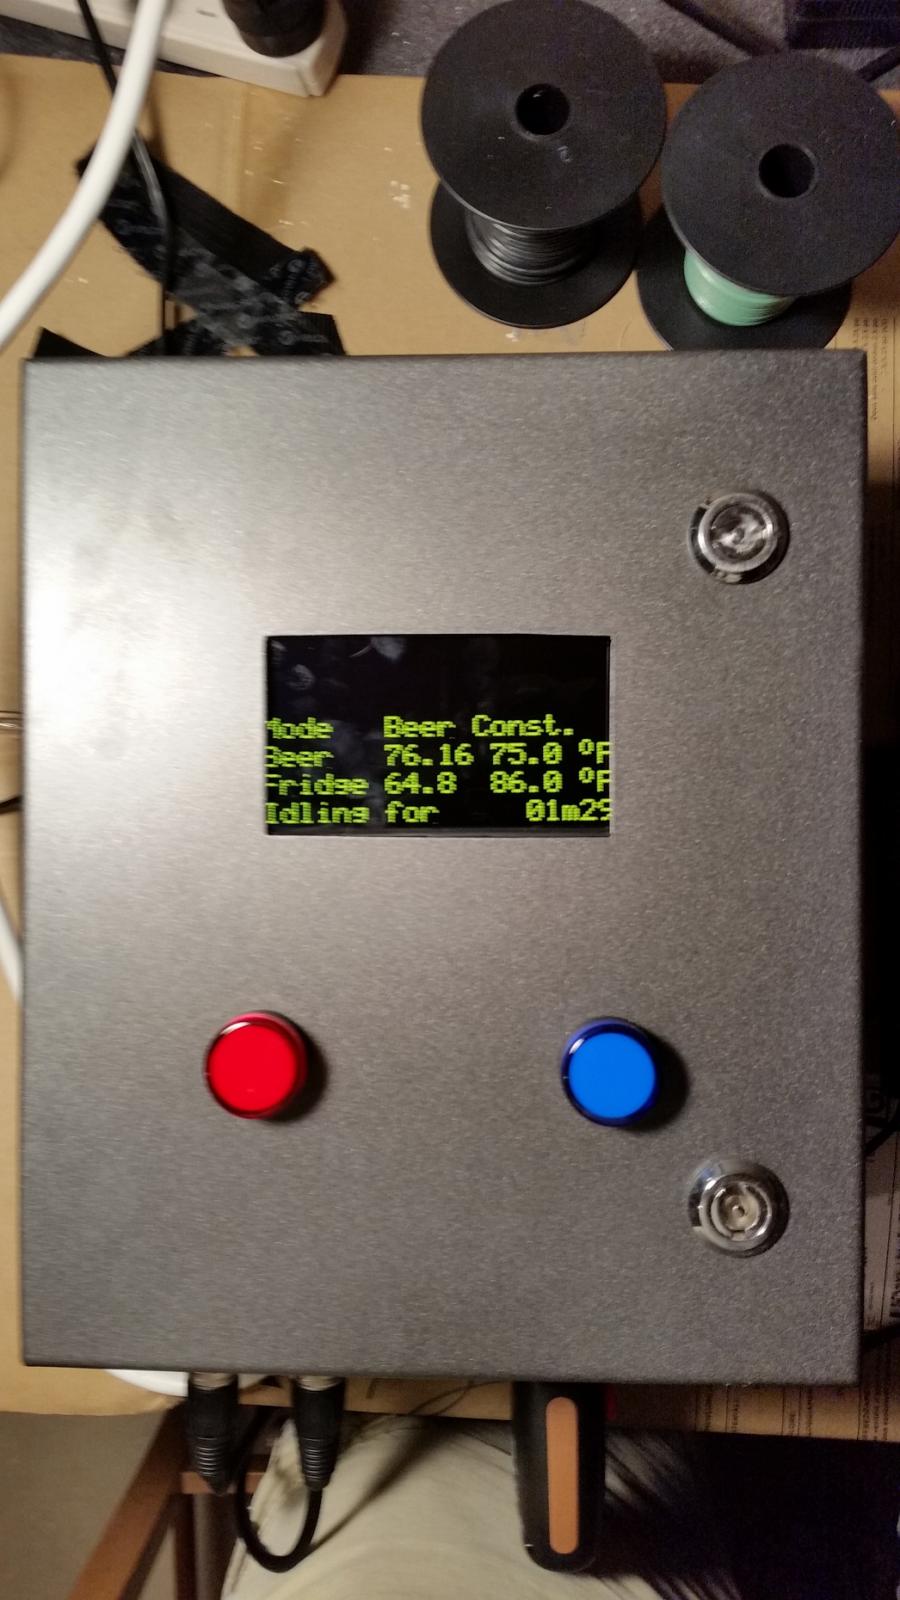
First of all, I want to thank everyone who's participated in making this thread (and forum) a success. With all the helpful hints, workarounds, suggestions and forum commitment, I was able to successfully build my own BrewPi using many of the suggestions and ideas mentioned throughout this enormous thread.

I've posted some pics to maybe contribute and help others who are contemplating on taking on this endeavor.

Like many, I had no prior electrical experience and feared if I could do this or not. Let me say, yes you can! It took me about 6 months from researching, planning, purchasing, designing, installing, wiring and configuring, but in the end it was well worth it. Life (and what it throws at you) was the reason it took me so long to complete, but I finished it (for a Pilsner that I wanted to do) and proud of it.

So will you. I hope this helps somebody with their build.

Thank all of you for your contributions. Keep it up!

D.

20160614_195756.jpg


20160614_150802.jpg


20160614_150743.jpg
 
A long time lurker, seldom poster, here.

First of all, I want to thank everyone who's participated in making this thread (and forum) a success. With all the helpful hints, workarounds, suggestions and forum commitment, I was able to successfully build my own BrewPi using many of the suggestions and ideas mentioned throughout this enormous thread.

I've posted some pics to maybe contribute and help others who are contemplating on taking on this endeavor.

Like many, I had no prior electrical experience and feared if I could do this or not. Let me say, yes you can! It took me about 6 months from researching, planning, purchasing, designing, installing, wiring and configuring, but in the end it was well worth it. Life (and what it throws at you) was the reason it took me so long to complete, but I finished it (for a Pilsner that I wanted to do) and proud of it.

So will you. I hope this helps somebody with their build.

Thank all of you for your contributions. Keep it up!

D.

Awesome build! Do you have a picture of the inside of the door showing how you attached the LCD screen and the wiring?
 
I'm thinking he might have an old cell phone as the display.
I can't see any wiring to the Uno - or the 'Pi for that matter - for a display...

Cheers!
 
I wish mine were 2M long. I will have to get some

You can just extend the wires. Solder three wires onto the end of the wire from the probe and it can be as long as you like.

My cables are terminated with RJ11 plugs, so I can use telephone extensions. Plug and play!
 
Thank you all for the help it turns out it was 3 out of my 4 sensors were bad and when the new 3 meter ones came I hooked two up and boom working like a boss thank you everyone for the info and help!
 
One last little question my sensors are too big to fit in my thermowell I was thinking of cutting the shrink wrap off the stainless steel and the wiring and adding something to the inside of the stainless piece because I get condensation in my thermowell and has shorted previous sensors. Any thoughts
 
One last little question my sensors are too big to fit in my thermowell I was thinking of cutting the shrink wrap off the stainless steel and the wiring and adding something to the inside of the stainless piece because I get condensation in my thermowell and has shorted previous sensors. Any thoughts

If you cut off the heatshrink it will make the diameter fractionally smaller, which might be enough. The sensor is protected inside the stainless steel end by some white goop, so you might not need to add anything.

Putting heatshrink back on again is also easy if you change your mind.
 
So I have 2 chambers and to instances of BrewPi running. Unfortunately one of my arduino's has given up the ghost. I have a new arduino to replace it. If I just do this part of the process will the rest still work as before or will I need to start all over?

Multiple Arduino BrewPi Installation (2 USB, 1 Serial)

1.1.1. Determine the USB hub port identifiers
With only one Arduino connected, issue the following command to see which device node the Arduino is currently using:

$ ls /dev/ttyACM*

/dev/ttyACM0

$ udevadm info -a -n /dev/ttyACM0 | less

looking at parent device '/devices/platform/bcm2708_usb/usb1/1-1/1-1.3/1-1.3.4':
KERNELS=="1-1.3.4"

ATTRS{manufacturer}=="Arduino (www.arduino.cc)" (note the section for the Uno)

move Arduino to next USB port and repeat
KERNELS=="1-1.3.3"


1.1.2. Write the udev rules
Now that the identifier for each USB hub port has been obtained, the udev rules can be written.

KERNELS=="1-1.3.4" [Port 1]
KERNELS=="1-1.3.3" [Port 2]
 
That should be just fine. but fwiw we found out its a lot more effective to use the serial identifier if possible that way it doesn't matter what port you plug it into it'll always be the right controller for the right instance.
 
So I am very interested in doing that. I have read the post with the instructions included. Not sure how to go from where I ma to what you have suggested.
 
So it is nothing fancy to look at but I am very pleased with the test trial of water. I can't believe how precise this device controls the temp! I thought when it first started that it would fluctuate around before honing in on the final temp but that is not so. Compensates very well and gets it exactly right. Now to get this moved into our new house in my brew kitchen and full of a new brew! Sorry for the sideways picture

View attachment 1466001641819.jpg
 
So I am very interested in doing that. I have read the post with the instructions included. Not sure how to go from where I ma to what you have suggested.

Just change your 99-arduino.rules using serial numbers instead of ports with whatever symlink names you want to use...

Code:
Set up identifiers for UNOS:

Remove all but one UNO from the USB ports and hubs, then run these commands:

$ udevadm info -a -n /dev/ttyACM0 | less > info.log
$ nano info.log

 looking at parent device '/devices/platform/bcm2708_usb/usb1/1-1/1-1.3/1-1.3.4':
    KERNELS=="1-1.3.4" 
 		ATTRS{manufacturer}=="Arduino (www.arduino.cc)"
 		ATTRS{serial}=="85336303532351F0A031"

Repeat for additional UNOS on the USB ports

Then create the rules files:

$ sudo nano /etc/udev/rules.d/99-arduino.rules

SUBSYSTEM=="tty", KERNEL=="ttyACM*" , ATTRS{serial}=="85336303532351F0A031", SYMLINK+="brewpi1", GROUP="brewpi"
SUBSYSTEM=="tty", KERNEL=="ttyACM*" , ATTRS{serial}=="85334333931351F0F020", SYMLINK+="brewpi2", GROUP="brewpi"

Then reload them...

Code:
$ sudo /etc/init.d/udev reload

...and you should be off and running again...

Cheers!
 
If anyone has gotten an Arduino with an HC-05 working using Jessie, please let me know...how.

Cheers! (Raspian.Org is run by morons)
 
Hi all,
I have finally managed to put together a Brewpi shield for my arduino which I had already flashed using Brewpi previously. My project box is all wrapped up but I don't seem to be able to configure my temperature devices anymore and I am getting a JSON error when I try to refresh the device list from the web server. USB lead should be good so I am stumped. The error I am getting is: "Error while receiving device configuration: SyntaxError: JSON Parse error: Unexpected identifier "Couldn".

Any help massively appreciated - it's worth mentioning that my set up is working (temperature monitoring, relays and LCD screen) but without the web server interaction i am struggling.
 
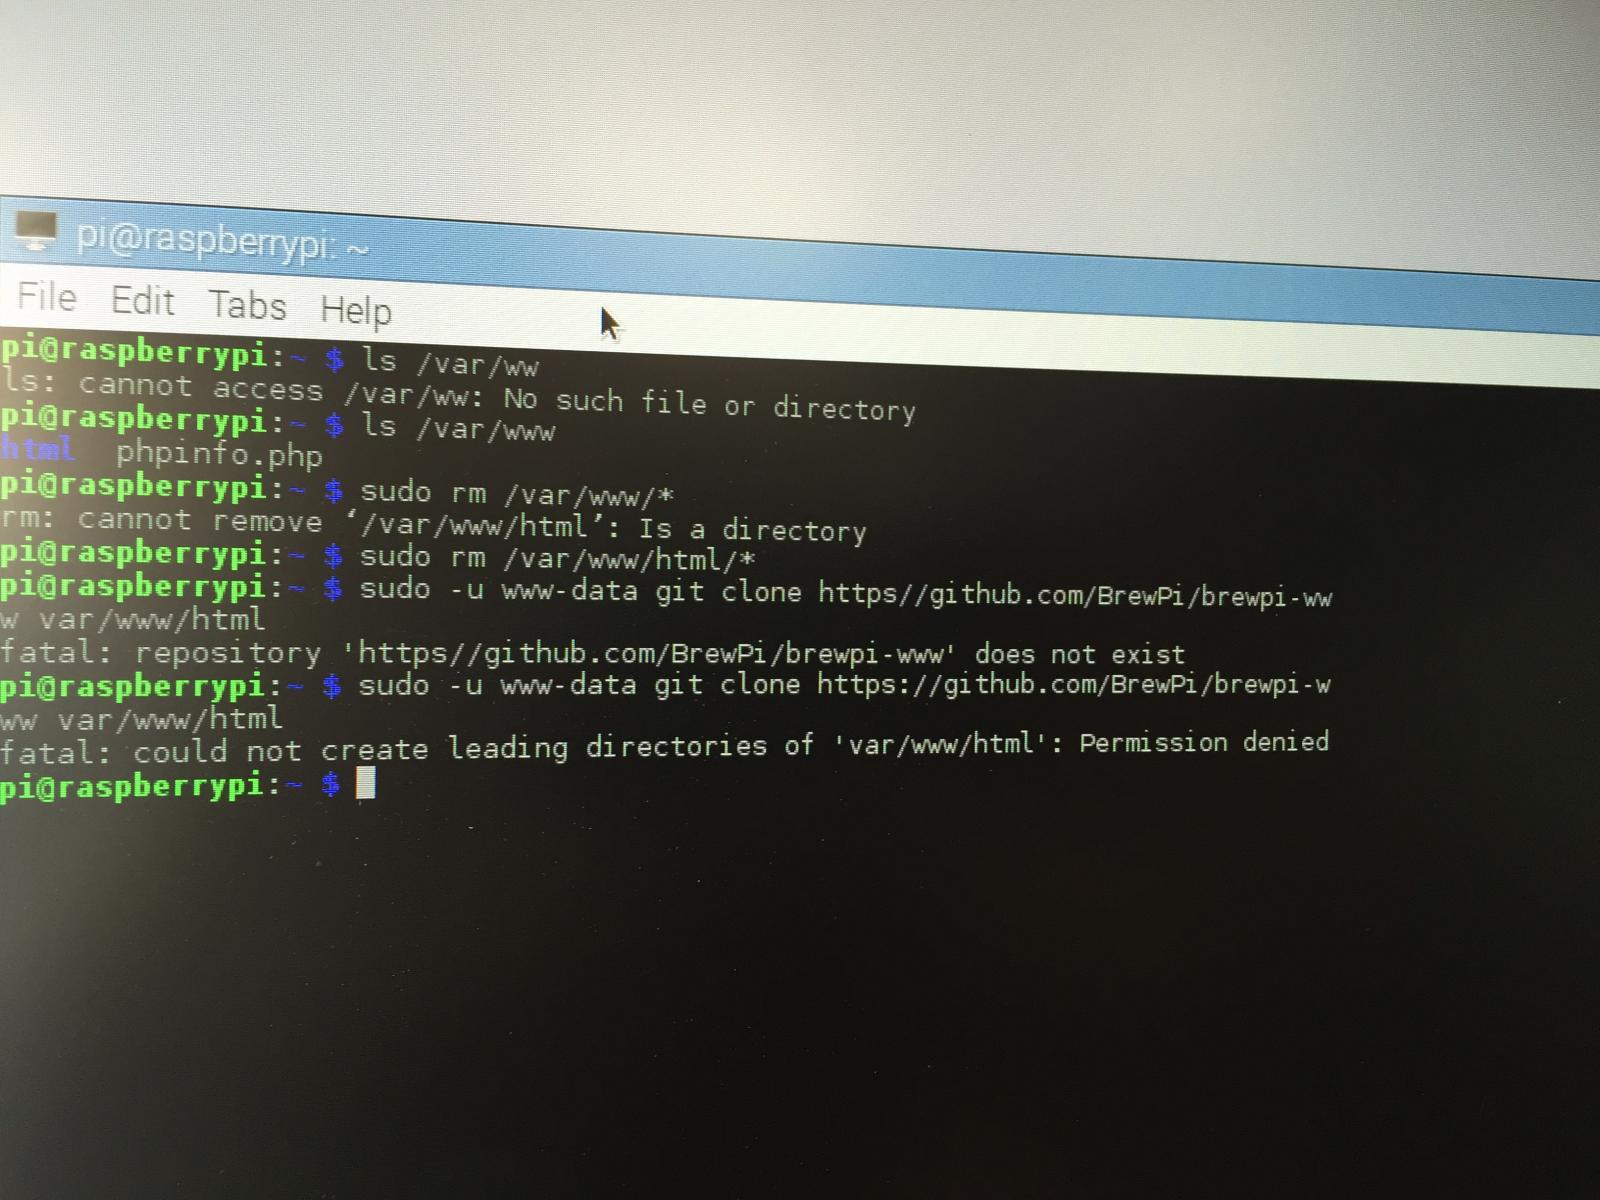
Finally diving into the Brewpi project after being a longtime Johnson A319 kinda guy. Having an issue with Brewpi install on a RPI 3 Model B starting with the latest version of Noobs. Have followed all instructions for initial RPI setup and software/firmware updates but every time I try to do the Brewpi install, either automatic or manual I get the same error. I have attached a photo of the error. Trying to search this thread for something similar but wow its a long one. Anyone ran into this error in the past? Also does the brewpi software still support the SainSmart UNO R3 or do you have to go with the spark version they are selling through their website?

Thanks in advance!

IMG_5780.jpg
 
You don't need to wipe out /var/www - just run the installer and point to /var/www/html (assuming you're installing under the current Raspian "Jessie" release) and you should be good to go.

Alternatively (posted a few back) you can change the Apache2 default web page folder to point to /var/www and install BrewPi there.
Either way, there's no need to wipe out /var/www.

Install the BrewPi Utils package under your /home/pi, and run the automatic installer from there.
It actually does work ;)

Cheers!
 
Are you using the automated instructions I rewrote on the Wiki? The instructions on the OP arent totally right anymore, and after awhile i lost access to edit the page myself. Maybe i should just bug the admins to flip some switch or something to make it editable again so i can clean up the OP.
 
Hey Fuzze, I bet if you copied that OP post, edit is as desired, and send it to a Mod, you could get them to update the post.

The "30-day-editable-lifetime" is a major pita for technical threads like this one...

Cheers!
 
You don't need to wipe out /var/www - just run the installer and point to /var/www/html (assuming you're installing under the current Raspian "Jessie" release) and you should be good to go.

Alternatively (posted a few back) you can change the Apache2 default web page folder to point to /var/www and install BrewPi there.
Either way, there's no need to wipe out /var/www.

Install the BrewPi Utils package under your /home/pi, and run the automatic installer from there.
It actually does work ;)

Cheers!

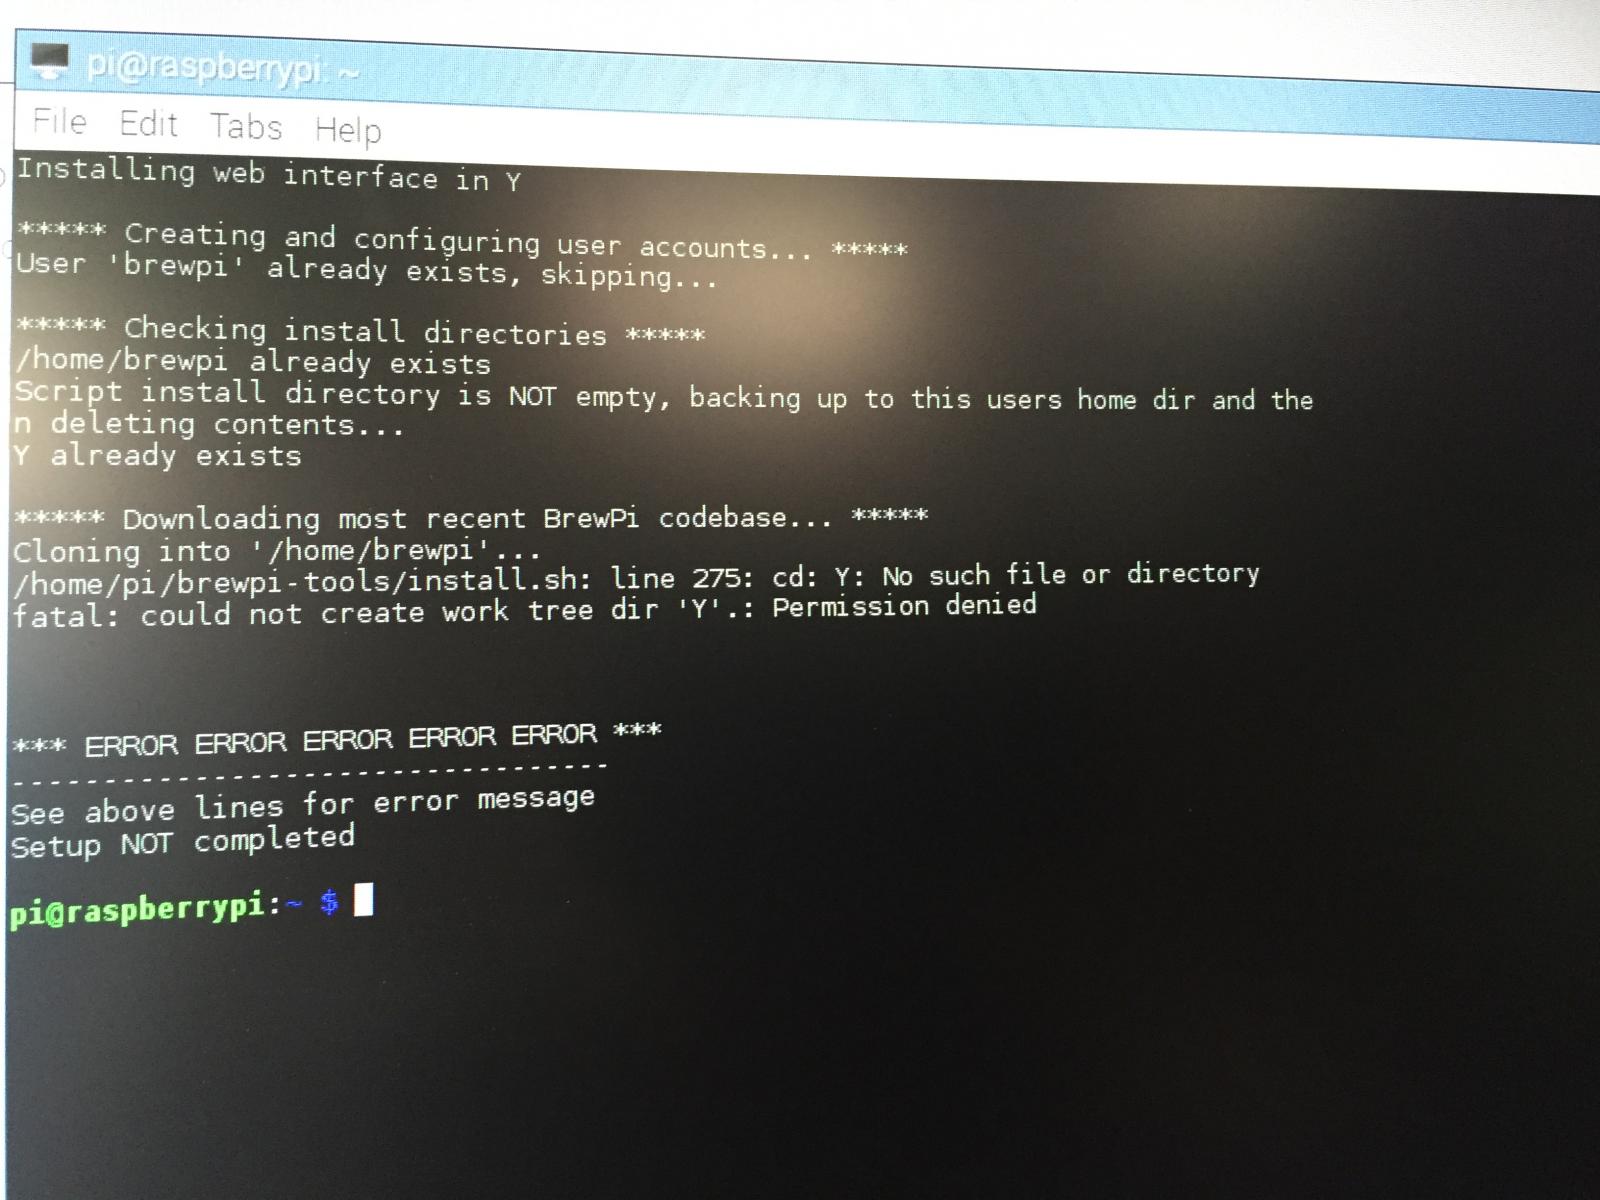
Thanks for help :rocking: I changed the apache documentRoot to /var/www and I still getting an error when I try to install the Brewpi from the automatic installer. I've attached photo of the error. I re-installed brewpi-tools just incase something was funky there and still get the same issue. Brewpi-tools is under /home/pi. Any other ideas?

IMG_5783.jpg
 
You already installed everything, it's complaining because the script folders are already installed from before
 
Thanks for help :rocking: I changed the apache documentRoot to /var/www and I still getting an error when I try to install the Brewpi from the automatic installer. I've attached photo of the error. I re-installed brewpi-tools just incase something was funky there and still get the same issue. Brewpi-tools is under /home/pi. Any other ideas?

The error is saying it cant create a folder named Y, i assume your answering Y to the question where its asking you where you want to install. Its not a yes or no question, its asking you for a path. Just hit enter so that it uses the default in the []'s. In general for the entire install.sh you should press nothing but enter. You may want to answer No to the Wifi question near the end if you dont use Wifi, but other than that the defaults are good.

If your using Wheezy its /var/www, and if your on Jessie or newer its /var/www/html, the install should auto fill that in but when you get to the update.py step later on to choose the legacy branch you may have to manually enter it if it gets it wrong.


I think the Brewpi auto installer has been updated to point to /var/www/html so there's no need to change anything apart from running the legacy update at the end.

I used it the other week to reinstall brewpi on my C.H.I.P that's running Jessie.
 
The error is saying it cant create a folder named Y, i assume your answering Y to the question where its asking you where you want to install. Its not a yes or no question, its asking you for a path. Just hit enter so that it uses the default in the []'s. In general for the entire install.sh you should press nothing but enter. You may want to answer No to the Wifi question near the end if you dont use Wifi, but other than that the defaults are good.

If your using Wheezy its /var/www, and if your on Jessie or newer its /var/www/html, the install should auto fill that in but when you get to the update.py step later on to choose the legacy branch you may have to manually enter it if it gets it wrong.

I think the Brewpi auto installer has been updated to point to /var/www/html so there's no need to change anything apart from running the legacy update at the end.

I used it the other week to reinstall brewpi on my C.H.I.P that's running Jessie.

Thank you all for your help. Started again with a clean install of Noobs V1_9_0 and everything went smoothly. Fuzze I think your exactly right. I think I answered with a Y for install patch... bonehead :) Also Mikmonken you right, the installer has been updated to point to /var/www/html so there was no ned to change that path. Thanks again!!
 
I think the Brewpi auto installer has been updated to point to /var/www/html so there's no need to change anything apart from running the legacy update at the end.

I used it the other week to reinstall brewpi on my C.H.I.P that's running Jessie.

Yes, but i believe the updater.py has not been, so you need to be careful and make sure you enter in the right path..atleast as of a few weeks ago.
 
Thanks to everyone...even that one person who doesn't get along with me. You know who you are! :fro:

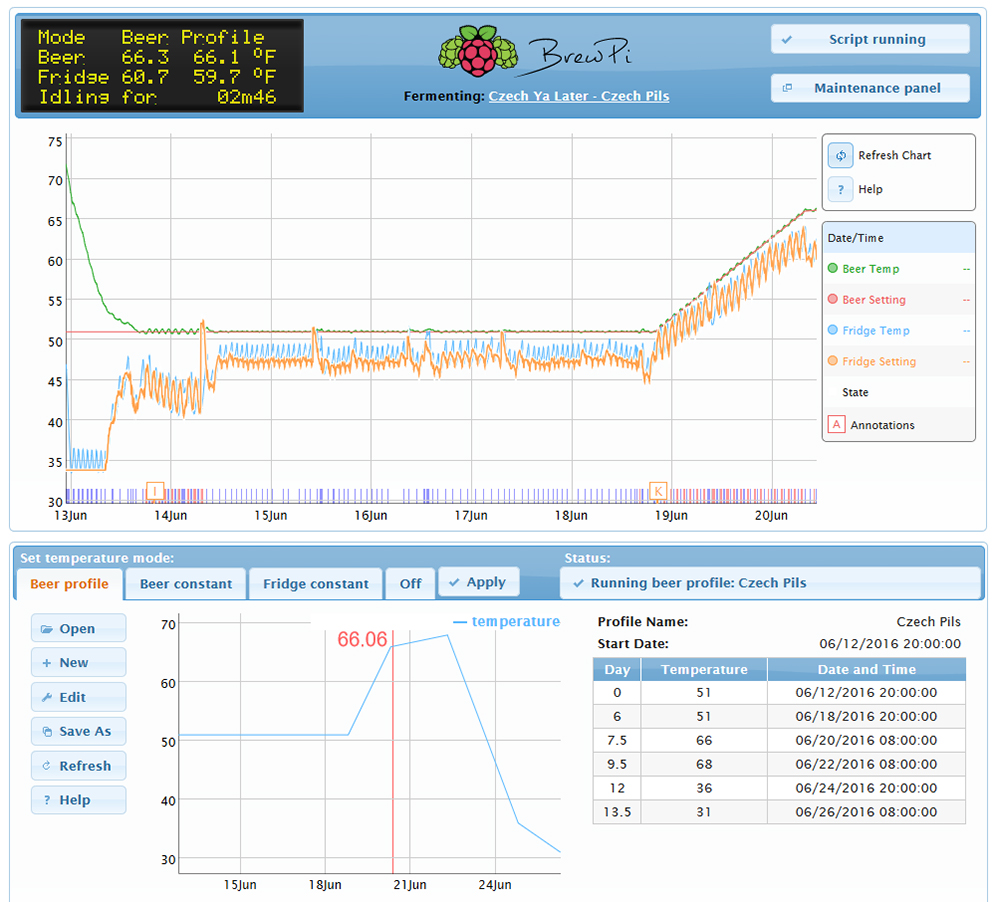
Anyway, I used the BrewPi at first for a saison that was just "in there" already fermented...keeping it cool and testing it. However, I finally brewed my first lager, and I want to say that the BrewPi is BITCHIN'! (Yes...you may date me from that.) I seriously want to thank everyone who helped me along the way.

I've been too busy with work to be on here much, but I wanted to post a pic of the progress. This is for a Czech Pils based on Marshall's Quick Lager method. I tasted the thing when doing a gravity reading for the ramp up, and it was spectacular. When you look at this, you'll notice that once the temp got close to 51*F, it started learning and was +/- 0.5 degrees and then finally got to a rhythmic amplitude of +/- 0.2 degrees which I think is freaking amazing! Even the ramp up was with +/- 0.2 most of the time.

One question I have. Is there a way to save the data that was logged for each session and perhaps a chart as well?

20160620_brewpi-screen-czechpils.jpg
 
One question I have. Is there a way to save the data that was logged for each session and perhaps a chart as well?

It saves it for you. Go to the maintenance panel and select "Previous Beers". Then there is a drop down with your previous logging sessions.

All of the data is saved on the Raspberry Pi's SD card.
 
Status
Not open for further replies.
Back
Top