• Please visit and share your knowledge at our sister communities:
  • If you have not, please join our official Homebrewing Facebook Group!

    Homebrewing Facebook Group

How to build a control panel (part 1)

Homebrew Talk

Help Support Homebrew Talk:

This site may earn a commission from merchant affiliate links, including eBay, Amazon, and others.
A: Love the XKCD schematic!

B: what are you using to 'draw' your schematics that you're posting? I'm starting my build and I'm using Vector Works. Something a little quicker than CAD might make it easier.

I dig your panel as well. Nice writeup.

B
 
B: what are you using to 'draw' your schematics that you're posting? I'm starting my build and I'm using Vector Works. Something a little quicker than CAD might make it easier.
Microsoft Visio 2007. Likely not the easiest way but it works.

Kal
 
Kal I think those diagrams look great, they will be a perfect addition to a schematic. I like how you are breaking it down into logical areas. If you show people your illustrations and a schematic I think they will be able compare it to the schematic and be able to modify the design if they want to suit their needs.

So in the end I wouldn't worry about people understanding because this is a good way to teach them. I can't wait for this to come out!
 
This is just awesome!!!

Even though Im not 100% electrically inclined, I do have an understanding, appreciation and respect for both electricity and the amount of time that Kal is putting into this.

I am very mechanically inclined, so these straightforward schematics to me are just perfect! Even with the help of my brother in law who is an electrical engineer, most schematics become a little too overwhelming for me and there is no way that I would attempt to play with electricity if Im not 100% in the know.

I guess what Im trying to say is Thank You for the direction that you are taking, it sure is helping me in the construction of my electric brewery! :mug:
 
Hi guys!

Part 2 of my "How to Build a Control Panel" is now online.

See: http://www.theelectricbrewery.com/control-panel-part-2

A teaser:

IMG_6681.jpg


This makes the control panel documentation complete! Future articles will show how to program the PIDs and Timer as well as actually use the panel during a brew day from start to end.

Cheers!

Kal
 
Looks good!

One note:
Step 11 para 2 - It's impossible with a PID and SSR to "Turn down" an element. It's duty cycle control that makes the apparent power less than 100%. So even with 2 PIDs set for 10% power, if both trigger at the same time, you have a 200% load.

It's irrelevant due to your selector switch, but should be fixed in the description...

I never said "turn down" an element. Read it again. I said "turn down the temperature on one PID controller to shut one element off before turning on the other one."

My first 2-3 paragraphs deal exactly with the fact that two elements running (even at 10% duty cycle each) will still draw 23A x 2 which is beyond what is allowed on my setup.

If it only took you 15 mins to get to Step 11, you're reading too fast... ;)

Kal

Quite true!

I yield.
 
Wow that is detailed! It probably would have taken you far less time than writing it up if you would have just come out to my place and built the enclosure for me already! :p
 
Wow that is detailed! It probably would have taken you far less time than writing it up if you would have just come out to my place and built the enclosure for me already! :p
You're absolutely right! It look me a lot longer to photograph and document it than to actually build it.

Kal
 
Kal,

You think it might be possible to get a pdf or easily printable version?

jeffr
 
Kal
You are surely first post worthy. I stand among a throng of attempts to match the engineering and "Je Nous Se Qua" you bring to the table. Cheers and many thanks for your efforts. I am about to buy you a beer (or many).
MS
 
Kal,

You think it might be possible to get a pdf or easily printable version?

jeffr

I posted this previously when someone asked:

"Afraid not, sorry! Viewing it online helps pay for the dedicated server I have to pay for to host the content. If everyone printed it out and walked away, it wouldn't last very long."

The other issue is that I still go back constantly to the other articles and tweak/fix/edit small things here and there, and add extra explanations when something isn't 100% clear after people email with questions. If I had a PDF/print version, I'd have to edit in two places. Twice as much work.

Now that being said, I will likely be offering a complete downloadable/printable PDF version of the entire brewery built instructions (not just the control panel) once the entire writeup is done. This will not be free however. It'll likely cost a few dollars to offset the first point I made above.

The other issue is that unless you have a colour printer, following a printed version would not be easy.

Dead sexy. However I think you need to start it's own thread for part 2, and part 3, etc.
It's done. There are only 2 parts. I figured those that are interested in part 2 are those that already ready part 1 so I posted here. The two parts go together so any questions/comments from one would also relate to the next. Unforutunately I can't edit the thread title...

Kal
You are surely first post worthy. I stand among a throng of attempts to match the engineering and "Je Nous Se Qua" you bring to the table. Cheers and many thanks for your efforts. I am about to buy you a beer (or many).
MS
Got it! Thank you for the generous donation Mark! It's truly appreciated and goes directly to help with my monthly hosting costs. (Ok, it may also help fund some future beer related projects ... which of course will be documented and posted online... ) :)

Kal
 
Point taken kal. I would pay a few bucks for a printable version. How about a few bucks to access a more easily printable version of the website. Just offering suggestions.
 
How about a few bucks to access a more easily printable version of the website.
Something that takes the content and creates PDFs from each of the articles for purchase? I'd have to code something to do that from scratch or find something to do that (I've never heard or seen anything like that).

Kal
 
Awesome control panel writeup, I will definitely be implementing some of your ideas in my next control panel.


On an (almost) irrelevant note:
I'm curious why you need an entire dedicated server for your site? I have a few dedicated servers myself and that's for serving over 1,000,000 pageviews a day (every day). Please note I'm not bashing on you wanting to recoup some costs and the time it took to put this incredibly detailed guide together.
 
Kal,
Can you explain the shunt that you have in your control panel? I'm planning to run two 5500W elements at the same time and was trying to figure out what I would need if I did something similar to your layout. I'm running 60A into the panel but not sure if the shunt would limit what I'm trying to do.
 
On an (almost) irrelevant note:
I'm curious why you need an entire dedicated server for your site? I have a few dedicated servers myself and that's for serving over 1,000,000 pageviews a day (every day). Please note I'm not bashing on you wanting to recoup some costs and the time it took to put this incredibly detailed guide together.
I'm running other sites as well. One of the biggest reasons for going dedicated is previously (on shared setups) I had had my server IP blacklisted twice due to nimrods with other sites on the same server being hacked due to insecure passwords. Wasn't able to send/receive emails for many days. I've also had SQL performance problems since most ISPs tend to overload their servers. Now since I'm all alone I can only blame myself if something happens. ;)

Kal,
Can you explain the shunt that you have in your control panel? I'm planning to run two 5500W elements at the same time and was trying to figure out what I would need if I did something similar to your layout. I'm running 60A into the panel but not sure if the shunt would limit what I'm trying to do.

This large amount of current for an amp meter does not directly flow through the amp meter. Instead, a shunt is used with a precisely known resistance. Current passes through the shunt and the amp meter measures the associated voltage drop and translates it into amps. Amp meters and shunts are typically matched and sold in pairs. You'll need a shunt that is at least 60A with a meter that is matched to it.

Kal
 
Kal,
Is there a particular reason why you used the DPDT relays? Woudn't a DPST work in this case? Also, since I hoping to run 60A directly to my panel would a 30A 4PST or 4PDT suffice?

Thanks for the clarification!
 
Is there a particular reason why you used the DPDT relays? Woudn't a DPST work in this case?

[EDIT] Yes! Sorry, I was thinking you said SPDT and answer differently originally. Just make sure that the switches are normally open (NO).

I've edited my post here.

Yes, DPST (douple pole single throw) would work for all 3 relays as it would still:

1. completely cut both HOTs from getting to the element (HLT and BK relay).
2. completely cut off both HOTs from getting into the control panel (MAIN POWER IN relay).

Read the "how it works" section I wrote here for more info on why/how you want to cut both off:

http://www.theelectricbrewery.com/control-panel-part-2?page=13

If you look at my pictures, I don't use the second "THROW" at all (it comes out the top of the relays).
It doesn't add any cost to the relays however and DPDT are much easier to find than DPST.

Also, since I hoping to run 60A directly to my panel would a 30A 4PST or 4PDT suffice?
I don't know. I can't answer that question without some sort of drawing or understanding of what you intend to do.

Since your setup's going to be different, I suggest you figure out what your goals are and then draw it up and start a build thread to get comments from people. That's probably the best way. There's a million ways to skin a cat. My intent was to show a way to build a setup that I consider to be very safe and reliable where 30A max is used (1 element at a time). Not everyone has the same needs or expectations.

Kal
 
Heads up!

Anyone who's been building this control panel: Last night I changed the ground wiring from daisy chaining grounds between devices to a star configuration (every device has its own ground line to the chassis) as this is the more "correct" way to do this.

All of the pictures where any ground wiring is seen has now been changed (a real pain in the butt) including the main ground wiring instructions here: http://www.theelectricbrewery.com/control-panel-part-2?page=8

You will now require 11 feet of 10ga GREEN T90/THHN/THWN wire instead of only 3. ;)

This is one of those "it really won't matter in this setup" type things, but I figured since I'm trying to do this 100% correctly that I should change my grounding scheme to be 100% correct.

Thanks to one of my local brewing guys (Barry) for pointing this out!

Kal
 
Thanks Kal! I noticed nothing on the second throw so that's why I needed the clarification. I figured it was related to cost or availability. I think this information will help with my power input question too.
 
I'd like to be the first person to say:

Kal, I absolutely hate you.

Because of you I now have a never ending supply of eBay stuff rolling into my house daily and a wife wondering if I am building a nuclear device in the spare room.


On the plus side it is doing absolutely wonderful things to my eBay rating :rockin:
But god knows what the FBI and HS are thinking and wondering with me getting boxes from China all the time.


:mug:
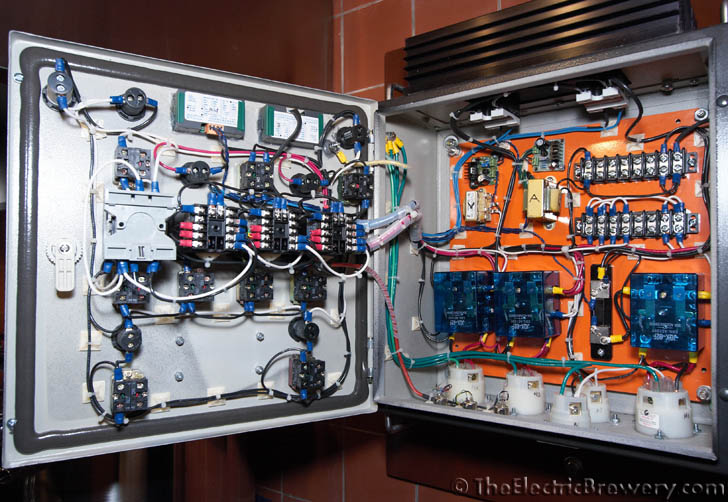
Seriously though amazing build. I'm nearly replicating it exactly (that GFCI cord is available on ebay right now FYI...he still has 4 left) with the exception of 15G Blichmann's instead of your 20's cause I still do a lot of 5G batches along with my 10G ones

I'd been working on a drawing for ages...learning lots of electrical stuff but even when I got how I wanted it running I didn't know what parts to get to make it happen.
That's where yours helped out a ton.


The only suggestion I would make to you (if you are even taking suggestions) would be the ability to download a CSV sheet on each of the parts pages so it is easier to make shopping lists and keep track of what you have.
That's what I did while I was building mine so I could keep track of what I got vs what I needed.

Don't worry...I always went to your site first to click to the supplier :rockin:


..edit.. Oh one last think...warn people Ikea will rape you for shipping if you aren't paying attention for those handlebars. I think they wanted $80 from me and the store is only 60m from where I work. But if you go to the Philly store you might want to pay the $80 cause that damn place is setup like a lab mouse maze.
 
I'd like to be the first person to say:

Kal, I absolutely hate you.

Because of you I now have a never ending supply of eBay stuff rolling into my house daily and a wife wondering if I am building a nuclear device in the spare room.
The good news is that you'll still have about 1/2 as many parts as I do. I went through a ton of stuff before settling in on what I wanted to use. I even have spare working timers, switches, buttons, etc. In some cases (don't tell my wife) I bought seconds simply because I thought they would match my other controls better. ;)

I now have enough spare parts to build almost a whole second control panel.

On the plus side it is doing absolutely wonderful things to my eBay rating :rockin:
But god knows what the FBI and HS are thinking and wondering with me getting boxes from China all the time.
Just wait until you order the fan system I used to ventilate (the next article I'm working on)). The fan's mostly used by people who grow pot so all of the sites that sell them advertise that they ship in "discrete brown paper boxes with no labels". I hate to think I've been put on some government drug list somewhere simply because I bought a good fan. :)

I'm nearly replicating it exactly (that GFCI cord is available on ebay right now FYI...he still has 4 left)
Yup! I saw it! He mis-spelt the name so I've changed the wording on my search used on my site so that it's found when you use my links..

Thanks for the compliments and suggestions! It's all considered!

Take pictures too! I'd love to post some on the site.

Kal
 
Back
Top