Grain Milling Station Build and Questions

Homebrew Talk - Beer, Wine, Mead, & Cider Brewing Discussion Forum

Help Support Homebrew Talk - Beer, Wine, Mead, & Cider Brewing Discussion Forum:

This site may earn a commission from merchant affiliate links, including eBay, Amazon, and others.

mullet

Well-Known Member
Joined
Oct 31, 2007
Messages
46
Reaction score
2
Location
St. John's, Newfoundland
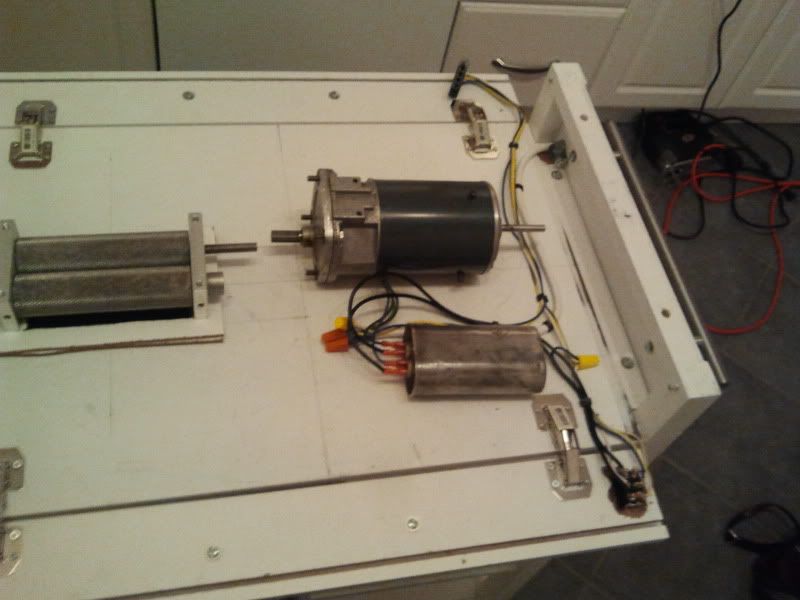
After hand-cranking all of my grain for over a year, I've finally decided to take the plunge and motorize my grain mill.

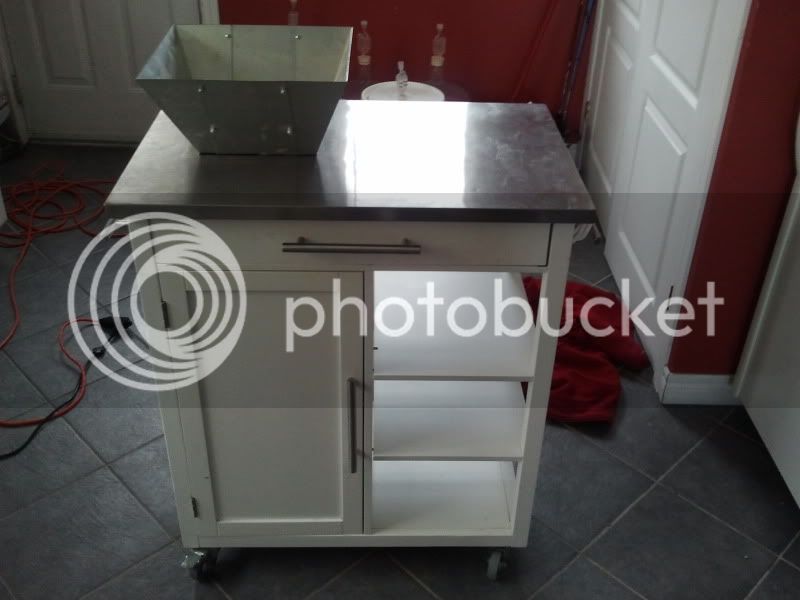
First off, I needed a stand. I've been down the road of building things before, and it never turns out as cheap as I'd like, so I started poking around classifieds ads to see if I could find a suitable stand, cupboard, vanity, etc... Picked this one up for $25.

2011-10-06173100.jpg


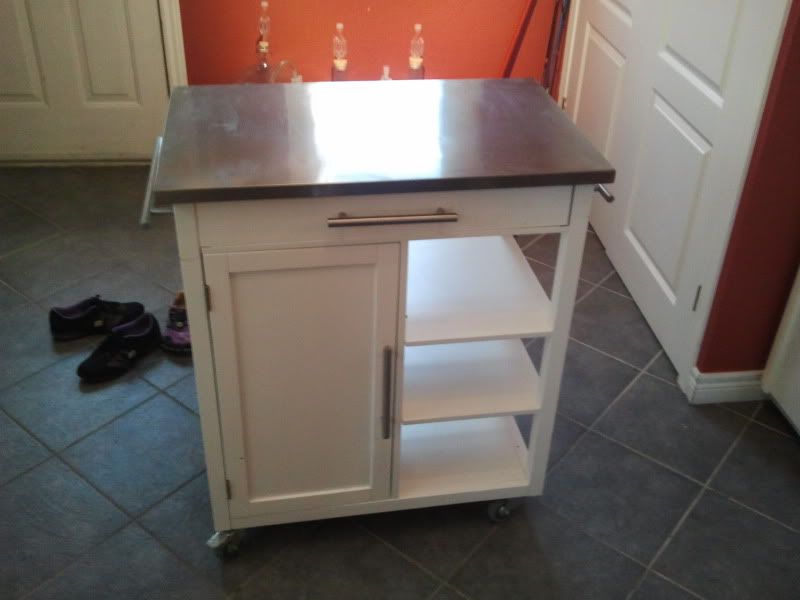
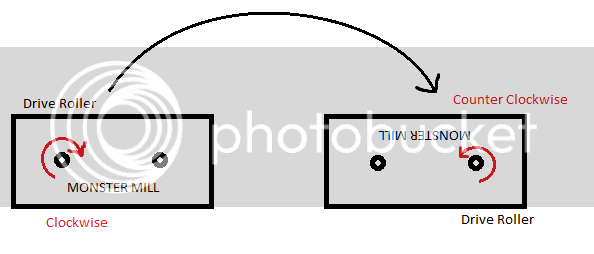
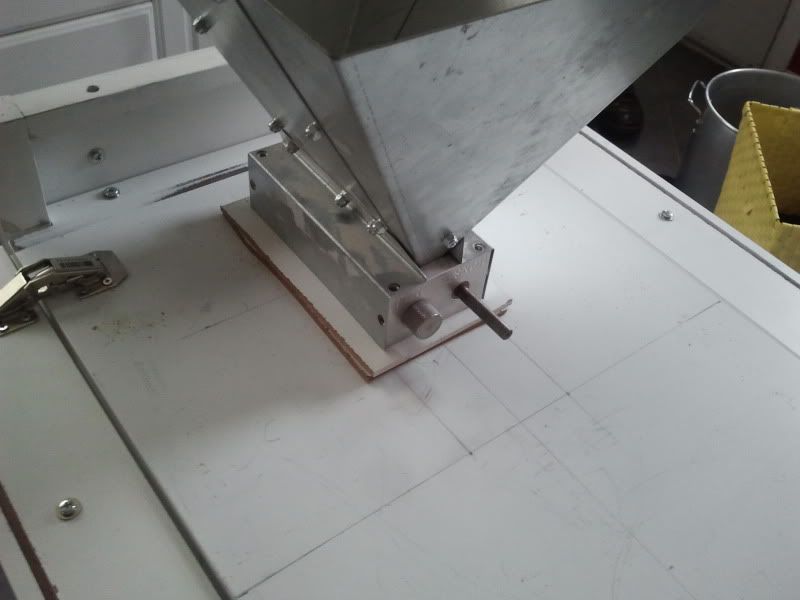
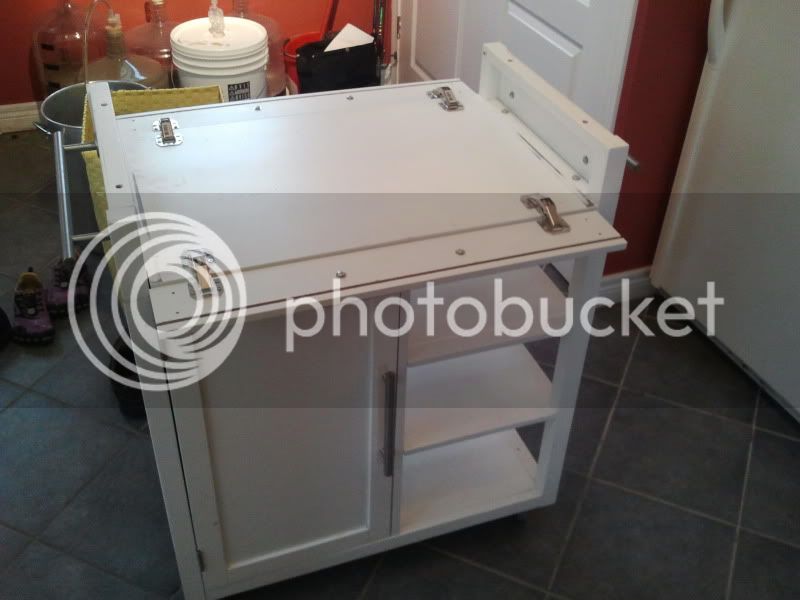
The door part would be great to keep dust down a bit and there is an identical door on the other side. The unfortunate part is the drawer at the top. It just slides in there, and it pulls out to either side. I'd like to mount the mill and motor under the table, with inspiration from this setup. So that drawer had to go. I took the top off the cabinet (was held on with 4 allen key bolts) I took the drawer out, disassembled it, and added some hinges to the faces of the drawer, and attached them back to the cart. This should allow me to get at the gap adjusting parts after I put it all together.

2011-10-06173159.jpg


Next I needed a motor. I have an MM2, which only has 2 1.5" rollers, so I figured the standard recommended motor would probably have enough torque for me, and I ordered one up. For any other Canadians, shipping to Canada was ~$40 by USPS priority mail and the motor showed up in 6 days. (4 business days)

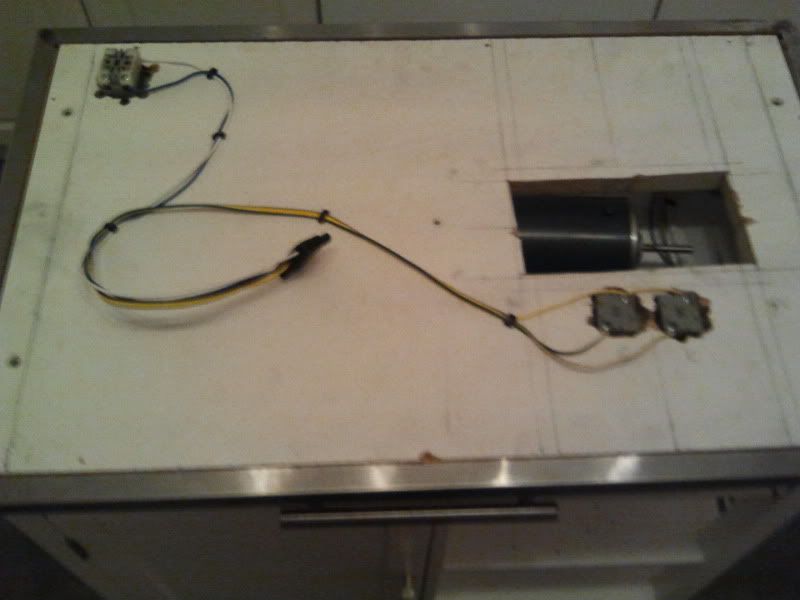
Here is where I have a question. The motor is sliiightly larger in diameter than the height of the space between the shelf and the bottom of the cart surface. But, if I take off the fan cover and fan, as shown below, I think I can elevate the top using some washers enough to squeeze the motor in there.

2011-10-06191618.jpg


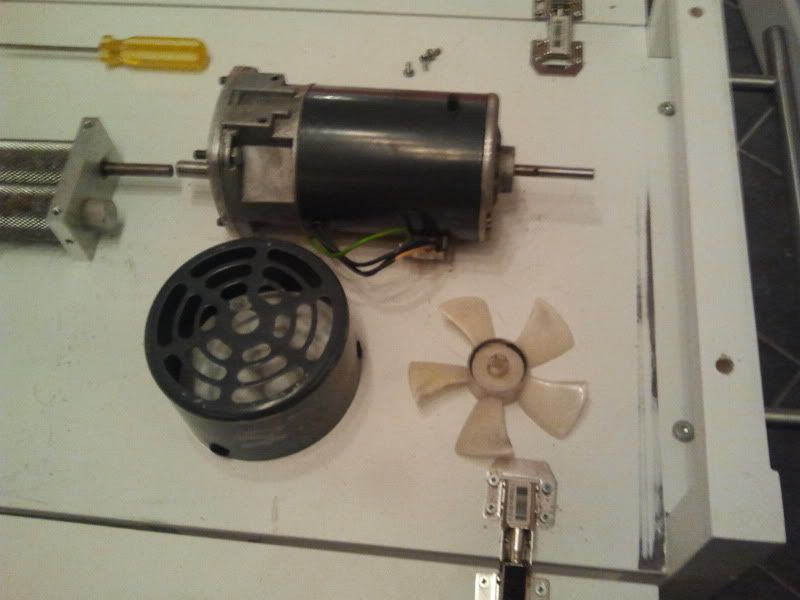
My question is, is it ok to take off the fan, or is that not really recommended? I figure if I was planning to actually run the motor continuously, that it would probably be an issue. But for the 4 or 5 minutes that I'd be milling grain, it probably isn't a big deal. Anyone got an opinion on that?

I also ordered the parts I'd need for the direct drive coupler from McMaster. Found out the next day that McMaster doesn't ship to Canada. Fair enough. Tried my local Princess Auto, found they had lots of sheaves, belts, sprockets, and chain, but no couplers. So after looking around online, I discovered that there was a Fastenal just around the corner from work and they can order the parts I need. It was a few dollars more expensive than McMaster, (I think the total for McMaster before shipping was ~$10, while the Fastenal order was something like ~$17) but there was no shipping, so I figure it's probably about the same. Here are the part numbers for anyone in Canada who might be curious:

3/8" Hub (For Mill) - Fastenal: 0439466 - McMaster: 6408K123
1/2" Hub (For Motor) - Fastenal: 0439470 - McMaster: 6408K712
Spider Insert - Fastenal: 0439459 - McMaster: 6408K73

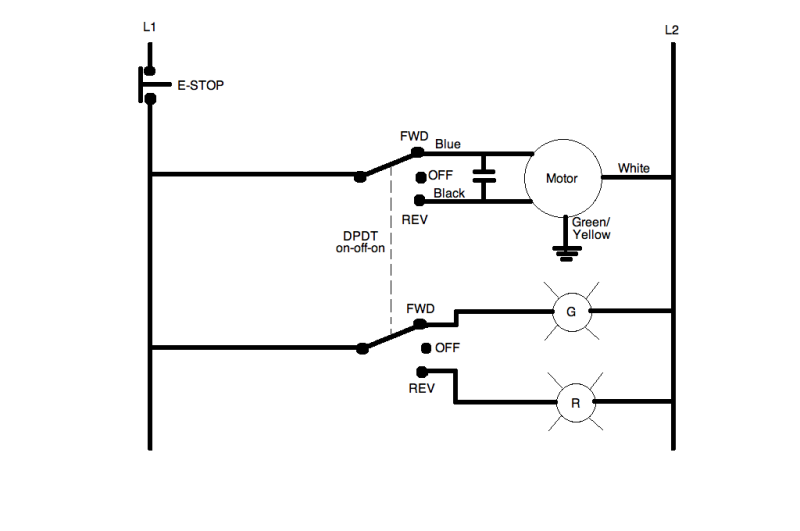
I'll post up an electical drawing next.
 
I would leave the fan on the motor and just use spacers to make the appropriate clearances for the motor. You could use a pack of door shims from your local hardware store.
 
I went ultra simple and mounted my Barley Crusher and gearmotor on a piece of shelving, with a little rectangular hole cut in it to allow the crushed grain to drop through. I set it on top of my cooler mashtun and grind away. Just like that it's ready for the strike water. I'm very happy with the arrangement.
 
I would leave the fan on the motor and just use spacers to make the appropriate clearances for the motor. You could use a pack of door shims from your local hardware store.

I thought about something like that. Problem is I need to gain 3/4" to make it fit with the fan on and I think if I raised the top by that far you'd be able to see the gap over the drawer faces. I guess I could get a piece of white melamine or something and make new faces, but that seems like a lot of work. Without the fan I only need to gain about 1/8" to 1/4" which should be a lot easier to pass off without looking strange.

The other option is that the shelf I'm mounting it on is about 1/2" thick, so I could cut a motor sized hole in that, fasten another piece of board under the hole, mount the motor to that and be about where I am without the fan. But that's a lot more screwing around and structural instability than just taking the fan off and mounting the motor to the existing shelf.

Upon closer inspection of the motor, it says "Thermally Protected" right on the label on the motor. I'm assuming that means that if it gets too hot, it'll shut itself off?

If that's the case, then I'll just give it a test run without the fan and see if it shuts off immediately, or if it can run for a while, and go from there.

You should be ok if you have a thermally protected motor.

http://electrical.about.com/od/wiringcircuitry/a/thermalprotectionformotors.htm
 
I'll try the motor without the fan after work this evening, but on to the electrical in the meantime. Here is the schematic for what I am planning to do. Please excuse the sloppiness, it was drawn on a laptop touch pad in Paint because I don't have any good schematic programs on this computer right now.

MotorSchematic.png


G and R are green and red 110V pilot lights. I thought it would be interesting to be able to tell at a glance which way the motor was running at any given time.

Here is the original wiring diagram from the supplier, so my intention is to use CCW as the forward direction and CW as reverse.

W5-1098.jpg


I was originally going to use momentary START/STOP push buttons, but I couldn't source a relay locally, and once I decided that I wanted reverse as well, I figured it would be just as easy to go with the DPDT.

Any obvious problems there? Or possibly any less than obvious problems?

My only question on the electical is about ground. The chassis of the motor is grounded, as shown in the schematics. When you guys connect grain mills to motors, do you ground the mill/hopper as well? Also, the top of the cabinet I'm using is covered in some sort of thin metal, should I try to ground that too?
 
Shouldn't be any reason to ground anything other than the motor. If a fault develops the green case ground should trip the service breaker on the main.

The "panic" button is probably overkill and the indicators are a bit of lily gilding as you'll certainly know which way the gear motor is turning by the sound it makes (CW is way noisier than CCW).

Speaking of which, I've almost finished building my grinding station using the same motor on a Barley Crusher. If it can be done to your MM2, I definitely recommend switching the mill so it runs CCW. It's pretty clear the gears on the motor were cut to run CCW...

Cheers!
 
I agree, the panic button is almost definitely overkill, but I like the way they look, so I went for it anyway. As for the lights, they are definitely not necessary, but again, think they'll look cool.

My plan for switching the drive direction of the 2-roller mill is very straight forward: just turn it upside down.

Reverse.png
 
[...]My plan for switching the drive direction of the 2-roller mill is very straight forward: just turn it upside down.

If that doesn't cause issues with fitting the grain chute, that will work. The BC's chute screws into specific holes inside the end plates that wouldn't be accessible if the mill was flipped over. But it only took me less than 10 minutes to take the mill apart, flip the drive roller end-for-end, and reassemble the mill, to set it up for CCW operation.

fwiw, here's a tip on a way to mount your gear motor: while every implementation I've seen used the ends of the four through-bolts holding the gear drive together to attach to some kind of "L" bracket in a cantilevered fashion, I went a different way.

On the "bottom" of the cast metal section there is that flat area with a pair of holes that can be tapped for 10-24 screws. On the same plane there is one of the three 10-32 screws that attach the fan shroud to standoffs connected to the motor shell.

So I ran a pair of 10-24 screws up through the top of my grinder station, then through a thin shim to level the motor front to rear, and into the two newly threaded holes, and then ran a 10-32 screw at the rear through the fan shroud into the standoff. As a result the whole gear motor assembly is extremely rigid - and if you're going for looks, I think it can't be beat for a clean installation.

When I get the whole rig painted and reassembled next week I'll put a thread up with pics...

Cheers!
 
If that doesn't cause issues with fitting the grain chute, that will work. The BC's chute screws into specific holes inside the end plates that wouldn't be accessible if the mill was flipped over. But it only took me less than 10 minutes to take the mill apart, flip the drive roller end-for-end, and reassemble the mill, to set it up for CCW operation.

Nah, the MM2 has identical mounting holes top and bottom for the hopper/base. I got the mill/hopper mounted this morning.

2011-10-08112444.jpg


Does anyone have any good ideas on what to use under the mill to direct the grain into a bucket? Right now I just have the square hole I cut under the mill and that's it.

On the "bottom" of the cast metal section there is that flat area with a pair of holes that can be tapped for 10-24 screws. On the same plane there is one of the three 10-32 screws that attach the fan shroud to standoffs connected to the motor shell.

I haven't mounted the motor yet, on account of not having the coupling to see how far away I need to mount it yet, but now that the mill is mounted, I am stuck with mounting the motor so that the shaft is towards the bottom. I had seen those holes on the motor and had wondered what they were for. Lucky for me I already mounted the mill, or I'd have a great excuse to go buy a tap/die set. :cross:
 
Old T shirt.

On the mill how did you cover the sides under the counter top to keep the space where the motor is from filling with dust?
 
Now with the electronics mounted, but not connected yet. To cut the 22mm holes for the pilot lights and e-stop switch, I picked up the world's cheapest hole saw. But the top of the cart is covered in metal and all I succeeded in doing was ruining the world's cheapest hole saw. I ended up cutting them out very slowly with a jigsaw. In conclusion, buy decent tools. :p

2011-10-08124720.jpg


Canvas or an old t-shirt either way would be great, yeah. I could fasten that on with staples or thumbtacks or something and it would be very easy. I had been imagining some sort of a funnel and was trying to figure out how to connect that.

On the mill how did you cover the sides under the counter top to keep the space where the motor is from filling with dust?

Here is a picture with the top of the cart removed. It's just the way the Monster Mill hopper connects, it covers the top and sides of the mill all the way down.

2011-10-08125230.jpg
 
Electrical done, tested, and working! Motor turns as expected, lights come on appropriately, no magic smoke released!

I used a connector for hooking up the tail lights of a trailer to connect the switch and lights on the top to the motor and capacitor on the bottom, so that I'd be able to disassemble it easier later on if I had to.

Here is the wiring on the underside of the cart top.

2011-10-08184248.jpg


And this is the wiring underneath with the motor and the mill.

2011-10-08184334.jpg


All that's left to do now is build a motor mount, get the couplers in there, find a way to hold down that capacitor, build some kind of an output chute, and test with grain. Unfortunately, I have to wait another 10 days or so for the coupler to get in. :(
 
Curious why you put your panic button so far away from where you'd presumably be operating the grinder. Normally you want panic buttons to be the easiest control to reach.

Anyway...fwiw, I built a "garage" for the capacitor - two pieces of 3/4" maple as long as the cap and a quarter-inch taller, with a "roof" of 1/4" MDF. Four 2.5" #10 wood screws pass through the roof and the side pieces to screw into the underside of the deck, trapping the capacitor between two thin sheets of foam. It ain't going anywhere...

Cheers!
 
I am planning to do a similar build and I have a question on the capacitor. The Surplus Center website says that the 177.7 RPM 115 VAC GE Gear Motor includes a 20 MFD capacitor. So I was curious if the capacitor in the picture was shipped with the motor or was this purchased separately. If it was purchased separately then why is it needed if the motor includes one (forgive my ignorance on such things).

Also, any idea who makes that cabinet? I really like the design.
 
The capacitor in the picture was shipped with the motor. Didn't have to buy anything separate, just ordered the motor and it came with the capacitor.

The cabinet, I have no idea. I bought it used from a classifieds ad. It isn't really top notch quality, so my guess would be Walmart or somewhere similar, but I really don't know.
 
Back
Top