Grain mill project - power drill driven

Homebrew Talk - Beer, Wine, Mead, & Cider Brewing Discussion Forum

Help Support Homebrew Talk - Beer, Wine, Mead, & Cider Brewing Discussion Forum:

This site may earn a commission from merchant affiliate links, including eBay, Amazon, and others.

YeastFeast

Supporting Member
HBT Supporter
Joined
Nov 9, 2013
Messages
395
Reaction score
247
Location
Bratwurst City, WI
Just getting into crushing my own grain and recently purchased a Crankandstein.
Found an old dusty table in the basement and it seemed to be just the right size to mount everything.
The drill is a harbor freight Bauer low speed drill/mixer (0-600 RPMs).
It conveniently had a place to screw a (3" approx.) 14 mm bolt so I could mount it upside down.
Then I used the template that came with the Crankandstein (to cut and drill holes) to mount the mill.

Crankandstein recommend running it around 200 RPMs. I have a zip tie on the trigger right now and just guessing at the speed.
Still trying figure out a more accurate way to count revolutions so I can run it at the optimal speed.

Cheers!

IMG_4549.jpeg
 
Tough to adjust a zip tie *especially* backing it up ;)

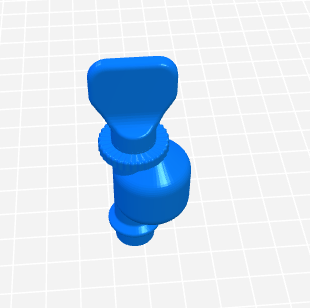
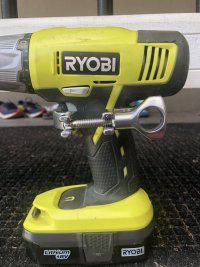
How about a U-bolt of appropriate size, except using wing nuts instead of hex nuts, slipped over the grip then tightened to pull the trigger to the desired speed....

1690832584625.png


Then see if there's a phone app with a stroboscope function...

Cheers!
 
How about a U-bolt of appropriate size, except using wing nuts instead of hex nuts, slipped over the grip then tightened to pull the trigger to the desired speed....

View attachment 826110

Then see if there's a phone app with a stroboscope function...

Cheers!
U-bolt & stroboscope, good ideas! Cheers.

This one might do it: ‎RPM Stroboscope
 
Very nice build and that base really sets it off. Its nice to have a work area when milling grain.

When I built my motorized mill I found a gear motor at salvage store that was the correct RPM. I think the place was called Surplus Center or Surplus Salvage.
 
I have the same drill and it does a great job. I tried the zip tie on the trigger and I wasn't happy with the results. For now I've been manually controlling it, but plan to buy one of these in the near future. When I do, I'll zip tie the trigger to 100% and throttle it down with the speed controller.
I was under the impression that a speed controller would not work with a variable speed drill, but I can’t find where I read that. Bottom line: please share your experience with this.
 
It didn't cost me anything, so as of now, I went with a U-bolt and attempted to dial in the RPMs with the iPhone app I linked above.
Seems like it's spinning pretty fast to me but the app is telling me that I have the trigger locked in at 200 RPMs based on utube videos I watched online.
 
I was under the impression that a speed controller would not work with a variable speed drill, but I can’t find where I read that. Bottom line: please share your experience with this.
I'm going to go out on a limb and say it definitely will. The speed controller is nothing more than a rheostat. Something that controls current by varying the resistance - same thing the trigger does.

In this case, you could either secure the switch at full speed (or connect the two leads completely closing the circuit) and plug the drill into the rheostat or bypass the trigger altogether and hardwire the rheostat. All depends on how clean you want the install and if you ever want to use the drill as a drill again.
 
Thought I'd add an update on using the U-bolt to control RPMs. It hasn't been great. I think because of the combination of a metal U-bolt against hard plastic, a handle that's on an angle, vibration, moving the table around, etc., the U-bolt doesn't stay in place and allows the trigger to change speeds. I attempted to put some rubber around the U-bolt to secure it a bit, maybe that will help? Also, the lowest speed by adjusting the wing nuts I can get (without it just turning off) is about 250-260 RPMs (as tested by a stroboscope app on my phone and double checked by making a slo-mo video of the rotation with a timer in the background and manually counting the rotations). Perhaps 250-260 RPMs is fine as long as I can get it to stay there?

The U-bolt sounds solid in theory but not sure it'll work well in practice? Need to keep thinking about this....
 
Last edited:
Actually I don’t believe that is correct. Most modern speed controllers use pulse width modulation using a TRIAC which is much more efficient (and thus less hot) than a rheostat.
Potato, potato :)
I'm not well versed on the exact technology behind it, but yes, a TRIAC. I have router speed controllers, drill press controllers, dimer knobs - all I just refer to as a rheostat. Thanks for the explanation. Ya learn something new everyday.
 
Potato, potato :)

More like table saw, band saw. They will both cut wood, but use completely different mechanisms and certain cuts can only be made with one or the other (e.g., try making a rabbet with a bandsaw or cutting wide veneer with a table saw).

Rheostats and triacs also work in completely different ways. Rheostats are simply variable resistors which reduce the voltage and current according to Ohm’s law. Triacs are essentially solid-state switches that in this application are turned on and off (at least) 120 times a second by an electronic trigger circuit. You can put two rheostats in series with no ill effects, but the chopped up wave passed by a triac voltage controller may mess up the electronics in another such controller placed in series.
 
I wonder if that's on/off binary only, or capable of variable travel...

Cheers!
If you’re referring to what I said here…

Also, the lowest speed by adjusting the wing nuts I can get (without it just turning off) is about 250-260 RPMs

The drill is variable speed 0-600, but with the awkward way the clamp fits on the handle, it’s seems impossible to get the speed real low by dialing in the wing nuts.

I can definitely adjust it faster, just not real slow.
 
Also, the lowest speed by adjusting the wing nuts I can get (without it just turning off) is about 250-260 RPMs (as tested by a stroboscope app on my phone and double checked by making a slo-mo video of the rotation with a timer in the background and manually counting the rotations). Perhaps 250-260 RPMs is fine as long as I can get it to stay there?
Is that the speed under load? That's what counts!

I would not be surprised if the speed under load (milling malt) is about half of freewheeling or even less.
I have a similar but older Low Speed/Heavy Duty drill model from HF. Load makes all the difference in speed.

[Added] Here are your target roller speeds (under load):
For grain used in brewing, a linear mill speed of around 12"/sec (ips) is recommended.

For a 1.5" diameter roller mill (e.g., an MM2, CrankandStein):
circumference = 1.5" * 3.14 = 4.71"
12 ips / 4.71" * 60 sec = 152 rpm

For a 2.0" diameter roller mill (e.g., an MM2 2.0):
circumference = 2.0" * 3.14 = 6.28"
12 ips / 6.28" * 60 sec = 115 rpm
 
Last edited:
Oh, you got one of the best looking milling tables around! Surely the prettiest and stylish I've seen.
How do you prevent it from tipping over? It looks meta-stable without some counterweight.

If you mill indoors, you may want to close the gap between the bottom of the milling platform and the top of the bucket. You could, by simply raising the bucket. Try to capture as much of the dust, or it's going everywhere else.
 
Looks nice…but I don’t know much about 3D printing and I’m not sure how slow I can get this Bauer drill to go by pulling in the trigger even ever so slightly…
Fair enough. Sounds like a drill limitation and the torque specs under load.
 
When someone posts in a thread, an immediate response should be readily associated with that post - a quote shouldn't be necessary.
Otoh, if there's an intervening gap caused by others' posts, it's good practice to lead with a quote of the text one is responding to...

Cheers!
 
I wonder if that's on/off binary only, or capable of variable travel...

Cheers!
It looks variable judging by the camshaft-like shape. My only concern with this would be the possibility of the mechanism rotating with vibration and losing speed. There doesn't seem to be a mating gear on the U shape to prevent it. Great idea though.

At the end of the day, your idea with the U-bolt and/or a rheostat would probably the most solid, simple solution.

1691154381115.png
 
Is that the speed under load? That's what counts!

I would not be surprised if the speed under load (milling malt) is about half of freewheeling or even less.
I have a similar but older Low Speed/Heavy Duty drill model from HF. Load makes all the difference in speed.

[Added] Here are your target roller speeds (under load):
For grain used in brewing, a linear mill speed of around 12"/sec (ips) is recommended.

For a 1.5" diameter roller mill (e.g., an MM2, CrankandStein):
circumference = 1.5" * 3.14 = 4.71"
12 ips / 4.71" * 60 sec = 152 rpm

For a 2.0" diameter roller mill (e.g., an MM2 2.0):
circumference = 2.0" * 3.14 = 6.28"
12 ips / 6.28" * 60 sec = 115 rpm
Didn't consider 'under load' speed to this point, still trying to get everything set up. Thanks for the roller speeds! This changes how I look at this.
 
Oh, you got one of the best looking milling tables around! Surely the prettiest and stylish I've seen.
How do you prevent it from tipping over? It looks meta-stable without some counterweight.

If you mill indoors, you may want to close the gap between the bottom of the milling platform and the top of the bucket. You could, by simply raising the bucket. Try to capture as much of the dust, or it's going everywhere else.
Appreciate the comments. It seem quite stable but I haven't given it a full load test yet....do that this weekend.

To attempt to keep dust to a minimum....thought about mounting a screw lid on the underside of the table but I think I'm just going to put a 2" board under the bucket I have and slide it under (top of bucket to bottom of table is exactly 2").
 
Didn't consider 'under load' speed to this point, still trying to get everything set up. Thanks for the roller speeds! This changes how I look at this.
To prevent starting problems, fill the hopper while the mill is running. You'll hear the speed drop significantly.

I have my drill's trigger simply locked with it's internal button. The speed dial is then finely adjusted to the right speed.* I rarely remove the drill from the platform, so it all stays in place for the next brew session. I often brew 2 (5 gallon) batches back to back, so they both get milled at the same session.

* I took a short video of the chuck with a mark on it to verify the set speed is in the ballpark. I played it back in slow motion (half speed) counting the revs over 10 seconds.

Mounted Monster Mill MM2.0_1200.jpg
 

Latest posts

Back
Top