• Please visit and share your knowledge at our sister communities:
  • If you have not, please join our official Homebrewing Facebook Group!

    Homebrewing Facebook Group

FuzzeWuzze's Coffin Keezer + Cabinet storage Build

Homebrew Talk

Help Support Homebrew Talk:

This site may earn a commission from merchant affiliate links, including eBay, Amazon, and others.
Yea all of the extra cabinetry work being done is making it much tougher than just building a box around a freezer, and because i don't know the tricks of the trade its all measure and remeasure and in some cases hit things until they are lined up properly ;)

I didn't want to end up with cabinet holes that are all crooked or not the same size then get to the end and realize there's no way i can mount cabinet doors.
 
Turns out when i ordered my extra 525SS to fill in the 5th hole i forgot to complete the order for the extra shank...i spent a good 30 minutes last night looking for a shank that didnt exist....thank god for Amazon prime it should be here Saturday.

Hand drilled one of the front holes, then quickly realized how stressful hand drilling 2 1/2" of wood perfectly level was...it came out alright but i remembered a co-worker with a drill press and after some maneuvering to get the giant box in there we got all the holes cut.

Keezer-Day24.jpg
 
First pour, i couldnt wait to stain everything, got the holes drilled into the lid...went with 3 1/2" holes because i bought a hole saw to drill the wine holes...its slightly big for a 80mm fan but it fits and the fan doesnt fall through it or anything..just a slight gap on either side of the fan which im not worried about.

Keezer-Day25.jpg
 
Here it is all stained up, taking a few pictures with the flash has shown a few areas that are a bit light, so Ill give those another coat. Got the chalkboard coated in chalk just to keep it from getting any stain to stick to it so that i noticed it easier.
Keezer-Day28.jpg


The back of my coffin, this actually worked out quite well, it looks might lighter than it actually is with the flash so close..its the same shade as the rest of it. Once i get all my shanks and stuff put back in ill take a few pictures of the inside setup, as it is now it hinges on the bottom and gives me lots of access inside.
Keezer-Day28b.jpg


And finally somehow i lucked out, the gap between my freezer wall and the cabinet is almost exactly 3.25" which is the width of a gang box. You can see i accidentally cracked the faceplate while shoving it in...dont care its not visible and serves its purpose of keeping all the electronics in. I have 1 cold line wired, and 1 always on socket wired. The always on socket will likely just host a small extension cord and host the coffin fan, coffin LED lights, and Arduino when i wire it up to some microswitches to control the cabinet LED lighting at some point.
Keezer-Day28c.jpg


Now i just wait for SWMBO to return from a trip tomorrow to give the final go/no go on the stain if we should go darker or if there are light spots im missing, then i start the multi day process of applying the many coats of semi gloss poly.
 
Got it stained and poly'd and in the house, yay it actually fit...you measure and measure and convince yourself its going to fit, but you never know with big furniture until you try to do it :)

Keezer-Day30a.jpg

Keezer-Day30b.jpg


Its definately a big beast, need to move some other furniture around to get it centered on the wall properly. Also very important i'll need to reposition my beer posters to the left and right as they are partially blocked by the coffin now :)

Today i am going to work on getting the LED lights in the coffin set, as well as finishing up getting my hoses in...turns out I lost one of my beer ball lock and swivels so had to buy new one today at the LHBS.
 
Looks great! Thanks a lot for the detailed steps. I've decided to attempt to build a similar one. Quick question, I assume you cut some holes in the top of the freezer lid and ran pvc piping to the taps similar to the original builder did? If so, have you noticed any issues with the cooling of the taps doing it this way? Do you have any pictures of the fan placement?
 
Older thread but in a search for new keezer ideas came across this and after showing the SWMBO the pics, she is on board. Fuzze, would you mind sharing the Sketchup model you have? Even if incomplete would be a great starting point for designing this thing.
 
Sure but it will have to wait. . just got married last week so on honeymoon. No access to the files for another week or so.

I'll update this as I finish the build, been busy the last month or so with wedding stuff so havent finished the build.

It's a big beast, if I had to do it again I'd probably only use 1 by 6s instead of 1 by 8 to frame the cabinets. The extra storage space is nice though.
 
Lol so much truth.

No rush at all. Congrats man! I would not be starting this project for a few months anyways as I am moving into my new condo in a month and have enough stuff to deal with. Just want to be plenty prepared!
 
Yea he posts here too,I had a long back and forth with him on reddit about his process and he's right a lot of it will be custom as you go. Because none of my measurement were exact as I wanted I just modified where needed. The only constraint I had was it had to be under 34 inches deep or it wouldn't fit through any doors. I have to take the lid off and bring it in sideways then reattach it. Not a big deal, just something I have to do whenever I move again.
 
Looks great! Thanks a lot for the detailed steps. I've decided to attempt to build a similar one. Quick question, I assume you cut some holes in the top of the freezer lid and ran pvc piping to the taps similar to the original builder did? If so, have you noticed any issues with the cooling of the taps doing it this way? Do you have any pictures of the fan placement?

I responded to you in pms but never here, so in case anyone else cares I didn't copy his design. Mine is two holes, one blows air up out of the freezer into the box and across the taps and down. The hole down back in is where I feed my lines up. I already had a 3.5 inch hole saw for the wine holes so used that for both holes and it works great
 
It's looking looking good I dig the LEDs. I had always planned on adding LEDs but haven't gotten around to it. I figured you had finished the build once the PMs on reddit stopped rolling in.

What are you planning on doing for the bar top?
 
It's looking looking good I dig the LEDs. I had always planned on adding LEDs but haven't gotten around to it. I figured you had finished the build once the PMs on reddit stopped rolling in.

What are you planning on doing for the bar top?

Some type of wood likely, they also make wood pergo that looks like stone, so we may loom at that also. Wish it was done, long project...but wedding trumped it the last few month or two :)
 
Quick update since i havent finished yet, busy getting married and such. Now that its over and we're back from the honeymoon I have some more time to finally finish this project up.

We found some nice wood at Lowes we actually like, its engineered hardwood(not laminate) bamboo flooring. They have a light and dark color and we went for the darker of the two as the other one is a bit too light and contrasts a bit much.
Just a few pieces put down to see what it looks like. Because of the already hefty weight of this keezer with all of the extra wood and potential storage we decided against tile, so we dont end up busting the caster wheels :)
Keezer-Day31.jpg


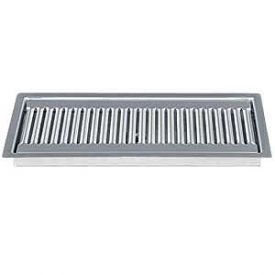
Im waiting for my 24" drip tray to show up Thursday so i can finish cutting the wood, ****s expensive but ive already blown so much money on this project whats another $100 ...

Thankfully they are on sale at Beveragefactory, got the inset one with the stainless cover. Although i realized that this drip dray is .75" deep and the bamboo is only 5/8 thick. So ive come to the conclusion that because my top is plywood i will just use a chisel to cut away the top layer of plywood or so where the drip tray goes...i think this should give me adequate depth to get it flush with the top and not compromise the strength of the lid which is 3/4" thick and i only need another 1/8th or so of space. So it should end up looking something like this(only 2x longer as this is the 12")

tn2_large_dp-220d072110084438.jpg
 
Wow! This thing is amazing! I'm hoping to just figure out a simple collar on a freezer.

Nice work.
 
My lazy ass finally got around to ordering cabinet doors that came in today. Need to stain them and hopefully in another week or two it will be totally done and ill post pics :)
 
Bump! Hey Fuzze, what's she look like nowadays? And how hard is it getting into the freezer to swap kegs or wipe it down, since there is an extra buffer (the shelving & wood) around the freezer?
 
Any finished pictures? I'm looking at doing something like this and found this thread. I really like the idea. Also, have you had any issues with blocking the vents for the freezer?
 

Latest posts

Back
Top