You are using an out of date browser. It may not display this or other websites correctly.
You should upgrade or use an alternative browser.
You should upgrade or use an alternative browser.
First brewday on DITCHES build - lots of beer porn!
- Thread starter Budzu
- Start date

Help Support Homebrew Talk:
This site may earn a commission from merchant affiliate
links, including eBay, Amazon, and others.
nostalgia
Well-Known Member
Thanks Budzu. So do the switches for the elements just break the connections to the SSRs? They certainly aren't beefy enough to kill the element itself - they're rated 6.5A at 120v.
-Joe
-Joe
OP
OP
Budzu
Well-Known Member
Nostalgia:
You are right, the switches do not switch the elements, rather they switch the "contactors" (located to the direct right of the SSR's), which in turn switch on or off both legs of the power to the 2 elements. If they are off, they are off no matter what the BCS says. If they are on, they are controlled by the BCS.
There is no hard "on".
As to the pumps, I do not plan to automate them whatsoever. Priming is always a manual issue with the March brand pumps, so it involves actively switching on/off, whatever you need to do to fill the lines with liquid. If I had peristaltic pumps then I could think about automation..
And Jmurm: you will be so happy to find that the BCS is super easy to program! Right now I am not using manual mode but have a 7 state process programmed that gets me through the entire brew day, preheat to chill. And there are like 7 processes you can preset. 7 states are max per process.
It will make alot of sense once you get into it via your browser. Very intuitive, and I spent maybe 30 minutes getting the entire process programmed. You are in for a real treat! good luck and have fun!
jjyoung
Well-Known Member
Very nice system. Maybe someday....
One thing I've always been curious about regarding these types of systems is the difficulty of cleanup. If you have your chiller permanently attached to your kettle I'd think it would be fairly difficult to clean. I imagine there's still some scrubbing required even if you run Oxyclean through it. In addition, do you need to disassemble to finish the cleaning so you can tilt the kettle/LT/MT and give it a final rinse out, or do you have some other method of doing it?
One thing I've always been curious about regarding these types of systems is the difficulty of cleanup. If you have your chiller permanently attached to your kettle I'd think it would be fairly difficult to clean. I imagine there's still some scrubbing required even if you run Oxyclean through it. In addition, do you need to disassemble to finish the cleaning so you can tilt the kettle/LT/MT and give it a final rinse out, or do you have some other method of doing it?
android
Well-Known Member
sick system. thanks for sharing!
soGGy
Active Member
Wowowowow! Talk about a lot of work, looks awesome! The 5500 watt heating elements must cost $$$ to run. How long does it take to bring to a boil compared to gas?


$10.99 ($31.16 / Ounce)
Hornindal Kveik Yeast for Homebrewing - Mead, Cider, Wine, Beer - 10g Packet - Saccharomyces Cerevisiae - Sold by Shadowhive.com
Shadowhive


$176.97
1pc Commercial Keg Manifold 2" Tri Clamp,Ball Lock Tapping Head,Pressure Gauge/Adjustable PRV for Kegging,Fermentation Control
hanhanbaihuoxiaoshoudian


$82.50
Wilbur Curtis Brew Cone Assembly with Splash Pocket, High Volume - Commercial-Grade Brew Basket - WC-3422 (Each)
Global Commercial Parts


$7.79 ($7.79 / Count)
Craft A Brew - LalBrew Voss™ - Kveik Ale Yeast - For Craft Lagers - Ingredients for Home Brewing - Beer Making Supplies - (1 Pack)
Craft a Brew


$53.24
1pc Hose Barb/MFL 1.5" Tri Clamp to Ball Lock Post Liquid Gas Homebrew Kegging Fermentation Parts Brewer Hardware SUS304(Gas MFL)
yunchengshiyanhuqucuichendianzishangwuyouxiangongsi


![Craft A Brew - Safale S-04 Dry Yeast - Fermentis - English Ale Dry Yeast - For English and American Ales and Hard Apple Ciders - Ingredients for Home Brewing - Beer Making Supplies - [1 Pack]](https://m.media-amazon.com/images/I/41fVGNh6JfL._SL500_.jpg)
$6.95 ($17.38 / Ounce)
$7.47 ($18.68 / Ounce)
Craft A Brew - Safale S-04 Dry Yeast - Fermentis - English Ale Dry Yeast - For English and American Ales and Hard Apple Ciders - Ingredients for Home Brewing - Beer Making Supplies - [1 Pack]
BellaRae


$58.16
HUIZHUGS Brewing Equipment Keg Ball Lock Faucet 30cm Reinforced Silicone Hose Secondary Fermentation Homebrew Kegging Brewing Equipment
xiangshuizhenzhanglingfengshop


$22.00 ($623.23 / Ounce)
AMZLMPKNTW Ball Lock Sample Faucet 30cm Reinforced Silicone Hose Secondary Fermentation Homebrew Kegging joyful
无为中南商贸有限公司

$53.24
1pc Hose Barb/MFL 1.5" Tri Clamp to Ball Lock Post Liquid Gas Homebrew Kegging Fermentation Parts Brewer Hardware SUS304(Gas Hose Barb)
Guangshui Weilu You Trading Co., Ltd


$33.99 ($17.00 / Count)
$41.99 ($21.00 / Count)
2 Pack 1 Gallon Large Fermentation Jars with 3 Airlocks and 2 SCREW Lids(100% Airtight Heavy Duty Lid w Silicone) - Wide Mouth Glass Jars w Scale Mark - Pickle Jars for Sauerkraut, Sourdough Starter
Qianfenie Direct


$45.74 ($45.74 / Count)
Brewer's Best Home Brew Beer Ingredient Kit - 5 Gallon (Grapefruit IPA)
Amazon.com


OP
OP
Budzu
Well-Known Member
Very nice system. Maybe someday....
One thing I've always been curious about regarding these types of systems is the difficulty of cleanup. If you have your chiller permanently attached to your kettle I'd think it would be fairly difficult to clean. I imagine there's still some scrubbing required even if you run Oxyclean through it. In addition, do you need to disassemble to finish the cleaning so you can tilt the kettle/LT/MT and give it a final rinse out, or do you have some other method of doing it?
The coils aren't actually permanently attached. I used these handy little fittings from bargainfittings.com, called unions. I just need to unscrew them and the whole coil pops right off.

http://www.greatbargain.net/order/shop2.html
So every brew I do remove the coil from the BK and clean it manually. Otherwise cleanup isn't bad, its easier than what I was doing before, now that I can pump oxyclean around. Most of the cleaning gets done during the boil (HLT and MT).
As for the MT, I never move it, I just scoop out most of the grain with a big scoop, then shopvac it clean before pumping oxy into it and scrubbing a bit with a brush. Rinsing it is easy with the bottom drain and the removable false bottom. Then everything gets a nice soak of starsan before I call it a day.
I'm thinking every 5 brews or 3 months I'll do a full disassembly and cleaning.
OP
OP
Budzu
Well-Known Member
Wowowowow! Talk about a lot of work, looks awesome! The 5500 watt heating elements must cost $$$ to run. How long does it take to bring to a boil compared to gas?
The boil comes super quick. I did water tests with 14 gallons and I think I had 55-170 in about 50 minutes, 170-boil in 12 minutes. I was using propane before with a rusty turkey fryer setup, and it is no contest. I have not calculated what the element actually costs to run, but with PID's controlling them, they are only running when they need to, and there is NO lost power. Propane was costing me alot of $, and I was losing alot of heat that way. My electricity is cheap and my house doesn't consume much. However, the brewery is growing and will soon meet the limit of its 100 amp service
")
jjyoung
Well-Known Member
I never thought of using a Shop Vac to clean things out. I can see where that would make it easier.
nostalgia
Well-Known Member
Is contactor another word for relay? Any reason you went that route instead of a high-amp switch like the one you used for a main power disconnect?Nostalgia:
You are right, the switches do not switch the elements, rather they switch the "contactors" (located to the direct right of the SSR's), which in turn switch on or off both legs of the power to the 2 elements. If they are off, they are off no matter what the BCS says. If they are on, they are controlled by the BCS.
There is no hard "on".
-Joe
OP
OP
Budzu
Well-Known Member
Is contactor another word for relay? Any reason you went that route instead of a high-amp switch like the one you used for a main power disconnect?
-Joe
Yeah, its a mechanical relay. The big disconnect is only turned by hand. It cannot be controlled by a switch. The relays are cheaper and can be switched by the 120v switches.
I have yet to install the remote handle for the disconnect, but it will give me a big red on/off on the outside of the door for the whole system.
OP
OP
Budzu
Well-Known Member
Today is the day... first time to test the 24 gallon batch mode. It's our club's big brew day and we're going to run 2 back to back 24 gallon batches and make about 8-9 corny kegs worth of my Clementine Extra Pale for the Southern Brewer's fest in Chattanooga this August. Clementine is a winning fruit beer with a balance of Clementine zest and citrus hop flavor/aroma.
I have only been brewing at night so far on this thing, but today the weather is unseasonably cool (70F highs) and I think it won't be quite such a sauna in there
I have only been brewing at night so far on this thing, but today the weather is unseasonably cool (70F highs) and I think it won't be quite such a sauna in there
bendavanza
Well-Known Member
Budzu
1) very cool setup and 24g out of keggles is fantastic.
2) I like clementine zest, too! I shave them with a peeler and lay the zest on a screen or paper towels by the window, they are so much more orangey than the stuff in the bag at lhbs. In this pic, clockwise from left, LHBS orange rind, clementine rind, clementine zest. Care to share your recipe?
OP
OP
Budzu
Well-Known Member
Hi Ben, noticed you have a nice rig built as well, I like!
I'll definitely share the recipe, its pretty simple.
85% 2-row
10% white wheat
5% crystal 10
152ish mash
23 IBU Summit - 60 minute
3 IBU Cascade - 15 minute
.75 oz summit per 10 gallon - 0 minute
1 oz cascade per 10 gallon - 0 minute
1.050 post-boil
As for the zest, I take only the very outer layer with a zester, no white. I soak this in 2 oz vodka per clementine, for 1-2 weeks or the length of fermentation. I keg and carb, then add zest when its ready for serving. I will add 1/2 oz of vodka solution to the keg at a time, mixing in and tasting as I go until the clementine flavor matches but does not exceed the hop character. I usually end up using a total of 1 clementine or slightly less per 5 gallon keg. This is the important part of the recipe, to balance these flavors correctly. I've won gold with this in fruit beers in BJCP, and I've also gotten comments like "not enough fruit character for style". But regardless it should not be dominated by the clementine. When balanced, this beer is awesome.
OP
OP
Budzu
Well-Known Member
The big brew day went great The 24 gallon batch idea is wonderfully effective and I got over 80% efficiency. I will certainly be doing that again.
Almost had a march pump tragedy last night however:
Last night I brewed a 12 gallon batch of a black IPA at 1.075 gravity. Everything was going swimmingly until during the sparge I heard a funny noise then started smelling a burning smell that was different.
I sniffed around then noticed that my wort pump was hot as all hell, and was not rotating. I thought for sure it was dead.. tried starting it up again several times and it just stayed hot. So... to finish the fly sparge I had to put the kettle on the floor and gravity drain from MLT. Then before the boil I hoisted it (full of 14 gallons to almost the brim) back onto the stand and went on with it. I ended up chilling with the sole working pump recirculating wort, and a pond pump recirculating some ice water.
The morning after, I inspected the pump closely. The moving parts were all stuck. I removed the wet assembly and opened it up. The impeller thing (that moves the wort) was lodged to the axle by a tiny paper-thin skin of grain. This had stopped everything from moving in the pump including the motor and magnet.
When it happened, the pump heated up to the point it would blister your skin if you touched it. Now its just fine, once I dislodged the grain bit.
There has to be some way to avoid this! Surely if I had let it run it would've totally burnt up. And it would've been tough to notice. I'll be trying to think of some safeguard. Until then I'll keep rolling with it and pay close attention.
The 24 gallon batch idea is wonderfully effective and I got over 80% efficiency. I will certainly be doing that again.Almost had a march pump tragedy last night however:
Last night I brewed a 12 gallon batch of a black IPA at 1.075 gravity. Everything was going swimmingly until during the sparge I heard a funny noise then started smelling a burning smell that was different.
I sniffed around then noticed that my wort pump was hot as all hell, and was not rotating. I thought for sure it was dead.. tried starting it up again several times and it just stayed hot. So... to finish the fly sparge I had to put the kettle on the floor and gravity drain from MLT. Then before the boil I hoisted it (full of 14 gallons to almost the brim) back onto the stand and went on with it. I ended up chilling with the sole working pump recirculating wort, and a pond pump recirculating some ice water.
The morning after, I inspected the pump closely. The moving parts were all stuck. I removed the wet assembly and opened it up. The impeller thing (that moves the wort) was lodged to the axle by a tiny paper-thin skin of grain. This had stopped everything from moving in the pump including the motor and magnet.
When it happened, the pump heated up to the point it would blister your skin if you touched it. Now its just fine, once I dislodged the grain bit.
There has to be some way to avoid this! Surely if I had let it run it would've totally burnt up. And it would've been tough to notice. I'll be trying to think of some safeguard. Until then I'll keep rolling with it and pay close attention.
OP
OP
Budzu
Well-Known Member
Well sweet, got an AHA site feature! Thanks to a gentleman who saw it on this site. Thanks Steve!
http://www.homebrewersassociation.org/pages/community/pimp-my-system/show?title=adam-hales-d-i-t-c-h-e-s
http://www.homebrewersassociation.org/pages/community/pimp-my-system/show?title=adam-hales-d-i-t-c-h-e-s
Boerderij_Kabouter
Well-Known Member
Awesome write up! Thanks for the props man, but your system is all your own! Great work

wildwest450
Well-Known Member
- Joined
- Dec 27, 2007
- Messages
- 8,978
- Reaction score
- 191
is also home to one of the finest homebrew systems that side of the Mississippi River." We'll just have to see about that! J/K, cool setup, I hope to see it in action someday. I have yet to decide on the direction i'm going to take.
P-Lay
Well-Known Member
Just read the whole thread. Awesome build! Glad that pump problem was just a grain particle and not something worse.
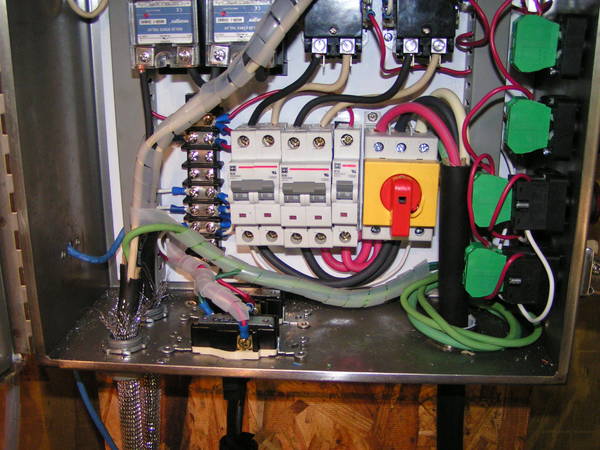
Quick question: In this picture what are the modules to the left of the main power disconnect? You mentioned you got some of your parts from Automation Direct. Are they the supplemental protectors listed here? Are you using them in place of regular fuses and as manual disconnects?
Thanks. I'm trying to figure out your wiring.
OP
OP
Budzu
Well-Known Member
Hey P-lay
Yes you have it right. When I bought my supplementary breakers, they were cutler hammer brand and were about to be replaced with what you linked. The only difference is yours now are $1 cheaper.
All 3 breakers are the "B curve" versions, which have the lowest trip limits. D curve for instance will not trip until larger loads are applied, and I think are designed for motor starts.
The big disconnect is for everything, and it can handle 63amp. It shuts off the neutral, and the two hots. Directly to the left of it is a 10 amp single pole. This supplies everything that is 110v (pumps and bcs), and is split off by the terminal bar to the left of the breakers. I chose a 10 amp because the switches I have on the outside recommend using a 10 amp circuit protection. Notice also that the hot entering the 10a breaker is still 8 gauge wire. It is then 16 gauge coming out (slightly oversized). None of my wiring has an opportunity to be overloaded. This is a better option than what you see some people do, splitting off of terminal blocks, which offer no such protection of wiring.
The other two breakers are double pole 30amp. They are supplied by 8gauge and output with 10gauge, which then go to the contactors above, which are switched by the 110v load coming from the external switches.
The breakers provide both circuit protection and a means for a semi-permanent shut-off in-case a certain component of the system needs to be tested or is damaged.
Good luck with everything, holler if you need any other clarifications.
P-Lay
Well-Known Member
Budzu - Great information! Thanks! It's making sense now.
Similar threads
- Replies
- 10
- Views
- 2K
