• Please visit and share your knowledge at our sister communities:
  • If you have not, please join our official Homebrewing Facebook Group!

    Homebrewing Facebook Group

Electric burners - Any builders out there?

Homebrew Talk

Help Support Homebrew Talk:

This site may earn a commission from merchant affiliate links, including eBay, Amazon, and others.
yes, but you have a more modules than you really need. each module can have a wire connected to both sides of it.

So, with two of the modules jumpered together, you can connect 4 wires together at that point.
 
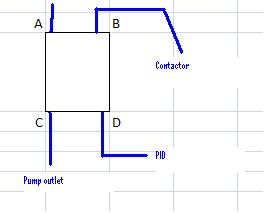
I gotcha. So the power feed in, then 3 terminals to pull off (using the remaining 3 spots) - see pic.

I think I am going to go with this switch. I assume 125V is ok? It will only get a feed of 120.

http://www.mouser.com/ProductDetail...=sGAEpiMZZMvudeGI7i40XNZb1JQ3EZ0V51GgJXHqhCg=


Assumptions:
1. A would be from the wall line into the box
2. the box represents two terminals jumpered together

So it looks like I would need 10 terminals. But I will grab a few extra for potential future upgrades

A.JPG
 
yes. 125 is greater than 120. :D

Like I said, insecure much about electrical?... yup

haha.

Just about to place a mouser order - thanks a lot for the help walker!!

Almost all my stuff for the box is in, in the mail, or on order. Wouldn't ahve been able to gather it all without your help!

And yes, that would be my neutral terminal

If it's not too late... make sure you order some extra terminal modules. They are cheap, but if you have to go back in a month and order 2 more and play shipping on them, it would suck.
 
Ha - my thoughts exactly. I ordered some extra partitions, terminal modules, jumpers and even switches. Just in case I get a bad one, or in case I count wrong.

I am hoping to dry fit everything in the auberins box this weekend and plan out my layout for wiring (make it pretty).

I think I am going to run everything on 12g wire in the enclosure (except for the element which will be on 10g). Figured it will be easier to buy 4 wire color types in 12g than some on 12 and some in 14).

Now the trick is to dodge my wife and get all these packages in the house - to minimize the appearance of cost! :mug:
 
Walker wanted to ask you. I am going to either run a long extension line (10/3 rubber coated all weather) from pots to auberins box, or (10/4) from the 240 outlet on the garage wall to the auberins box.

Do you find with your set up you prefer to have your PID closer to the brew stuff? Or do youhave it a bit away and on the wall?

Part of me is thinking I want the box on the wall, away from harm (boiling work, HLT spills, etc.). Another part says it might be cheaper to run the longer 10/4 line so the cords to the HLT and BK are shorter.

Any usability thoughts from your own system?
 
I have a 10/4 running to my control panel, and 8 ft of 10/3 SOOW to each kettle from there. My control panel box sits on a fold out table well out of harms way. Close enough to flip a switch to turn on the pump, but far enough away that it doesn't get splashed. Works pretty well..

BTW, the 16 feet of 10/3 was about $25 total from Lowes at I think $1.65 a foot.
 
I was actually surprised at how cool some of the bulk wire was at HD. Thanks for the tips!
 
Do you know (roughly) how much wire you used in your panel (the THHN stranded stuff?)
 
my panel sits pretty close to my HLT, but the HLT only has water in it for a very short period of time.

left to right: panel, HLT, boil kettle, MLT.

all_stainless_now.jpg


I bought two rolls of 14 gauge stranded THHN for my internal wiring. One 20' roll of black and one 20' roll of white. I used less than half of the black and even less of the while.

For the heavier gauge stuff that carries the 30A feed, I bought just a few feet of red, black, and green.
 
Cool - I figured about 10 feet of each color was overkill (I was thinking 10 feet of each color in 12g and 10g, less the white for the 12g wiring), that sounds about right. Thanks for the pics and the info. Can't wait to start dry fitting it all in. I probably should just roll with the 14g, but I thought the price was so close...

Just grabbed all the plugs and faceplates I think I need from HD on my lunch. Now it is just the wires I need to grab.

Scored access to about 15 various greenlee conduit punches from my neighbor (not the radio/chassis type, but should work for some of the holes I need to cut in my project box).

It is tough... I want to brew, but now I am "amped" about this project. The wiring is making a lot of sense to me, so that is cool too. Though before I connect anything I will be letting a cert electrician confirm the goods.
 
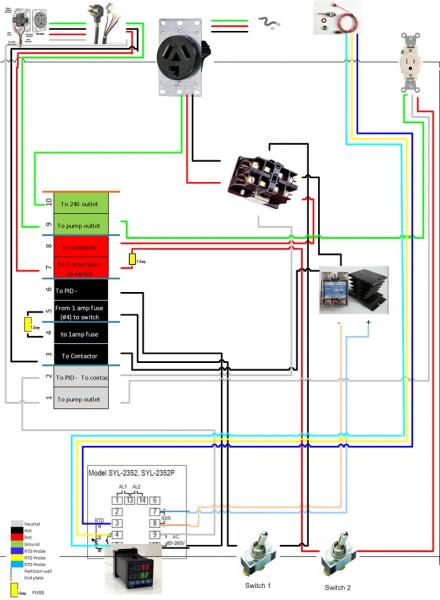
Hey guys - If you can check this out and let me know if you have any suggestions please let me know. This is the layout I am planning for the auberins box (the box is to scale but the components aren't). If I add the herms portion of this, I should be able to squeeze things in and put in another outlet (if needed). I have to check the wiring to see if the PID wiring is any different.

Anyway, have a look and if anything glares out - please let me know.

Thanks again for the help!

Control Panel Box Wiring.jpg
 
something is not right. You have the terminal block labeled "to contactor" going to the SSR, and the terminal block on one side of the 1A fuse isn't connected to anything.
 
Oh.. hang on. I see what you mean. 1A fuse terminal is jumpered to the incoming black line, so it's just the label on the one that says "To Contactor" that should instead read "To SSR", right?
 
You are right - it should say SSR instead of contactor - I screwed that up - but late in the game

edit : unfortunately it isn't easy to change that terminal graphic. My ghetto paint skills were at play for that one.
 
The only thing I see missing is the explicit mention of a ground wire connected to the metal box itself. Just a wire from the right side of terminal block "10" screwed down to the enclosure itself to ground the whole box.
 
Great point - I totally forgot about the ground wire to the box. That is kind of a big deal!
 
Wiring changes if you end up adding a second electric kettle or something would be add a second 240V receptacle, a second contactor, and swap on the ON/OFF toggle switch for the contactor you have now for an ONa/OFF/ONb toggle that will cause one of the two contactors to be enabled for ONa and ONb settings, or both contactors off in the center position. SSR input stays the same, but output feeds to both contactors in the system instead of just one.
 
looks good to me. now.... just follow the advice in my sig and take it to an actual electrician instead of some dudes on the internet. :D
 
I should probably lay in the changes, or put in the hardware the first time. I bought two contactors, so I would just need to grab another outlet and put in another switch with the on-of-on. This way, all the wiring is in.
 
looks good to me. now.... just follow the advice in my sig and take it to an actual electrician instead of some dudes on the internet. :D

Absolutely. And when I build it - someone will be performing QA (i.e. a union electrician). I understand the concepts on some level, and can bend wire. I also can fry my own @ss pretty quick.
 
Basically I wasn't sure if the neutral was good as it is, or if it should be on a switch. I think I have the rest right. Each should get its own ground I think.
 
P-J:

So you would wire the black hot from the SSR, #9 terminal red and one ground from say terminal 11 into the switch and split out those three lines to the two respective plugs?


What about the neutrals from terminals 2 and 3 - these are unnecessary?

And the hot blacks from terminals 6 and 7 to contactors?

Is that switch rated high enough? It says 250V at 15amps, I have 5500W elements; therefore 23-24 amp draw. Or is that 250v and 15amp on each leg?
 

Latest posts

Back
Top