Does anyone out there own a TOP TIER?

Homebrew Talk - Beer, Wine, Mead, & Cider Brewing Discussion Forum

Help Support Homebrew Talk - Beer, Wine, Mead, & Cider Brewing Discussion Forum:

This site may earn a commission from merchant affiliate links, including eBay, Amazon, and others.

HickoryMike

Well-Known Member
Joined
Nov 18, 2009
Messages
345
Reaction score
4
Location
Anchorage
I have scoured the web looking for videos on the top tier and there are two....one is boring, one is awesome. I have searched tirelessly for a forum thread that reviews the system.....I have found of few, but they consist mostly of people that have never owned or seen the unit complaining about the pricetag. There is one review at The Brewing Network, but it's a fella that's uses an electric system. Surely more than a handful of people use a Top Tier--it's Blichmann after all.

So, I'm putting out the call:

DO YOU OWN A TOP TIER? Tell us about it, please!

Mine will arrive any day now and I want to get feedback/ideas on how to arrange my system.

Thanks.
 
I've never heard much around here about them, but they look pretty straight forward to me. How did you get yours configured?
 
Blingman is crazy expensive. We're more of a DIY community. I've not seen any in the "Show us your brew rig or sculpture" thread. Perhaps the high price tag for what it is and the lack of being able to find anyone else with one should be the only info you need about them?
 
And, like every other thread about the Top Tier, no one shows up to talk except those that say "I could build that for $100."

Well, I COULDN'T build that for $100. A matter of fact, if someone showed me a system that looked like the top tier with all the same customization opportunities and quality of construction and said "I built that for $600 + 20 hours of labor" I would stand up and applaud them. I would salute my screen as I drooled over the accompanying photo-thread on HBT.

That 20 hours of labor is extremely costly for me. I have a two-year-old, I am a full time student, and I am in the middle of an unpaid, full time internship. I want to spend what little time I have brewing. So, when I consider the following 2 options:

a) try to design a decent system, spend a few hundred bucks, spend a year putting it together, probably end up with an average quality build (because I'm the one doing this, afterall)

or

b) Pay $800, know I got top quality, know I have something that will grow with my brewing education, know that the thing will be on my doorstep in a week, know that I will be the envy of my homebrew club, and know that I'll be brewing instead of fabricating

Choosing B is very easy for me. That couple hundred dollar difference is waaaay worth it when I consider everything else involved in the decision.

Now, I know many, many, many of the folks on here find the fabrication of a stand to be even MORE enjoyable than brewing and drinking their beer. I get that. I also enjoy drilling pots, assembling hardware, building a mash tun and smaller projects, but with my life situation, a looooong project isn't in the cards.

Rant over. Now, if someone has some experience with this system and would like to describe how they set things up, I would love to hear it.
 
There is a guy here who built one. It ended up costing him about the price tag of a top tier if I recall correctly.

I have seen the system in action several times and can say without a doubt it is a great system. Northern Brewer uses one in there Milwaukee test brewroom/classroom. It can be changed around, is rock solid, and looks great.

Not sure what you need to know other than that. It is a system designed to allow you to do what you want. It doesn't have a default setup or anything. It is just a nice carcass to build a brewery with.

Any specific questions?
 
I have a top tier and I love it... don't let anyone discourage you from getting one. I love building stuff as much as the next guy, but I am in the same boat as you Mike. I have a 4 month old and a very demanding job so my free time is worth quite a bit to me. When I ran the numbers of building from scratch vs buying a full built frame vs the top tier, the top tier won every time when I considered the cost of my time. To each his own, but I would rather spend my disposable income and time brewing beer instead of building. I bought the stand, 3 burner tiers, an additional shelf and 2 pump mounts for under a thousand. Some people might call that "crazy expensive", but not in my book. I got a stand shipped to my door and I still got the DIY experience I wanted by putting it together and configuring it the way I wanted, a good compromise in my opinion. I'm traveling right now for work but when I get home later this weekend I will take some pictures of it for you. I have it setup in basically a "single tier" with 2 pumps and electric gas valves, all controlled by a BCS-460. PM me if you want and I can get you all the info you need... thank god for wifi on airplanes now.
 
Not sure what you need to know other than that. It is a system designed to allow you to do what you want. It doesn't have a default setup or anything. It is just a nice carcass to build a brewery with.

Any specific questions?

Well, I'm curious how to arrange my three vessels. I'll have a pump, so the options are limitless. I'm curious about the stories that go like this: "I tried xyz, I thought it would be awesome, but it wasn't. I ended up changing things around and now I like it THIS way."

User pics would be awesome (since they don't currently to exist....go try a google image search). I would love to see how people arrange their vessels, pumps, shelves, & chillers. There's so little user feedback available on this stand currently available.....let's change that.
 
I have a top tier and I love it... don't let anyone discourage you from getting one. I love building stuff as much as the next guy, but I am in the same boat as you Mike. I have a 4 month old and a very demanding job so my free time is worth quite a bit to me. When I ran the numbers of building from scratch vs buying a full built frame vs the top tier, the top tier won every time when I considered the cost of my time. To each his own, but I would rather spend my disposable income and time brewing beer instead of building. I bought the stand, 3 burner tiers, an additional shelf and 2 pump mounts for under a thousand. Some people might call that "crazy expensive", but not in my book. I got a stand shipped to my door and I still got the DIY experience I wanted by putting it together and configuring it the way I wanted, a good compromise in my opinion. I'm traveling right now for work but when I get home later this weekend I will take some pictures of it for you. I have it setup in basically a "single tier" with 2 pumps and electric gas valves, all controlled by a BCS-460. PM me if you want and I can get you all the info you need... thank god for wifi on airplanes now.

The only thing I don't like about the Top Tier is that I would have to use a ladder; so I would be VERY interested in any additional information and pictures you had to share! I'm in the early stages of considering a brew sculpture and gathering pros\cons of tiered versus flat. I'm a big fan of flat, but already have a 15 gallon Boilermaker, one Top Tier burner, Therminator and a March pump; it seems to be calling for a Top Tier rack.

HickoryMike, I hope to be up in your neck of the woods in about six weeks doing some riding at Brushy Mountain.

I can't wait for the fall colors....we'll both be out there, trust me.

I'm getting a pump so I could go with a single tier set up if I wanted. I am not planning to do any work on a ladder either. In addition to the pump, I purchased megapots because they aren't very tall (only 17" if I remember right). I believe I could do a 3 tier, gravity feed with these pots and still be able to peek into the top vessel (I'm 6'1", if you're 5' you might be SOL).

Flexibility is awesome, now I need to figure out what the hell to do.
 
I haven't seen one set up like this, but the first thing I would try would be a quasi single tier. Basically, use three sides of the stand and put the burners (or shelves) all that the same level on three sides. You would need to control via pumps, but that is my preference anyway.

If you don't like that, I would next go to a pyramid. MLT elevated, and the HLT and BK on about the same level. Then you only need one pump and if you want to fly sparge you can achieve constant flow rate by pumping into the MLT and gravity draining into the BK. If you gravity drain the hot liquor into the MLT you get varied flow rate as the HLT empties, but the level in the MLT stays constant so gravity works well.

Ladder smadder. You could use a step stool if it made you feel better.

I'm leaning towards the pyramid, just as you've described. I'm currently a simple batch sparger using a converted cooler, so fly sparging isn't really something I'm worried about.
 
I know this isn't a Top Tier, but it seems kinda similar to me. [ame]http://www.youtube.com/user/sentrealty#p/u[/ame]
 
I have a top tier but choose to use gravity and a cooler. Fly sparging is a snap. The only thing I use my pump for now is recirculating for cooling/aerating, and transferring to the fermenter.

The things I like most about my top tier is the small footprint and it's mobility. I pull it out of the garage during the summer and am able to balance it nicely anywhere on my driveway. I also liked that it took only about two hours to assemble, then i was off and brewing.

I highly recommend you go ahead a purchase the pump mounting bracket and therminator bracket because going back and adding them later, after the burners have been attached, was a real pain.

The one thing I want to add is a raw water manifold. Right now I just attach the hose to the hlt outlet on the third tier and fill with water but would prefer to attach a hose to a bottom inlet.
 
I highly recommend you go ahead a purchase the pump mounting bracket and therminator bracket because going back and adding them later, after the burners have been attached, was a real pain.

This is a really easy fix: Simply remove the 3 "burner to post" bolts from the burner on one side. Remove the tee-slot nut. Next drop in the square tee-slot nuts one at time to the proper position. You can now move them up and down in the tee slot with a screwdriver or similar device (nail).

To the OP:

Id say the best way to position the tiers on the TopTier (after building several at the shop), is as follows:

To keep tripping over the wheels at a minimum, keep the wheels positioned away from you. Position one wheel on the other side of the post, and the other either to the left or the right. This will position the post square to the user.

Starting from the bottom up, position the boil kettle burner closest to the user, as far as it can get to the bottom. The gas nozzle of the BK burner can be placed to either the right or left. But, because of how the gas manifold is installed, the position of the MLT burner dictates which side the gas nozzle is positioned. Since the gas manifold is mounted 180* away from the MLT, the gas nozzle on the BK will be positioned to the side opposite of the MLT. For example: If the MLT is mounted to the left side, the gas manifold is going to be on the right, and because of that, the boil kettle gas nozzle is directed to the right.

So in case you haven't figured it out already, the BK burner is mounted closest to the user and all the way down, and the MLT burner is mounted adjacent, either to the right or left of the BK. The elevation of the MLT burner is defined by the pre-boil volume elevation in the BK and the end of laughter level in the MLT. If the MLT 'end of laughter' level is above the pre-boil volume level, a complete fly sparge is possible.

The HLT is positioned to the side opposite of the MLT. And for the same reasons, its gas nozzle is positioned closest to the user, regaurdless which side the burner is mounted. The same goes for the MLT. I need to photograph this. Anyway, the HLT burner's elevation is determined by your fly sparge hot liquid delivery method. I keep my whole system as low as possible to make filling and stirring easy. To fill my HLT, i simply flop a hose down in the pot and watch the volume rise in the level gauge.

One more note: the instruction manual has a mash ton of information about how to set it up.


What do I think of mine? I Love It!
 
I own one and posted pictures here and on the brewing network forum -- along with very long reviews of the whole setup.

After brewing with it for the entire spring and summer -- my sense is that it's awesome. It's rock solid, build like a fricking tank, and does exactly what I need it to do with a minimum of fuss. I run a 220V eHERMS setup from it and love it -- absolutely love it. I have 3 15 gallon kettles, a 4500W element in the HLT and a 5500W element in the BK. Temp controlled with a single Ranco at the HX-out. I pump from HLT --> MLT for fly sparging, and then gravity from MLT-->BK. I also recirc the HLT water with the second pump (which doubles to whirlpool the wort after the boil.)

There's a sense that it's not as cost effective as if you build it yourself (I suspect it's cheaper) and there's a sense that's it's not as cool as fabricating one yourself (I suspect it's much cooler to be brewing than building, but I'm not a fabricator, so my ideas of cool may be skewed.) Assembly took 4 hours or so over two days. The most difficult part of the assembly was determining where to place the shelves for the kettles. I have 3 shelves, 2 utility shelves, and 2 march pumps all bolted to the Top Tier core.

Two thumbs up from me.

Here's one link to the above review:

https://www.homebrewtalk.com/f11/my-top-tier-review-176076/
 
I've posted several times in the link below about my TopTier:

http://www.thebrewingnetwork.com/fo...sid=f58cb8aa55fcd754185d91e48b37677f&start=30

The only key thing about the configuration is to make sure that however you set it up -- you want to keep the center of gravity low. So two 15 gallon kettles at the top across from each other won't work. I ended up using the standard 3-tier config.

The only downside I've got -- and I know many people think of this as a deal-breaker or offer up some weird reluctance to do this -- is that I need a step stool to fill the HLT with my RV hose and charcoal filter. That's a downside not because it's a pain (it's not) but just in terms of safety. I found a step stool with good step treads, so if it got wet, I'd still be okay going up the step and back down.

But I fill it once at the beginning of the session to heat the water and then usually climb it a second time to top up the HLT right before I start the mash. So it's definitely do-able.

What's cool is that the MLT is below my eye level, so I can easily stir and watch the mash. BK is even lower, so as the brew day progresses, the height becomes a non-issue. I usually clean and put away my HLT and MLT during the boil.

After everything's done, I cover the whole structure with a tarp -- shelves, pumps, and all. In the winter when I stop brewing, I'll move it in the garage and stow it away.

It's been a home run for me. I know there's other structures that have a cool factor that this one probably doesn't have, but I'm making brews with dead-on mash temps that taste great. No complaints.
 
Sorry its been a few days and I've been meaning to post a few pictures so here we go. You can click the smaller pics to see larger versions of them.


I ended up sneaking in a brew on Sunday but I forgot to take pics with the pots on the stand. I'll try and snap a few if I can get in another brew this weekend.

Joe

Very cool! These are exactly the type of user photos that have been so hard to come by.

Is it hard to get to the pumps? It seems like they are sitting right under the burners. I envision a lot of crouching and working under pots.
 
Actually the pumps are pretty clear to get to as they stand out a bit from the front of the frame, the picture does make it deceiving though... besides, I generally don't mess with the valves too much once I initially get the pumps running, then I just control on/off with the BCS.
 
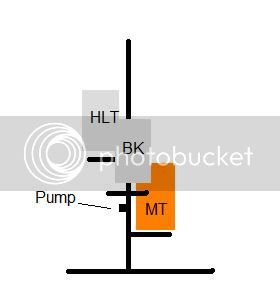
I don't have one myself, but have been thinking about configurations. I would like a pump for whirlpooling and think that this configuration may work...

Everything mounted pretty low down on the tree so that a ladder is not needed. Arranged with HLT at the hop, gravity fed to cooler. Then pump from cooler to a slightly higher BK. By having the BK a little higher it makes it easy to gravity feed down to the fermenting bucket/ carboy.

config.jpg


EDIT.. Just realized that the pump will have to go at the very bottom on this configuration, as you need to prime it from the MT which would have to be above it.
 
I made a video about my new top tier setup.

I crammed a lot of info and commentary into this video. Some may find it to be a bit dry, but there's so little user feedback out there that I thought it was important to be thorough.


Crank it up to 720p and check it out.
 
Last edited by a moderator:
Well played Sir - outstanding job. Finally an online video and decent review of this product.

I have two questions for you.
1. Do you think it would be worth having the BK a few inches higher so that you can gravity feed straight to the bucket/ carboy without using the pump?
2. Are the burners really "whisper quiet" as they claim?

Also you made a comment in the video about how you were thinking of options to wire the pump. I have my pump plugged into a remote controlled outlet (like what you use for Christmas lights). It works really well and I control the pump with the click of a button on the remote.
http://www.amazon.com/dp/B00008X5D5/?tag=skimlinks_replacement-20

I love, love, love the wireless switch for the pump. I might have to go that route.

1. I think the burner is actually high enough to gravity feed into a bucket that's on the ground. Good thought.

2. Yes, the burners are super quiet and they are run incredibly hot. In a simple water test I was able to bring 7g of water to boil in what seemed like a very short time (i didn't time it, but it was obviously faster than me sq-14).

Thanks for the feedback. I wish I had more time to go into some of these details, but 15min filled up awfully fast.
 
Last edited by a moderator:
Nice video... I agree with all of the points you made. I can also attest that the burners are very quiet, so quiet in fact that my standing pilot lights are louder than the burner itself. I just used standard furnace pilots but I'm thinking about changing that.
 
I know this is a little late since you already bought the Top Tier, but John Blichmann had this video on YouTube describing it.


Don't know if you saw it and I know I'm a little late with the link. You're video was awesome; I can't wait to see some videos of your rig in action!
 
Last edited by a moderator:
I know this is a little late since you already bought the Top Tier, but John Blichmann had this video on YouTube describing it.

http://www.youtube.com/watch?v=u9YaEY5K3fU

Don't know if you saw it and I know I'm a little late with the link. You're video was awesome; I can't wait to see some videos of your rig in action!

I'm definitely aware of this video. As of 2 hours ago, it was the ONLY top tier video on YouTube. While Mr. Blichmann has excellent design sense and creativity, he's not much of a salesman. Watching this video didn't play much of a role in my buying decision.
 
HickoryMike,

Thanks very much for that video! I don't have a YouTube\Google account or I would have already subscribed to the videos. I'd sure appreciate another video after you have a couple of brew sessions under your belt. This is excellent information.
 
Sweet video Mike! I'll chime in with my love the shear utility of the product. One note on the flame shown in the video: It looked like the inidvidual flames were bouncing off the nozzles on the burner and the damper was wide open. At that point, close up the damper until the flame is nice and stable, and not bouncing all over the place. I've noticed you can keep the damper in the same spot for all gas flow settings.

Here's a video purely for assembly:

Its mostly a video version of the instruction manual, completely lacking advice or opinions of awesomeness. This brings the assembly manual to life.
 
Last edited by a moderator:
Great thread, Mike. I just finished putting together my gravity-fed Top-Tier this past weekend using the instructions provided out of the box. The directions were sufficient, but could've been much better.. I had a few "WTF??" moments while assembling.

The assembly directions are my only semi-complaint. I can't wait to use this thing, it's so solid.
 
Here's some more shots of my TopTier electric HERMS in action. I love this thing! Two pumps, two utility shelves, three 15 gallons kettles, two 5500W elements. It all comes together nicely.

The photos are slightly out of order.

First photo is my fly sparging. You can see the sprinkler/sparge head right above the MLT (second tier) . HLT is the top kettle. BK is lowermost. Notice the stepstool to see into the HLT. See also the (gravity) tube going from the MLT (second) to the BK (third).

Second, Third, and Fourth photo is recirculating the mash prior to fly sparging. I'm making a Scottish 80. You can see the dark wort in the tubing. The boil ketttle (lowermost kettle) is unplugged and waiting. Control panel and Ranco temp controllers on the table to the right (facing the TopTier). 220V outlets are on the side of the house. You can see the manual thermometer in the MLT lid. So long as this thermometer is my mash temp, I know I'm good to go.

My Ranco monitors my HLT temp. There's a 1-2 degree difference between HLT and my mash temp. If i want to mash at 150, I set the Ranco in the HLT to 151 or 152. Bottom-most pump recirc's the water in the top HLT to maintain a steady temp in the HLT.

I pump the HLT liquor into the MLT, then gravity the MLT into the BK. BK for 90 mins, then pump into my therminator and into my fermenter. For my last batch next week, I'm making a double IPA using the new HopRocket (not shown). That'll be my last batch for the season.

121.jpg


123.jpg


199.jpg


205.jpg
 
I shot a new video (yes, I know it's been a while) with some actual brewday footage on the Top Tier. Those of you that are still following this thread might be interested.


Cheers!
 
Last edited by a moderator:
Does anybody know what the channel size is on the TopTier? Width? Depth? I am trying to buy mounting brackets for a RIMS Tube but I do not yet have the stand as it will be 6 months before have somewhere to put it so don't know what size brackets to buy.

Thanks,

-J
 
Back
Top