
Joshua Austin
New Member
- Joined
- Dec 22, 2014
- Messages
- 2
- Reaction score
- 0
As every brewer knows, a wort chiller is an essential piece of equipment in your homebrewing inventory. Use of a wort chiller can drastically increase the rate at which you chill and decrease the chance of infection before transferring to your fermenter. It can also create cold break, which will help improve clarity and stability in your homebrew. There are several options when it comes to wort chillers, and all have varying benefits and costs. Through a series of articles we will look at ways to decrease costs by building your own wort chillers. The methods used in these articles are not designed to be the absolute best, but are instead designed to provide you with a highly effective chiller that won't break your wallet.
There are brewers out there that swear by everything Stainless Steel, which is great for ball valves, kettles, etc... but lack effectiveness when it comes to chilling equipment. When it comes to thermal conductivity, Copper will beat out Stainless Steel every time as Copper has a thermal conductivity of 231 and 304 Stainless Steel comes in at 8.09. The other benefit to Copper is cost and availability. Copper can be found at your local big box hardware store for an affordable price, whereas you would normally have to order Stainless Steel. This is why we are going to utilize Copper tubing for the "DIY Wort Chillers on a Budget" series.
We are going to start off by discussing immersion chillers. An immersion chiller is designed to be immersed into your hot wort and it chills by having cool water go through one opening, travel through the coil while absorbing heat from the wort, and exit through the other opening. Immersion chillers have the benefit of not having to be sanitized before use as you can put them in the boil for the last 15 minutes and it will kill any bacteria that may be residing on it. The only downside to an immersion chiller is chilling time. Chilling time is significantly less than other designs as it is attempting to cool the entire batch at one time, while other designs only chill the amount that passes through it.
SOURCE: http://www.amazon.com/gp/product/B00...3MWEZ6MJPQ33T7
Now that you have a basic understanding on how an immersion works, we can discuss how to build one that won't break your wallet. Before you go purchase your materials you will need to decide on your tubing length and diameter. As you go up in length and diameter, the amount of water that will be able to travel through the coil increases, and ultimately will decrease your chilling time. We are going to focus on 25' x 3/8" ID tubing for the purposes of this article. Links are provided to the varying parts to ease the ordering process:
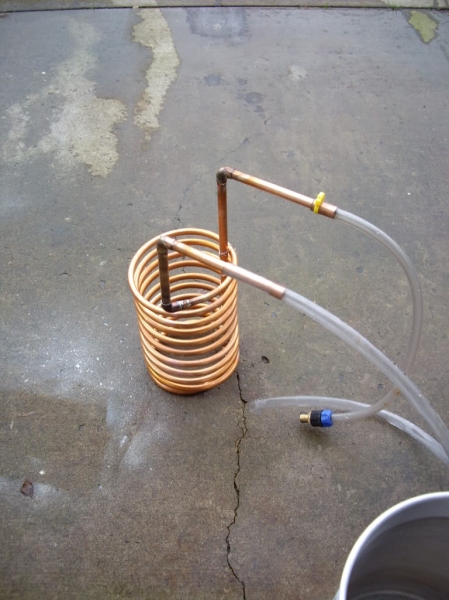
Image courtesy of NateG
Tools and Parts
About the Author
Joshua Austin is owner of Golden Isles Brew Supply, located in Brunswick, GA. He has been brewing for 3-4 years and has upgraded to a 25 gallon electric system since starting. On his way to becoming a BJCP judge, Joshua has a passion for brewing great beers as well as drinking them.

There are brewers out there that swear by everything Stainless Steel, which is great for ball valves, kettles, etc... but lack effectiveness when it comes to chilling equipment. When it comes to thermal conductivity, Copper will beat out Stainless Steel every time as Copper has a thermal conductivity of 231 and 304 Stainless Steel comes in at 8.09. The other benefit to Copper is cost and availability. Copper can be found at your local big box hardware store for an affordable price, whereas you would normally have to order Stainless Steel. This is why we are going to utilize Copper tubing for the "DIY Wort Chillers on a Budget" series.
We are going to start off by discussing immersion chillers. An immersion chiller is designed to be immersed into your hot wort and it chills by having cool water go through one opening, travel through the coil while absorbing heat from the wort, and exit through the other opening. Immersion chillers have the benefit of not having to be sanitized before use as you can put them in the boil for the last 15 minutes and it will kill any bacteria that may be residing on it. The only downside to an immersion chiller is chilling time. Chilling time is significantly less than other designs as it is attempting to cool the entire batch at one time, while other designs only chill the amount that passes through it.
SOURCE: http://www.amazon.com/gp/product/B00...3MWEZ6MJPQ33T7
Now that you have a basic understanding on how an immersion works, we can discuss how to build one that won't break your wallet. Before you go purchase your materials you will need to decide on your tubing length and diameter. As you go up in length and diameter, the amount of water that will be able to travel through the coil increases, and ultimately will decrease your chilling time. We are going to focus on 25' x 3/8" ID tubing for the purposes of this article. Links are provided to the varying parts to ease the ordering process:
Image courtesy of NateG
Tools and Parts
- 25' x 3/8"ID Copper tubing Amazon, eBay
- 10' x 3/8"ID Vinyl tubing Amazon, eBay
- Spring tube bender Amazon, eBay
- 1 -- Plastic barb x " Female Hose adapter Amazon, eBay
- 3 Hose Clamps Amazon, eBay
- Gather your materials.
- Find a cylindrical object roughly 10-12" in diameter. If you have a 5 gallon keg you can use that.
- Start wrapping your Copper coil tightly around your round object, being careful not to kink tubing
- Unravel top coil layer and straighten
- Using tube bender bend top coil layer to a near 90* vertical
- Using tube bender measure about 4" down the newly vertical bend and bend tubing at 90* horizontal angle at this point. This will become your water-in opening
- Unwind enough of bottom layers to equal total height of chiller plus 4" and straighten
- Using tube bender bend new straight piece at 90* vertical angle starting at base of chiller
- Using tube bender measure 4" down newly formed vertical piece and bend at 90* horizontal angle. This will become your water-out opening.
- Cut 3/8" ID Vinyl tubing into 2 pieces measuring 4' and 6' respectively
- Slide 4' section of Vinyl tubing onto the water-in opening and secure with 1 hose clamp
- Slide 6' section of Vinyl tubing onto the water-out opening and secure with 1 hose clamp
- Slide other end of 4' Vinyl tubing over the Female hose adapter and secure with 1 hose clamp
- Spend savings on some homebrew ingredients
- Brew and enjoy your new chiller!
About the Author
Joshua Austin is owner of Golden Isles Brew Supply, located in Brunswick, GA. He has been brewing for 3-4 years and has upgraded to a 25 gallon electric system since starting. On his way to becoming a BJCP judge, Joshua has a passion for brewing great beers as well as drinking them.


![Craft A Brew - Safale S-04 Dry Yeast - Fermentis - English Ale Dry Yeast - For English and American Ales and Hard Apple Ciders - Ingredients for Home Brewing - Beer Making Supplies - [1 Pack]](https://m.media-amazon.com/images/I/41fVGNh6JfL._SL500_.jpg)


