• Please visit and share your knowledge at our sister communities:
  • If you have not, please join our official Homebrewing Facebook Group!

    Homebrewing Facebook Group

DIY Interwoven "Rib-Cage" Immersion Chiller

Homebrew Talk

Help Support Homebrew Talk:

This site may earn a commission from merchant affiliate links, including eBay, Amazon, and others.
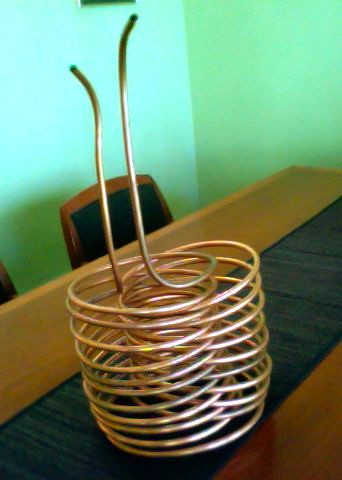
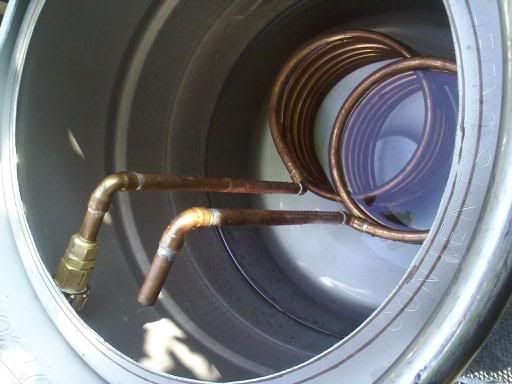
I just used the chiller, water out of the tap right now is around 45 deg. I tried to download pics from my phone, no luck. I have a 15 gallon mega-pot so there is no moving that sucker until it is empty! I used 50' instead of 25' because of the diameter of my pot, fits like a glove! It took all of 20 min to make, your directions helped A LOT! I am going to hijack the office camera at lunch and try to snag a pic!

edit: how do you get all of the water out of it or is there always some in there?
 
Turn it upside down and suck on one of the hoses to get the flow started, make sure the hoses aren't kinked in any way. It seems that the water likes to stay in the tubing, I noticed that too.
 
20jqvjo.jpg


finally able to post the thing!
 
I used to do the old ice bath trick until I bought a 15 gallon pot! It took at least 30 min to cool 5 gal of wort, way to long in my humble opinion.
 
I used to do the old ice bath trick until I bought a 15 gallon pot! It took at least 30 min to cool 5 gal of wort, way to long in my humble opinion.

I ran into the same problem at the beginning of my IC project, what I discovered, was that due to the dynamics of temperature disparity, it worked better if I chilled with tap water down to 100 deg F. and then finished with the ice bath.... that changed from a 25 minute process down to like a 11 minute process.
 
RedIrocZ-28,

tried to send you a PM, but it said your storage was full.
 
Yeah, I am having this moral dilemma about upgrading membership because it costs $25. Thats 1 batch of wonderful beer. Decisions decisions....

I cleared it out. send it quick before I get enough to fill it up again today...
 
I built a chiller using this design and it works fantastic. Boiling wort to 67 or so degrees in under 20 minutes. At 11 minutes it was under 80 degrees. Well worth the effort to build this. I would recommend it to anyone. I used about 30 ft. of 3/8 in. tubing. I tried to insert a picture but I guess I can't figure that out:drunk:
 
Use photobucket to upload the image, then you can paste the image link here.

Thanks for the compliment!

By the way, the original ribcage chiller is no longer in my posession. I sold it to ArcaneXor and its now on its way to Florida with some stow-aways in the package. "Just a couple of live yeast samples", is what I told the lady at the post office. ;)
 
Using warm Florida tap water (72 deg F), it took about 12 minutes to get 4.5 gallons of water to 105 degrees, after which it's almost like hitting a brick wall - 25 minutes to 90 degrees.

I bet that I'll be able to get down to pitching temperature within half an hour if I combine the chiller with an ice bath and intermittent whirlpooling, which would beat my previous method by about 20 minutes. So I am quite happy.
 
Hey Danny, coil that real long input hose in the sink next to the pot and have ice in that sink so you cool the input water before it hits the chiller. (I assume you have a 2 basin/side by side sink like I do)
 
Just made my ribcage chiller!

3536443429_0b70afd4e4.jpg


Got 45' of copper off craigslist for $25, just need to grab some hi-temp tubing and I'll be set. So these are supposed to chill faster than the single-coil chillers? Why is that?
 
Because you have more contact area vs the single coil. Think of it this way, if you have a single stack of coils in effect you have 1 verticlal column or a single cylinder of chilling mass, the copper. With this, you have basically 2 vertical cylinders, and more even distribution throughout the pot/kettle of cooling rails, or coils, because they are relatively evenly spaced. i.e. one on the outer wall of the pot, one nearer the center, another nearer the center and another at the opposite wall of the pot. Basically its all about copper to wort coverage.

Make sense? :)
 
Totally, I get the increased contact area... I'm just curious about the increasingly hot water running through the coils... by the time the water gets to the second coil, will it be cool enough to chill the wort? Will it be hot enough to heat up the cooler water from the first coil as it passes it? There's a lot I don't know about physics. :)
 
I am actually thinking of makeing one of these to be a pre-chiller; place in an ice bucket to bring the water temp down lower than 72 degrees here in my apartment.
 
Well, my initial test had the chiller bringing the wort from boiling to 160 in 3 minutes... I don't know that there is much in the way of worrying about how hot the water is passing through the coils after the first few minutes. THe water is heated up on its way through the first coil, and then as its racing up the second, there should be a small temperature differential in the wort. Either way, my initial test cooled from boiling to pitching in 9 minutes with only 20' of 3/8 tubing with the incoming water charge at 42*F.

Could there be a better design that goes a little faster? Sure, but when I can make 2 coils instead of one, in 15 minutes, Its not really worth it to make a better and more time consuming coil setup.

:shrug:
 
I'm bumping this thread because I'm wondering if anyone has tried this with a keggle. I have purchased all the materials to build a single column IC for a keggle (I just made) but after seeing this rib-cage IC I've put the breaks on.

If you use the 2 paint cans method I think rib-cage IC going to be too wide to fit in the keggle. This would imply smaller diameter columns. I'd like to know if others have already tried??

Thanks.
 
when i get home i'll put mine in the keggle. The lid may be a problem isf you cut the hole narrow. Keggles are all unique
 
Just a thought, im new to this. How about just using the cooling fins out of an old air conditioning unit, or piggy back a few. Just sterilize it and solder some ends on. AC's are free at any dump.

radiator.gif
 
I'm bumping this thread because I'm wondering if anyone has tried this with a keggle. I have purchased all the materials to build a single column IC for a keggle (I just made) but after seeing this rib-cage IC I've put the breaks on.

If you use the 2 paint cans method I think rib-cage IC going to be too wide to fit in the keggle. This would imply smaller diameter columns. I'd like to know if others have already tried??

Thanks.

I used a growler to wrap my coils around for a 50ft one I built. It works great in a keggle, fits easily. You can always adjust the total diameter of the chiller by pushing each "rib" closer to the other one.
 
THe water is heated up on its way through the first coil, and then as its racing up the second, there should be a small temperature differential in the wort.

:shrug:

If theres only a small temperature differential, that part of the chiller isn't chilling. You guys would be much better off splitting the feed and having two separate attached coils.
 
If theres only a small temperature differential, that part of the chiller isn't chilling. You guys would be much better off splitting the feed and having two separate attached coils.

The original chiller that I posted in here was 20' of 3/8" tubing and with 42* input water would chill 5 gallons to pitching temp in 9 minutes. Realistically speaking, there was 18' in contact with the wort. Thats pretty damn fast. Could it go faster? Sure it could with a better optomized design.

But again, the point that the ones that want to pick apart the design always miss is this: A dual coil design will chill faster than a single coil design. The reason why is more wort coverage/more even distribution of coils throughout the wort.

I guarantee that you can make a single coil chiller out of the same material, same length, as a dual coil design and the dual will be faster.

:)
 
If theres only a small temperature differential, that part of the chiller isn't chilling. You guys would be much better off splitting the feed and having two separate attached coils.

Thats what I did with my rib-cage-based design. Also, in reference to a previous poster, I use mine in a keggle. I wound the coils on a corny keg. My results are sort of mediocre. My tap water is about 65. I run tap water through it and out for 10 gallons, and then switch to ice-water recirculated using a very very wimpy pond pump (2nd smallest one sold at home depot). I get down to about 100 degrees in 10 minutes, and its another 15 to get it down to 80. I'm sure a bigger pump would help a moderate amount. Another issue is that it quite difficult to get any sort of circulation going in the keggle via stirring, as the chiller sort of blocks a lot of the space. And a final final issue is that my chiller is sitting about 1/3 out of the wort for 5 gallon batches. None of these statements are meant to criticize the rib-cage chiller - I would not do anything different - just some observations and data points.
 
Not quite as impressive in a keggle. maby CFC is the way to go there? five gallons of water.

get-attachment-4.jpg
 
Just to clarify, since I think I'm going to be making one of these this weekend: to make the rib-cage chiller, you simultaneously wind the coils around 2 paint cans, right? i.e. each half of the chiller is wound around its own can, then the two halves are sort of smushed together? Or can you wind to coils in opposite directions around 1 can, then pull them apart?

I'm only asking because reading this thread, it seems like most people have done the 2 can method, but it looks like the OP (I may be wrong here) wound it with one can. As I said, though, I may be wrong. I'm only planning on doing this once so I want to get it right!

Thanks!
 
Yeah, I actually did make it, a few days after posting that. I started from the middle and winded out in first one direction, than in the other. Then I just kind of opened the two coils and smushed them together.

I gotta say, the thing works pretty great. I bought a 50' roll of tubing, and figured out that only about 35' worth of IC would fit in 5 gallons of wort. So I took the other 15' and made a little pre-chiller. Not sure what my groundwater temp is - I'm guessing around 65 or so - but since I've built it I can consistently get from boiling to 70 in about 18 minutes, boiling to 65 in about 20. Not quite the mind-blowing times you get, but I'm super happy with it! I pretty much keep the wort circulating the whole time.

It's a great design, IMO, since it just makes so much sense. Thanks for the idea and the thread!
 
Back
Top