DIY Fermentation Chamber

Homebrew Talk - Beer, Wine, Mead, & Cider Brewing Discussion Forum

Help Support Homebrew Talk - Beer, Wine, Mead, & Cider Brewing Discussion Forum:

This site may earn a commission from merchant affiliate links, including eBay, Amazon, and others.

jmward21

Well-Known Member
Joined
Dec 11, 2014
Messages
149
Reaction score
58
Location
Cincinnati
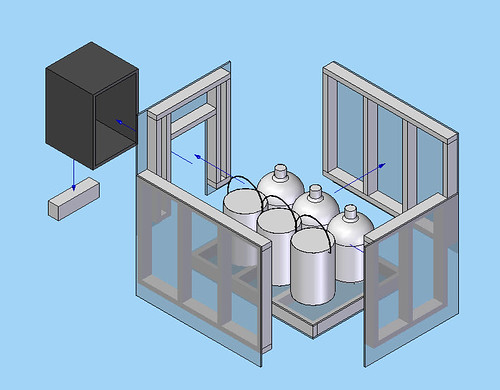
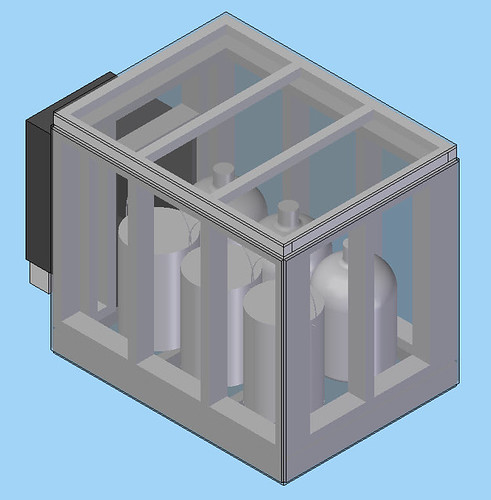
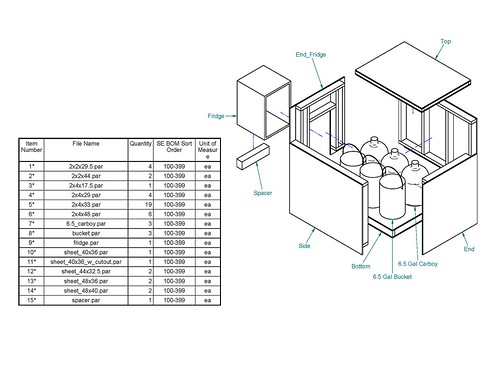
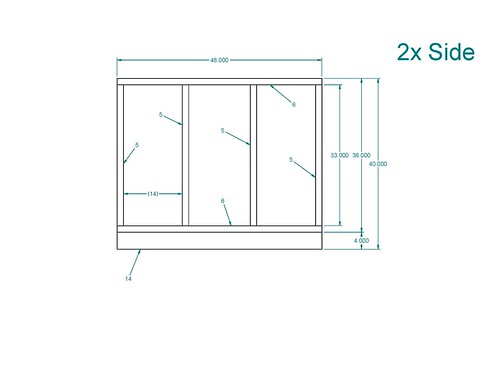
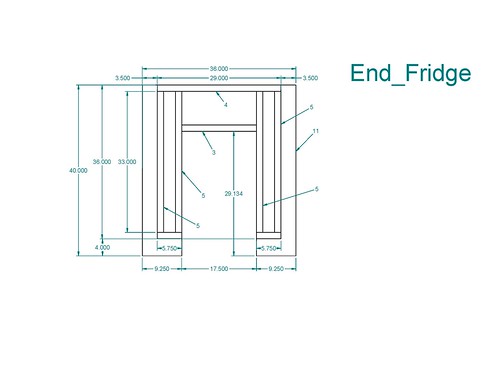
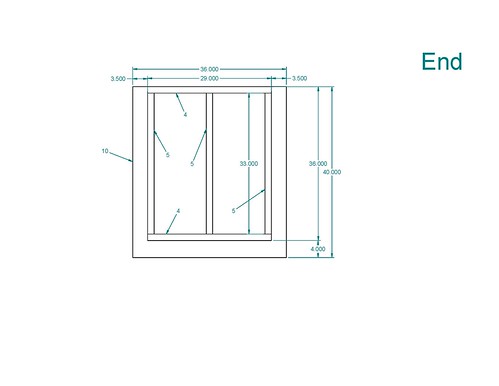
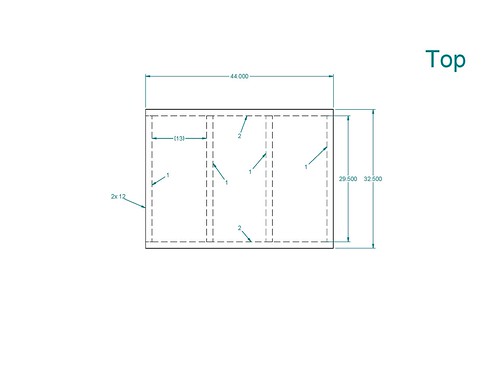
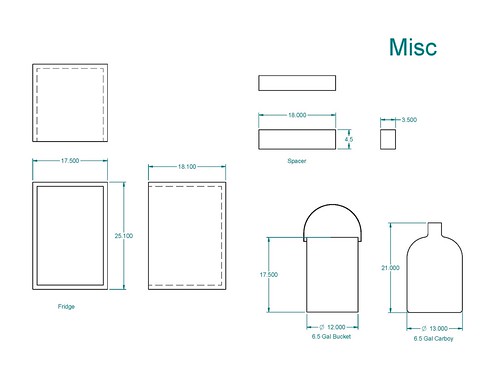
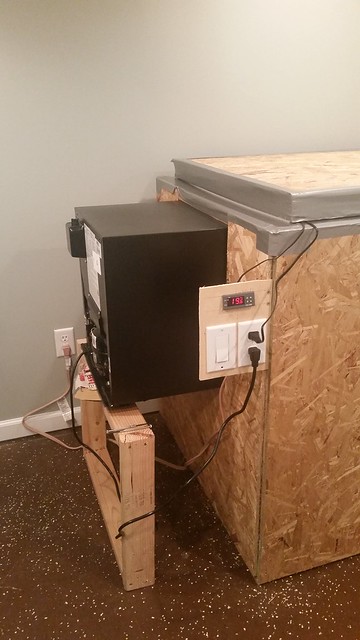
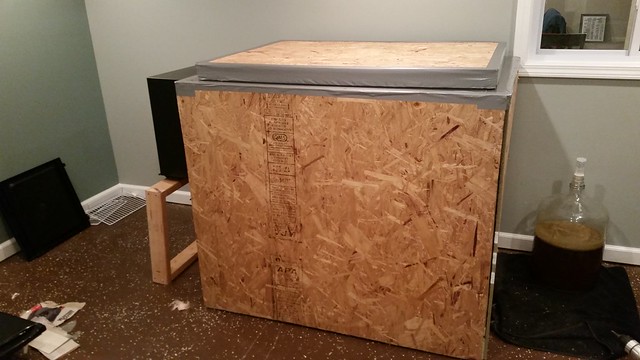
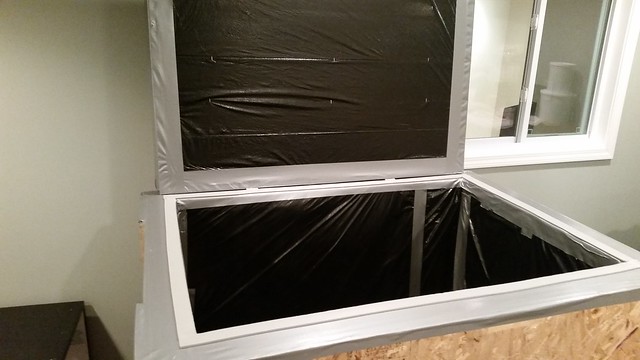
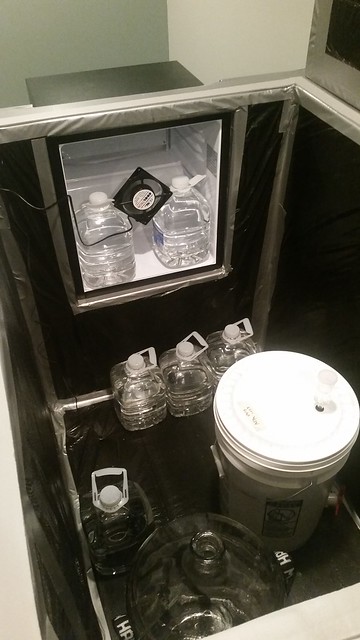
I've been looking a lot of designs in this forum and I decided to build one of my own. I pick up the fridge tomorrow ($25 mini fridge from an auction) and I have most of the wood. I got a STC1000 controller ($15) and a small circulation fan ($15). I still need to figure out the vapor barrier and the hinge/seal for the lid. This will be built in my basement so the temperature difference won't be that much. My basement is finished and usually stays around the same temperature as upstairs so (68F-72F).

Anyrate, this will be a fun and relatively inexpensive weekend project and hopefully it makes the beer taste even better. I will post the pictures from the build and the final product when I'm done. If anyone wants the plans send me a message and I will email you a PDF. And yes, I was very bored and designed this in CAD...

:mug:

15556387453_ea2c624ef8.jpg


16175421002_f49e88810f.jpg


15553809794_df5e0e8d06.jpg


16175421212_df3f5e7ddd.jpg


15990114489_220d4312d0.jpg


16174300261_3368273a99.jpg


15553809574_9aa950b3d6.jpg


16176173155_f89c23d9d0.jpg


16176173115_c65a94284a.jpg
 
Polystyrene and polyiso rigid insulation boards are both qualify as a vapor barrier. Just put the boards on the inside of the framing and use silicone sealant at all the seams. If you want a belt and suspenders approach, you can put a layer of FRP panel on there too.
 
Polystyrene and polyiso rigid insulation boards are both qualify as a vapor barrier. Just put the boards on the inside of the framing and use silicone sealant at all the seams. If you want a belt and suspenders approach, you can put a layer of FRP panel on there too.

Along with the wood, I actually have left over fiberglass insulation from finishing the basement. For the vapor barrier, I had planned on buying flooring underlayment or something similar. For the bottom, I'd like to lay down a thin sheet of aluminum so it can be cleaned easily. I will caulk the edges.

This is a down and dirty build on a small budget. I made my first home brew 5 weeks ago and I have already built a kegerator and now I'm making a fermenter. Next up is AG, so I'm saving my money for a bigger/better pot.
 
I used the foil covered 1/2" foamboard insulation and never thought about cleanup...until a chocolate milk stout blew the lid off a bucket, splattered the inside of my chamber, and also lifted the chamber lid enough to mess up the wall behind the chamber. The foily board is still good, but lining the chamber with Al or linoleum would certainly be a good idea.
I'm no engineer or carpenter but is your design a little overbuilt? Kyle
 
I had decided to build my own fermentation chamber such as yours, but not wanting an older fridge as the frame would have to be rebuilt if/when the fridge broke down. With the cost of a new fridge and all of the materials it went well over what I could buy a chest freezer for (7 cu ft).

Just under $200 and HomeDepot delivered it. It certainly didn't give me the satisfaction of creating something though...
 
Yes I agree, this is overkill. But since I have a lot of 2x4s laying around this is the cheapest solution for me
 
Here's a couple shots of mine. It'll hold 5-6 buckets and 3 kegs if I need it to. Simple framing with no flex when moved. It's fairly heavy too, and will need casters at some point. My original design was similar to yours but then I decided the extra lumber wasn't needed. Kyle

P1030533.jpg


P1030534.jpg
 
Along with the wood, I actually have left over fiberglass insulation from finishing the basement. For the vapor barrier, I had planned on buying flooring underlayment or something similar. For the bottom, I'd like to lay down a thin sheet of aluminum so it can be cleaned easily. I will caulk the edges.

This is a down and dirty build on a small budget. I made my first home brew 5 weeks ago and I have already built a kegerator and now I'm making a fermenter. Next up is AG, so I'm saving my money for a bigger/better pot.

I would at least go with some 1/2" iso board as the vapor barrier and use some spray foam sealant/adhesive instead of the silicon sealant. As for the floor some cheap tile will be easy and cheap.

Go fancy with an arduino based controller so you can monitor temps via web browser - maybe $50 in parts.
 
**UPDATE**

I finally "finished" building everything and I got the controller hooked up. I think in total I paid around 75 bucks for this. 25 for the fridge, 15 controller, 15 fan, 20 bucks for misc wood and hardware. Like I said before, I had a lot of left over materials so I made due with I had laying around.

It's not the prettiest, but it works. And yes that is duct tape. and I used heavy duty trash bags for the vapor barrier. I taped all the seams and ran the bags all the way to the outside. I taped the top of the chamber and the bottom of the door. This gave me a smooth surface for the gasket which seems to working great.

I still need to get a project box and clean up the wiring. I need to drill into the chamber to run the wires for the fan and temp probe.

Let me know what you think or if you have any concerns. I'm always looking to learn and improve.

15717963483_d18e33a572_z.jpg


15715449364_805c7605e4_z.jpg


15715451024_e52d068053_z.jpg


16337890885_0ff95a79c6_z.jpg
 
Looks good bud, It took me a second to figure out what was in the carboy but it was the Zombie Dust. Hopefully she holds the temp well. What is all in there now?

I forget the ferm. temp for dead guy.
 
I put my stout and apa in there. I'll add in your dead guy and amber if you want. I didn't want to move your stuff into my experiment yet. There's more than enough room if you want me too. Your choice.
 
I like your build. I've been trying to plan one out and seeing yours gave me the visual I was missing. I like the cooler being up near the top. I assume you're in a climate that doesn't get a lot of cold? No heating option?
Great build!
 
fwiw, the author of the thread has not logged in since 2018.

I have had the "pleasure" of visiting Cincinnati in the dead of their winter and can attest it gets cold there. But it was mentioned that the basement the author's system resides in stays in the same 68F-72F temperature range as his living space upstairs, which would preclude the need for a heater - unless one is running one of those kveik yeast strains, or maybe forcing a saison to move along :)

Cheers!
 
Back
Top