You are using an out of date browser. It may not display this or other websites correctly.
You should upgrade or use an alternative browser.
You should upgrade or use an alternative browser.
Danby 10.2 (DCFM289WDD) Keezer Build Thread
- Thread starter jcaudill
- Start date

Help Support Homebrew Talk:
This site may earn a commission from merchant affiliate
links, including eBay, Amazon, and others.
OP
OP
jcaudill
Well-Known Member
Yes the EVA-Dry will work - you just need to check it often.
As for the bonding - use 100% silicone for attaching the collar to the keezer and for sealing all joints. When you attach the foam to the collar, or anything to the foam (if you do like I did and use Reflectix) - use foam sealant. If you use anything other than that it'll burn through the foam.
Glad to help - don't hesitate to ask.
You should get this to prevent moisture build-up. My keezer is in progress now so I can't personally testify to its usefulness, but many people have reported it works awesome.
I have one of these but it seems you need airflow for the best effect. Putting a pc fan in the keezer is supposed to be the way to go. I haven't done it yet but plan to.
Last edited by a moderator:
rshortt
Well-Known Member
I'm thinking about getting this same model either tonight or tomorrow at Costco. I have 6 perlicks to go in. Is it a bitch to get kegs in and out with shanks in the way?
Thanks! Sweet build too!
Thanks! Sweet build too!
OP
OP
jcaudill
Well-Known Member
I'm thinking about getting this same model either tonight or tomorrow at Costco. I have 6 perlicks to go in. Is it a bitch to get kegs in and out with shanks in the way?
Thanks! Sweet build too!
I wouldn't call it a bitch - but it definitely takes a little thought. You may have to pull a keg out to get to another one and so forth. If you're thinking 6 shanks then I think that may cause a problem. If you want to run 6 out the front then I'd be running dual faucet shanks. Otherwise, I'd consider going through the top instead. Like I mentioned in a previous post, in hindsight that is probably the only thing I'd re-evaluate about the build. One thing you don't see in the pictures is I have 4 flare bulkhead now that I bring 4 different secondary regulator into so I can run different pressure inside. That was worth the effort. I keep the regulator external to keep the clutter out.
HTH.
![Craft A Brew - Safale BE-256 Yeast - Fermentis - Belgian Ale Dry Yeast - For Belgian & Strong Ales - Ingredients for Home Brewing - Beer Making Supplies - [3 Pack]](https://m.media-amazon.com/images/I/51bcKEwQmWL._SL500_.jpg)

$33.99 ($17.00 / Count)
$41.99 ($21.00 / Count)
2 Pack 1 Gallon Large Fermentation Jars with 3 Airlocks and 2 SCREW Lids(100% Airtight Heavy Duty Lid w Silicone) - Wide Mouth Glass Jars w Scale Mark - Pickle Jars for Sauerkraut, Sourdough Starter
Qianfenie Direct


$22.00 ($623.23 / Ounce)
AMZLMPKNTW Ball Lock Sample Faucet 30cm Reinforced Silicone Hose Secondary Fermentation Homebrew Kegging joyful
无为中南商贸有限公司


$10.99 ($31.16 / Ounce)
Hornindal Kveik Yeast for Homebrewing - Mead, Cider, Wine, Beer - 10g Packet - Saccharomyces Cerevisiae - Sold by Shadowhive.com
Shadowhive


$53.24
1pc Hose Barb/MFL 1.5" Tri Clamp to Ball Lock Post Liquid Gas Homebrew Kegging Fermentation Parts Brewer Hardware SUS304(Liquid Hose Barb)
Guangshui Weilu You Trading Co., Ltd


$176.97
1pc Commercial Keg Manifold 2" Tri Clamp,Ball Lock Tapping Head,Pressure Gauge/Adjustable PRV for Kegging,Fermentation Control
hanhanbaihuoxiaoshoudian

$7.79 ($7.79 / Count)
Craft A Brew - LalBrew Voss™ - Kveik Ale Yeast - For Craft Lagers - Ingredients for Home Brewing - Beer Making Supplies - (1 Pack)
Craft a Brew

$20.94
$29.99
The Brew Your Own Big Book of Clone Recipes: Featuring 300 Homebrew Recipes from Your Favorite Breweries
Amazon.com


$53.24
1pc Hose Barb/MFL 1.5" Tri Clamp to Ball Lock Post Liquid Gas Homebrew Kegging Fermentation Parts Brewer Hardware SUS304(Liquid MFL)
yunchengshiyanhuqucuichendianzishangwuyouxiangongsi


$479.00
$559.00
EdgeStar KC1000SS Craft Brew Kegerator for 1/6 Barrel and Cornelius Kegs
Amazon.com


$58.16
HUIZHUGS Brewing Equipment Keg Ball Lock Faucet 30cm Reinforced Silicone Hose Secondary Fermentation Homebrew Kegging Brewing Equipment
xiangshuizhenzhanglingfengshop


rshortt
Well-Known Member
Yeah, 6 out the front. If I do that it might be worth getting right angle tail pieces. Thanks for the reply, I now have something to think about.
")
pleaseeatsomepoo
Member
Looks good! That paint is impressive.
MichaelBrock
Well-Known Member
jcaudill,
Nice build! I'm in the process of planning for my keezer build and really like the size of the danby 10.2. I know you run your co2 from outside but do you think a 10# bottle would fit on the hump with a 6" collar like you used (which I guess is actually 5.5" if you used a 2x6)?
Thanks for the build thread!
OP
OP
jcaudill
Well-Known Member
Ya I'm pretty sure a ten pounder will fit fine. You may find it gets a little cramped inside though if you plan to run any secondary regulators for maintaining different pressures. It gets pretty cramped in there when loaded with 8 kegs and all the tubing and such.
MichaelBrock
Well-Known Member
I'm going to do a coffin build so that should help a little with space. thanks!
OP
OP
jcaudill
Well-Known Member
How do you regulate the temp so it doesn't freeze?
Externally mounted temperature controller with a probe inside the freezer - mine is set at 37. And I have one of those Evadry humidifiers inside to capture moisture and it works BRILLIANTLY.
OP
OP
jcaudill
Well-Known Member
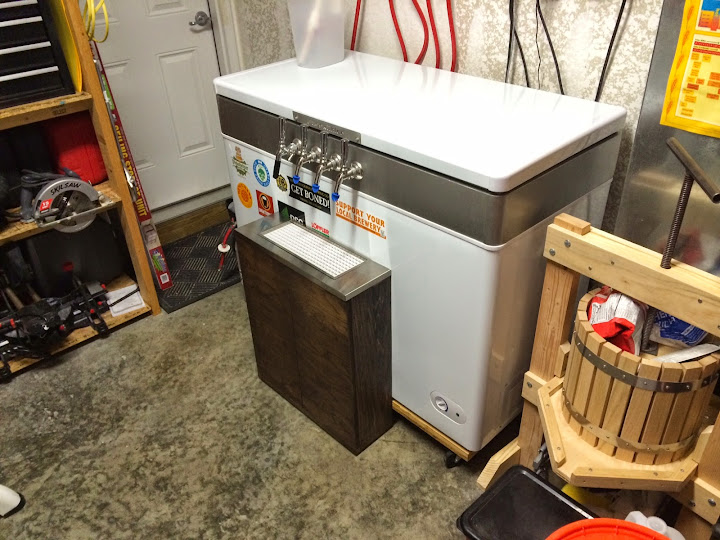
One quick little update. The drain tray has always been an issue - even 10 earth magnets would not hold it! So I decided to build an external cabinet with a drain tray that actually drains. You can't really see it but the doors open to a container inside I can just empty out!
TenaciousDustin
Member
I am starting my keezer build on this same model today. Can you show a picture of your hinges on the back of your unit? I would like a frame a reference one the issue you mentioned about the lid not sitting flush without adjusting with spacers. Thanks and I really enjoyed all these posts.
Sent from my iPhone using Home Brew
Sent from my iPhone using Home Brew
OP
OP
jcaudill
Well-Known Member
I am starting my keezer build on this same model today. Can you show a picture of your hinges on the back of your unit? I would like a frame a reference one the issue you mentioned about the lid not sitting flush without adjusting with spacers. Thanks and I really enjoyed all these posts.
Sent from my iPhone using Home Brew
Sure thing give me a bit!
OP
OP
jcaudill
Well-Known Member
Ok here are some close up pics:
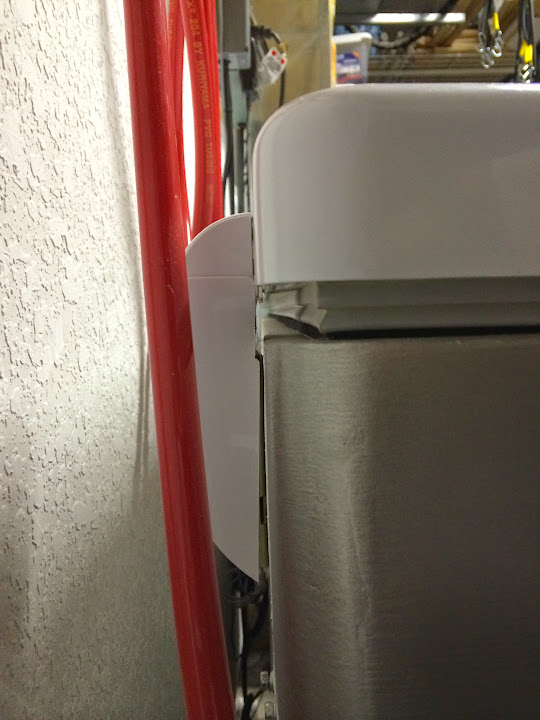
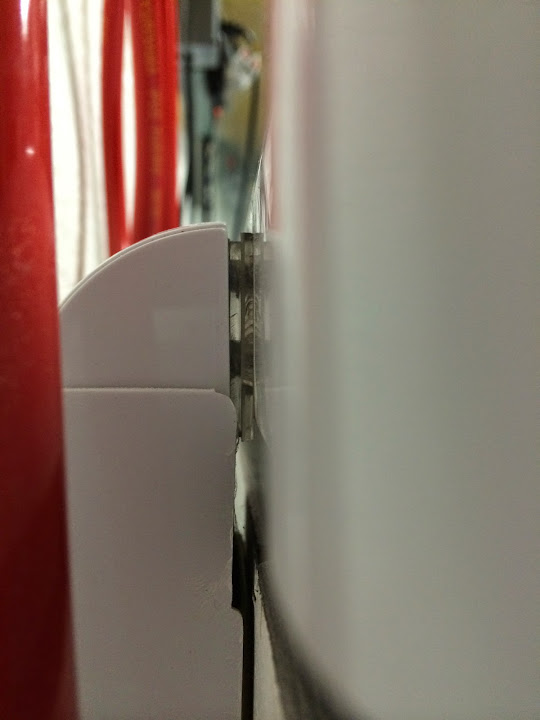
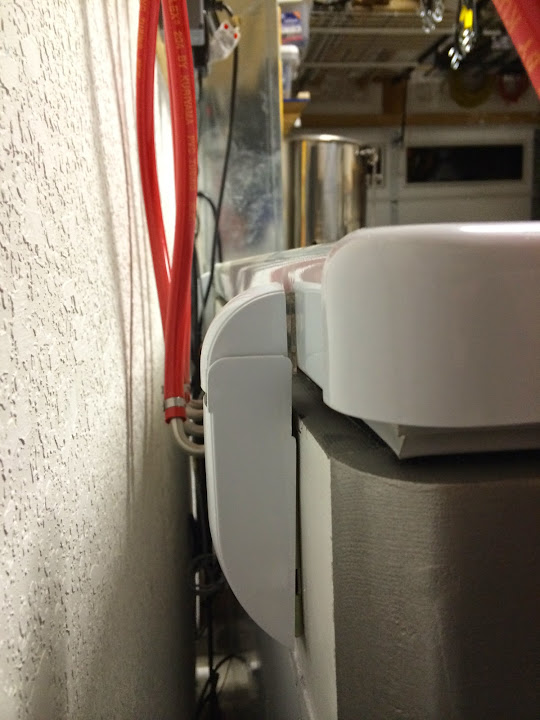
What you'll notice is I used two thin sheets of plexiglass with holes drilled as spacers. The deal is they designed the hinge around the moulding that goes around the top-side of the bottom part of the freezer. In doing so you have an offset you have to account for. I think you'll see what I mean if you take the hinge off and try to set it against a flush surface.
What you'll notice is I used two thin sheets of plexiglass with holes drilled as spacers. The deal is they designed the hinge around the moulding that goes around the top-side of the bottom part of the freezer. In doing so you have an offset you have to account for. I think you'll see what I mean if you take the hinge off and try to set it against a flush surface.
TenaciousDustin
Member
Gotcha, thanks! I imagine washers could do the same as long as they are the right size and depth.
Sent from my iPhone using Home Brew
Sent from my iPhone using Home Brew
TenaciousDustin
Member
That's always the easiest and cheapest way. Thanks again.
Sent from my iPhone using Home Brew
Sent from my iPhone using Home Brew
FredTheNuke
Well-Known Member
I wouldn't call it a bitch - but it definitely takes a little thought. You may have to pull a keg out to get to another one and so forth. If you're thinking 6 shanks then I think that may cause a problem. If you want to run 6 out the front then I'd be running dual faucet shanks. Otherwise, I'd consider going through the top instead. Like I mentioned in a previous post, in hindsight that is probably the only thing I'd re-evaluate about the build. One thing you don't see in the pictures is I have 4 flare bulkhead now that I bring 4 different secondary regulator into so I can run different pressure inside. That was worth the effort. I keep the regulator external to keep the clutter out.
HTH.
Great Build! I am about to begin my conversion. Would this issue be solved if you'd have hinged the the collar and connected the lid permanently to the top of the collar (so the taps and hoses/regulators lift with the collar for accessing the keg space)? Is that what folks refer to as a "coffin build"?
TenaciousDustin
Member
I've heard that can cause too much strain on the hinge (which are probably only built for so much weight) and could compromise the longevity of the function.
Sent from my iPhone using Home Brew
Sent from my iPhone using Home Brew
OP
OP
jcaudill
Well-Known Member
Great Build! I am about to begin my conversion. Would this issue be solved if you'd have hinged the the collar and connected the lid permanently to the top of the collar (so the taps and hoses/regulators lift with the collar for accessing the keg space)? Is that what folks refer to as a "coffin build"?
No generally speaking, coffin builds completely encapsulate the freezer with a finished exterior of some kind - usually wood. Almost like turning the keezer into a bar.
I think you'd be ok in this case but as previously mentioned, I would question the ability of the stock hinges to hold that kind of weight.A 2x6 collar will have some heft to it. You'd almost need something to support it when the lid was up - like the hood on a car.
B-Dub
Well-Known Member
Just added a small PC fan and an Eva Dry 500 to mine. Seems like a good idea.
BW
BW
Definitely subscribed!
I have been looking at the Danby 8.7 and love the way your Danby build turned out. Maybe the wife won't mind looking at it if it turns out like this one. I have a few questions if you don't mind.
I was thinking of doing 5 taps. Do you think mounting them offset in the collar so they are over the hump area would help with the internal organization?
How often do you need to recharge the eva dry?
Where did you get that awesome name plate that covers the old handle holes?
Thanks again for the awesome inspiration!
OP
OP
jcaudill
Well-Known Member
Definitely subscribed!
I have been looking at the Danby 8.7 and love the way your Danby build turned out. Maybe the wife won't mind looking at it if it turns out like this one. I have a few questions if you don't mind.
I was thinking of doing 5 taps. Do you think mounting them offset in the collar so they are over the hump area would help with the internal organization?
How often do you need to recharge the eva dry?
Where did you get that awesome name plate that covers the old handle holes?
Thanks again for the awesome inspiration!
Hi and thanks! I wanted to stay pretty simple and give it that kind of retro cooler feel. I am pretty happy with how it came out!
I am not sure what you mean by mounting them offset over the hump area. Can you please explain that and I'll do my best to help?
So the way I do it is I have two eva dry's. I just keep them rotating and probably swap them once a week. You say recharge so just to be clear - I have the ones you plug-in and dry.
The nameplate I actually designed in Front Panel Express! I am happy to send you my file if you'd like. This way you have the basic template and can change the text to whatever you'd like.
Let me know if you have anymore questions and thanks again!
I was thinking of mounting the taps justified to one side in the face of the collar as opposed to centered like yours.
Good idea to have two Eva dry for swapping out.
Never used that program before. Is it a freebie online? Sure, send the file along anyways, I always love a head start.
Good idea to have two Eva dry for swapping out.
Never used that program before. Is it a freebie online? Sure, send the file along anyways, I always love a head start.
OP
OP
jcaudill
Well-Known Member
I was thinking of mounting the taps justified to one side in the face of the collar as opposed to centered like yours.
Good idea to have two Eva dry for swapping out.
Never used that program before. Is it a freebie online? Sure, send the file along anyways, I always love a head start.
Gotcha! I see no reason that wouldn't work.
Front Panel Express is free, you have to ultimately order the part you design from them. I want to say that cover was about 50 bucks but it just depends on what material and thickness and such.
You can download the software here: http://www.frontpanelexpress.com/ and if you send me a PM with your e-mail address I'll shoot over the file. Thanks!
Similar threads
- Replies
- 7
- Views
- 1K
- Replies
- 1
- Views
- 2K
