You are using an out of date browser. It may not display this or other websites correctly.
You should upgrade or use an alternative browser.
You should upgrade or use an alternative browser.
Conical Fermenter Chiller/Heater Build
- Thread starter JasonO
- Start date

Help Support Homebrew Talk:
This site may earn a commission from merchant affiliate
links, including eBay, Amazon, and others.
BrewGeek_Ohio
Well-Known Member
- Joined
- Nov 29, 2012
- Messages
- 48
- Reaction score
- 1
So what sort of control loop are you thinking about. I think just plain time based boundary control would be sufficient.
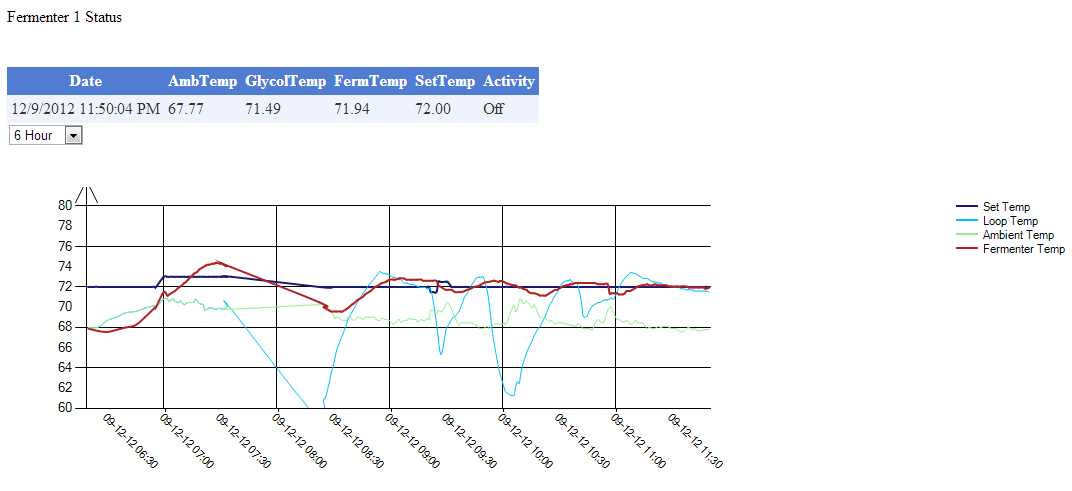
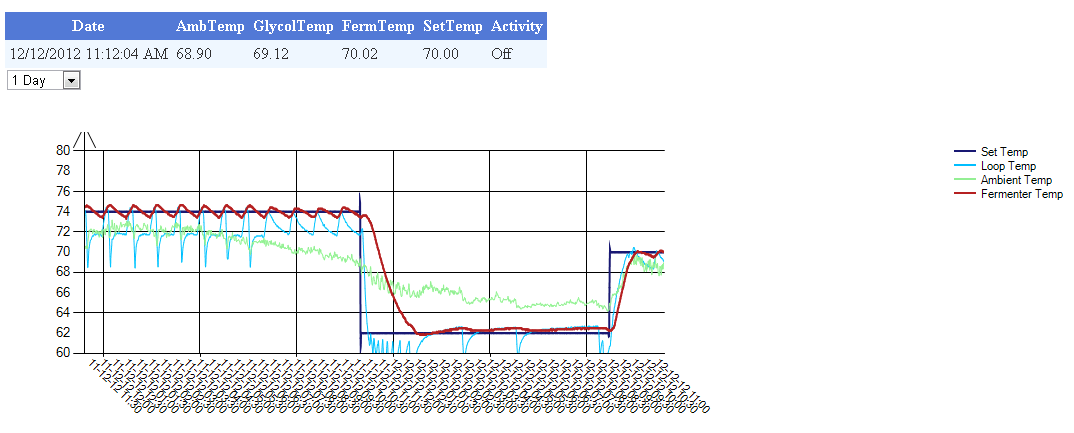
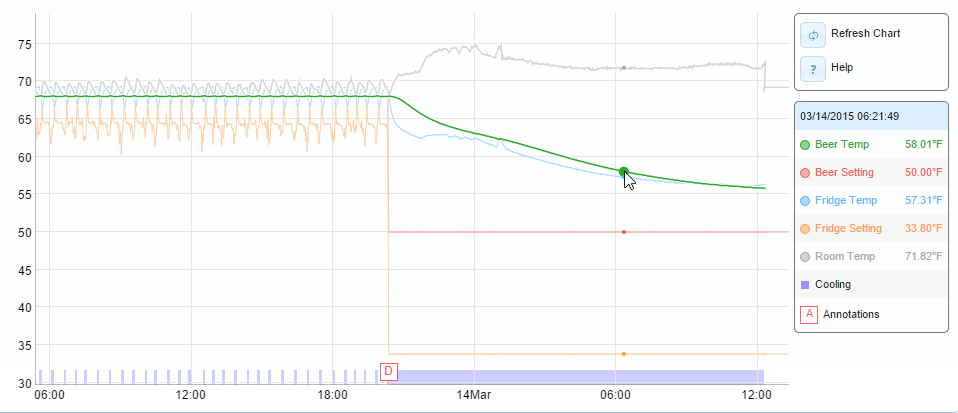
Starting the testing now. Basement is currently 68 degrees, set the temp to 72. I should have some nice numbers on the chart shortly.
BrewGeek_Ohio, as for control I can set things on the arduino at the moment and I have a .5 degree buffer from the set temp between the heater and chiller running. I also have a compressor timeout in the code. I'm guessing this will need some tweaking as I collect data.
-Jason
BrewGeek_Ohio, as for control I can set things on the arduino at the moment and I have a .5 degree buffer from the set temp between the heater and chiller running. I also have a compressor timeout in the code. I'm guessing this will need some tweaking as I collect data.
-Jason
BrewGeek_Ohio
Well-Known Member
- Joined
- Nov 29, 2012
- Messages
- 48
- Reaction score
- 1
JasonO said:Starting the testing now. Basement is currently 68 degrees, set the temp to 72. I should have some nice numbers on the chart shortly.
BrewGeek_Ohio, as for control I can set things on the arduino at the moment and I have a .5 degree buffer from the set temp between the heater and chiller running. I also have a compressor timeout in the code. I'm guessing this will need some tweaking as I collect data.
-Jason
I wonder what the temp swing limitation really needs to be. I'm sure +/- 1 degree is plenty tight. It would be nice to get the definitive answer from the yeast supplier. Sounds like a mission, I may just start asking that question to them today.
BrewGeek_Ohio
Well-Known Member
- Joined
- Nov 29, 2012
- Messages
- 48
- Reaction score
- 1
Ales: 62°F 75°F (17°C 24°C)
Lagers: 46°F 58°F (8°C 14°C) *Note: Lager fermentations can be started warmer (~60°F, 15.5°C) until signs of fermentation (gravity drop, CO2 production, head formation) are evident. Cool to desired fermentation temperature once signs of fermentation are observed.
Wheat and Belgian styles: 62°F 85°F (17°C 29°C)
Got this from wyeast, Seems like a very broad spectrum. Pick a middle point, calculate a high and low standard deviation and bobs your uncle you got a perfect fermentation!
With a temp swing like this i can see a +/- 3 degF is a nice and tight control.


$58.16
HUIZHUGS Brewing Equipment Keg Ball Lock Faucet 30cm Reinforced Silicone Hose Secondary Fermentation Homebrew Kegging Brewing Equipment
xiangshuizhenzhanglingfengshop

$10.99 ($31.16 / Ounce)
Hornindal Kveik Yeast for Homebrewing - Mead, Cider, Wine, Beer - 10g Packet - Saccharomyces Cerevisiae - Sold by Shadowhive.com
Shadowhive


$33.99 ($17.00 / Count)
$41.99 ($21.00 / Count)
2 Pack 1 Gallon Large Fermentation Jars with 3 Airlocks and 2 SCREW Lids(100% Airtight Heavy Duty Lid w Silicone) - Wide Mouth Glass Jars w Scale Mark - Pickle Jars for Sauerkraut, Sourdough Starter
Qianfenie Direct


$20.94
$29.99
The Brew Your Own Big Book of Clone Recipes: Featuring 300 Homebrew Recipes from Your Favorite Breweries
Amazon.com


$22.00 ($623.23 / Ounce)
AMZLMPKNTW Ball Lock Sample Faucet 30cm Reinforced Silicone Hose Secondary Fermentation Homebrew Kegging joyful
无为中南商贸有限公司


$53.24
1pc Hose Barb/MFL 1.5" Tri Clamp to Ball Lock Post Liquid Gas Homebrew Kegging Fermentation Parts Brewer Hardware SUS304(Liquid Hose Barb)
Guangshui Weilu You Trading Co., Ltd

$176.97
1pc Commercial Keg Manifold 2" Tri Clamp,Ball Lock Tapping Head,Pressure Gauge/Adjustable PRV for Kegging,Fermentation Control
hanhanbaihuoxiaoshoudian


$53.24
1pc Hose Barb/MFL 1.5" Tri Clamp to Ball Lock Post Liquid Gas Homebrew Kegging Fermentation Parts Brewer Hardware SUS304(Liquid Hose Barb)
yunchengshiyanhuqucuichendianzishangwuyouxiangongsi


$7.79 ($7.79 / Count)
Craft A Brew - LalBrew Voss™ - Kveik Ale Yeast - For Craft Lagers - Ingredients for Home Brewing - Beer Making Supplies - (1 Pack)
Craft a Brew


$44.99
$49.95
Craft A Brew - Mead Making Kit – Reusable Make Your Own Mead Kit – Yields 1 Gallon of Mead
Craft a Brew


![Craft A Brew - Safale S-04 Dry Yeast - Fermentis - English Ale Dry Yeast - For English and American Ales and Hard Apple Ciders - Ingredients for Home Brewing - Beer Making Supplies - [1 Pack]](https://m.media-amazon.com/images/I/41fVGNh6JfL._SL500_.jpg)
$6.95 ($17.38 / Ounce)
$7.47 ($18.68 / Ounce)
Craft A Brew - Safale S-04 Dry Yeast - Fermentis - English Ale Dry Yeast - For English and American Ales and Hard Apple Ciders - Ingredients for Home Brewing - Beer Making Supplies - [1 Pack]
Hobby Homebrew


So my plan is + or - 1 degree but for testing right now I'm seeing how tight i can make it without cycling too much. This week I'll be setting up the server side piece to host the temp the arduino should be set to. It will be really cool to be able to pitch @ 64 degrees then bring things up to 68 then cold crash when complete. Also I'm going to see how far down I can keep the fermenter. Being able to lager would be really cool.
-Jason
-Jason
BrewGeek_Ohio
Well-Known Member
- Joined
- Nov 29, 2012
- Messages
- 48
- Reaction score
- 1
That's my concern also, cycling. A good insulation will be magic!
Getting closer on the control. Yesterdays changes fixed both cycles fighting, the last thing I am going to do is all a relay to the pump to turn it off in between cycles. That should stretch the time between cycles.
Last night I set things much lower and it pulled down correctly. This morning I set things higher and it worked well too. In real world use I would not be going this crazy but I now know I can pull the fermenter down to a lower temp easily for pitching yeast or possible lagering.
-Jason
Last night I set things much lower and it pulled down correctly. This morning I set things higher and it worked well too. In real world use I would not be going this crazy but I now know I can pull the fermenter down to a lower temp easily for pitching yeast or possible lagering.
-Jason
Pretty damn sweet!
Sweet build! Just throwing this out there for you, but I insulated my hot side equipment (all Sanke keg holes) with Reflectix insulation sealed with duct tape then shot with insulating truck bed liner. Very efficient and sturdy, plus it looks good. Check out my HLT build in my threads. I would post a link but I'm on my phone. I will be following this thread and can't wait to see the final product.
Sweet build! Just throwing this out there for you, but I insulated my hot side equipment (all Sanke keg holes) with Reflectix insulation sealed with duct tape then shot with insulating truck bed liner. Very efficient and sturdy, plus it looks good. Check out my HLT build in my threads. I would post a link but I'm on my phone. I will be following this thread and can't wait to see the final product.
Thanks! I'll check it out.
Any update on this? I have a plastic conical and I'm thinking of doing this using a stainless coil immersion chiller connected to a reservoir of water cooled by peltier.
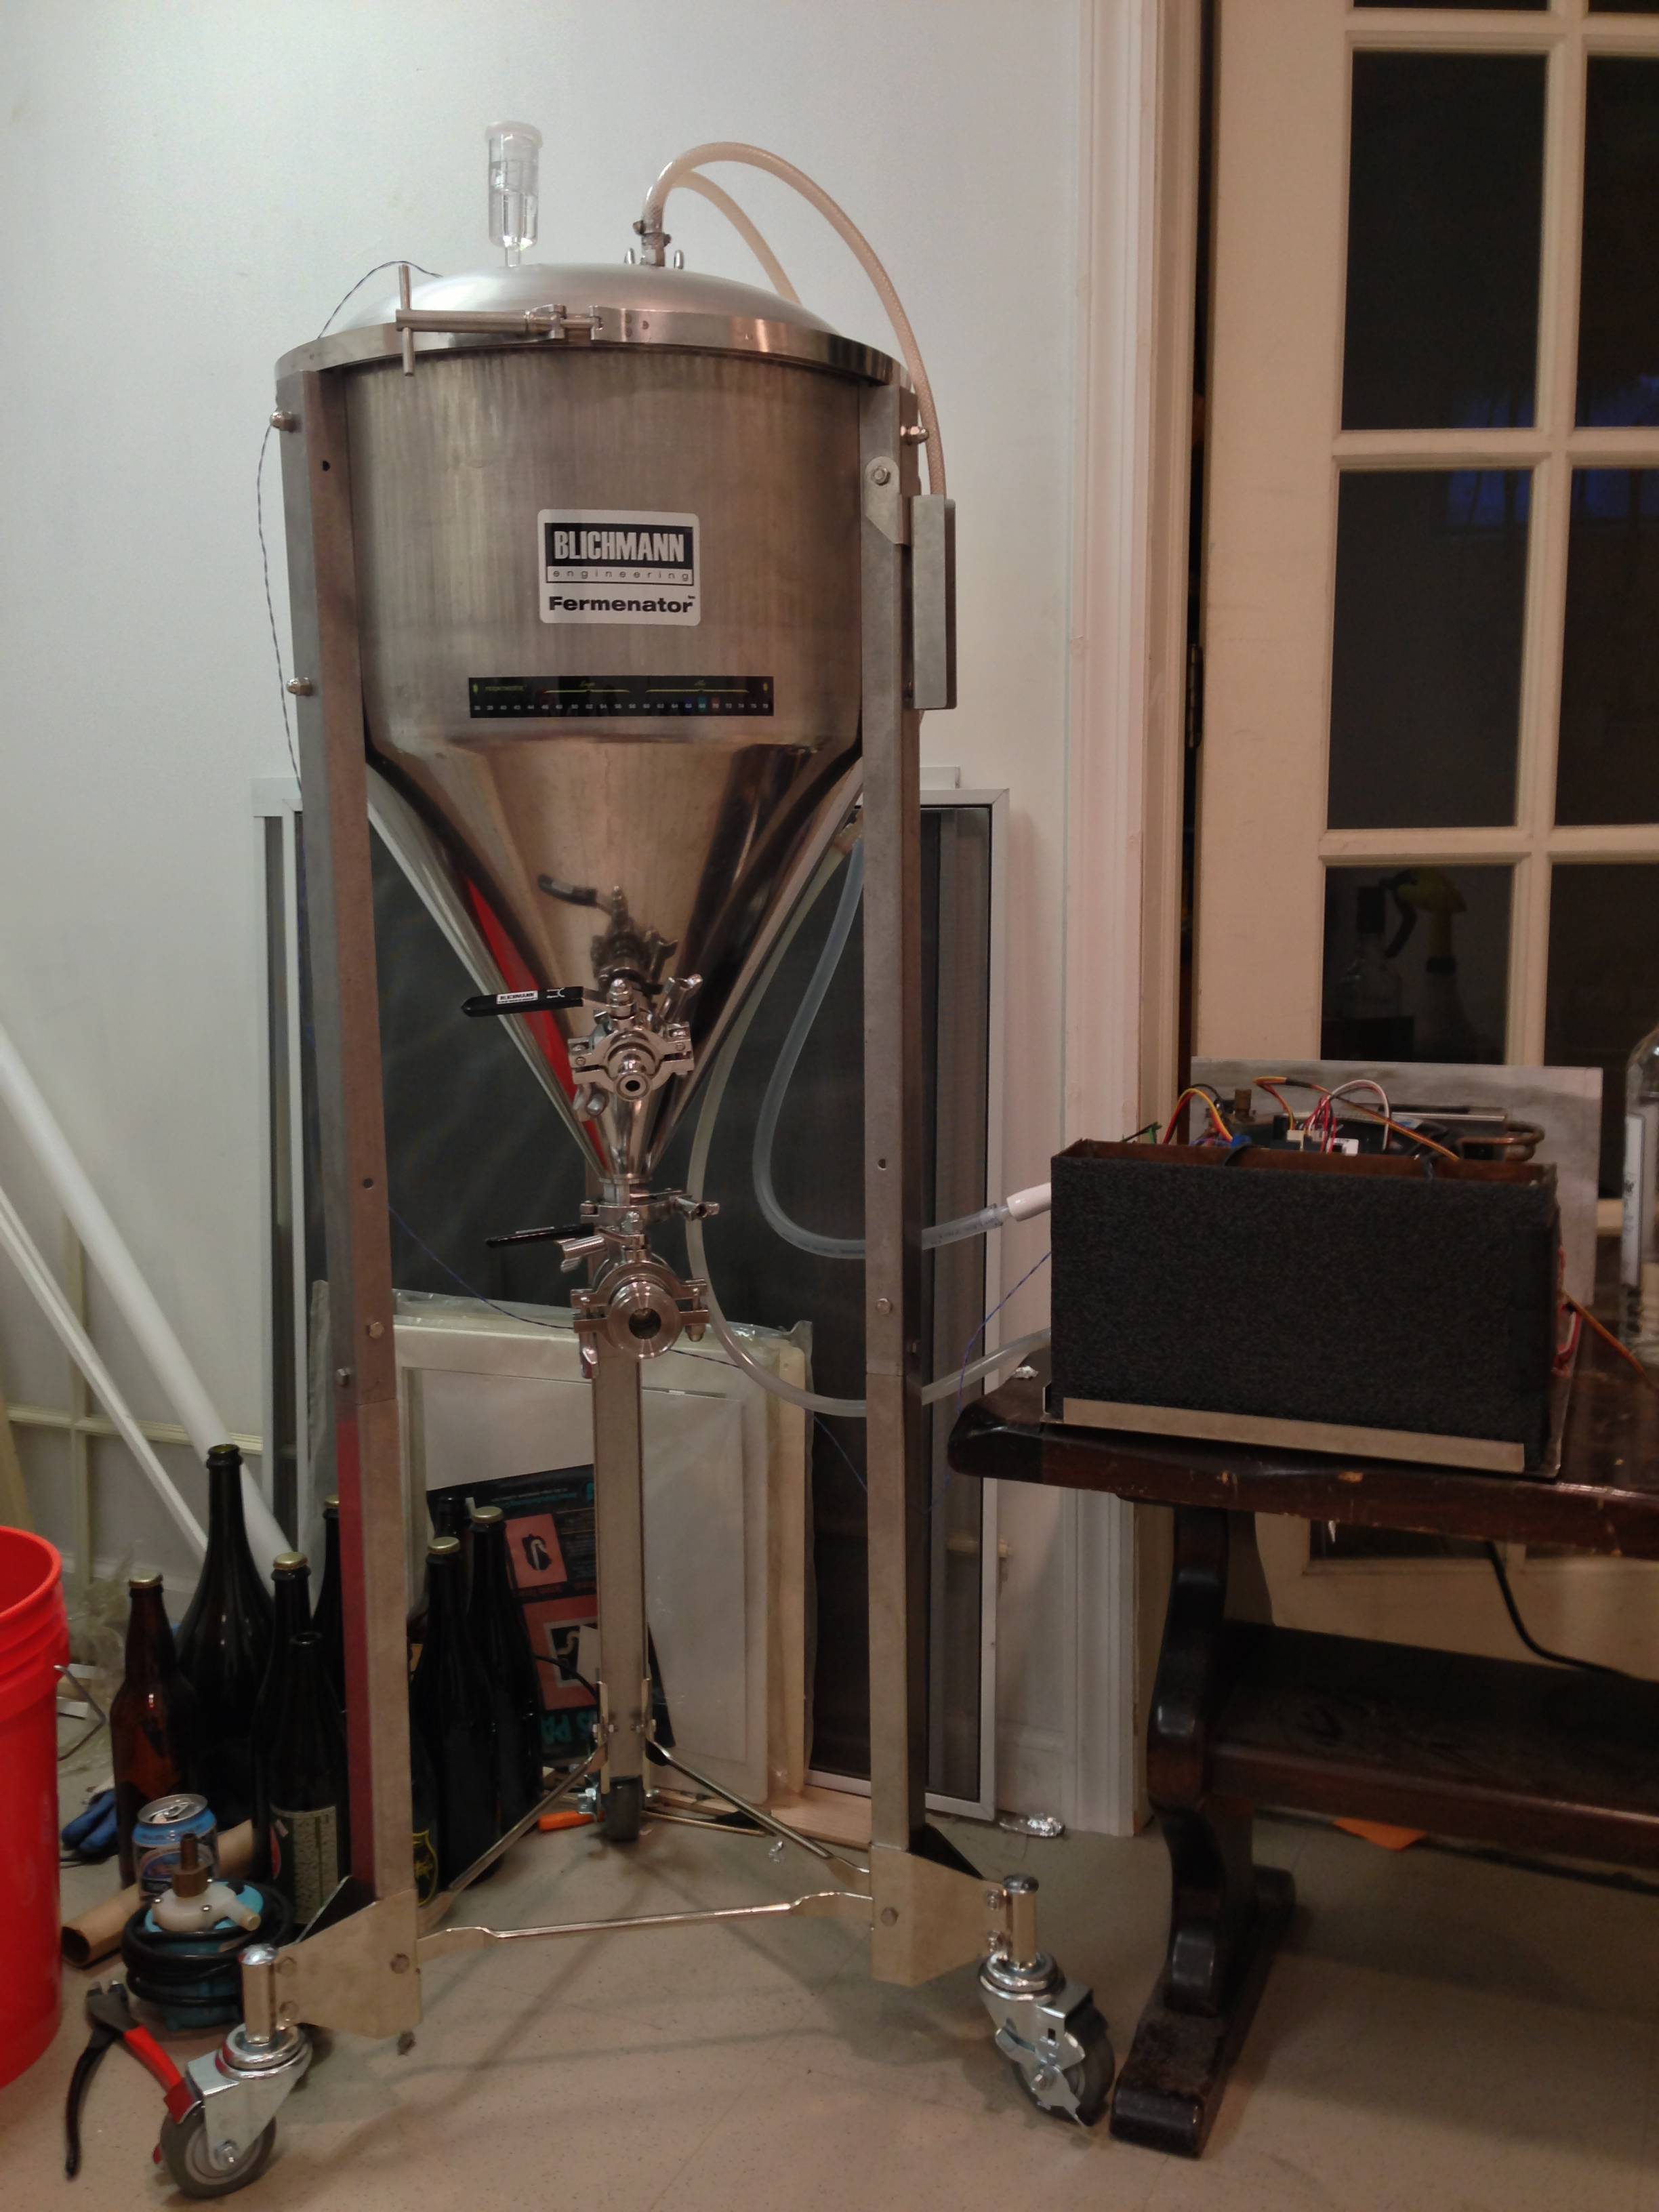
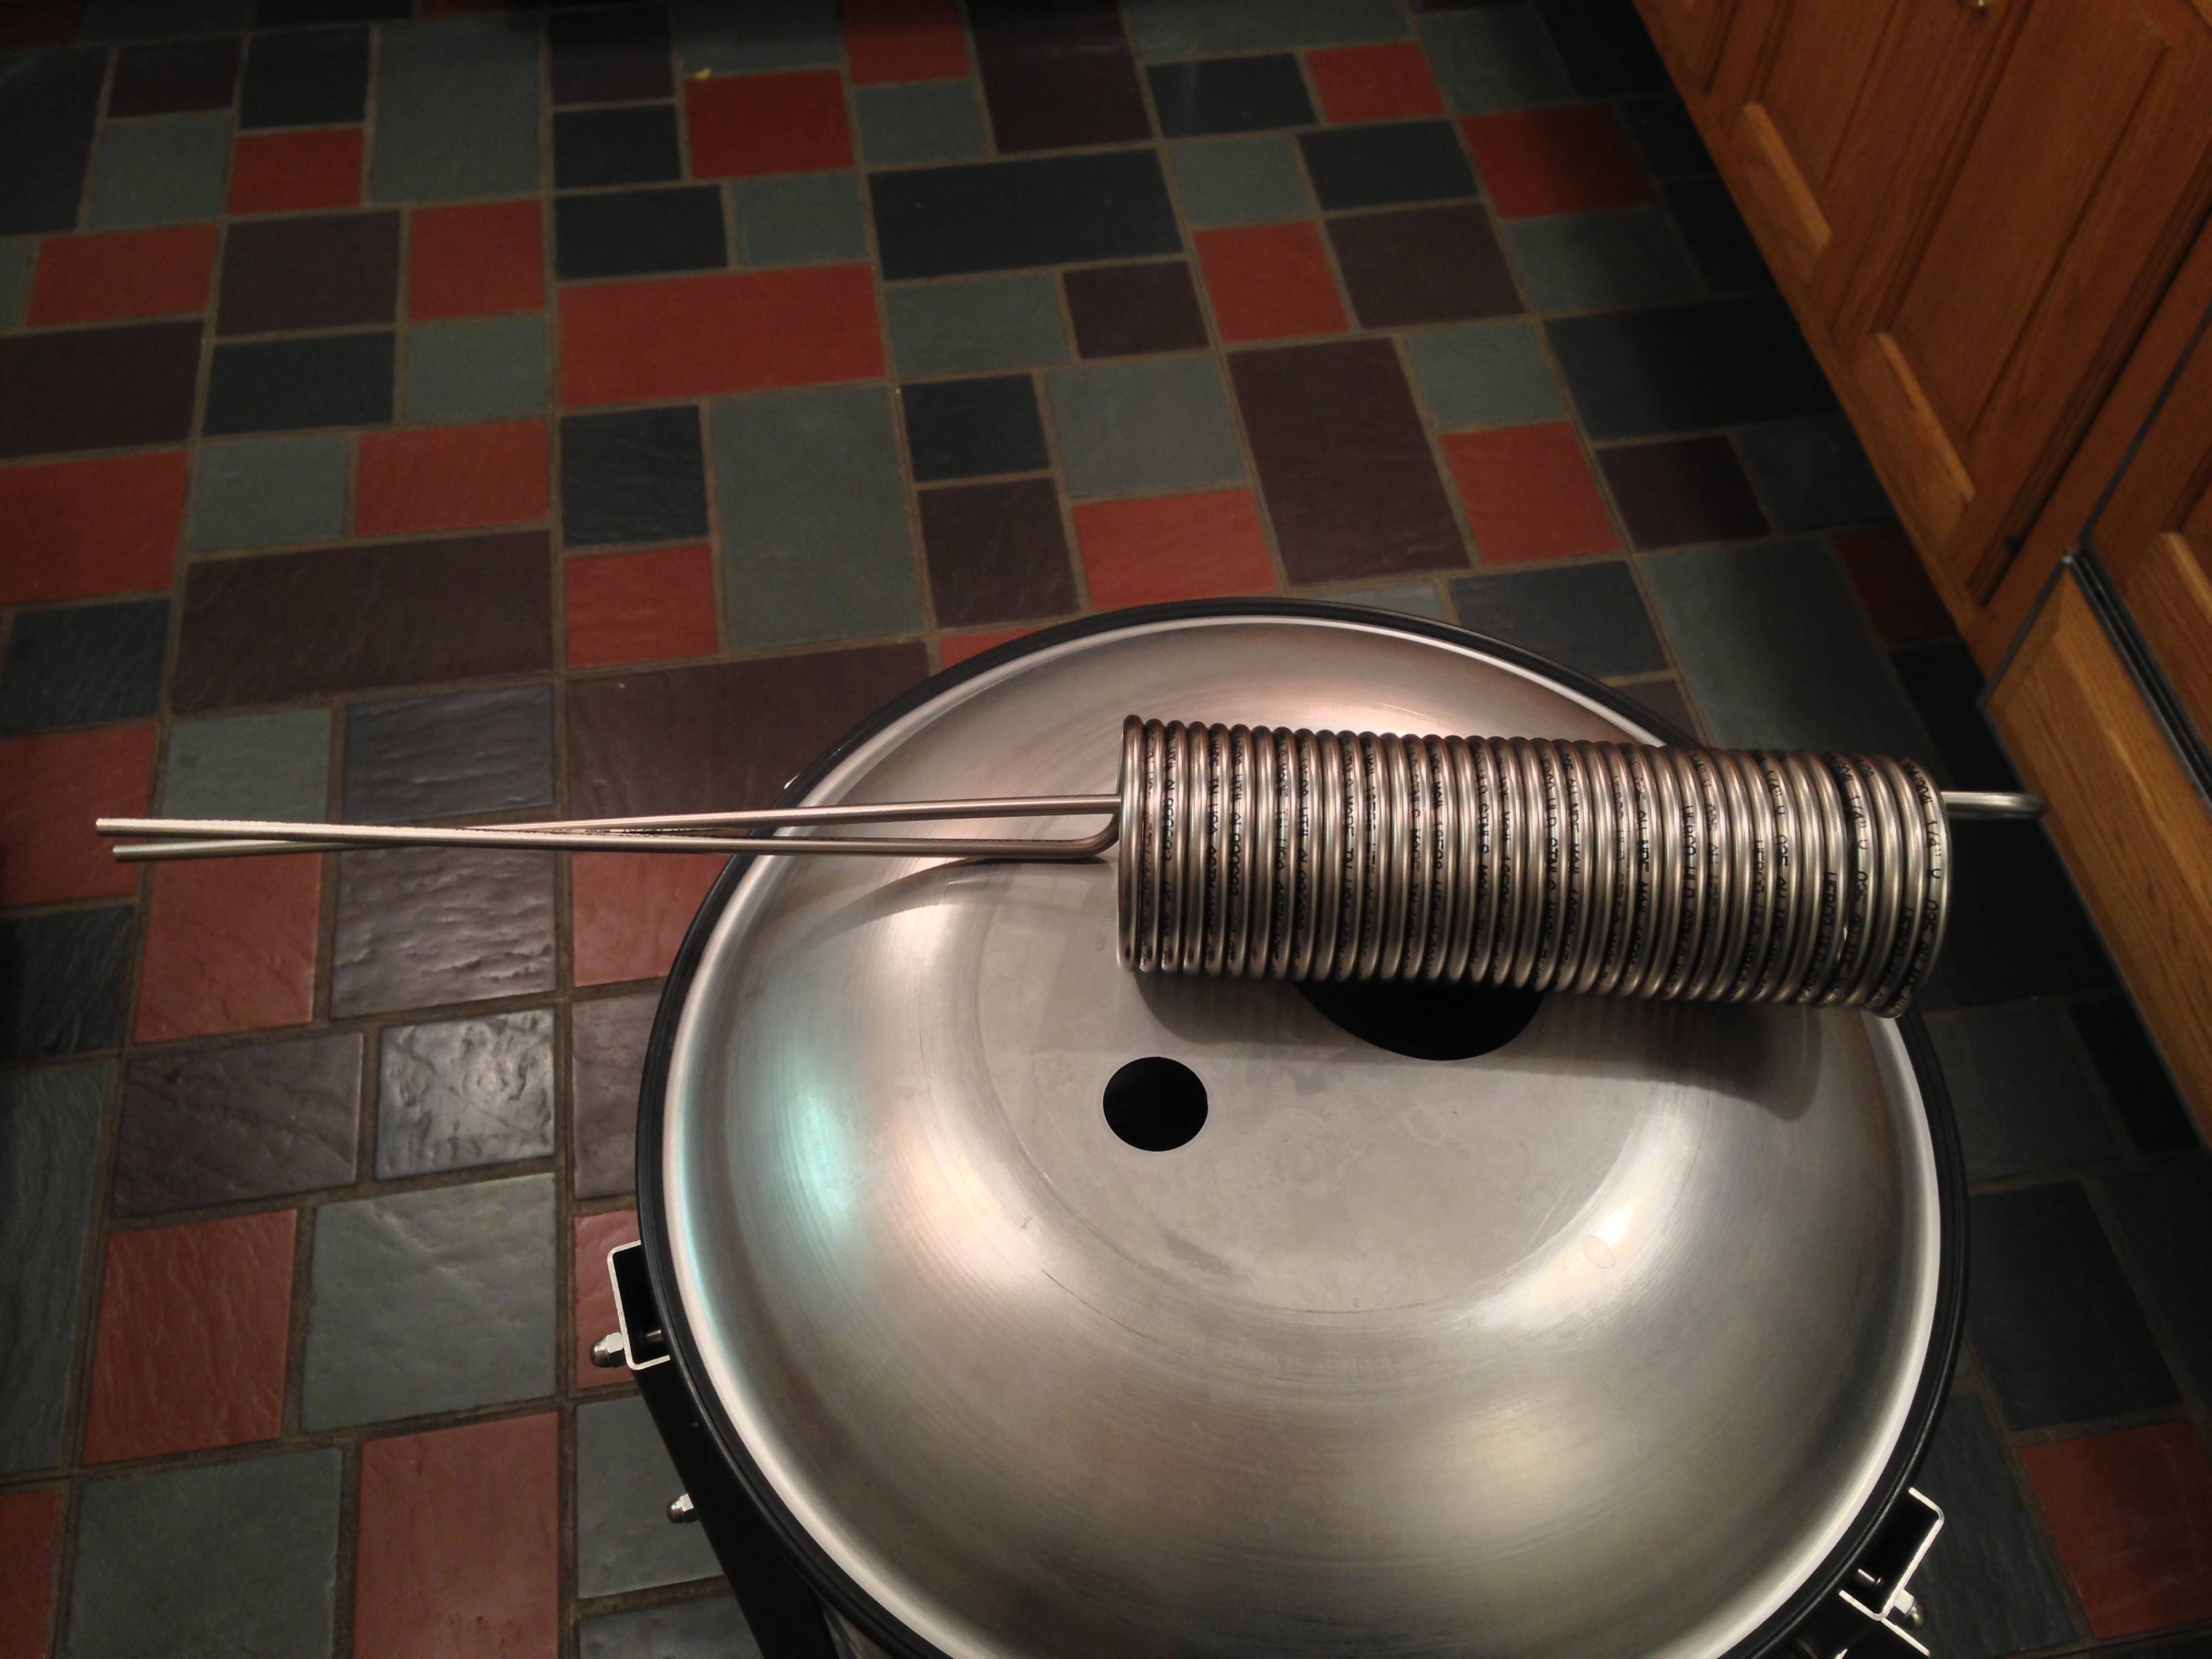
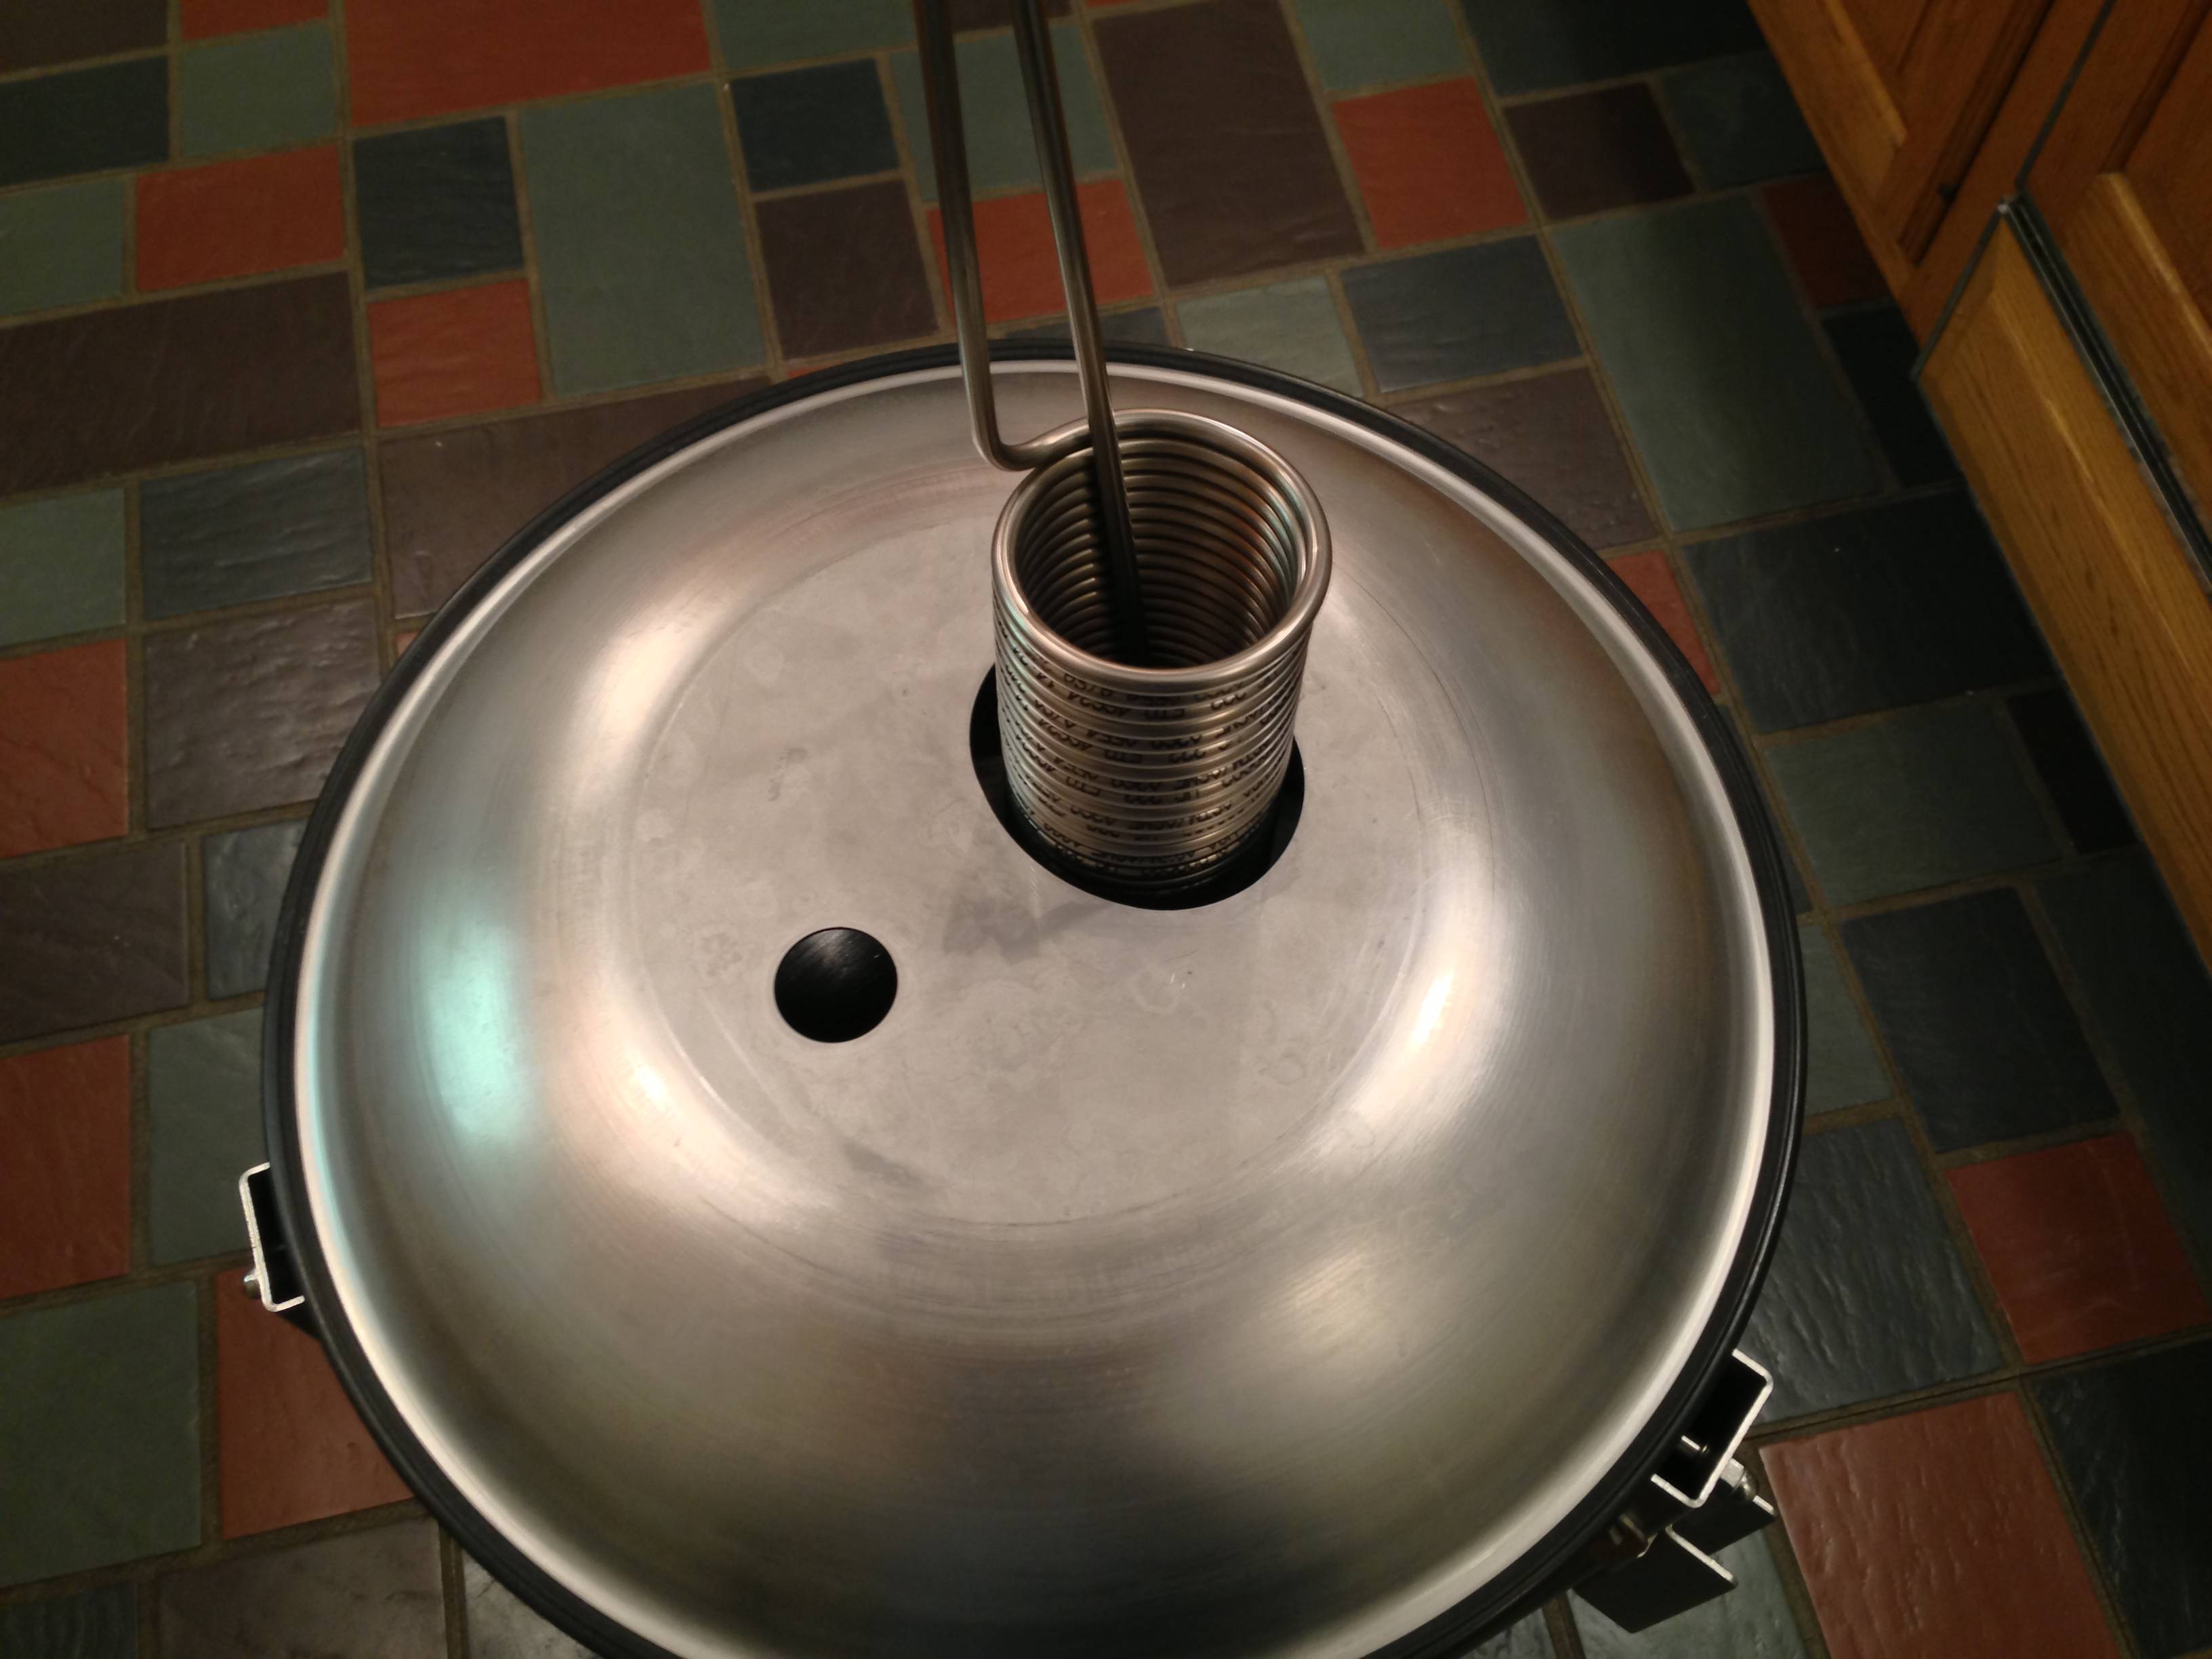
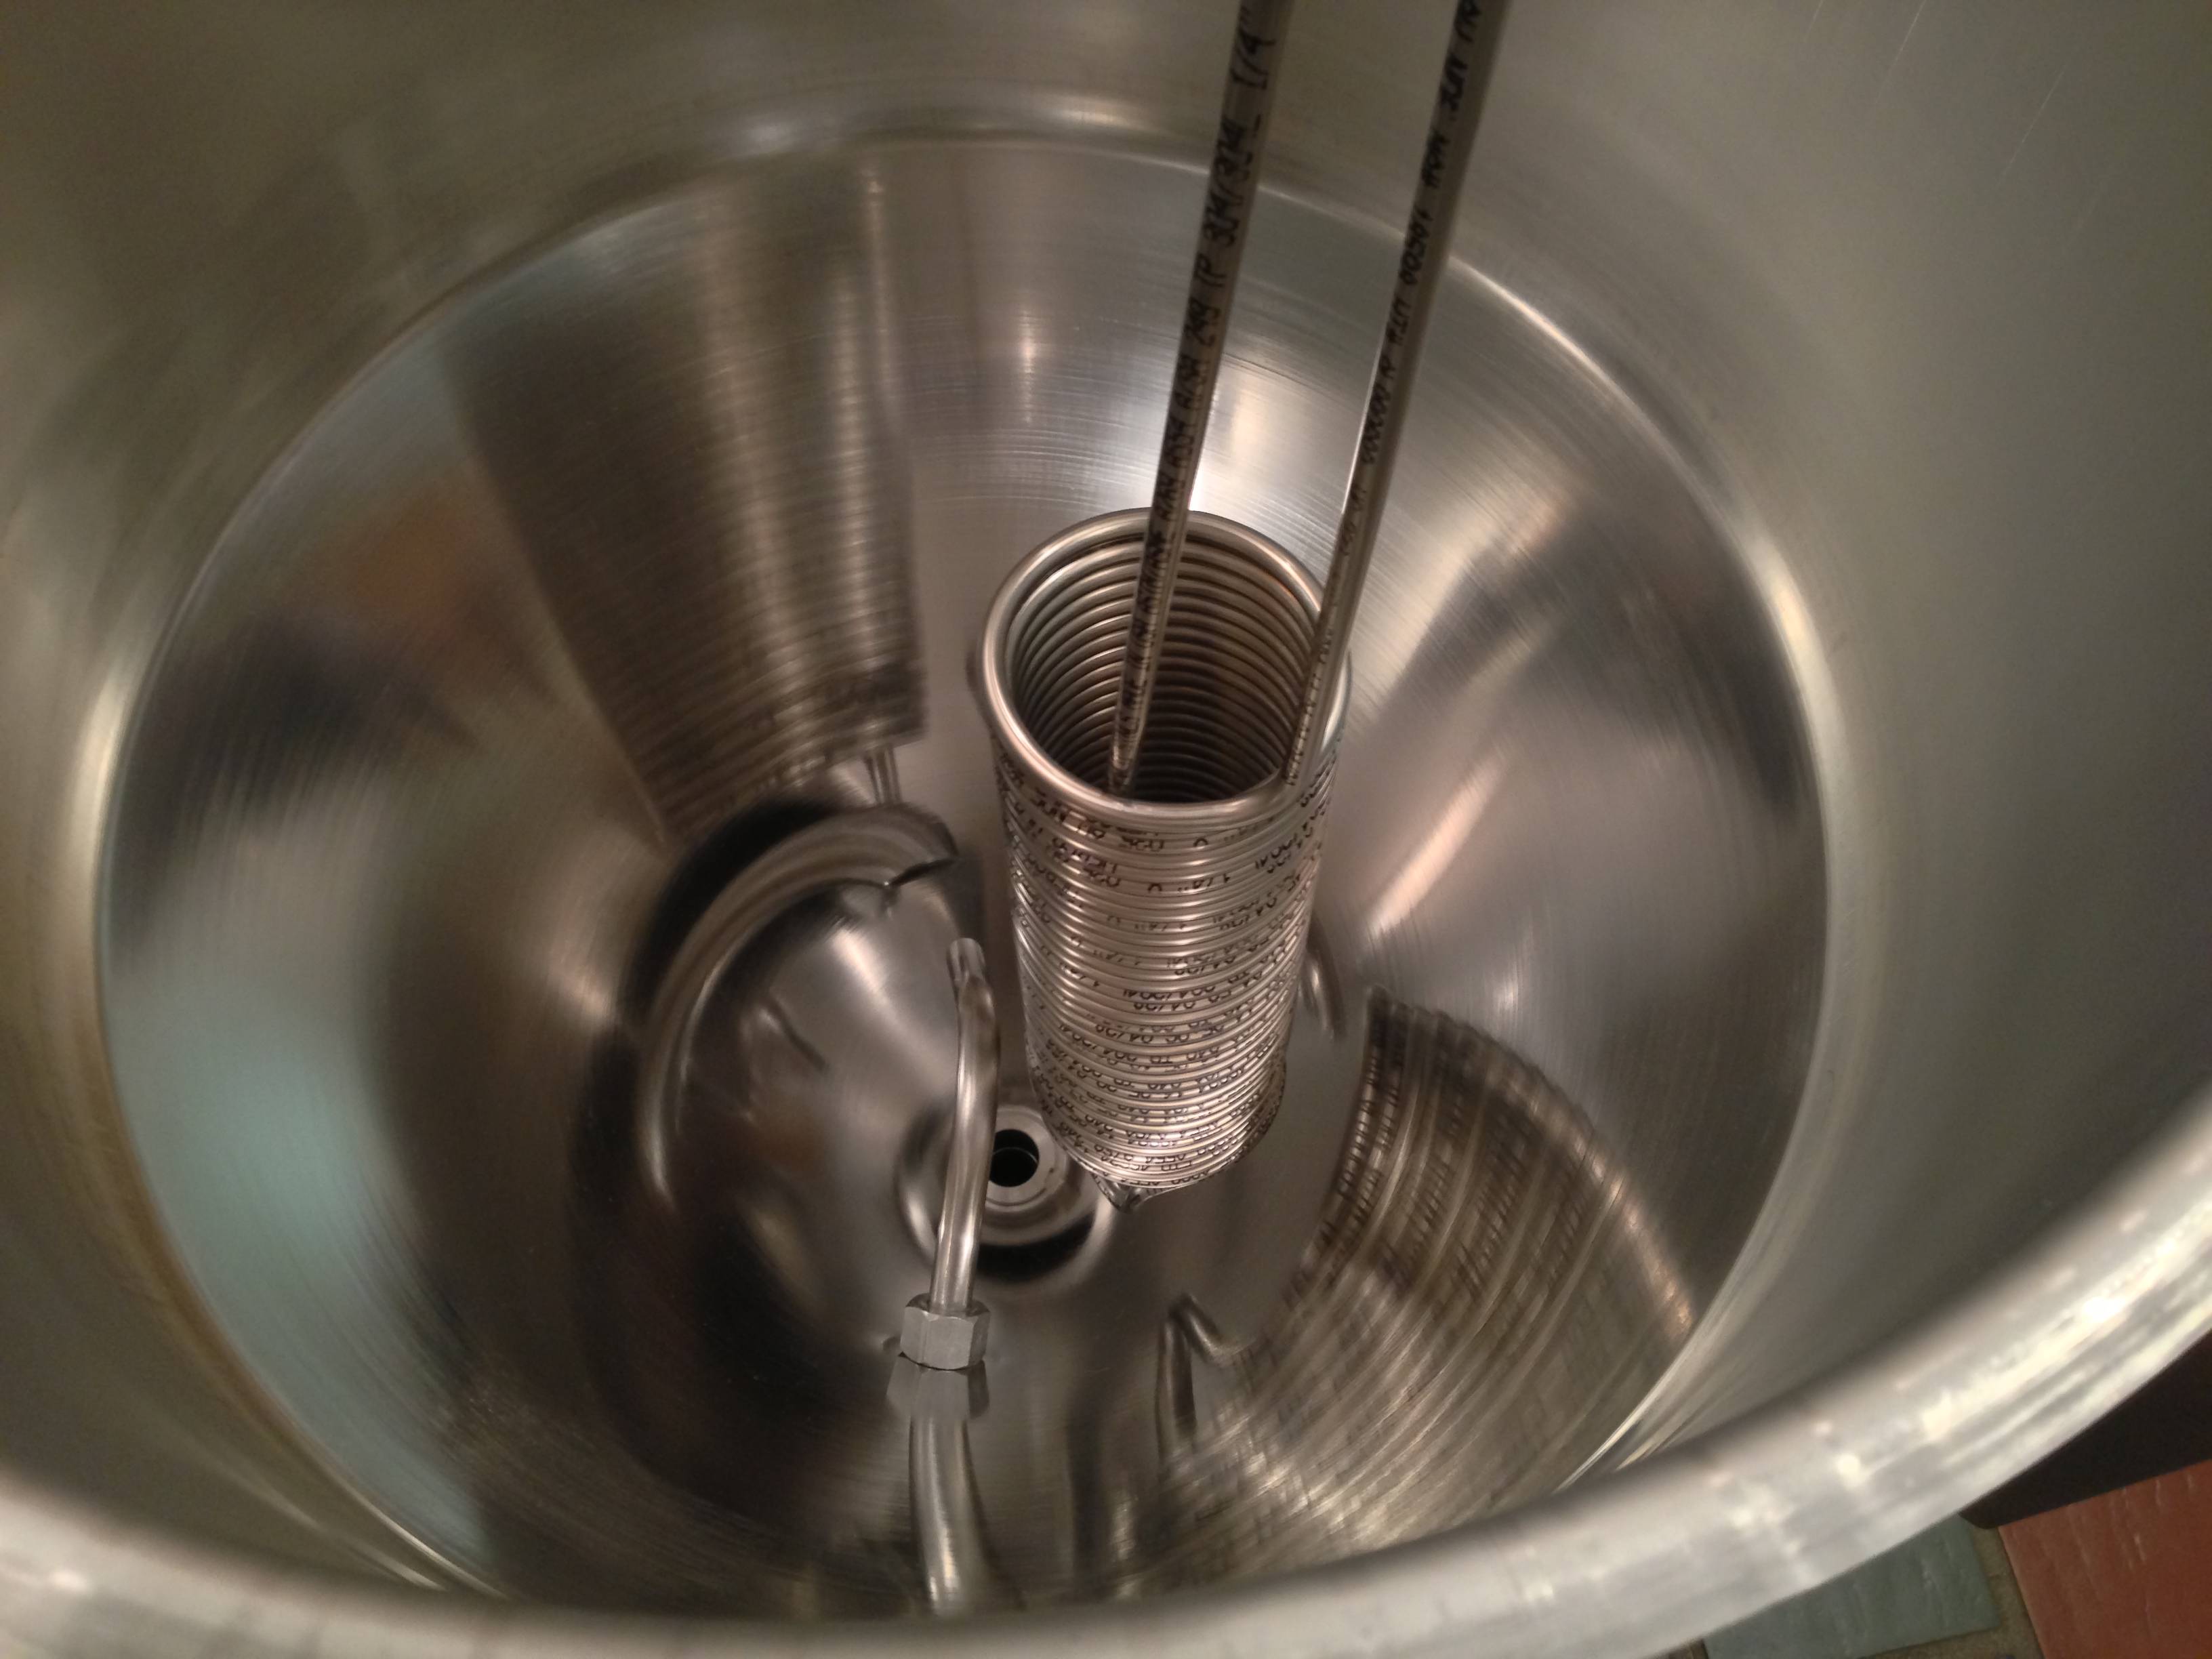
Totally thought I updated this a while ago, whoops! So I have been using this setup for many batches now and it has been working great! I have yet to clean up the wiring mess and such as I may move to a BrewPi.
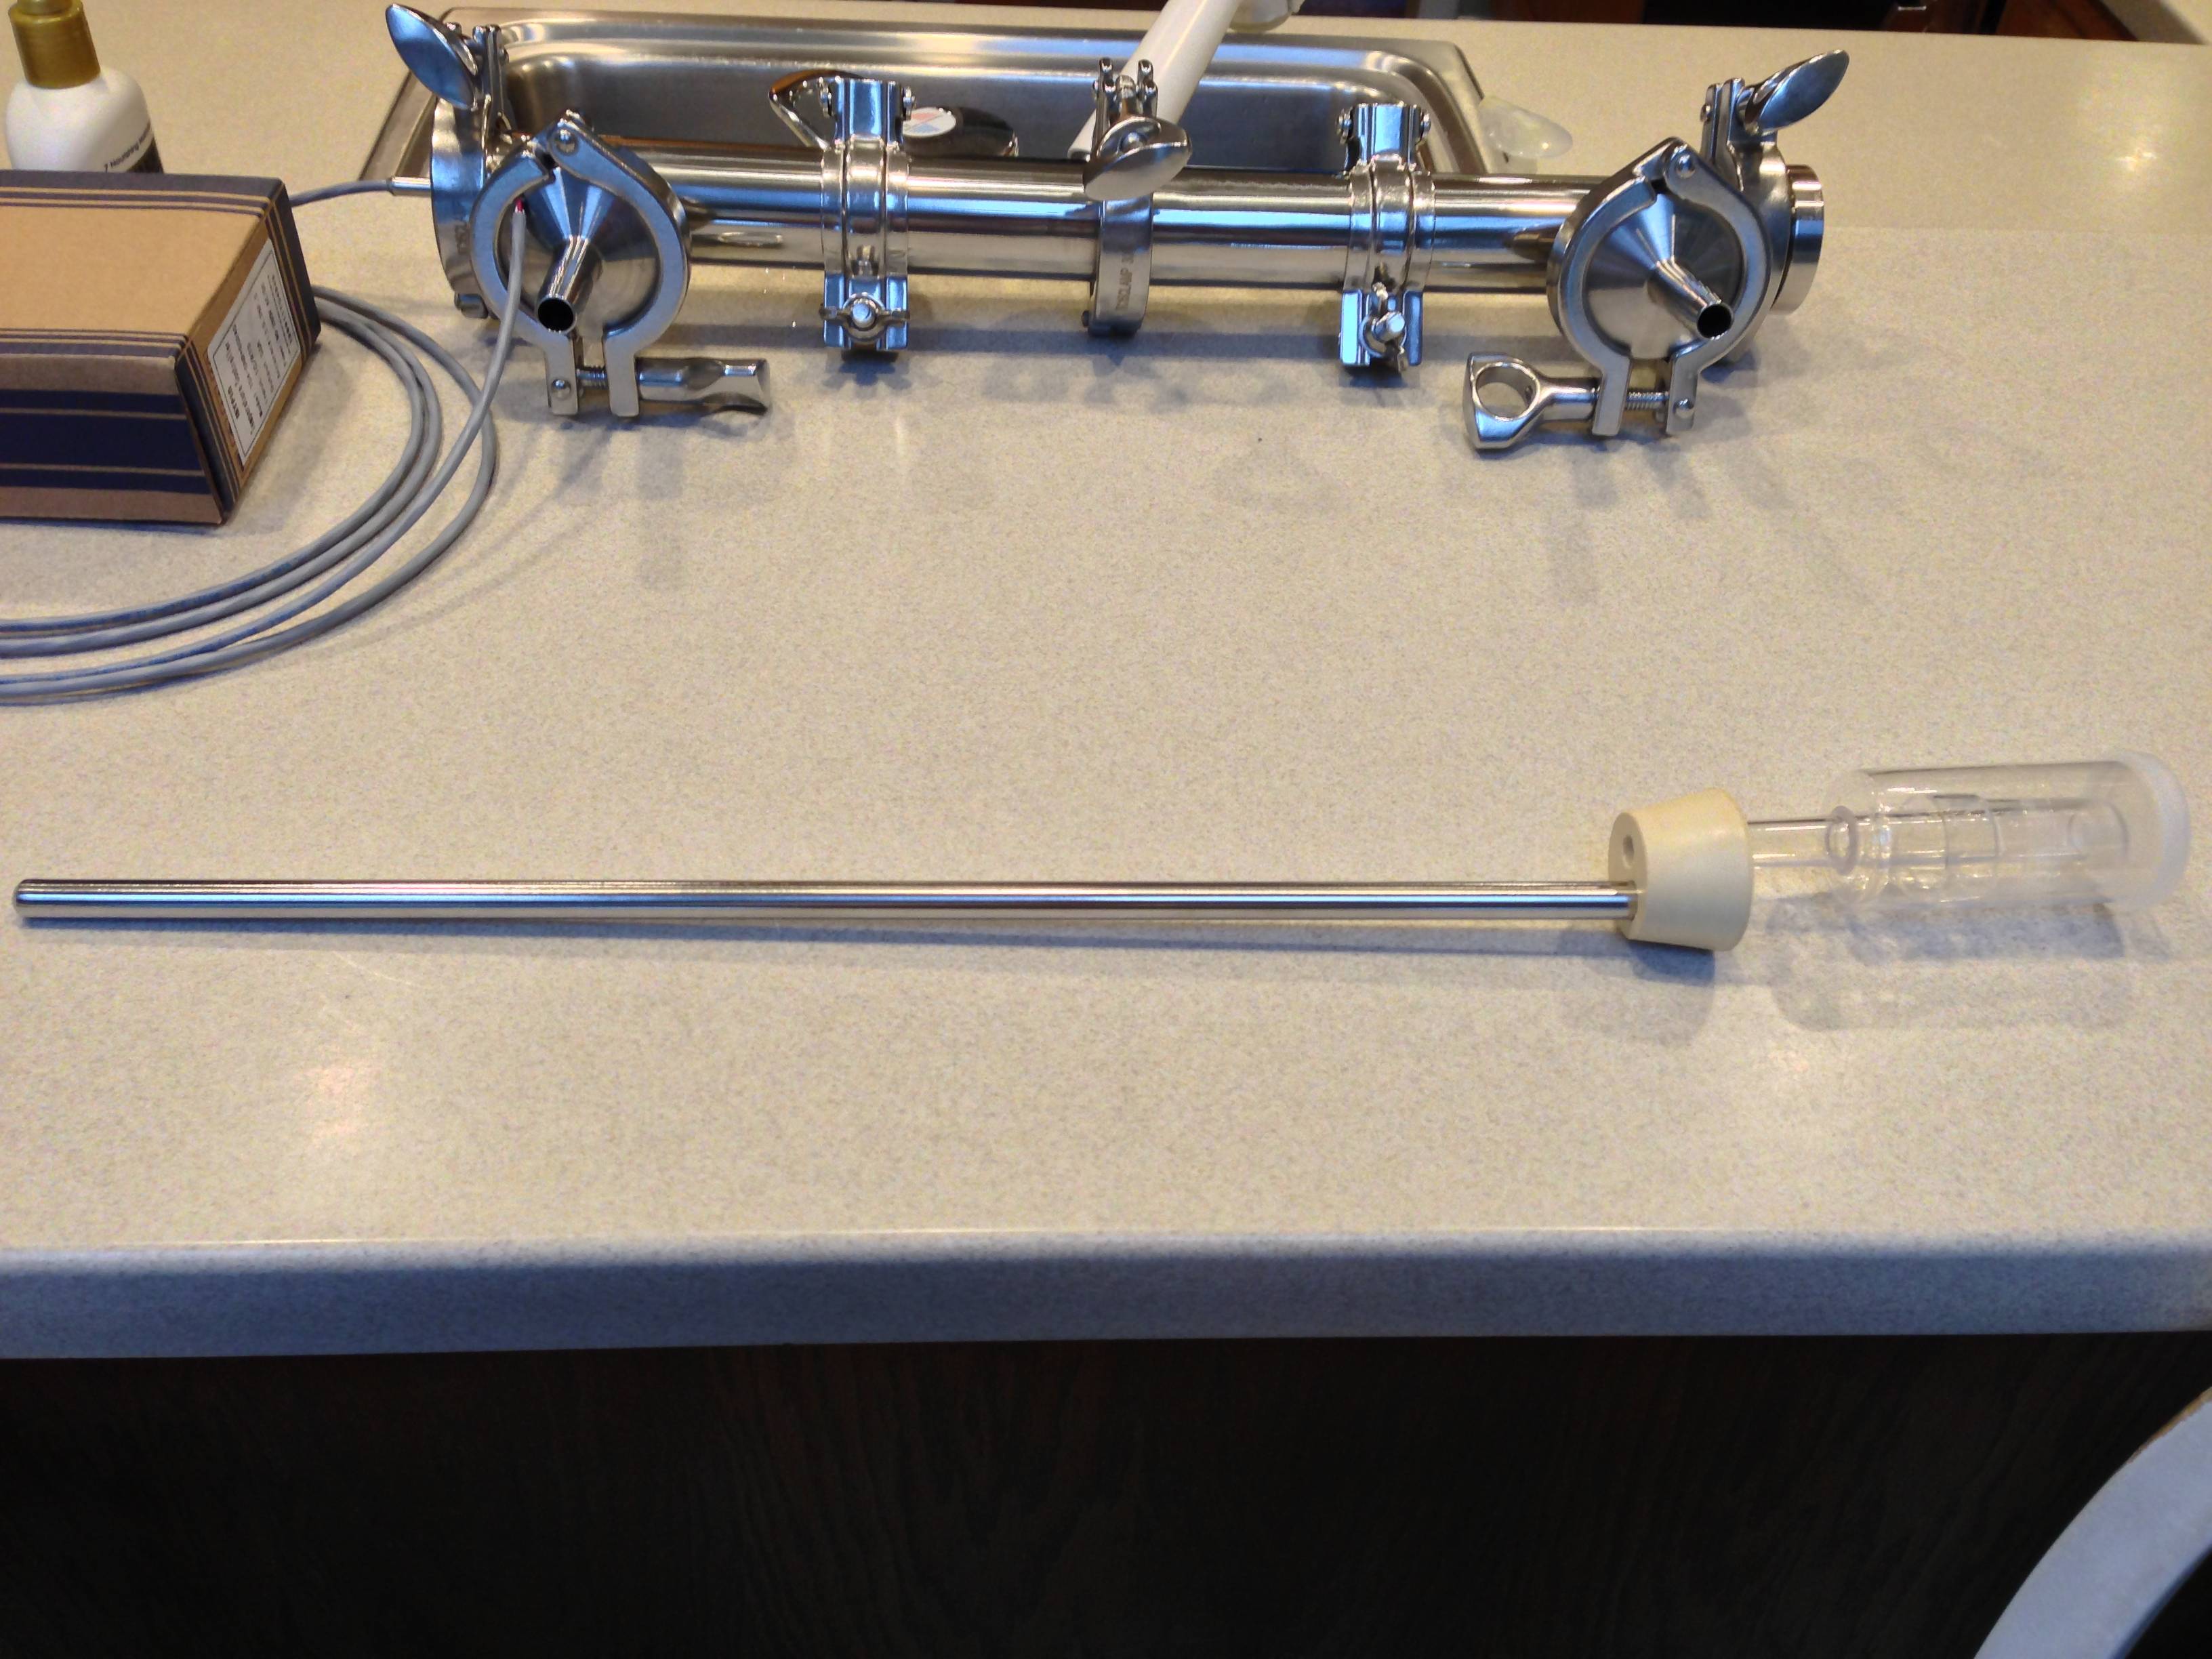
The stainless coil I am using has no issues pulling up or down the temp of the 5 gallons in the fermenter even with the extremely limited flow (due to my pump).
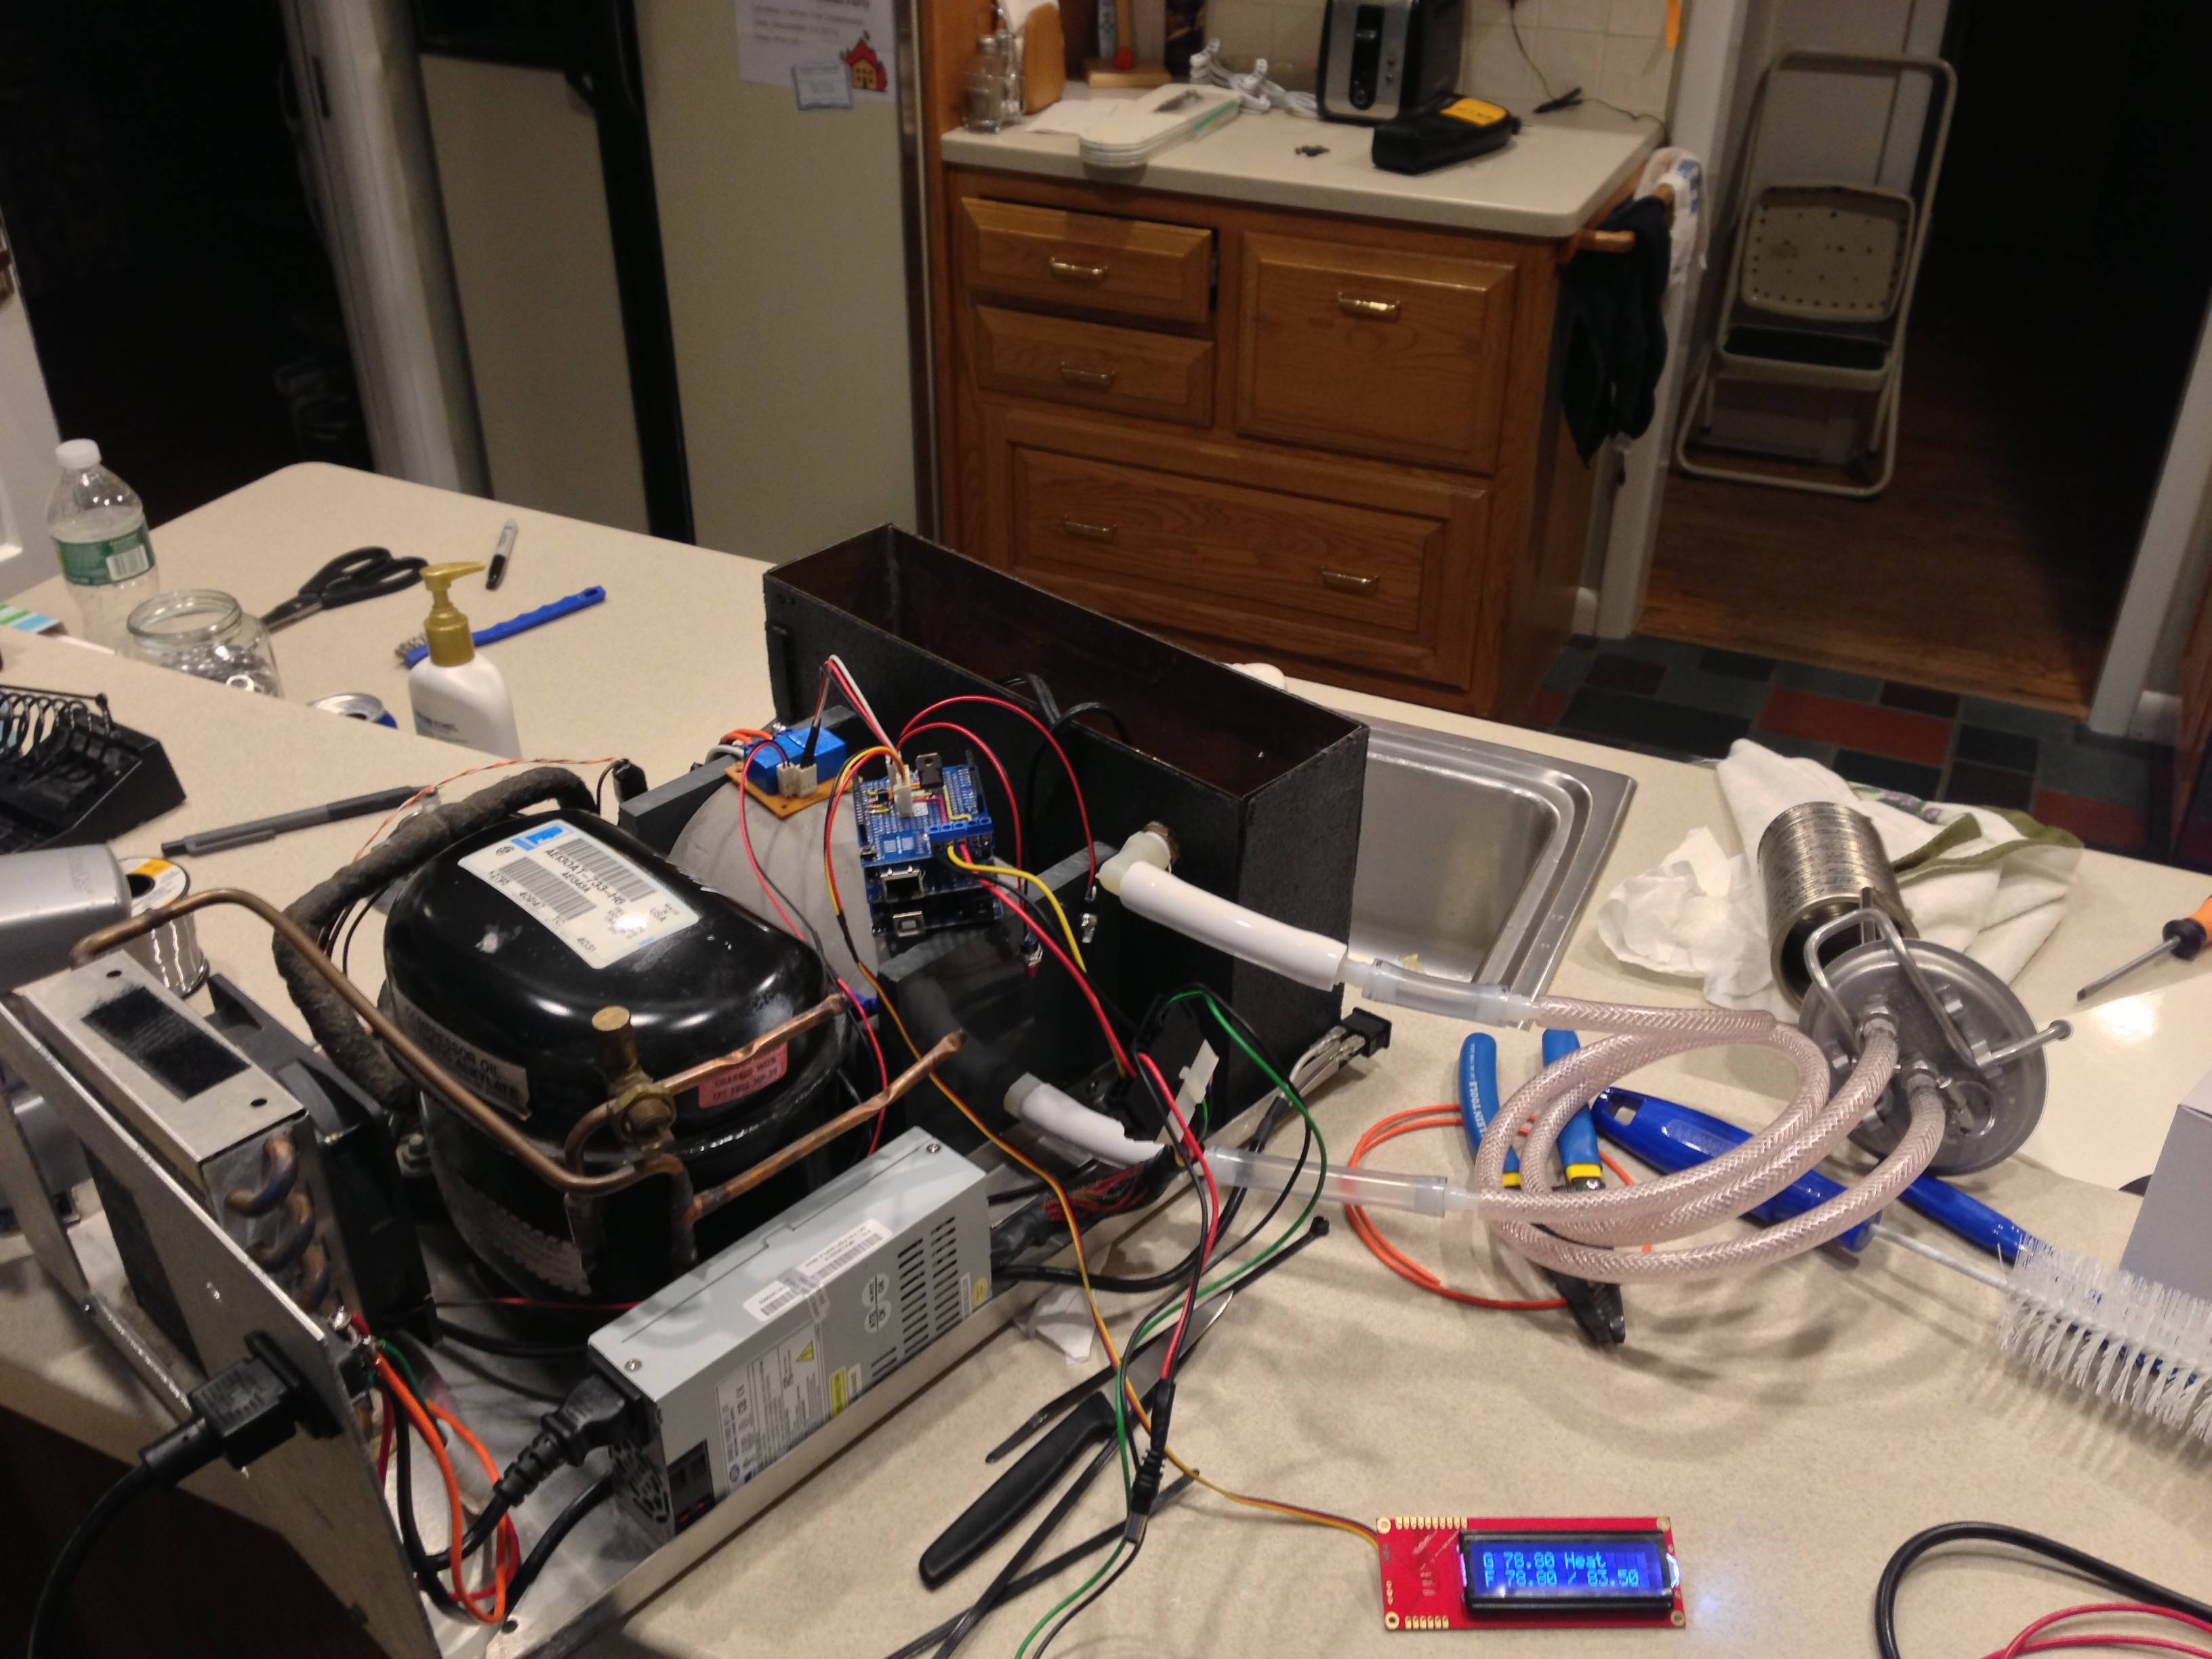
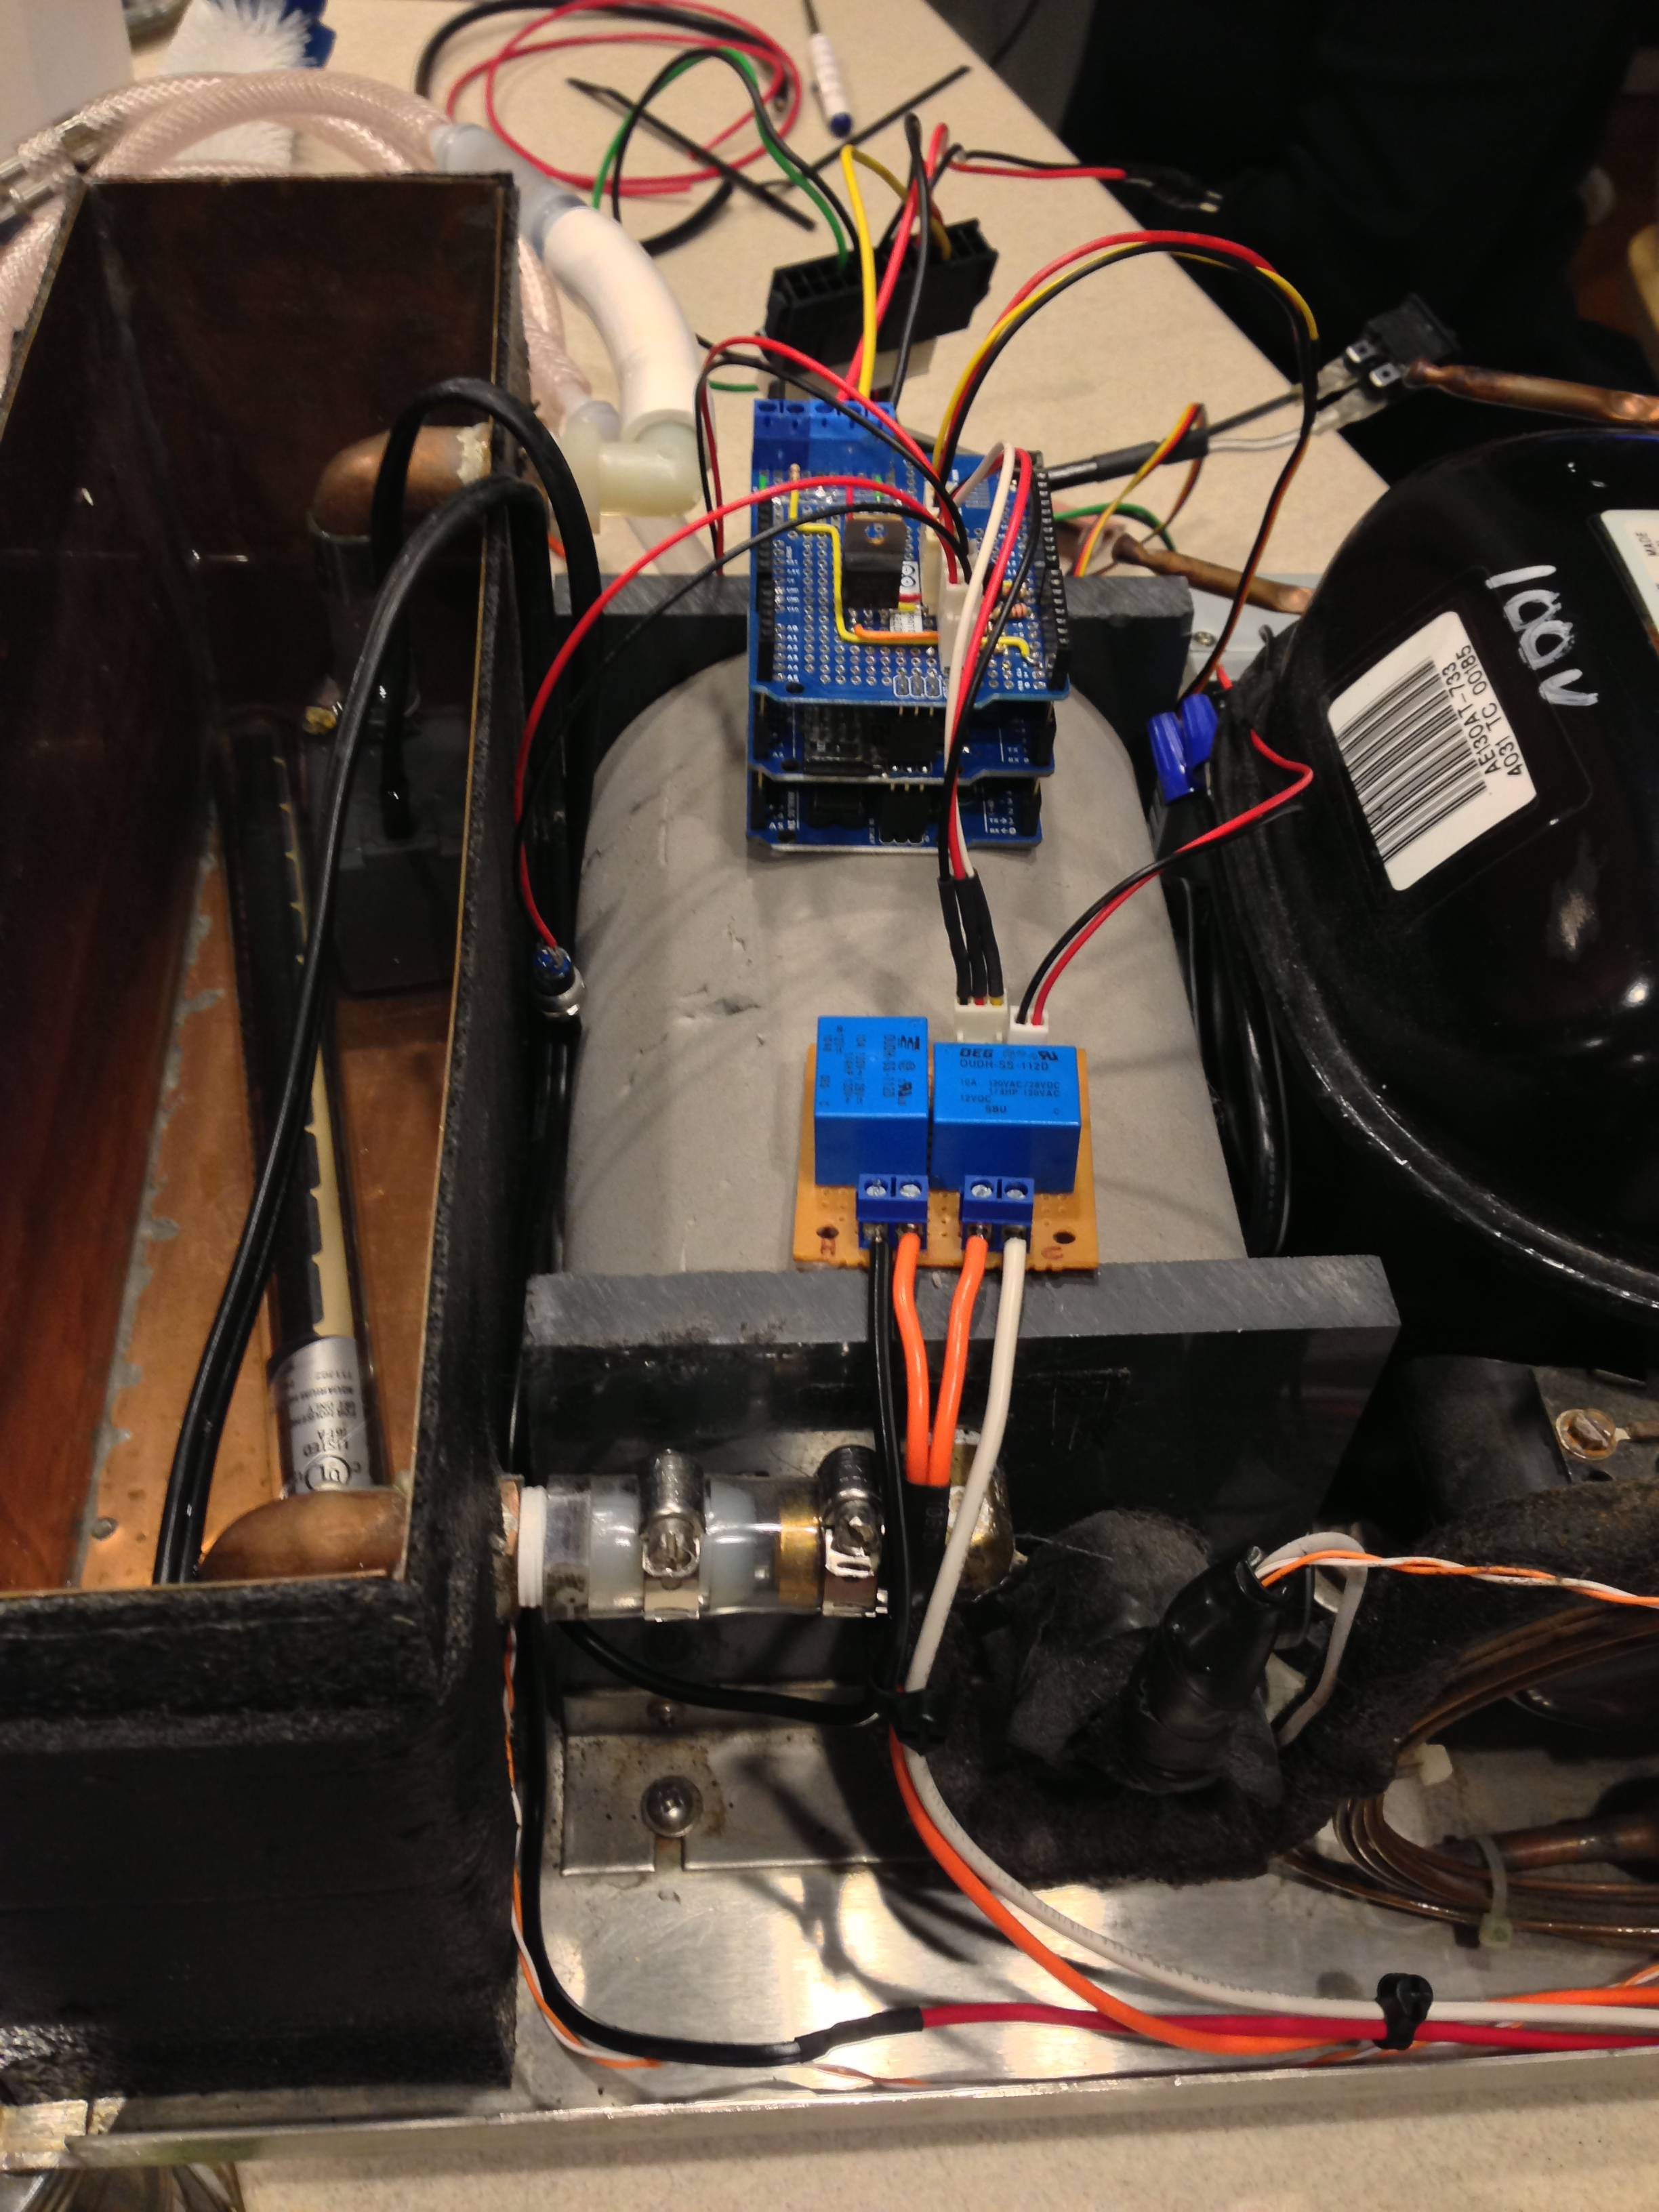
Current setup:
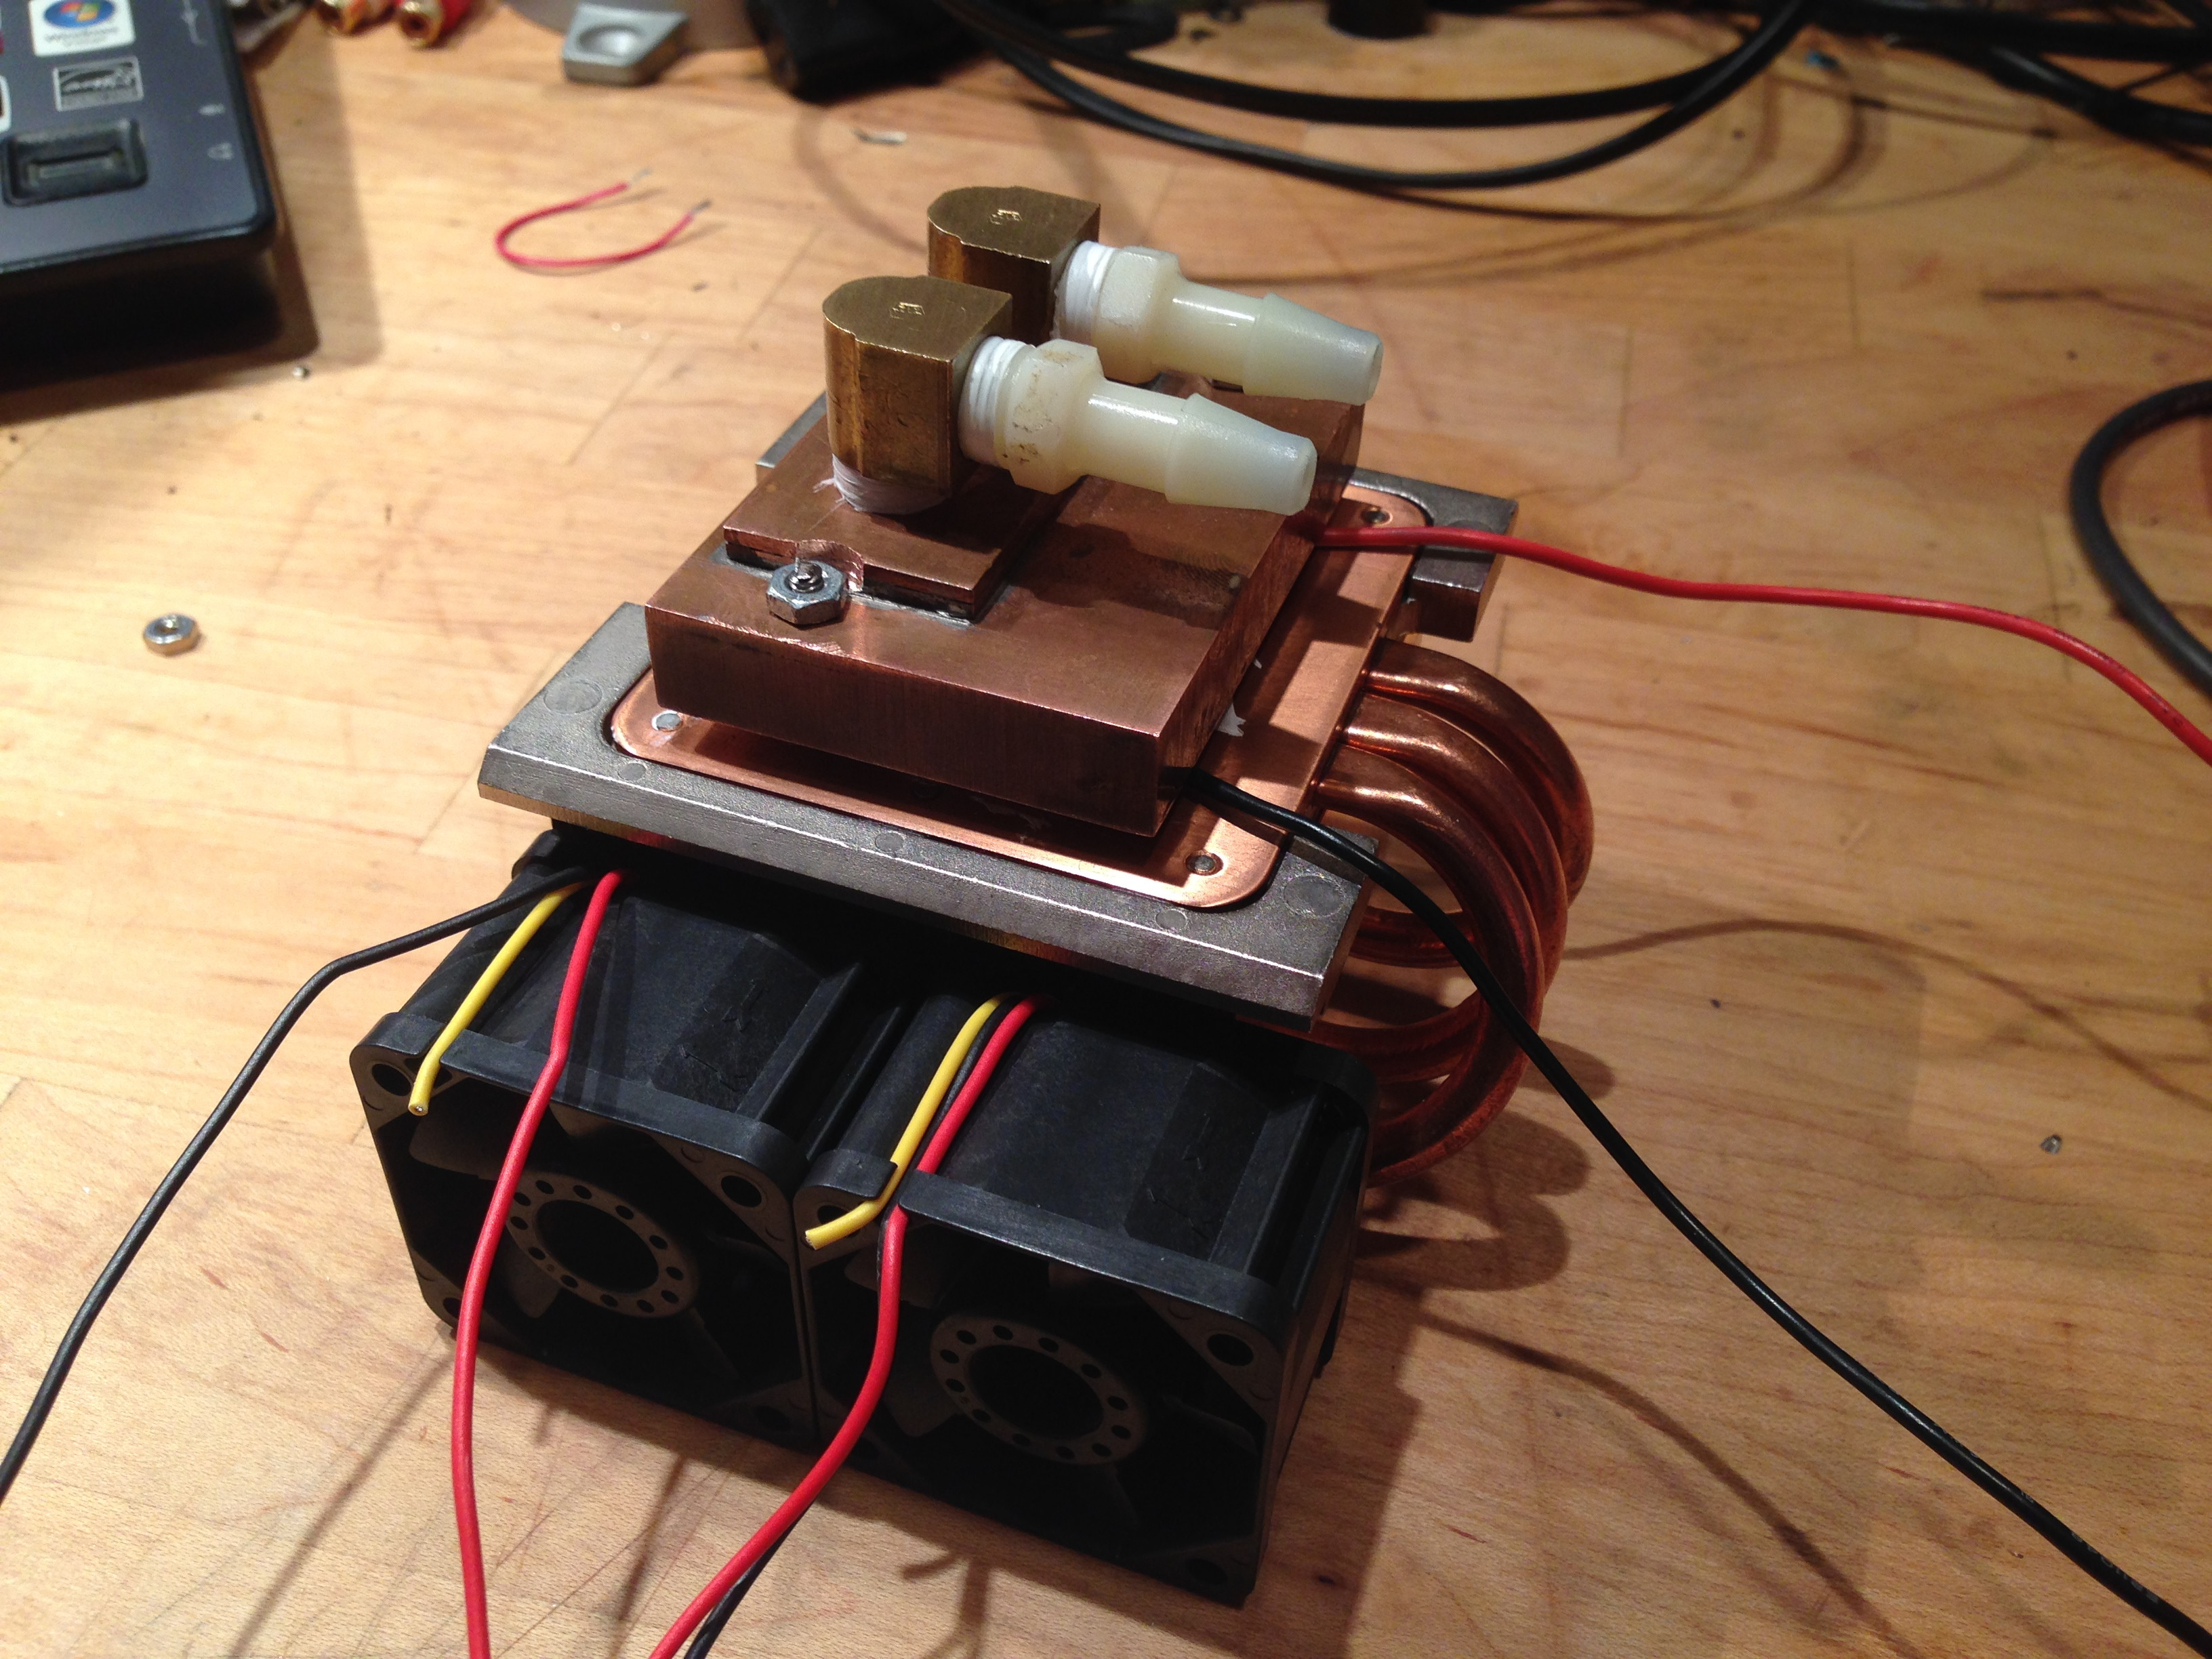
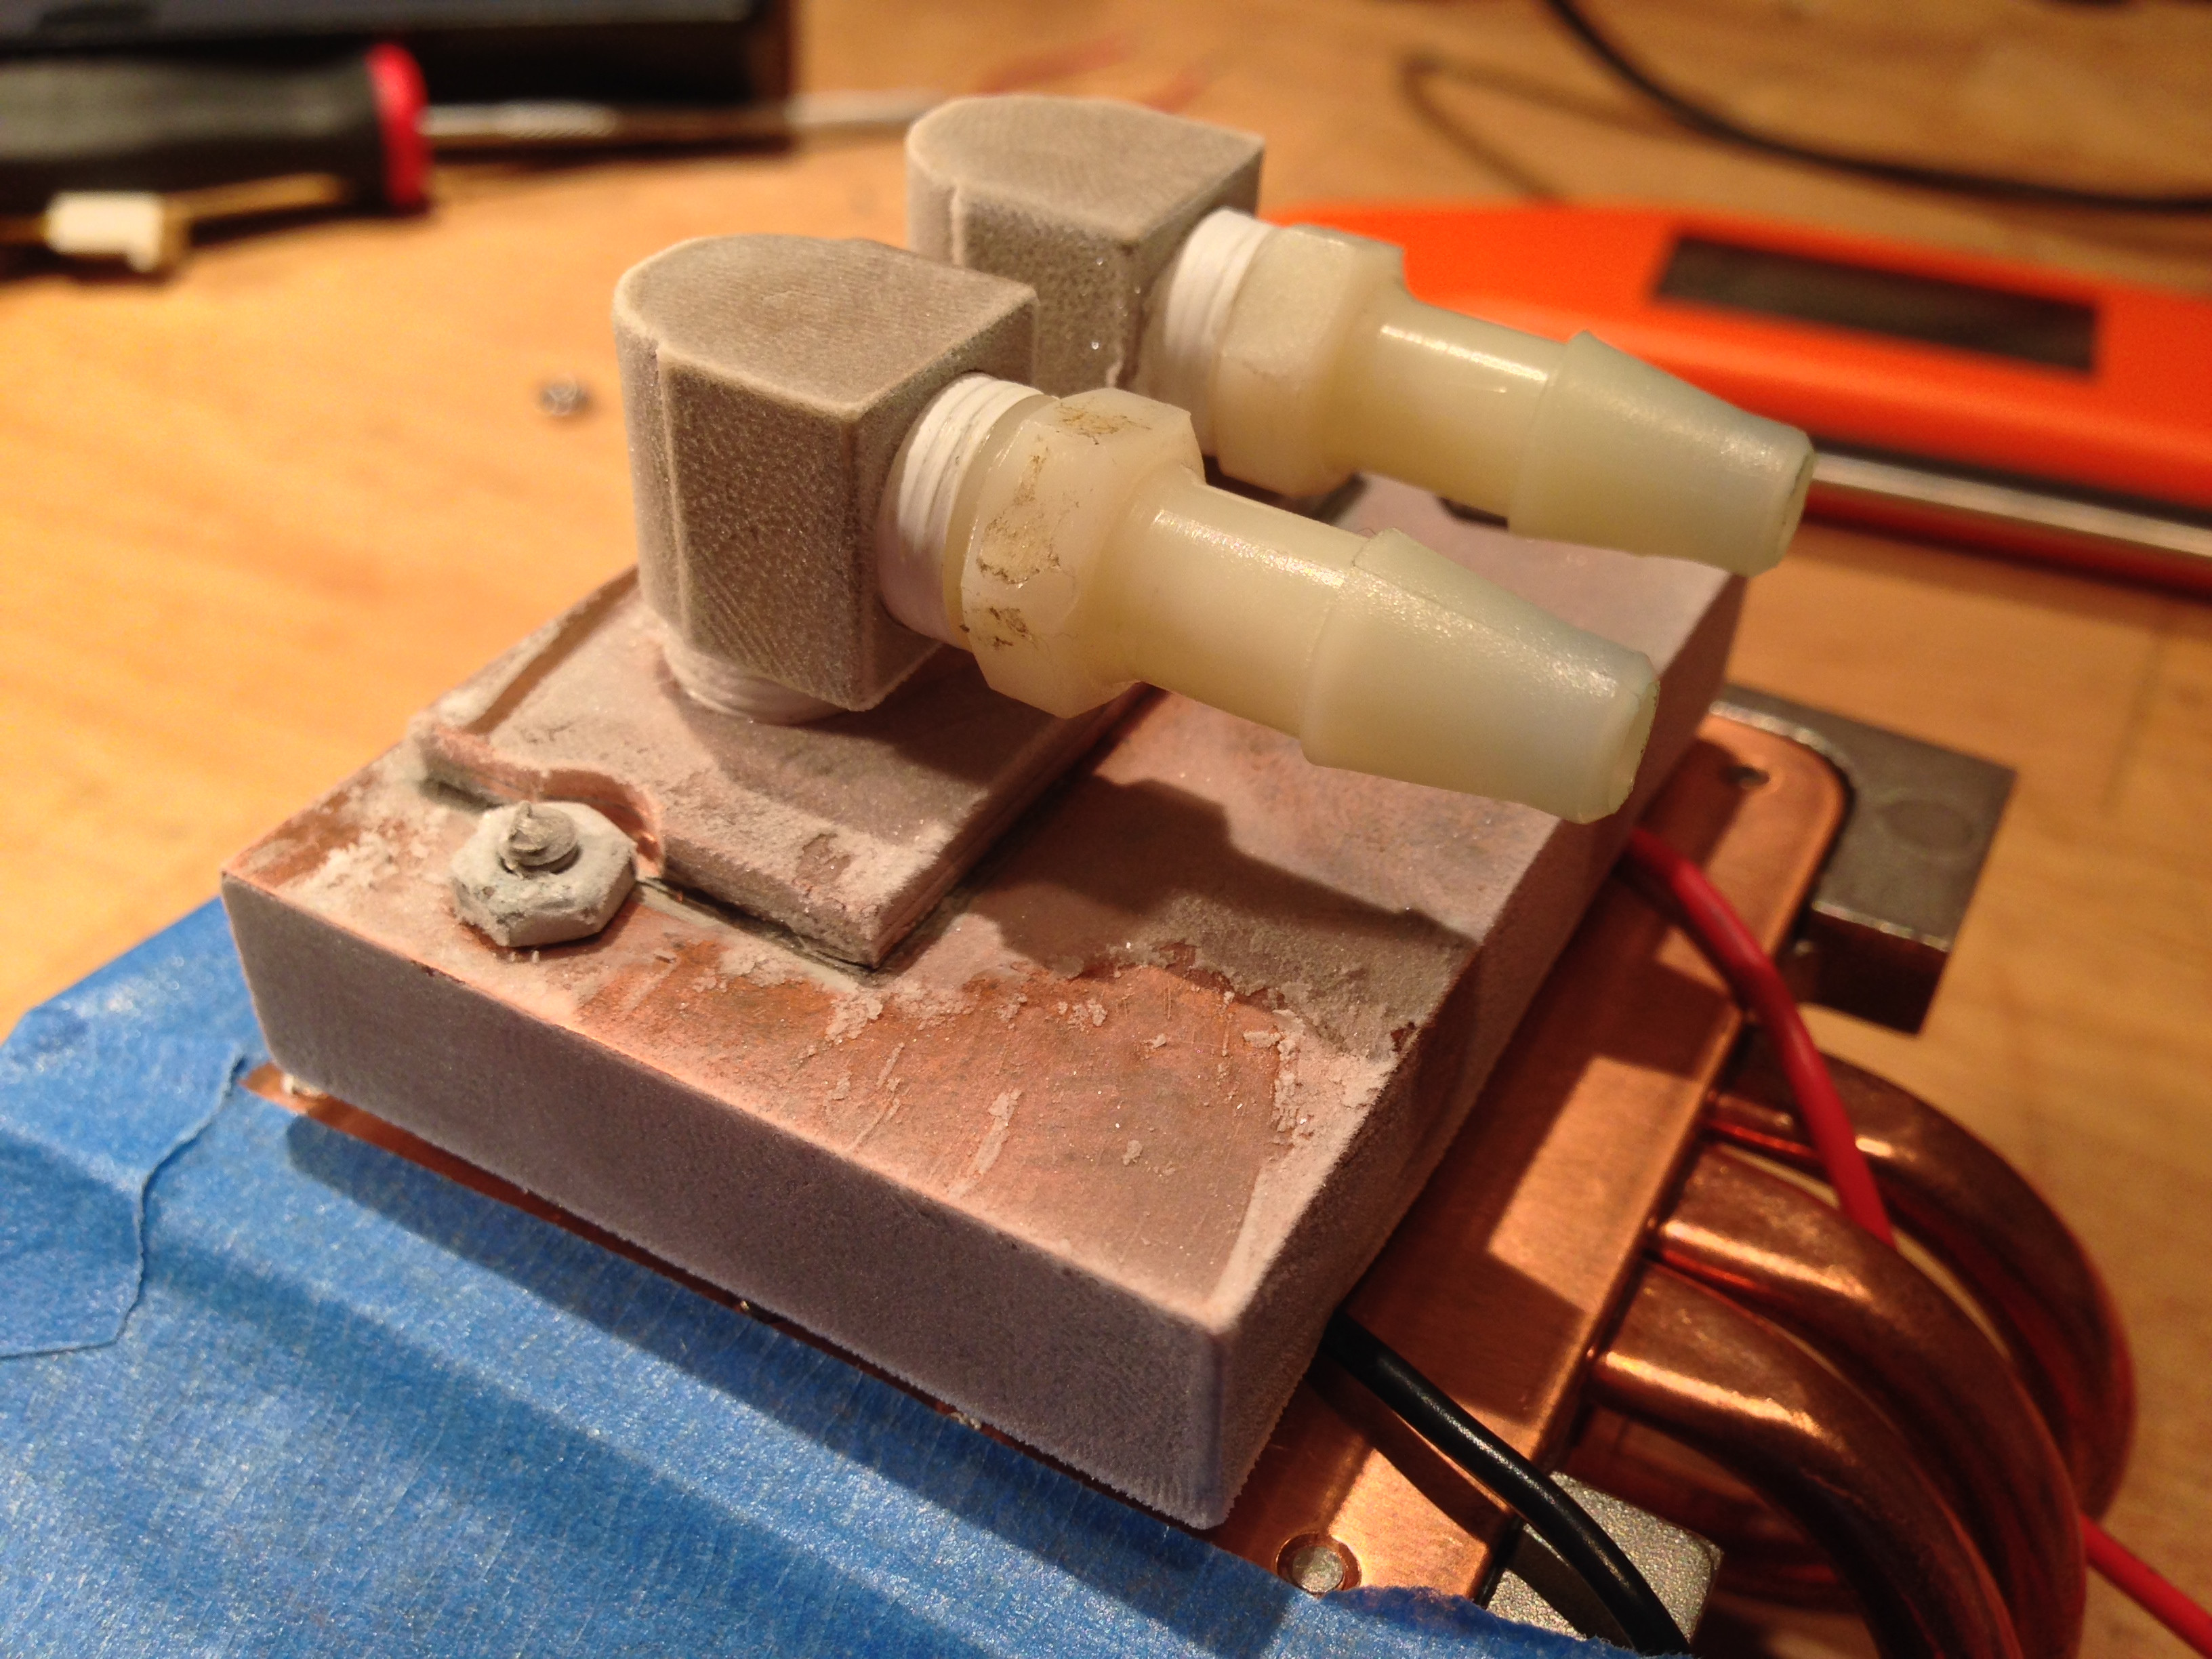
I am currently working on a peltier based heating and cooling upgrade for my system too, some parts were gutted from an old water block I made for a graphics card years ago.
The possible new chiller unit.
Testing
just out of curiosity... How much do you think it would cost to run that?
Not sure yet. It still gets quite cool @ 5vdc/3amps so I am hoping I can use it there. If I get some time in the next few weeks I'm going to get it hooked up to a small 1U computer powersupply and see what my Kill A Watt says.
Small update when the current TEC is heating or cooling the whole sytem pulls 120 watts via my Kill-a-watt. 11 watts when idling.
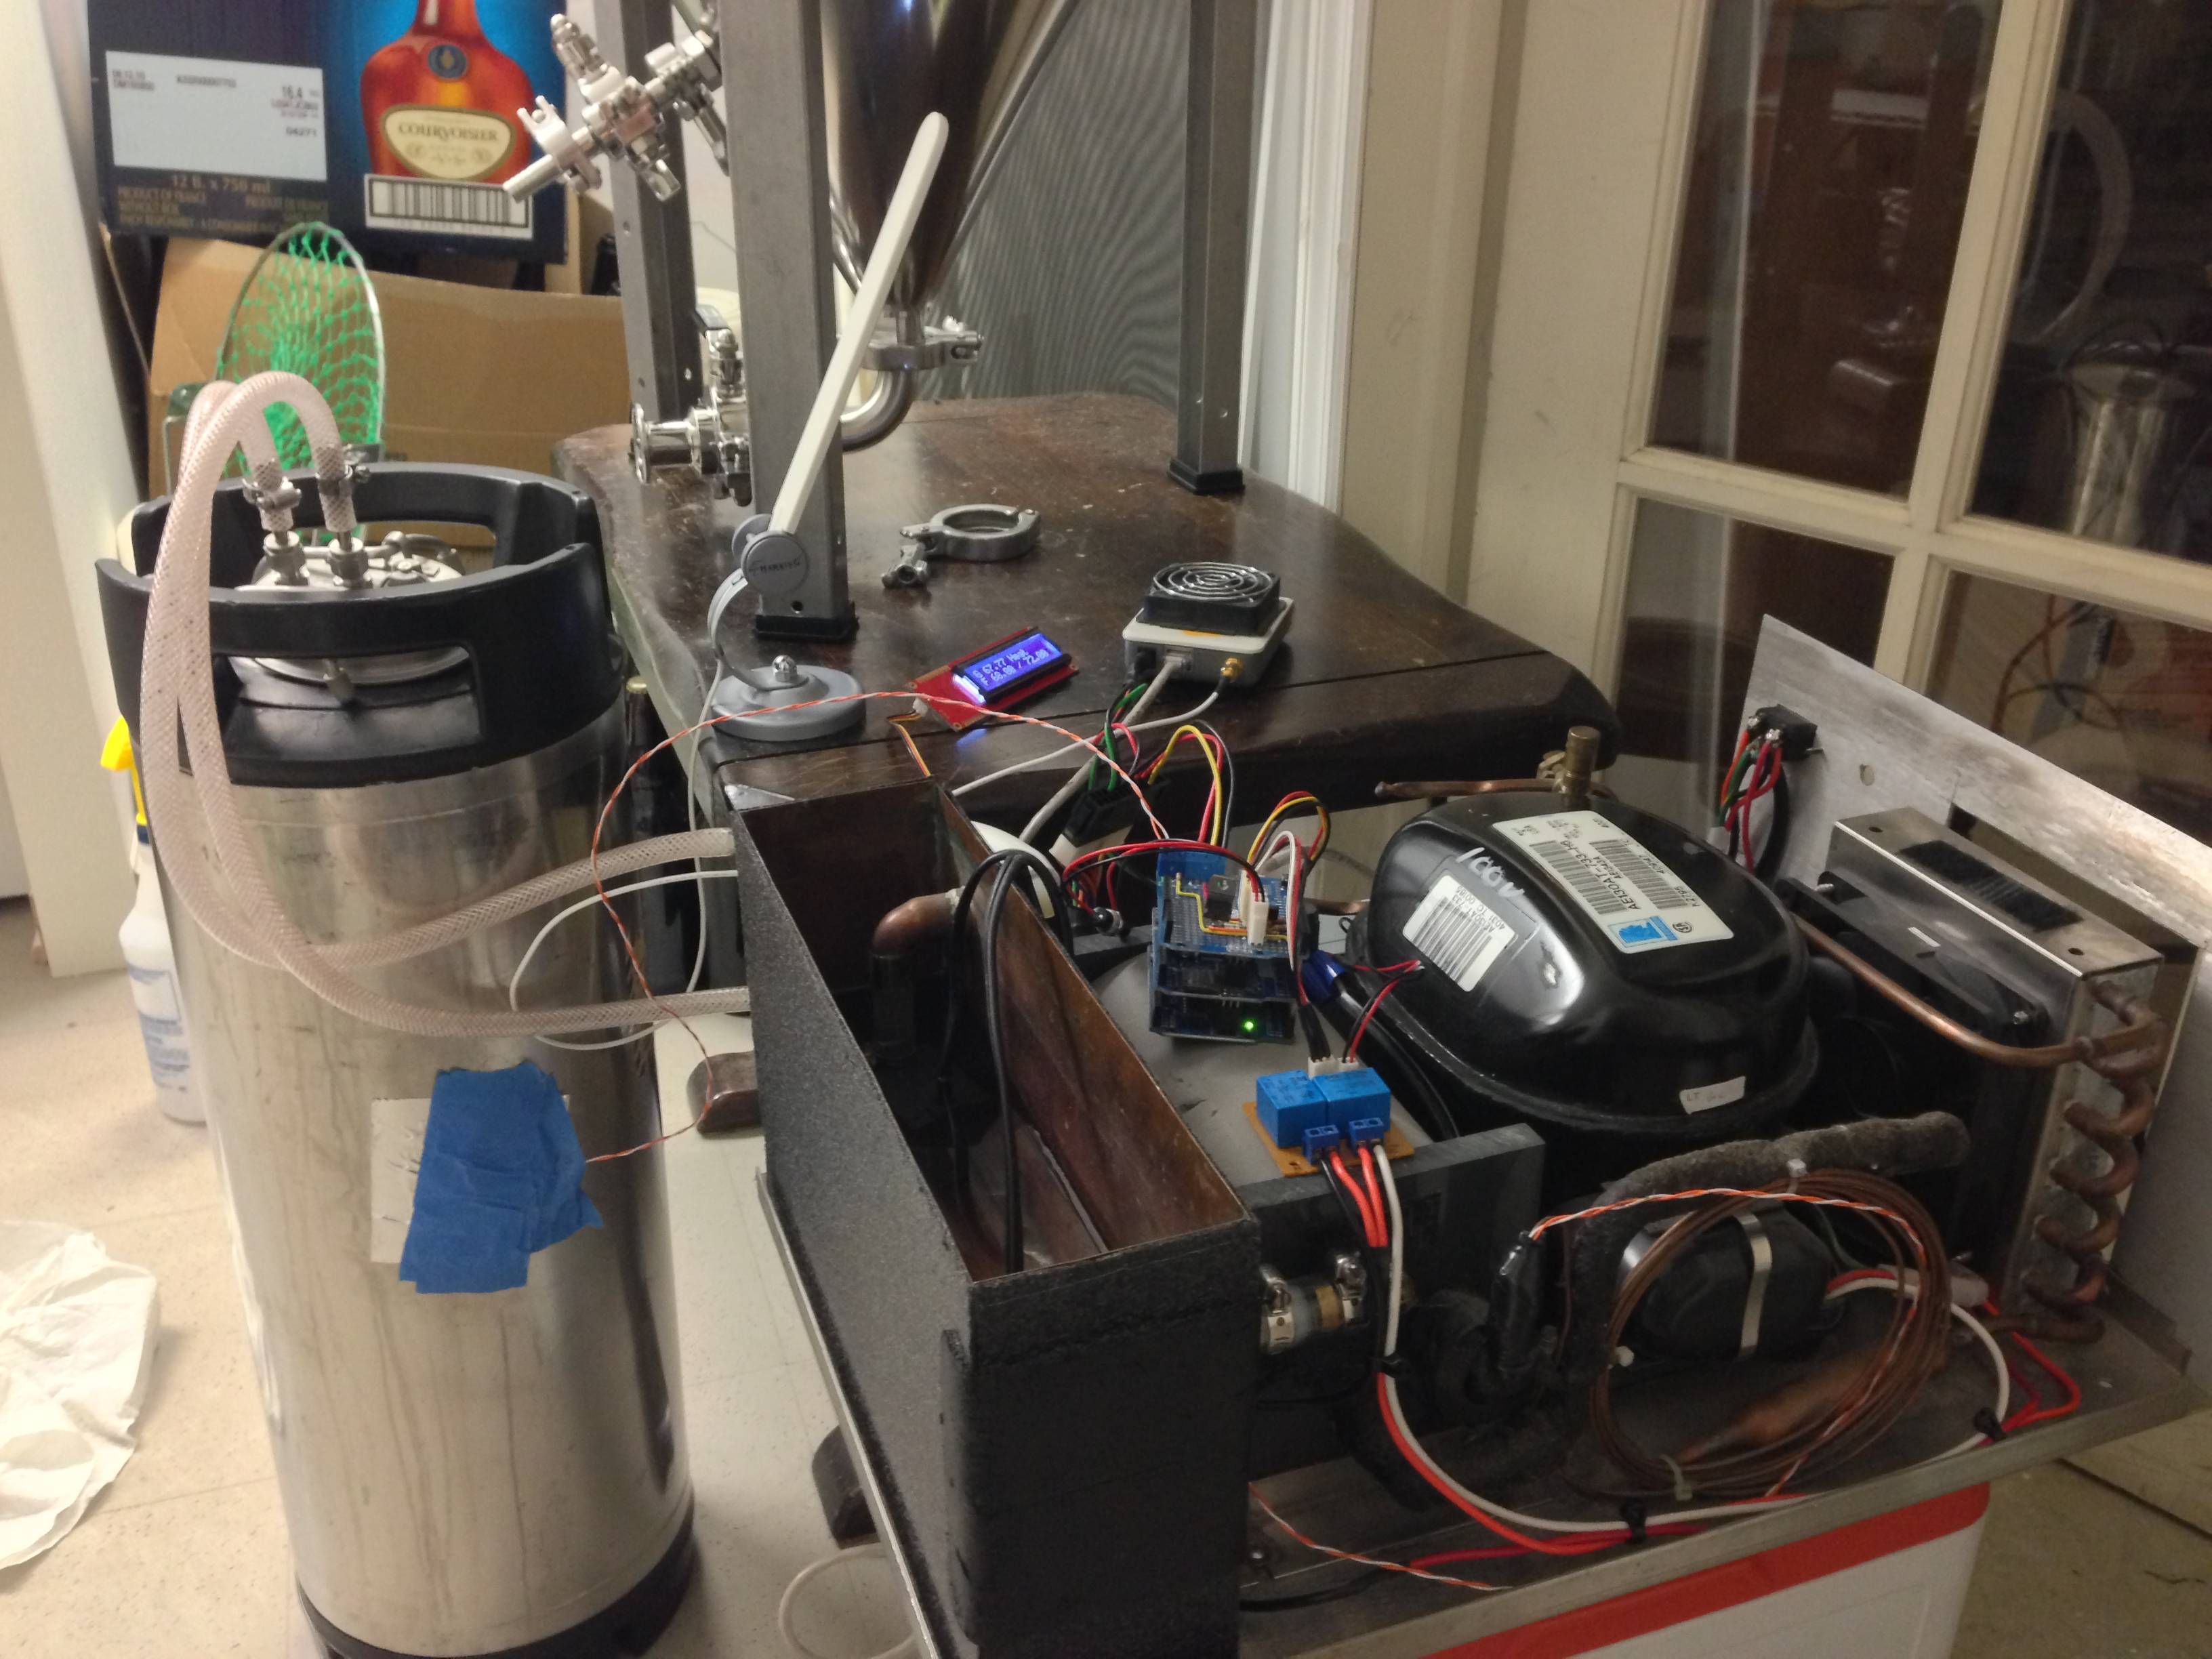
Current album: http://imgur.com/a/vwX5L
Quick picture:
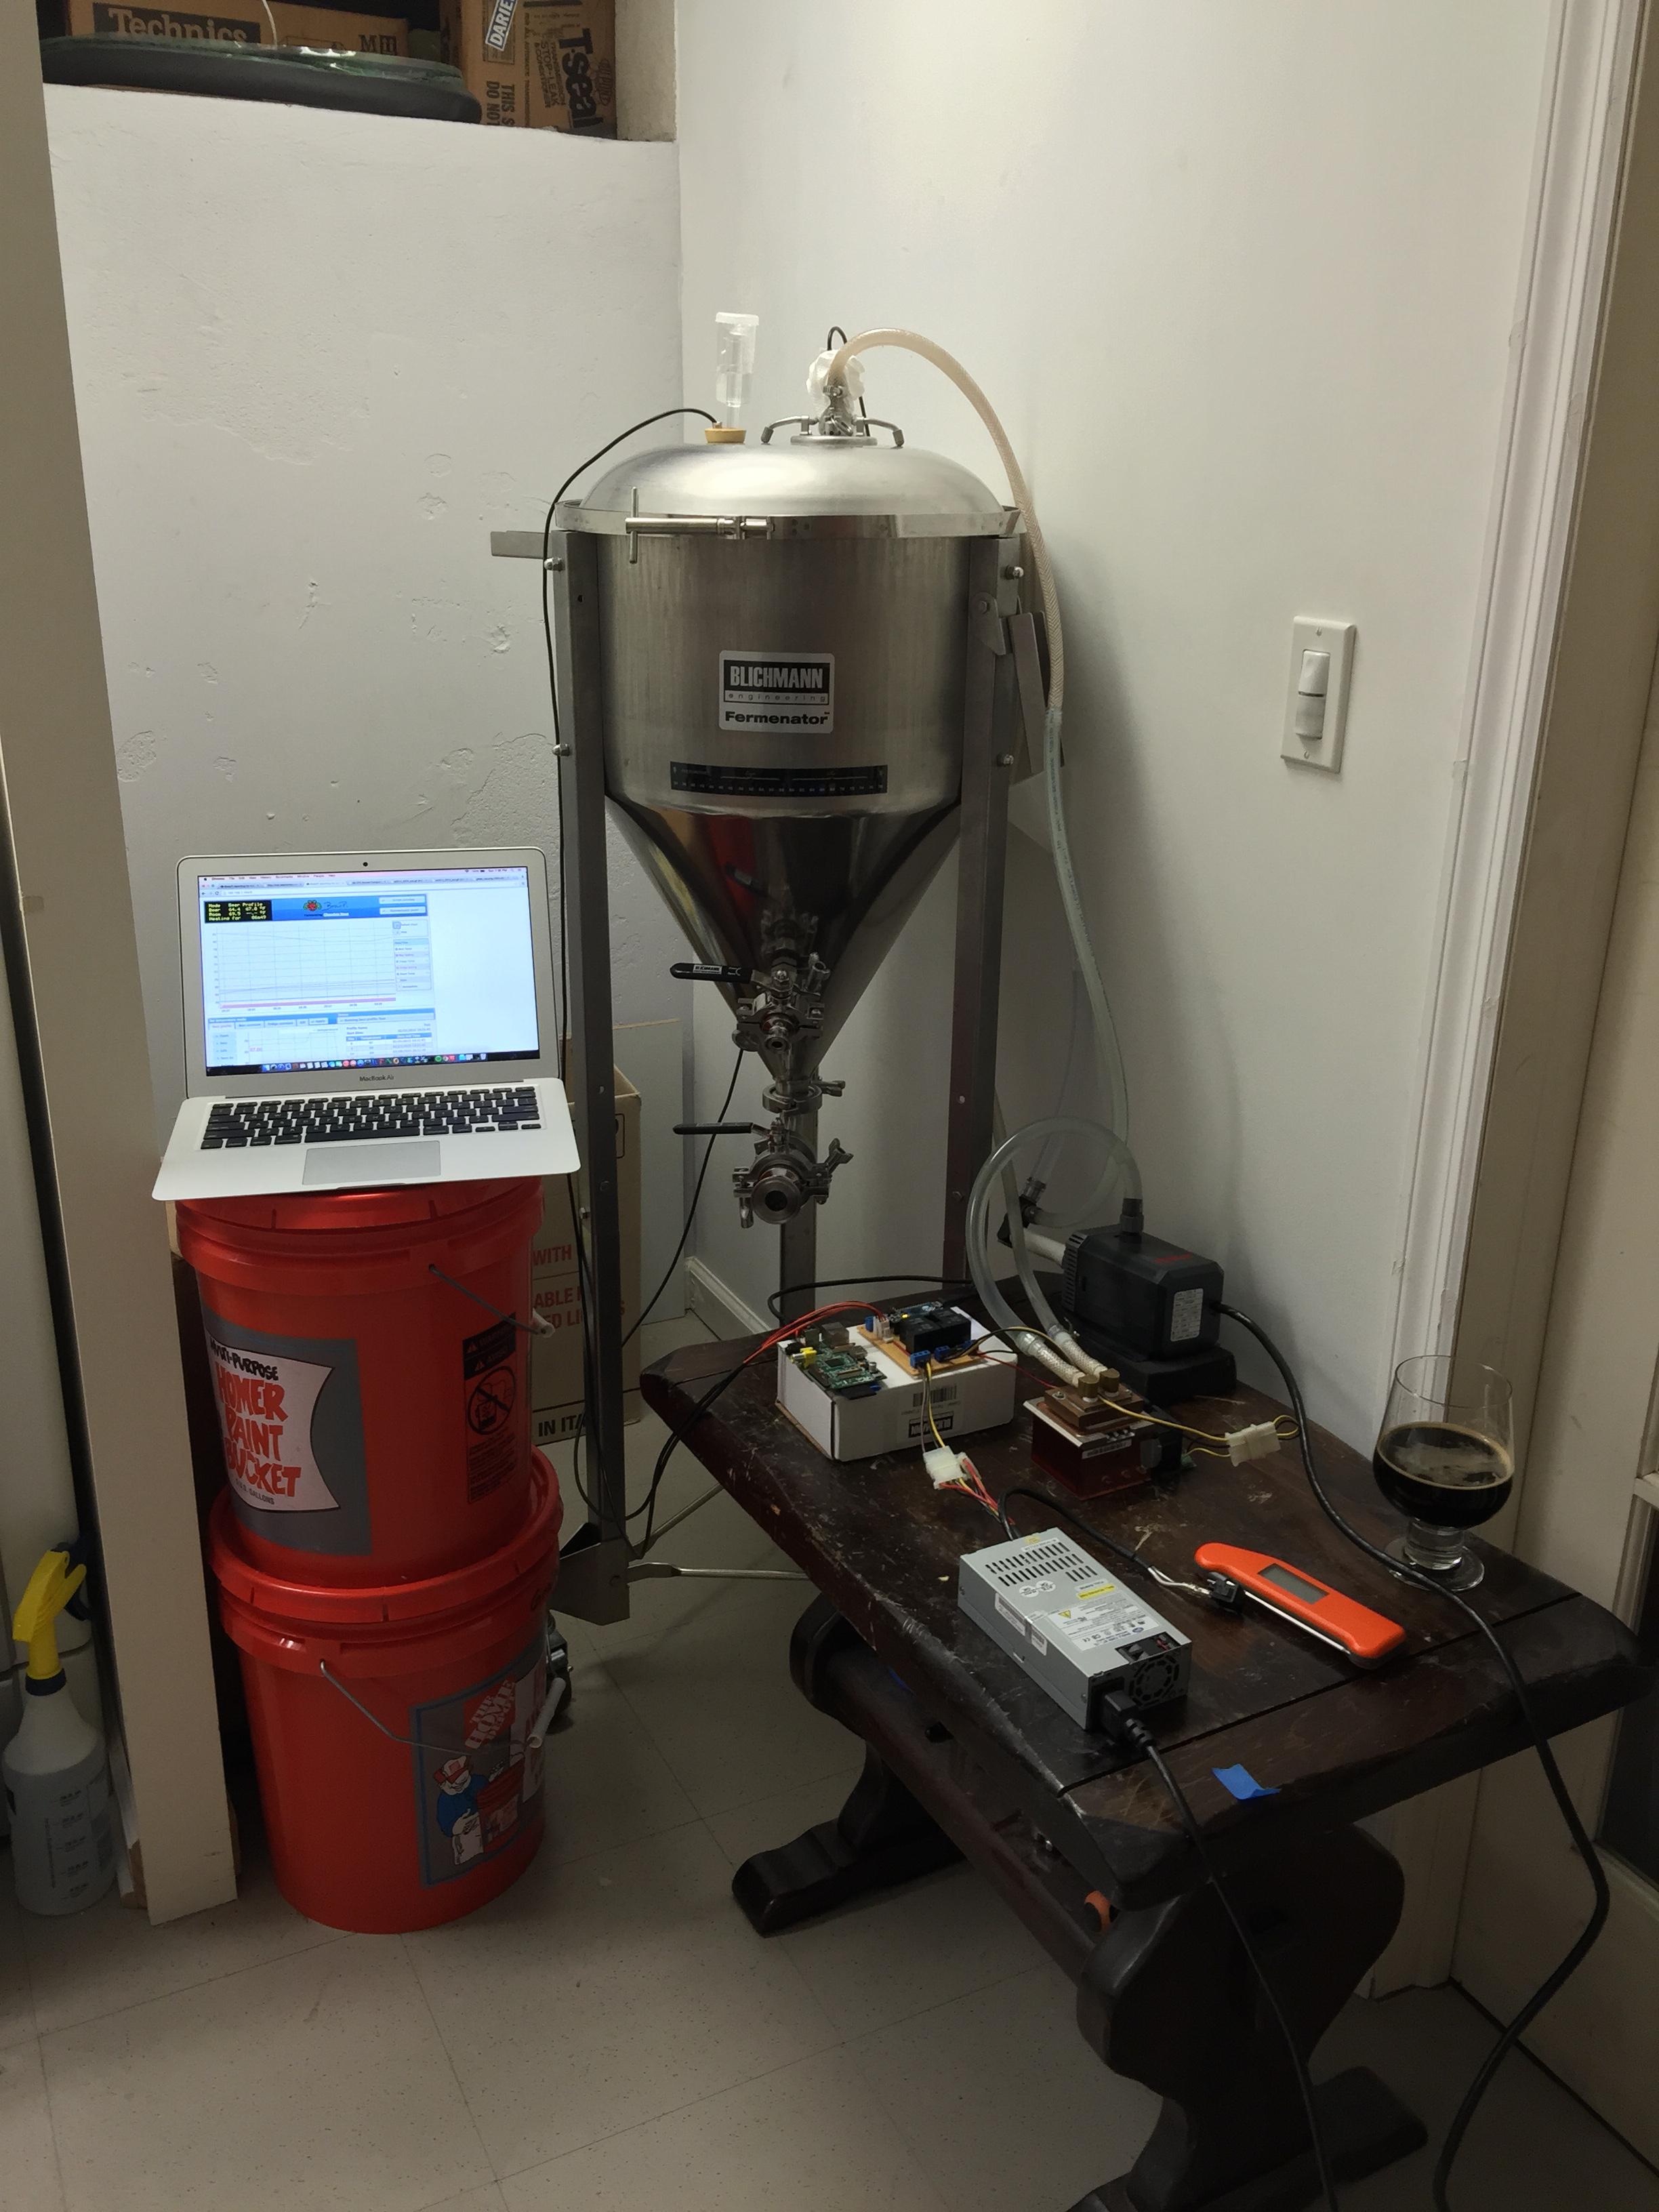
Current album: http://imgur.com/a/vwX5L
Quick picture:
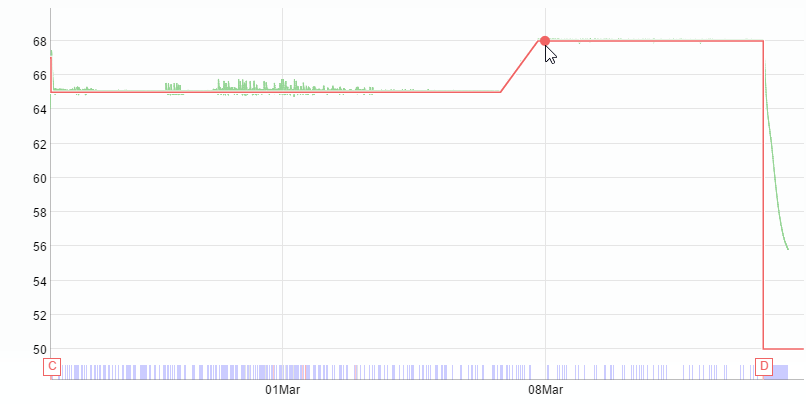
First fermentation done. This setup works very well for the minor temp changes and holding a temp from 64 to I'm guessing 80 but crash cooling was an issue.
A new heating/chilling element is in order before my next brew. Everything else was perfect.
-Jason
A new heating/chilling element is in order before my next brew. Everything else was perfect.
-Jason
megabyte
Member
- Joined
- Sep 23, 2013
- Messages
- 9
- Reaction score
- 2
Hey Jason, how's this project progressing? I was wondering why does your room temp appear to be zig zagging up and down until you start crash cooling?
Also, did you have any troubles with condensation forming on the fermentor when you're crash chilling?
Also, did you have any troubles with condensation forming on the fermentor when you're crash chilling?
Hey Jason, how's this project progressing? I was wondering why does your room temp appear to be zig zagging up and down until you start crash cooling?
Also, did you have any troubles with condensation forming on the fermentor when you're crash chilling?
No big updates, the setup works ok for 5 gallon batches but now that the weather is getting warmer I either need to build an insulated enclosure for the fermenter or upgrade the cooling.
The zigzagging is from the exhaust from the hot side of the chiller warming up the room. If I build an enclosure this should go away.
Recently I brewed a 10 gallon batch and the chiller is no were close to handling the fermentation in a room temperature room. IT was on at least 75% of the time to keep things cool. After my upcoming vacation i'll be spending some time upgrading things.
-Jason
megabyte
Member
- Joined
- Sep 23, 2013
- Messages
- 9
- Reaction score
- 2
Thanks Jason, I'll stay tuned to see your progress.
I've got a similar setup running off about 110W input power and I was only getting a drop of about 10f below ambient for a non-fermenting liquid. Then I added some insulation around the fermenter and it nearly doubled. In my case I'm using a small Pentium III heat sink for the hot side and I think this is the limiting factor in my cooling ability.
The trouble with insulation is you hide all the sexy stainless")
I've got a similar setup running off about 110W input power and I was only getting a drop of about 10f below ambient for a non-fermenting liquid. Then I added some insulation around the fermenter and it nearly doubled. In my case I'm using a small Pentium III heat sink for the hot side and I think this is the limiting factor in my cooling ability.
The trouble with insulation is you hide all the sexy stainless
Luiscv
New Member
- Joined
- Jun 18, 2018
- Messages
- 2
- Reaction score
- 0
Where i can bue this coil??
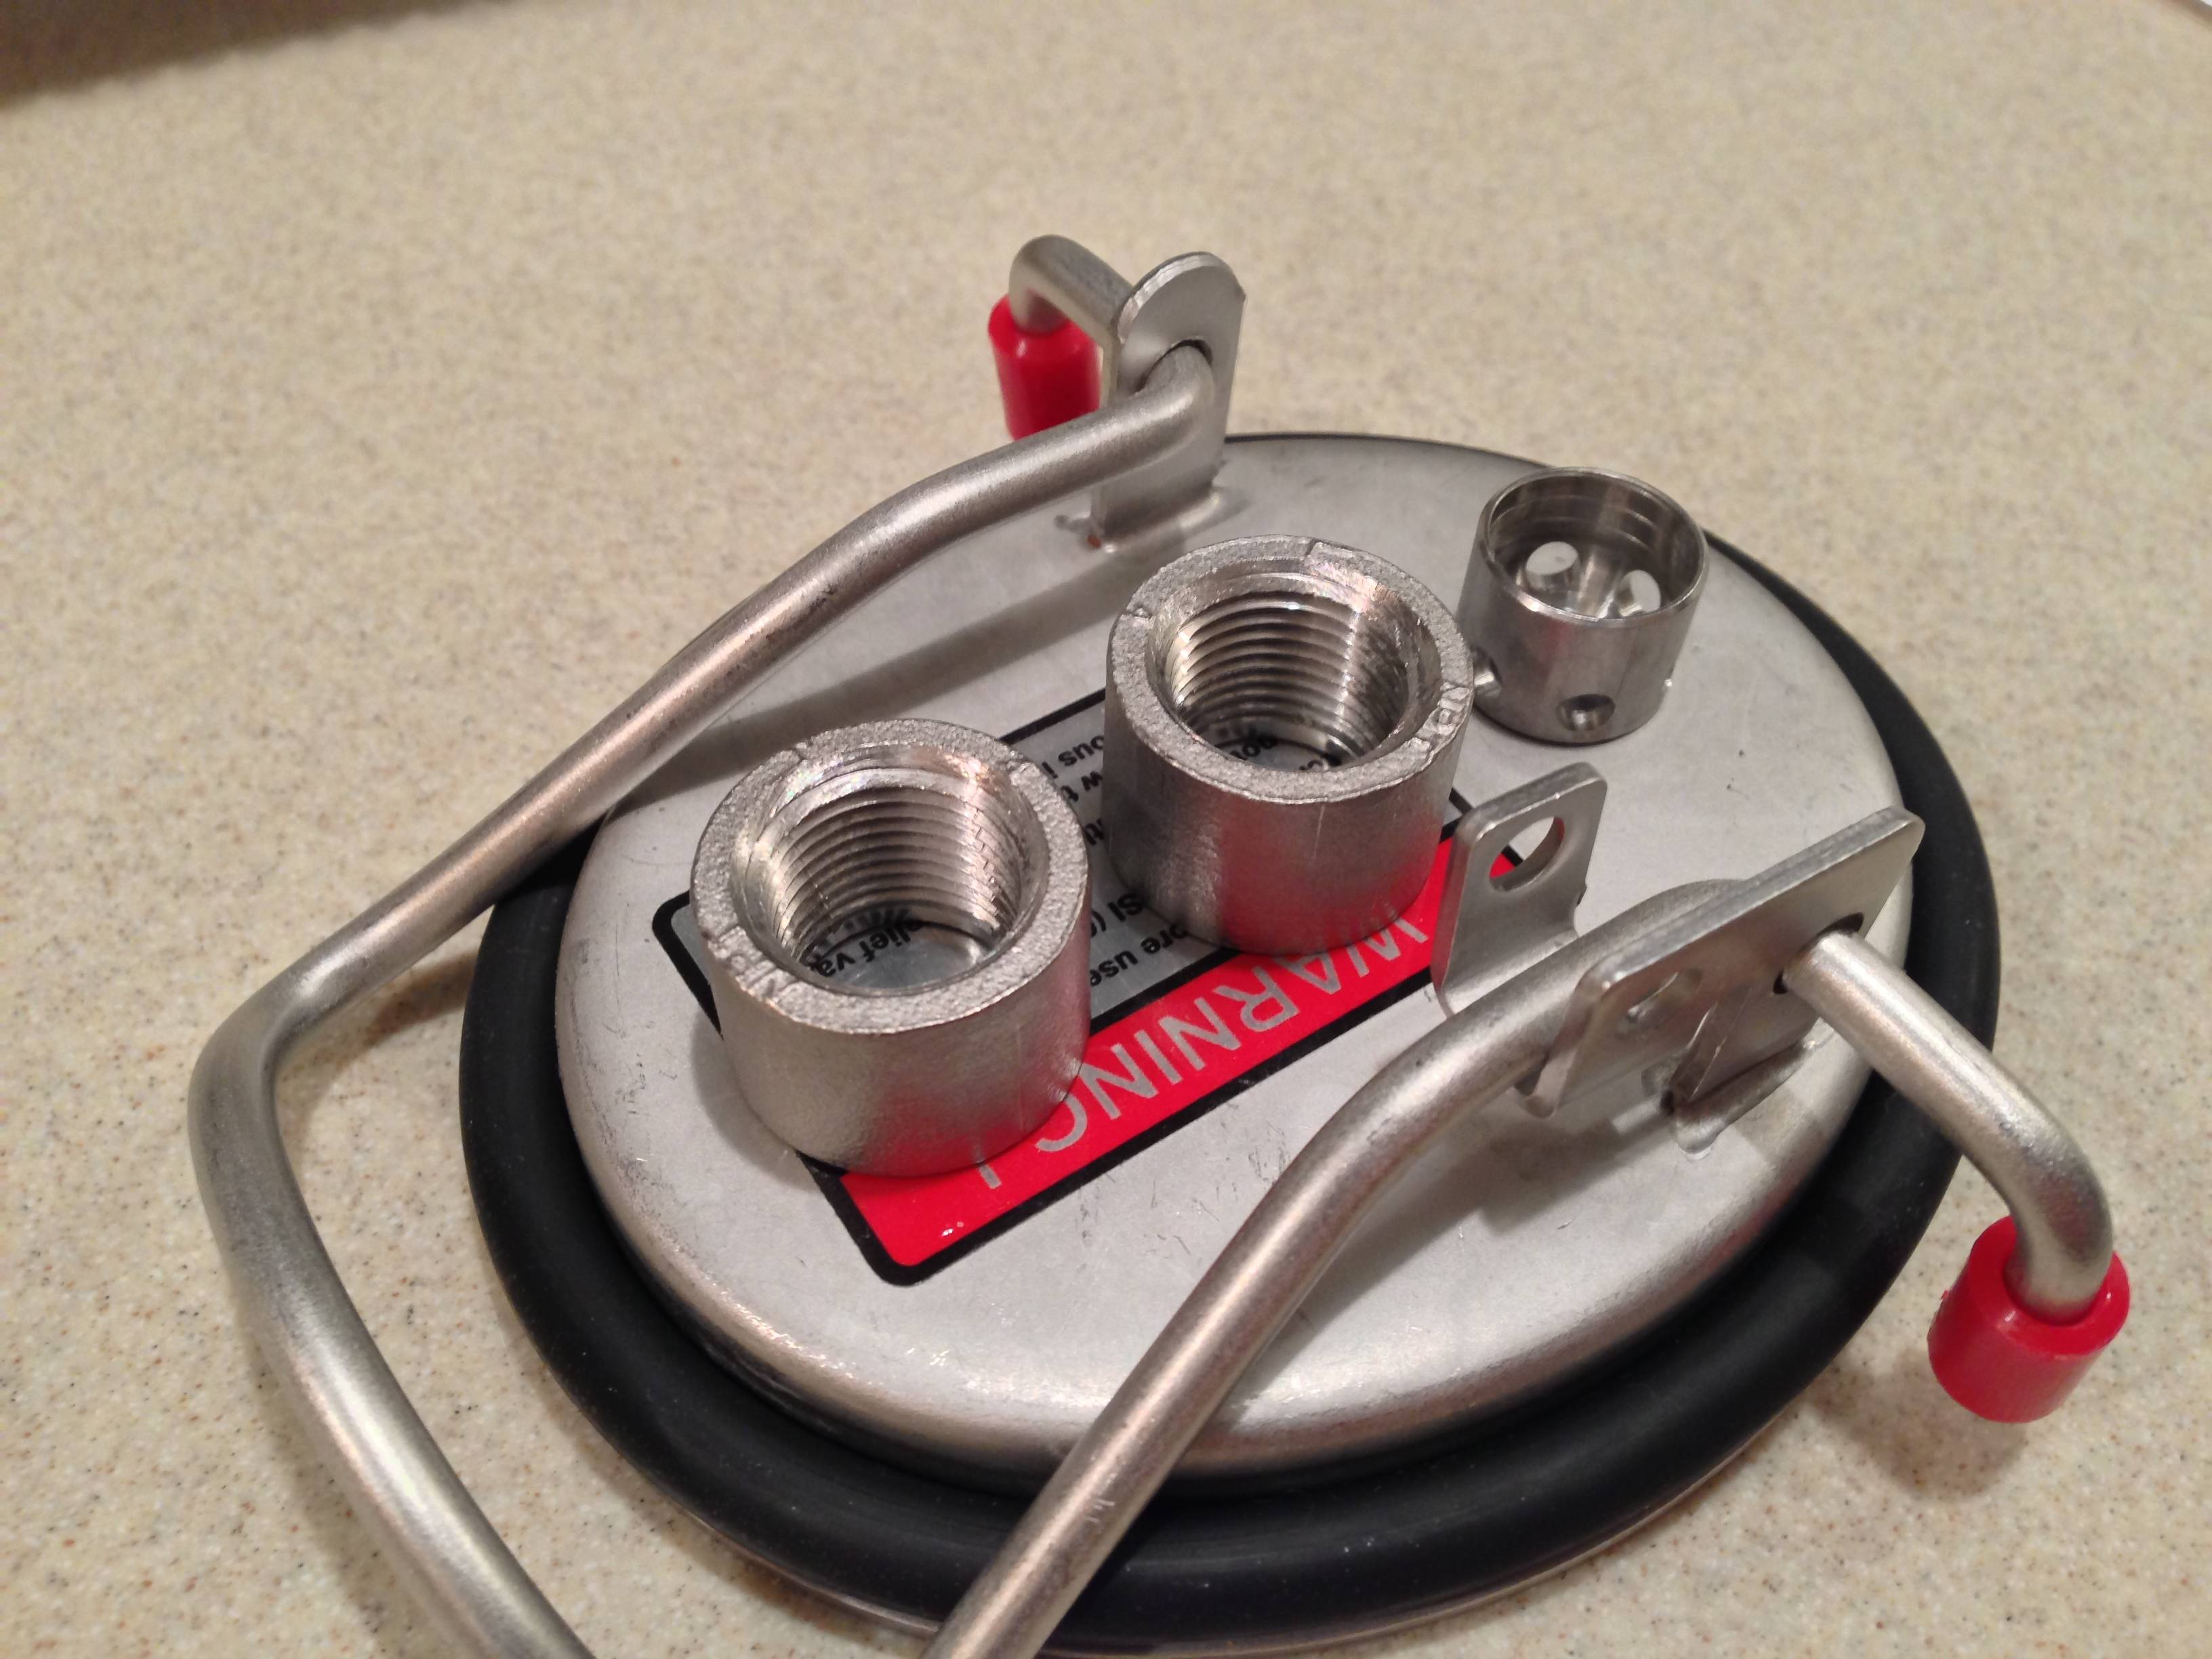
Stainless coil should work nice, now I just need to get the right compression fittings and get the lid welded.
augiedoggy
Well-Known Member
Ive seen very similiar ones on ebay.Where i can buy this coils??
Please help
I have a coil in my ssbrewtech conical and for my other 3 conicals I made jackets out of blue 1 1/2" discharge hose or used a jacket from coolzone.com and I actually prefer the jackets for a couple reasons. The biggest being cleaning is much easier without having to clean the coil. I do have 2 layers of reflective bubble wrap around my conicals though which covers the jackets.
unfortunatly jackets wont work with a blichmann conical due to the leg design.
Where i can buy this coils??
Please help
You can get customs coils here: http://stainlessbrewing.3dcartstores.com/HERMS-coils-Custom-coils_c_24.html
Just click on the different diameters to get an idea of configuration and cost.
You may need to call them to get exactly what you need.
Ive seen very similiar ones on ebay.
I have a coil in my ssbrewtech conical and for my other 3 conicals I made jackets out of blue 1 1/2" discharge hose or used a jacket from coolzone.com and I actually prefer the jackets for a couple reasons. The biggest being cleaning is much easier without having to clean the coil. I do have 2 layers of reflective bubble wrap around my conicals though which covers the jackets.
unfortunatly jackets wont work with a blichmann conical due to the leg design.
I'm looking to get a couple of those coolzone jackets. I want to ferment in kegs. Do you think these would work for that?
augiedoggy
Well-Known Member
Yes they sell different size ones... you would want the small 1 gallon sized ones if your looking to use regular corny kegs I would think.. I use one of the larger carboy sized ones for my 12.5gallon stout conical.. fits perfect but its only 12" wide.I'm looking to get a couple of those coolzone jackets. I want to ferment in kegs. Do you think these would work for that?
The discharge hose works better but its not as clean of an installation.
augiedoggy
Well-Known Member
augiedoggy
Well-Known Member
I know this is an old thread but now there is software like brucontrol that works great with an arduino for keeping fermenter temps.. I even use simple scripts for temp profiles for different yeasts to automatically ramp up and cold crash... The next version will work with the tilt hydrometers so they can do all this automatically when the gravity reaches the proper levels.
Similar threads
- Replies
- 9
- Views
- 3K
- Replies
- 1
- Views
- 874
