• Please visit and share your knowledge at our sister communities:
  • If you have not, please join our official Homebrewing Facebook Group!

    Homebrewing Facebook Group

Compact 3-tier, first steps

Homebrew Talk

Help Support Homebrew Talk:

This site may earn a commission from merchant affiliate links, including eBay, Amazon, and others.

daphatgrant

Well-Known Member
Joined
Aug 12, 2015
Messages
186
Reaction score
26
Location
Upstate
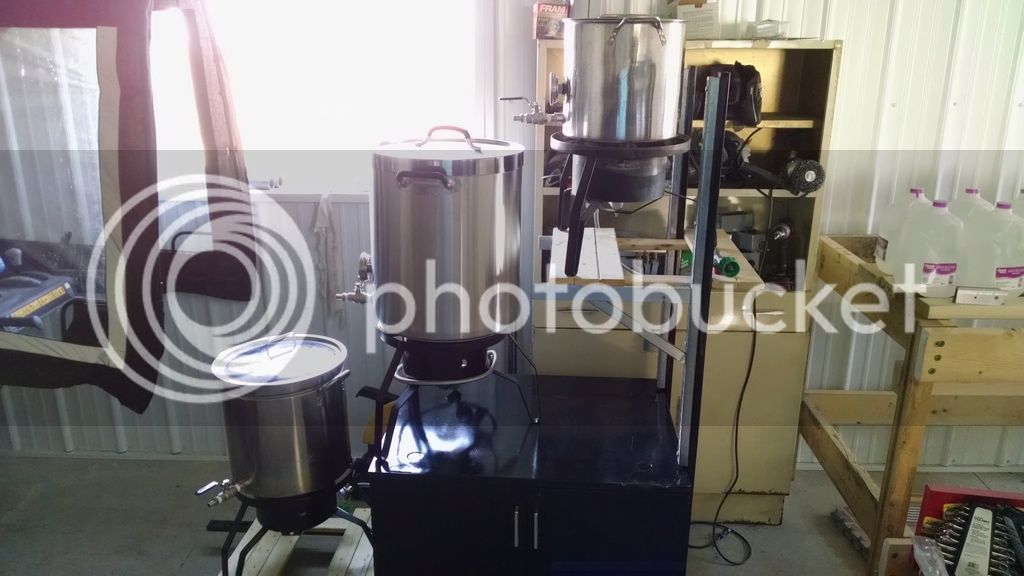
Hey HBT, I'm starting homebrewing from scratch and am getting to the point in my parts accumulation where it's time to think of a brew stand. I'm almost all the way through the "show me your brew stand" thread :eek: and between here and this link I think I'm close to finalizing a plan.

I guess I don't know exactly what to ask other than do you guys see anything alarmingly wrong with my proposed design? It'll be made of 1.5" x 1.5" x 1/8" square stock and will be welded. It's primarily a gravity system with one pump to bring the wort back up to the boil kettle and to circulate the mash at the end (vorlaufing). I think that the height @ a little over 5' to the top of the highest kettle is pretty reasonable.

Any input from you guys? Thanks in advance, it's getting exciting that an actual brew day is looking closer and closer :D.

6mQHKqQ.png
 
Maybe I don't know enough about 3-tier, but I always thought the HLT was on top and boil kettle on the bottom.
 
Maybe I don't know enough about 3-tier, but I always thought the HLT was on top and boil kettle on the bottom.

From everything I've seen it typically is but this version would allow you to add water to the mash tun and sparge from the top kettle with gravity, drain the wort from the mash tun with gravity, pump it back to the top kettle and then move the finished wort from the boil kettle to the fermenter by gravity. All without having an 8 foot tall setup.
 
OP can you explain the reasons behind the bk being on top?

My thought and again I got the idea from here is that I could essentially have a full gravity setup without the stand being overly tall. I didn't add it in the pic but the fermenter would replace the mash tun after the wort had been moved to the boil kettle.
 
From everything I've seen it typically is but this version would allow you to add water to the mash tun and sparge from the top kettle with gravity, drain the wort from the mash tun with gravity, pump it back to the top kettle and then move the finished wort from the boil kettle to the fermenter by gravity. All without having an 8 foot tall setup.


Is there a reason why you want to sparge from your bk instead of your hlt?
 
Is there a reason why you want to sparge from your bk instead of your hlt?

That I don't have a reason for, lol. I could just as easily sparge from the hlt, I'd just need to pump it back up (if using the design above). Gravity was my thought I guess.
 
It just seems that if you don't mind buying a pump and three vessels that it would be much more simple to employ a two tier stand. The added step of pumping the wort back up to the bk seems unnecessary and time consuming.
 
I love the similar threads list at the bottom of the page :D, my thoughts were just the same as the ones here.
 
From everything I've seen it typically is but this version would allow you to add water to the mash tun and sparge from the top kettle with gravity, drain the wort from the mash tun with gravity, pump it back to the top kettle and then move the finished wort from the boil kettle to the fermenter by gravity. All without having an 8 foot tall setup.

I see what you're doing...I guess... but then I don't see what you need the bottom burner for, since that whole tier is, as I understand it, just for collecting mash and sparge runoff and will be pumped to the top for boiling. Its basically a sump? I don't see when you'd fire up the bottom burner.
 
I see what you're doing...I guess... but then I don't see what you need the bottom burner for, since that whole tier is, as I understand it, just for collecting mash and sparge runoff and will be pumped to the top for boiling. Its basically a sump? I don't see when you'd fire up the bottom burner.

The thought is that you could do back to back batches, after the wort is moved to the boil kettle, rinse out the bottom pot, add water and heat. Empty and clean the mash tun and by the time you are draining from the BK to the fermenter you have a full batch of hot water ready in the lower pot. Clean out the BK and you are ready to start again.
 
You could knock off almost another foot of height switching to a rectangular cooler. Those Extreme coolers have a real nice low profile drain... you probably already have the round cooler set up though...
 
You could knock off almost another foot of height switching to a rectangular cooler. Those Extreme coolers have a real nice low profile drain... you probably already have the round cooler set up though...

Yeah that was my original plan but a good friend of mine convinced me to go for a round cooler. He said that being a cylinder it did a better job when sparring, I don't really know if that's the case and even if it did a better job if it would equate to any substantial difference. Being that so many people brew with the rectangular coolers I doubt there's any real difference. Yeah, that's what I've got for that, lol.
 
Will you be unhappy that you can't easily see down into your BK during the boil and chill? That would bug me, but it may be fine for many.
 
Will you be unhappy that you can't easily see down into your BK during the boil and chill? That would bug me, but it may be fine for many.

I'm tall enough that I should be fine. To double check I stacked my boil kettle on some stuff to get it to the height I plan on it being and I was able to see into the pot and stir (simulated) without any issues. Good point though!
 
Little update with measurements, all pieces will be 1.5" x 1.5" square stock 1/8" thick.

6CNIwi5.png
 
Last edited:
I also considered this same design you're looking at. Spent a LOT of time drawing it up for a 10gal kettle. Ultimately I started messing around with things I already had on had and put together this really CHEAP 3-tier system. Sure I have to set it up and tear it down on brew day, but it doesn't use a pump. Brewing back to back batches is no problem with my current system. We do it all the time! Once all the water has drained into the MT cooler for the first batch I fill up the HLT for the next batch ( ;

If I had it to do all over again... I could have saved some $$$ on the fancy HLT with a sight glass up top and applied it towards a pump. Then purchased a less expensive HLT and go with a 2-tier system.

IMG_20151017_114421.jpg
 
I'm still getting there, the holidays put a bit of a hold on my progress. Below is an updated pic. I made a 1/6 scale model of the stand out of 1/4" square wooden dowels. I'll take a pic of it tomorrow and post it.

I did some research into using 80/20 extruded aluminum but after further consideration I don't think that it would hold up to the extensive direct heat from the burners.

iJ1ZcG7.png
 
Figured I'd upload the model I made. I don't usually go this crazy with prep but I've never welded before and don't want to forget anything. It's 1/6 scale and will be on either 4 or 6 heavy duty 6" casters. I used a steel weight calculator and I assume that with the 2 burners that it will weigh around 275#'s.


iEBYbj9.jpg


xSjA47Z.jpg


g172ghh.jpg
 
You are making me want to break out the hack saw, welder, and grinder! Never hurts to build a scale model, especially before that first build. Are you planning on using a round cooler or will you switch over to a rectangular cooler for a mash tun?
 
You are making me want to break out the hack saw, welder, and grinder! Never hurts to build a scale model, especially before that first build. Are you planning on using a round cooler or will you switch over to a rectangular cooler for a mash tun?

I'm planning on using a round cooler, the space on the left will be a spot for my mill. I'm planning on having it be easily detachable so I can use the whole area as a work surface when I'm not actively milling.
 
It's been a while but I picked it up a couple days ago :D. I drilled holes for the burners but the Bayo Classic banjo burners use metric bolts? I had planned on just grabbing some threaded rod locally but had to order metric M6 online. I've still got to install the water system and gas piping, I'll update as I go along. Thanks for all of the help guys :D.

dh1vmEUh.jpg
 
My compact setup. I need to cut the bottom supports on the left back 6 inches(mistake when cutting originally...oops). It will be 54" wide HLT top is about 60 inches, and the boil kettle on the bottom is just high enough to gravity feed my fermenting buckets.

IMG_20160518_1711264581_zpsefpqncbs.jpg
 
Got my burners installed, my regulator came in today, tomorrow I'll give it a test run by bringing 14gal of water to a boil and keeping it there for an hr so I can see how hot the stand gets. I'd like to mount both my pump and water filter to the stand but I don't want them to melt :p.

I'll eventually have individual lines with needle valves so I can use both burners at the same time. If anything it'll be interesting to see how fast I can get a boil going.

Ugga4Tdl.jpg
 
Well I did a test boil with it today and damn does this thing cook! :eek: I took 14gal from cold tap water to full boil (209F because of elevation) in just under 50 min with the lid off. I think I had the flame a little too high (hard to see in the sun) and ended up melting the rubber handle cover on the ball valve a bit but the o-ring on the pot and the plastic inside the valve are fine.

7XCwyaUl.jpg
 
You may want to look into the elevated burner rings people put around the burners that direct most of the heat to the bottom
of the pot instead of wasted heat blowing up the sides of the pot. Should increase efficiency and lower times for you! :)

Edit: here's a link to what I'm talking about. http://www.brewershardware.com/12-Heat-Shield-Burner-Mount.html
 
Last edited:
Back
Top