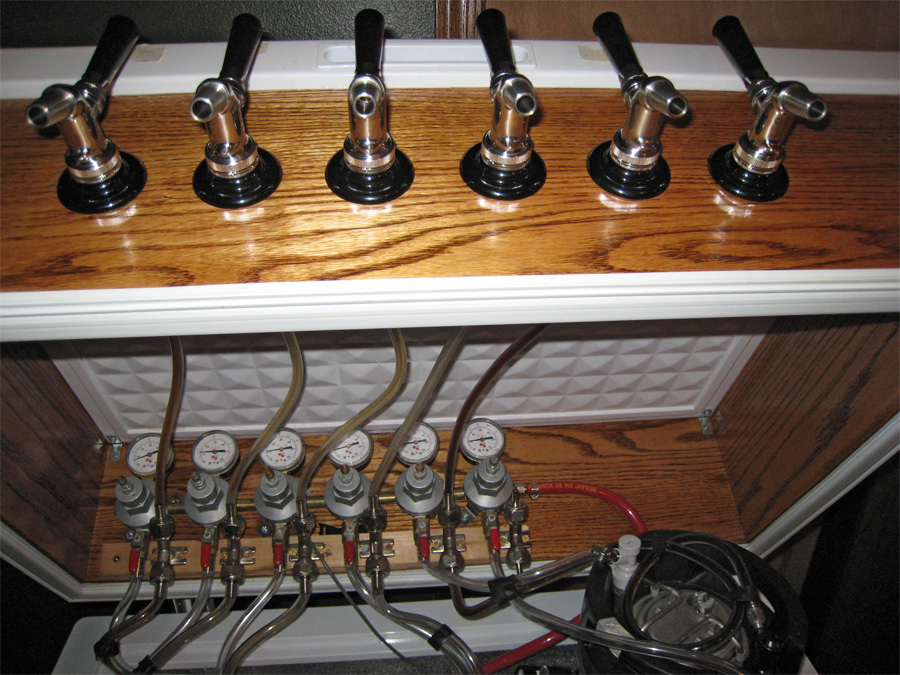
collar mounted to top or body of keezer?

Homebrew Talk - Beer, Wine, Mead, & Cider Brewing Discussion Forum

Help Support Homebrew Talk - Beer, Wine, Mead, & Cider Brewing Discussion Forum:

This site may earn a commission from merchant affiliate links, including eBay, Amazon, and others.

williec30

Well-Known Member
Joined
Nov 24, 2008
Messages
147
Reaction score
1
Location
Michigan
after spending hours paging through the "show me your kegerator" thread...

if you had to do it all over again, would you mount your keezer collar to the top or the body of the freezer? i have read pro's and con's to both... it seems the big benefit of mounting it to the top allows for more space to load and unload kegs (don't have to worry about hitting tap shanks, etc...).

i have a rather large chest freezer (62Lx34Tx27W) project underway and would like to think it through before designing something.

anyone care to convince me one way or the other?
 
williec30,
If the curb on my chest freezer were mounted to the lid, I would be dealing with a tangle of hoses hanging down from my taps not to mention that it would be more difficult to remove the taps for cleaning or re-attaching hoses, etc.
mark
Beer Diary...
 
I may be the first HBT'er to mount the collar to the lid (not sure) but in any case, having used the design for over a year, I'd do it exactly the same way again. If you're going to use huge 2x6 lumber, you obviously can't do that. However, if you're only building the collar large enough to put faucets in and don't need the added height, 1x4 poplar is nice.

It's a big enough pain in the back to lift a full corny over just the wall of the freezer that I couldn't imagine having to lift it another few inches higher.

You can see I used clamps to keep the beerline out of the way. That didn't hold very well because it's just foam under there. A better idea would have been to run a 3/8" hardwood dowel across the collar towards the back and just run the lines over it.

keezerdone.jpg
 
I currently have a no-collar setup which is working well enough but I'm considering building one. At the moment I have a setup similar to what you see in bobby's picture, except that the line ends at the clamp on the lid and I have picnic faucets. That way you open the lid and all six faucets are there waiting. All you have to do is pull a faucet and the hose slides up. Naturally, my keezer is filling with condensation from the constant opening and closing, and also with beer from the drip after the pour.

edit: I forgot to mention that I'm planning to mount to the lid.
 
By the way, another consequence of setting up a keezer like I did is then having to decide to start the collar build and when I go to install it I'll have to shut down my kegs until I'm done.
 
I may be the first HBT'er to mount the collar to the lid (not sure) but in any case, having used the design for over a year, I'd do it exactly the same way again. If you're going to use huge 2x6 lumber, you obviously can't do that. However, if you're only building the collar large enough to put faucets in and don't need the added height, 1x4 poplar is nice.

It's a big enough pain in the back to lift a full corny over just the wall of the freezer that I couldn't imagine having to lift it another few inches higher.

You can see I used clamps to keep the beerline out of the way. That didn't hold very well because it's just foam under there. A better idea would have been to run a 3/8" hardwood dowel across the collar towards the back and just run the lines over it.

oddly enough... i was going to single you out in my original post bobby, but wanted to see what people had to say before i did :rockin: you have done the exact thing i am shooting for, run the tubes down the top with ties and make it functional. thanks for the ideas!

another detail that is escaping me... any issues with the co2 tank in the keezer? i have plenty of room and would rather not deal with the extra hole if i don't need to.

thanks...
 
i attached mine to the lid and love it. I am so glad i did it that way (although i have yet to use it - one beer in primary started sat and one will be done this week -I really contemplated this and i think that having the lines and shanks in the way while you are placing a full keg in would be too much to worry about. This way, i have nothing to worry about with just a little bit of work invested.

I thought of taking the easy way but i then decided to rethink this and i am so glad that i did.

what did you use to attach the top to your collar? i have read about the liquid nails and silicon applications. i would assume silicon is the preferred method?
 
I followed Bobby's directions and put it on the lid and I also love it. All my hoses are tucked into the lid so it's a pretty clean build. I have my CO2 tank outside with a quick disconnect so that I can disconnect the CO2 and move the freezer easily. I would do it this away again if could
 
You can always mount the collar to the bottom and then put your taps on the end of it instead of the side. This is what one of my friends did, worked out really well.
 
While we're on the subject, can anyone link me to some info regarding the light on the lid and having to cut/disconnect the wire? I have a maytag. I wouldn't care if that light never came on again, but I'm afraid that just cutting it might make the fridge never come on again.
 
I mounted mine on the bottom. My top did not have the same design as Bobby's. It would have been more difficult to attach so went lower. I went w/ a 1x3 which allowed my lid to re-screw using one of the original hinge holes. To keep my 8-10ft. hoses out of the way I coil them and zip tie. It only took 1-2 hours to attach everything, beer never had a chance to warm up. Also gave me a chance to clean out the keezer. Using picnic tap inside a keezer can get a little sticky.
If I were you I would study my keezers hinge screw holes, lid, thickness etc. Then make your decision where to attach. Another point is shanks length. Many have recommended 4". After measuring my keezer I went w/ 3" and am glad I did. The don't stick out into the keezer.
 
I mounted mine on the bottom. My top did not have the same design as Bobby's. It would have been more difficult to attach so went lower.
+1 mine was not either buck what i did was removed the factory weather seal and put in one from Home Depot which made it sit a little better, layed the lid on the ground, and then put silicone where the collar would touch and then stacked everything heavy that i had on top of the collar to force it against the lid so that it would seal / adhere. It worked perfectly.
To keep my 8-10ft. hoses out of the way I coil them and zip tie.
me as well. Worked nicely.
Many have recommended 4". After measuring my keezer I went w/ 3" and am glad I did. The don't stick out into the keezer.
+1 I am SOOO glad i went with 3's but it was a close fit. actually a perfect fit.
 
Connected mine to the top with a 1x8 oak collar, and it worked great. If I were choosing between attaching to lid and base, I'd still go with lid.

However, I'm thinking about redoing my collar for a few different reasons, and for V2 am planning on adding some latches and another set of hinges so that it can open at either spot.

The lid attachment is great for loading/unloading cornies and for cleaning, no contest. But there are some occasions, like cleaning lines, balancing pressure, or filling bottles/growlers from the tap, that it would be very convenient to have access to my regulators and connections without moving the faucets.

CO2 tank works fine inside the freezer. Aluminum is better than steel, since condensation can create little rust spots where the bottom of the tank sits, but it's not a big deal.

<Edit> - This is how I keep my lines from dropping down and getting tangled. Clips would work just as well for organization, but the elbow gives me a place to easily change beer line length without messing up the connection from faucet to back board.

2851480945_af1efb05af_o.jpg


Did you put the original seal gasket on the bottom of the collar? What did you put between the lid and the top of the collar if so?
 
I attached my collar to the lid and have had no regrets thus far. I actually threw away the original seal gasket because we kind of cut it up removing it from the lid. However, I got some white weatherstripping that was exactly the same width as the collar wood and it seats very nicely on top of the body of the freezer now.
 
I installed my collar on the freezer rather than the lid. Lifting a full keg over the collar isn't difficult (and that's coming from a cyclist!) and I never understood what the fuss was all about.

I fail to see any advantage to putting it on the lid, but I do see a number of disadvantages. First, the lid won't stay open unless you add additional supports or a prop rod. Second, you can't use a shank-mounted drip tray, unless you want to be dumping the overflow and smacking your head on the thing every time you open the lid. Third, you can't use gravity to help keep the collar in place.

WRT the bottle inside the kegerator, go for it. I had mine there for a while and it worked fine. I have since moved it outside, which frees up space in the kegerator and allows the "order gas" band on the bottle gauge to provide meaningful info.

I did the same with my taps mounted on the end rather than the front. I don't like disturbing the integrity of the original lid seal. They are rather delicate, easily damaged and expensive to replace. Kegs are not light, but I can move them in and out of my freezer without much difficulty. Helps to have the taps out of the way on the side.
 
That is a good point--now that I think about it, having the taps out of the way would be an advantage to the lid-mounted collar. One time I had a guest over digging around in the kegerator (they had stashed a sixer in there or something) and they inadvertently opened one of the taps and spilled about a half pint before they noticed. It was no big deal as it mostly went into the drip tray, but it was a bit of a buzz-kill for them.


MadDwarf's was the inspiration for my chambers, except that I put the 5 taps on the end in stead of the front (that's an old pic). Also built 2 ferm chambers the same way, the second of which's collar is higher to accomodate the 15 gal corny. In stead of making my own grooves, like MadDwarf did, I used 1" X 8" tongue and groove board (and 1" X 10"). Made it like a picture frame so the tongues and groves line up. The tongue wedges in the slot where the seal was (if you got the measurements right!) and the seal goes in the groove- air tight.

Using these as a ferm chamber with heavy vessels prohibits mounting on the freezer. You HAVE to mount on the lid, I think. That's 4x5 gals and 1x15 gal corny in that thing! I don't guess a lid mount is great on a much bigger freezer though.

My only thoughts after doing these three would be..
Re: placement. You have to accommodate opening a big lid, so it has to be a foot or so away from the wall or put a short table behind it. That's one of the reasons I put mine on wheels.
Re: condensation. It's a big deal to make the thing air tight. I caulked the hell out of the joints and the seal works as it did before. If there's any way for air to get inside, you'll get much more condensation.

Hope you like!:mug:

SDIM1720.jpg
 
Back
Top