
Kevin Kroll
New Member
- Joined
- Oct 20, 2014
- Messages
- 1
- Reaction score
- 0
I, like many other home brewers, began my journey 9 years ago with a standard home brewing starter kit. I brewed only extract beers and infrequently at that. Later, I began to use steeping grains and spices, but my brewing remained very basic. My job, then and now, has required a lot of travel, thus, I do not brew as regularly as I would like. For years I would hear about and see articles on all-grain home brewing. This always interested me because it seemed that I could have more control over the ingredients going into my precious homebrew.
Since beginning in 2005, it would be fair to say that I have brewed less than one hundred beers. Far less than the typical home brewer over a similar time period. As such, I could never justify the additional costs to go all-grain as it seemed to be equipment intensive. While perusing Home Brew Talk forums, I stumbled across an all-grain method referred to as Brew in a Bag or BIAB. My interest was piqued and I began to research this method. I first came across those practicing a hybrid of BIAB and traditional all-grain brewing. They used two vessels, one to mash and one for batch sparging. To me, this still seemed more difficult than what I was currently doing. Then I came across information for the original BIAB method; full volume mash and boil. This seemed so simple to me. With very little additional investment and effort, I could create an all-grain brew. I set to work researching the few pieces of equipment that I would need to upgrade.
Here is the list that I came up with:
I personally went with a 44 quart Bayou Classic stainless steel pot, a standard stainless brew spoon long enough to not get lost in my mash, a Dark Star burner, and a Wilserbrewer BIAB bag that was custom built for my kettle that came with a ratchet pulley. All in all, the total cost was less than $160.00 or about the same as five extract kits.
To BIAB, I calculate the strike water that I will need with an online calculator that accounts for water losses of grain and hop absorption as well as boil off. I then heat it to the strike temperature, which is usually just a few degrees above my desired mash temperature. I add the grains and stir vigorously with the brew spoon to break up any clumps and to ensure that the mash temperature is homogenous throughout the kettle. Once that is done, I cover the brew kettle in an old moving blanket for insulation and then let it mash for the prescribed amount of time.
Kettle wrapped in moving blanket for insulation
It is also possible to do a step mash through application of direct heat and stirring. I have yet to burn my BIAB bag doing this. Once the mash is over, I use direct heat and stirring to achieve the mash out temperature. I let it rest for five to ten minutes and then pull the bag to drain.

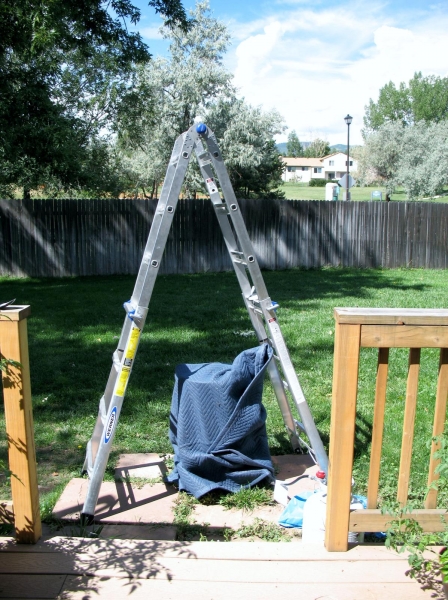
BIAB bag hanging for initial gravity drainage

BIAB bag hanging higher for squeezing with pot lids
At this time I begin heating the wort for the boil. In the BIAB world there are squeezers and non-squeezers. If I was more patient, gravity would do all the work of draining the bag for me. I am not that patient, so when the bag slows to a trickle I simply use two pot lids to squeeze the remaining wort from the bag. Now all that remains is to boil, hop, cool wort, and pitch yeast as you always do.

Boiling the wort

Cooling the wort with my faithful brew assistant
I have personally made some of my best batches of beer since switching over to BIAB. Also I achieve a brew house efficiency of 80% plus with just a standard crush from my LHBS.
I hope that this has been helpful and may push some of you lurking around all-grain brewing to take the plunge.

Since beginning in 2005, it would be fair to say that I have brewed less than one hundred beers. Far less than the typical home brewer over a similar time period. As such, I could never justify the additional costs to go all-grain as it seemed to be equipment intensive. While perusing Home Brew Talk forums, I stumbled across an all-grain method referred to as Brew in a Bag or BIAB. My interest was piqued and I began to research this method. I first came across those practicing a hybrid of BIAB and traditional all-grain brewing. They used two vessels, one to mash and one for batch sparging. To me, this still seemed more difficult than what I was currently doing. Then I came across information for the original BIAB method; full volume mash and boil. This seemed so simple to me. With very little additional investment and effort, I could create an all-grain brew. I set to work researching the few pieces of equipment that I would need to upgrade.
Here is the list that I came up with:
- (1) 10-15 gallon Stainless Steel Brew Kettle
- (1) Long Stainless Steel Brew Spoon
- (1) Propane Burner
- (1) Brew in a Bag bag
- (1) Pulley
I personally went with a 44 quart Bayou Classic stainless steel pot, a standard stainless brew spoon long enough to not get lost in my mash, a Dark Star burner, and a Wilserbrewer BIAB bag that was custom built for my kettle that came with a ratchet pulley. All in all, the total cost was less than $160.00 or about the same as five extract kits.
To BIAB, I calculate the strike water that I will need with an online calculator that accounts for water losses of grain and hop absorption as well as boil off. I then heat it to the strike temperature, which is usually just a few degrees above my desired mash temperature. I add the grains and stir vigorously with the brew spoon to break up any clumps and to ensure that the mash temperature is homogenous throughout the kettle. Once that is done, I cover the brew kettle in an old moving blanket for insulation and then let it mash for the prescribed amount of time.
Kettle wrapped in moving blanket for insulation
It is also possible to do a step mash through application of direct heat and stirring. I have yet to burn my BIAB bag doing this. Once the mash is over, I use direct heat and stirring to achieve the mash out temperature. I let it rest for five to ten minutes and then pull the bag to drain.
BIAB bag hanging for initial gravity drainage
BIAB bag hanging higher for squeezing with pot lids
At this time I begin heating the wort for the boil. In the BIAB world there are squeezers and non-squeezers. If I was more patient, gravity would do all the work of draining the bag for me. I am not that patient, so when the bag slows to a trickle I simply use two pot lids to squeeze the remaining wort from the bag. Now all that remains is to boil, hop, cool wort, and pitch yeast as you always do.
Boiling the wort
Cooling the wort with my faithful brew assistant
I have personally made some of my best batches of beer since switching over to BIAB. Also I achieve a brew house efficiency of 80% plus with just a standard crush from my LHBS.
I hope that this has been helpful and may push some of you lurking around all-grain brewing to take the plunge.


![Craft A Brew - Safale S-04 Dry Yeast - Fermentis - English Ale Dry Yeast - For English and American Ales and Hard Apple Ciders - Ingredients for Home Brewing - Beer Making Supplies - [1 Pack]](https://m.media-amazon.com/images/I/41fVGNh6JfL._SL500_.jpg)


