• Please visit and share your knowledge at our sister communities:
  • If you have not, please join our official Homebrewing Facebook Group!

    Homebrewing Facebook Group

Brewtality 2

Homebrew Talk

Help Support Homebrew Talk:

This site may earn a commission from merchant affiliate links, including eBay, Amazon, and others.
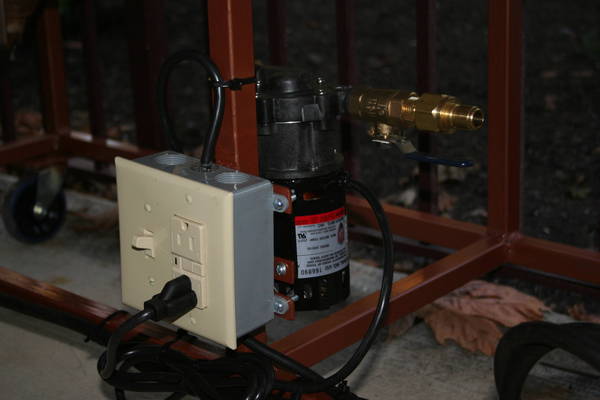
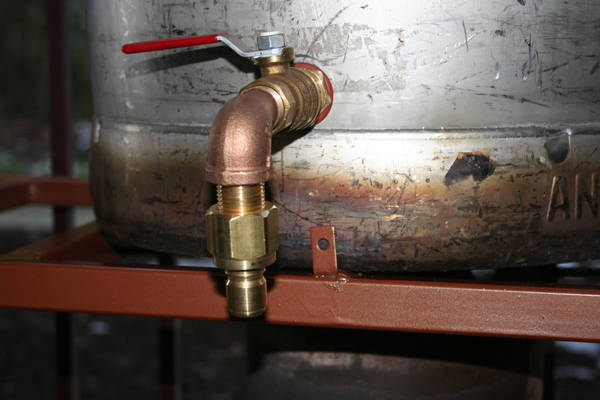
CFCs (and plate chillers for that matter) work so well because a very small volume of wort is met with a small volume of cold coolant (which is constantly being refreshed). The "counterflow" is the key. When the 212F wort hits the chiller, it's met with coolant at about 150F. You'd think that doesn't do much good but you still have a 62F delta there. Obviously the further down the coil you get the cooler the wort will become as it encounters colder and colder coolant. All the way at the wort's exit end, the coolant it encounters is whatever your tap is, say 65F.

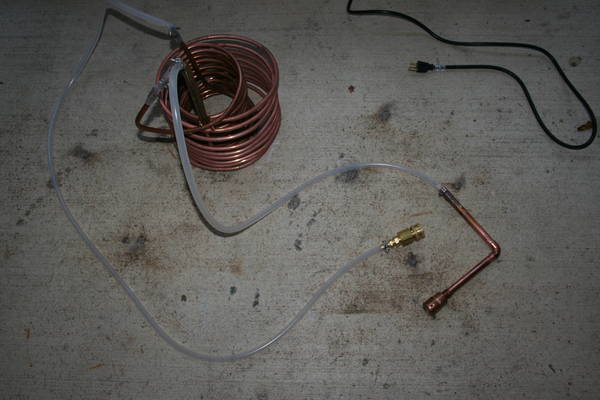
You very well might get it to cool in one pass but again, it's going to take a lot of ice to keep the water cold and you have to stir it big time because the water near the coils is going to heat quickly.
 
I will probably drop an aquarium pump in the ice bath to facilitate stirring.
The amount of ice doesn't bother me. The real test is going to be the ability to cool within 50 ft of tubing.
 
Finished the structure today. Below are some pics of it before painting. It is in the garage with the first coat drying. I will post some pics of it later this week when I get the peripherals attached and the last coats of paint on her.

IMG_3344.jpg


IMG_3345.jpg


IMG_3347.jpg

This gives a proportional view with a keg. The top of the keg is mid-chest. The height worked out perfect.

IMG_33481.jpg

A close-up showing the tabs that keep the kegs from sliding off.
 
SHINY!
don't you hate painting shiny metal?
Looks good Couevas. I'm brewing 2 beers today, I f'd up and left the MLT ball valve open part way while adding my sparge water, live and learn.
 
Major props for going with the lesser used, but easily capable 1" square tubing.

Half the price and half the weight......no brainer.
The only thing that made me consider 2 inch tube was the margin for error on the keg width. There would be more "shelf area" if I went with 2. But I just put faith in my measurements and went for it.

$70 for the steel and about 40 pounds total weight (without kegs).
 
\]$70 for the steel...).

Is this normal prices or did you have a connection/hookup or whatever you wanna call it?

$70 puts the idea of a rig out of my dreams and into reality for sure! I know the $70 is only the steel, But once you ahve a frame you can always brew on it and add as you go.
 
Is this normal prices or did you have a connection/hookup or whatever you wanna call it?

...And these prices include the fact that it was precut to length. I had to do absolutley NO cutting. Just weld, grind welds, and you are good to go.

Also, I didn't have a hookup. Go to google maps and type in "Chillicothe, OH." Once you are looking at your town, type "Steel" in the search bar. Then just start calling the companies listed until you find one that serves the public. Then send them an RFQ (Request for Quote, incase you hadn't seen that before). See what comes up. That's all I did. Here is the quote they sent me...(note that this is a quote for both 1 inch and 2 inch steel)......
Steel_Quote.JPG
 
Here is the new manifold I just finished. I never was that happy with my bazooka T and now I am done with it

IMG_3350_1_.jpg


IMG_3351.jpg

Holes not slits.

IMG_3352.jpg


IMG_33531.jpg

All joints are soldered except these. I wanted it to be strong enough to withstand stirring the mash, but I also wanted to be able to disconnect for thorough cleaning every once in a while.
 
Do you have Blueprints for your stand? It is a beauty!

Well, thank you:ban:
If you look back in the thread, you will see a quote printout that shows the cut lengths of each piece of tube. There are two groups of parts, 1inch and 2inch tube, so you can choose which you want. Also, if you look way back to the sketchup file I made, you will see where the joints are.....I think
 
Well, I think I am done
Gonna brew a nice little Belgian Wit on Friday as an inauguration.

IMG_33541.JPG

Here is the finished rig zoomed out


IMG_3355.JPG

It's dark, but here is the power box with the march pump mounted behind it and plugged in.


IMG_3356.JPG


IMG_3357.JPG

Here is a male QD on one of the spigots
 
IMG_33581.JPG

Here is the drain line connected from a spigot to the pump via two QDs


IMG_3359.JPG

Went ahead and built a replacement for my Bazooka T


IMG_3360.JPG

The output loop of the system. A QD connects to the output of the pump, runs through a HERM/chilling coil, then through my sparge-arm-style nozzle.


IMG_3361.JPG

The coil-in-a-coil
 
IMG_3362.JPG

Here is a close-up of the sparge-arm-style nozzle. Note the holes on the side for gentle dispursement and aeration after chilling. The 4 holes in the head will aerate the wort in the better bottle nicely after being chilled by the dual coil in and ice bath.
 
Not enough can be said in favor of testing thoroughly. You may think everything is set up well, but you can never know.

:(
I have a problem. Many of the seals leak (I knew this could be a problem because I didn't use teflon tape, but I never do). That isn't a big deal. The biggest deal is that my pump can't push fluid through my lines. It tries, but it can't make it.

I think the problem lies in my monster coil. It may be that 50 feet of 3/8 tube is too much restriction. I am gonna try removing the inner coil and see if that works. Between that and the leaks, it should help the pressure.

I will post later with results.
 
Let me start by saying this information is second hand from this forum. I don't have any first hand knowledge of this. But I've seen on other threads that you should mount that pump horizontally or you might have problems. I'm not sure if that is what you're seeing, just throwing that out as a possibility.
 
IMHO the length of the coil really shouldnt matter. You have some awfully long hoses though, wonder if that is causing an issue with getting reliable flow to the pump? When I used to gravity feed my sparge arm, I started with a longer hose, the hose messed up the flow enough that my sparge arm couldnt turn, not enough pressure. Shortened the hose so there were no loops in it, tada... there was enough pressure to turn the sparge arm nicely. Just an idea... shorten your hoses as much as you can.

Also in another thread you stated that then you closed off the flow enough to avoid a stuck mash, that the pump would lose prime. This should never happen if you are only controlling the flow with the pump outflow valve. You should be able to shut the outflow valve OFF, then turn it back on 10 minutes later and not lose prime. Were you closing off a valve prior to the inlet of the pump?
 
Let me start by saying this information is second hand from this forum. I don't have any first hand knowledge of this. But I've seen on other threads that you should mount that pump horizontally or you might have problems. I'm not sure if that is what you're seeing, just throwing that out as a possibility.

He mounted his pump identical to mine, and I have no problem priming it whatsoever.
 
Make sure you get the pump primed before you try hooking up the connection to the long coils. Once you know what that pump can do when primed, you'll be happy. If you have to mount the pump vertically like that, I'd flip it over. The output of the pump head is the chamber closest to the motor and you'd want any trapped air to work it's way to the output. A guy in my brew club has them mounted motor side up and he never had a problem priming.

You'll have to dismount it once in a while to oil the bearings but it should be fine for a few months at a time.
 
SUCCESS!!!

I brewed a nice little session West Coast Pale Ale yesterday....

Everything went flawlessly. Prior to starting, I inverted the pump so the the pump housing was under the motor. I also made sure the input side of the pump was fully primed throught the process. This made for smooth sailing! :ban: I didn't even have a problem with the HERM system!

Also pitched some newly bottle-harvested Pacman....my first attempt at bottle harvesting and my first use of my new DIY stirplate.

All in all, a great day!!!!

Edit: Just realized this is post 400. Might have to post below after I get home from work today....
 
I have been drawing up plans to build a brewstand and when I saw your's it was nearly identical tpo what I want. I have a real nice mig and a metal shop down the street and I'm tired of picking up and moving heavy loads of water and mash to get things done. I need a single tier thats light and has a small footprint when standing on end because I have too much crap in the garage and my wife thinks her car belongs in there. I have 3 questions, can you post the exact length, width and height of the finished product? Do those rings you have mounted that hold the burners come with the burners or did you build those? Is there anything you would do different now that you used it? I want to get started on mine in about 1 month.
 
I have been drawing up plans to build a brewstand and when I saw your's it was nearly identical tpo what I want. I have a real nice mig and a metal shop down the street and I'm tired of picking up and moving heavy loads of water and mash to get things done. I need a single tier thats light and has a small footprint when standing on end because I have too much crap in the garage and my wife thinks her car belongs in there. I have 3 questions, can you post the exact length, width and height of the finished product? Do those rings you have mounted that hold the burners come with the burners or did you build those? Is there anything you would do different now that you used it? I want to get started on mine in about 1 month.

You can find the cut list on post 38 of this thread. The rig is 5 feet wide by 16 inches tall and 16 inches deep. By making the height and the width the same, you only have to cut two different lengths of steel; the 4 pieces of 5 foot length and the rest all 14 inches. It is very simple and that was the idea. KISS.

The windshields around the burners came with the burners. Both of them are hacked out of cheap turkey fryers. I just took some CRS strips and welded the rings in place. Nothing special.

I painted the rig with the High Temp Ultra BBQ paint you can get at HD or the big L. It is "Antique Copper" (although it looks brown) and is a semi-gloss satin finish instead of the standard flat black. The semi-gloss holds up a little better than the flat and looks better too. Many coats will get you better protection with this kind of paint. Many people on here complain about it, but if you put several coats on the areas that will see the most heat, it holds up pretty good. Two spray cans would be adequate, but 3 would be better.

The only thing I would do different now is beef up the little "L" brackets I welded on the top to keep the keggles from sliding. One has popped off after only 2 brew sessions.

Hit me up if you have any more questions.


You convinced me, I'm doing it in afew weeks when I get back from vacation. The timing is perfect, my birthday is coming up and I'll have the wifey buy me some parts to make it. Thanks.
 
You convinced me, I'm doing it in afew weeks when I get back from vacation. The timing is perfect, my birthday is coming up and I'll have the wifey buy me some parts to make it. Thanks.

Thanks. Glad I could help. Have fun with it!!!
 
Personally, I use the full-port "High Flow" hose couplings. P286 from MMC.
 
Hi!

I came across your thread while looking at building a rig. I had thought I would do a 3 tier to save on a pump but I am vertically challenged and pretty...well..weak..haha. so I then thought a single tier with a pump would be better for me to handle and easier on my body. I just wonder how are you liking your rig? I saw where you said you would beef up the tabs for the kegs sliding off...anything else you would change? Also, not sure if you put this in your thread, dont think i saw it but what BTU are you burners? I believe you said they were just turkey fryers. Very nice rig you have going on....props!! :mug:
 
Back
Top